


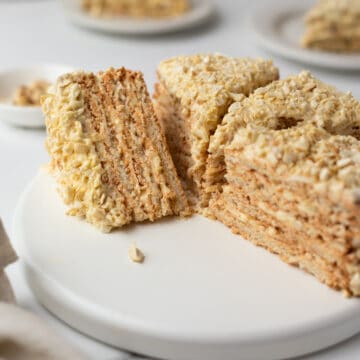
Here's the famous Russian honey cake Medovik, or simply Medovik tort. It's sweet and rich with a pronounced honey flavor, superb taste, and beautiful stature. Cut yourself a big slice and enjoy it with tea or coffee.

Honey cake Medovik
Honey cake Medovik, aka tort Medovik, is a Russian layer cake made with the main ingredient - honey - translated in Russian as мёд [mʲot].
For many Russians and people from the former Soviet Union, Medovik tort is a childhood dream cake, perfect for birthday parties, weddings, and other special occasions. The recipe can be made in different variations using a regular oven or an ancient Russian oven/stove.
The cake traditionally consists of 4 to 8 thin layers, sometimes 10 to 15. But the number of layers depends on your preference: the thinner the layers, the more layers you will get out of the cake batter.
But let me show you how to make the easiest Medovik cake without sweating over cake layers. It uses an easy sponge cake technique (express Medovik cake) with a mouthwatering result!

Ingredients
For ingredients and detailed instructions, refer to the recipe card below.
- Unsalted butter cut into cubes. You can replace it with good-quality margarine.
- Honey - Choose buckwheat honey or replace it with the honey you prefer. You can use liquid or crystallized honey; it won't affect the taste of the cake.
- Baking soda (sodium bicarbonate): Make sure it's fresh.
- Large eggs at room temperature.
- All-purpose flour.
- Sugar - Use granulated white or caster sugar.
- Heavy cream with at least 30% fat content.
- Sour cream with at least 20 %, better 25% fat content.
- Icing sugar - Use a coffee grinder to make it yourself, or use store-bought powdered sugar.
How to make tort Medovik
Preheat the oven to 355°F (180°C). Line a 10 x 15 inches (25 x 38 cm) jelly roll pan with parchment paper.
To make the cake, place butter and honey in a large saucepan and bring over low heat. Cook the mixture for about 2-4 minutes with regular stirring until the butter is melted.
Add baking soda and continue cooking with constant stirring. When the honey reacts with the baking soda and begins to foam, cook the mixture for a few seconds, remove it from the heat, and let it cool.
Meanwhile, beat eggs with sugar in a separate bowl with an electric mixer for 2-3 minutes.
Add sifted flour to the honey mixture and mix with a rubber spatula. Pour the eggs and and mix. The consistency of the dough should be smooth, without lumps, and resemble thick sour cream.
Pour the dough into the prepared baking pan and bake for 18 minutes. The baking time may vary; use your oven as a guide. Check the doneness with a toothpick: the cake is ready if it comes out dry.
Remove the pan from the oven and flip the cake onto a large sheet of parchment paper. Peel the parchment from the bottom of the cake and leave it to cool completely.
Using a plate as a template, cut a circle of 7 inches (18 cm) in diameter and two half-disks. Cut the cake round and half-disks lengthwise with a long serrated knife into two layers.
Crumble the rest of the cake with your hands. This crumb will be used to sprinkle the cake.
To make the sugar syrup, combine water and sugar in a saucepan and stir. Bring to a boil, then cool.
To make the sour cream frosting, whip cold heavy cream with powdered sugar until medium peaks with an electric or stand mixer. Add cold sour cream and mix at low mixer speed. Adjust the cream consistency with your mixer, but don't overwhip the cream.
To assemble the cake, place the first cake layer on a serving board. Soak it with sugar syrup. Spread ¼ of the cream. Place two half-disks, making a round cake layer, soak, and spread another ¼ of the cream.
Continue the same way, finishing with a whole cake layer (circle), and spread the rest of the cream over the entire cake (don't soak the top cake layer).
Sprinkle the top and sides of the cake with the prepared biscuit crumbs. Transfer the cake to a serving plate and refrigerate for at least 5-6 hours; better overnight.
Expert tips
- To make a larger cake, cut the baked cake into two rectangles instead of the round and half-circles, then each into two cake layers. Use the edges of the baked cake to make crumbles. Multiply the cream ingredients by 1.5.
- If you ever need to recalculate the cake recipe ingredients for another size, use this simple cake pan calculator.
- Decorate the cake using a honeycomb stencil and dust icing sugar on top of it, or arrange a few bee icing decorations.
- Use leftover cake to make cake pops.
Recipe variations
There are plenty of Medovik recipe variations, with alcohol (vodka) and without alcohol, with a double boiler and without, but all of them have two ingredients in common: honey and sour cream.
The original recipe for Medovik frosting is based on sour cream. However, creamy frosting with sweetened condensed milk, dulce de leche, heavy whipping cream, cream cheese, crème fraîche, or even alternated cream layers are famous nowadays.
The delicious sour cream frosting made with adding whipping cream works best. It is stable enough to spread between layers and has a distinctive look once the cake is sliced.
You can experiment with adding chopped roasted walnuts or pieces of dried prunes between the cake layers.
How to store
Store Medovik cake under a glass dome and refrigerate until serving. Leftovers can be kept in the fridge for one to two days.
Can you freeze Medovik? It isn't recommended to freeze the finished cake, but you can freeze the honey cake layers for up to one to two months. Cut cake layers, cover each with plastic wrap (aka cling film), and freeze.
To thaw, bring cake layers to the fridge overnight or on the kitchen counter for a few hours.
Recipe FAQ
It is recommended to make the cake Medovik one day in advance to let the cake layers absorb the tangy sour cream frosting. Then, refrigerate it overnight and serve it the next day.
Love cakes? Try these next!


Want more delicious and beautiful recipes? Subscribe to my newsletter and follow me on Facebook, Pinterest, and Instagram for my latest updates. If you make this recipe, please leave a star rating on the recipe card and comment below!
PrintRecipe card
Russian Honey Cake Medovik (Tort Medovik)

Medovik tort is a traditional Russian honey cake made with multiple layers and sour cream frosting. It's sweet and rich with a pronounced honey flavor, superb taste, and beautiful stature.
- Total Time: 1 hour, 30 minutes (plus chilling time)
- Yield: 10 slices 1x
- Category: Cakes
- Method: Baking
- Cuisine: Russian
Ingredients
For the cake:
- ⅔ cup (150 g) unsalted butter
- ⅓ cup (135 g) buckwheat honey
- 1 ½ teaspoons baking soda
- 3 large eggs, room temperature
- 150 g granulated sugar
- 1 ¾ cups + 2 ½teaspoons (225 g) all-purpose flour
For sugar syrup:
- ½ cup (115 g) water
- 4 tablespoons granulated sugar
For the sour cream frosting:
- 1 cup (238 g) heavy cream (30% fat, cold)
- 1 ½ cups (350 g) sour cream (20-25% fat, cold)
- ¾ cup (100 g) icing (powdered) sugar
*Don't you have the correct baking pan on hand right now? Try this simple Cake Pan Converter!
** If needed, please refer to Baking Conversion Charts.
Instructions
- Preheat the oven to 355°F (180°C). Line a 10 x 15 inches (25 x 38 cm) jelly roll pan with parchment paper.
- Place butter and honey in a large saucepan and bring over low heat. Cook the mixture for about 2-4 minutes with regular stirring until the butter is melted.
- Add baking soda and continue cooking with constant stirring. When the honey reacts with the baking soda and begins to foam, cook the mixture for a few seconds, remove it from the heat, and let it cool.
- Meanwhile, beat eggs with sugar in a separate bowl with an electric mixer for 2-3 minutes.
- Add sifted flour to the honey mixture and mix with a rubber spatula. Pour the eggs and and mix. The consistency of the dough should be smooth, without lumps, and resemble thick sour cream.
- Pour the dough into the prepared baking pan and bake for 18 minutes. The baking time may vary; use your oven as a guide. Check the doneness with a toothpick: the cake is ready if it comes out dry.
- Remove the pan from the oven and flip the cake onto a large sheet of parchment paper. Peel the parchment from the bottom of the cake and leave it to cool completely.
- Using a plate as a template, cut a circle of 7 inches (18 cm) in diameter and two half-disks. Cut the cake round and half-disks lengthwise with a long serrated knife into two layers. Crumble the rest of the cake with your hands. This crumb will be used for sprinkling the cake.
- To make the sugar syrup, combine water and sugar in a saucepan and stir. Bring to a boil, then cool.
- To make the sour cream frosting, whip cold heavy cream with powdered sugar until medium peaks with an electric or stand mixer. Add cold sour cream and mix at low mixer speed. Adjust the cream consistency with your mixer, but don't overwhip the cream.
- To assemble the cake, place the first cake layer on a serving board. Soak it with sugar syrup. Spread ¼ of the cream. Place two half-disks, making a round cake layer, soak, and spread another ¼ of the cream. Continue the same way, finishing with a whole cake layer (circle), and spread the rest of the cream over the entire cake (don't soak the top cake layer).
- Sprinkle the top and sides of the cake with the prepared biscuit crumbs.
Notes
- To make a larger cake, cut the baked cake into two rectangles instead of the round and half-circles, then each into two cake layers. Use the edges of the baked cake to make crumbles. Multiply the cream ingredients by 1.5.
- If you ever need to recalculate the cake recipe ingredients for another size, use this simple cake pan calculator.
- Decorate the cake using a honeycomb stencil and dust icing sugar on top of it, or arrange a few bee icing decorations.
- Use leftover cake to make cake pops.
Nutrition
- Serving Size: 1 slice
- Calories: 483
- Sugar: 28.2 g
- Sodium: 289 mg
- Fat: 24.6 g
- Saturated Fat: 14.9 g
- Carbohydrates: 60.7 g
- Fiber: 1.2 g
- Protein: 6.8 g
- Cholesterol: 105 mg
The nutritional information has been calculated using an online recipe nutrition calculator such as Verywellfit.com and is intended for informational purposes only. These figures should be used as a general guideline and not be construed as a guarantee.
The recipe was originally published on June 09, 2018. It has been updated and may differ from what was originally published. It was revised to include improved content and photos.
For reference, if you have made this recipe previously and want to replicate it, please get in touch with hello@bakinglikeachef.com. I will be happy to send you the old version of the cake.
Tara says
Such an absolutely gorgeous cake, and I love your family memories paired with it. Beautiful design on top, too, with the honeycomb pattern and little bees.
Irina says
Thank you very much, Tara! And thanks for stopping by. 🙂
Biana says
This cake looks amazing! And I love how you decorated it with the little bees, so cute.
Irina says
Thanks, Biana! 🙂
Jenny says
I LOVE the honeycomb pattern on top of the cake! The combination of whipped cream and sour cream is just perfect, very creamy, and not too sweet.
Irina says
Thanks, Jenny! Yes, this frosting is amazing.
Michelle says
I've always been so intimidated to make Medovik, but with your tips, I can't wait to give it a try!
Irina says
It sounds great, Jenny! Happy baking, and enjoy it!
Beth says
Yummy! This is such a beautiful and delicious-looking cake! I’m so excited to make this with my daughter.
Irina says
Sure thing, Beth! Happy baking, and enjoy it!
Denay DeGuzman says
My friend made this delicious Russian cake last night. I had a slice of it, and it was delightful! And now I have the recipe too! Thanks so much for sharing it.
Irina says
Thanks for letting me know that you both enjoyed the cake, Denay! Please, enjoy the recipe!
Heather Johnson says
That design is adorable!!! I am definitely making that!
Irina says
Thanks, Heather! Happy baking, and enjoy it!
Julie says
Wow, look at all those perfect layers of deliciousness! Your decoration is beautiful too!
Irina says
Thanks a lot, Julie!
Heather says
I loved the tips - especially the note to make it a day in advance so that it becomes more flavorful and moist as it rests. I can't wait to try this.
Irina says
You are very welcome, Heather! Please, let me know if you have any questions.
Chichi says
This is ace! Love it. Thanks for sharing this recipe and the stories.
Irina says
You are very welcome, Chichi!
Vicky says
What an absolutely beautiful cake!! I can't wait to give this a try!
Irina says
Happy baking, and enjoy it, Vicky!
Kushigalu says
Thanks for sharing this. Something new. Totally in love with this cake recipe. I will be making this for my family soon.
Irina says
It sounds great! Happy baking, Kushigalu! Please, let me know if you have any questions.
Anjali says
This cake looks so delicious and lovely! I hadn't heard of this type of cake before I came across your recipe, and now I can't wait to bake it at home!
Irina says
You will love this cake, Anjali! Please, enjoy it!
J says
My husband is Russian and he talked about how he always had Medovik for his birthdays and special occasions when he was growing up. I'm always wanting to make new things and I wanted to make Medovik for him to have here in the US. At first, I didn't find any recipes that looked authentic to what he described, but when I found this one, it looked exactly right. He says it tastes exactly like what he grew up eating. I've made it quite a few times now, but just now remembered to come back and say thanks!
Irina says
Thanks you for making the recipe and your lovely comment.
Mike says
Would it make a difference if another type (flavor) of honey other than Buckwheat were used in this recipe?
Veronica Judd says
This will help me a lot going forward. It's rare to find such clear writing online. This recipe made me stop, think, and make a cake.