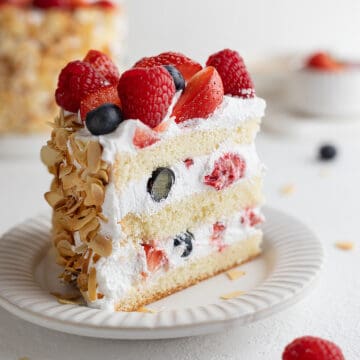
Japanese strawberry shortcake, also known as Japanese Christmas cake or Kurisumasu Keki, is made with soft and fluffy Genoise sponge layers, sweetened whipped cream, and juicy fresh strawberries. No wonder this decadent treat is fit for the best time of the year.

Japanese strawberry shortcake (イチゴのショートケーキ), frequently referred to as Korean strawberry shortcake, fresh cream strawberry cake, Chinese strawberry cake, or simply fresh cream cake, is a highly sought-after dessert in Asian nations.
Jump to:
Instead of traditional buttercream, the cake features a light and airy fresh whipped cream. It also highlights soft and fluffy sponge cake that melts in the mouth.
During the Christmas season in Japan, one of the most popular cakes is the Japanese Christmas Cake, also known as Kurisumasu Keki. This cake is adorned with beautiful red and vibrant strawberries, making it a festive and attractive dessert choice.
What is the Japanese strawberry shortcake?
Japanese strawberry shortcake is a fluffy sponge made with fresh whipped cream and fresh strawberries. Shortcake was brought to Japan by Rinemon Fujii, the founder of Fujiya, who released the shortcake for the first time in 1922.
Japanese shortcake is different from the Western countries' shortcake. American shortcake features a crispy biscuit dough with luscious whipped cream and strawberries.
In England, the shortcake sandwiches strawberries and cream between crunchy, cookie-like shortbreads.

Japanese strawberry shortcake recipe
- Japanese strawberry shortcake recipe is made with basic ingredients with a make-ahead option.
- It makes a basic cake perfect for experimenting with other fruit and flavors. Get started by downloading this complimentary 10-page fruit flavor pairing chart.
- This fresh strawberry cream cake is made from ripe, juicy strawberries instead of the cooked strawberry filling. So it preserves the utmost flavors and aroma of luscious berries.
- The fluffy texture of the sponge cake and the sweetness of the fresh cream brings out the acidity of the strawberries. The contrast between the pure white whipped cream and the bright red strawberries is beautiful.
- Unlike the traditional British Christmas cake that is dense and boozy, it is a light Christmas cake that complements a rich and indulgent holiday meal.
Ingredients

For ingredients and detailed instructions, refer to the recipe card below.
- Eggs: Use large-sized whole eggs at room temperature. Bring them to the kitchen counter about 45-60 minutes before you start.
- Sugar: The recipe calls for white granulated and icing sugar. Process sugar in a food processor a few times to make icing sugar.
- Flour: Use all-purpose flour, which is plain flour in the UK. You can replace the flour and corn starch with cake flour if desired.
- Cornstarch is an effective aid for tenderizing the flour's tough proteins and so effectively prevents the development of gluten.
- Whole milk is added to make the cake batter.
- Honey brings moisture to the cake. Read about how to make cakes moist.
- Butter fixes the aromas of the sponge cake, helps the coloring, and brings the cake's softness. Opt for an unsalted batter with 82% fat content, preferably.
- Heavy cream: Choosing the right fat content of the cream is the key to a beautiful cake finish. Opt for heavy cream or heavy whipping cream with at least 30% fat content. If you live in the UK, choose double cream.
Heavy cream with 30% milk fat has a light and smooth texture compared to double cream with 48% milk fat. Also, whipped cream with 48% milk fat whips more easily than whipped cream with 30% milk fat, and it separates easily, so be careful when beating.
In Japan, fresh cream with 35% and 45% milk fat content is mainly used for making fresh whipped cream. They often mix high-fat and low-fat creams for easier handling when making whipped cream for decoration.
- Vanilla extract brings an exquisite flavor to sugar syrup.
- Fresh strawberries are the stars of Japanese strawberry cake. Opt for ripe seasonal strawberries that feature the best taste and flavor.
Recipe variations
The cake, also known as white Christmas cake, symbolizing the winter season, is traditionally served on Christmas Eve. Japanese people usually place a chocolate Santa on top.
- Feel free to decorate the cake with candles or other chocolate Christmas decorations.
- Replace vanilla extract with Kirsch (Kirschwasser) to flavor the sugar syrup.
- Arrange a strawberry layer as you desire: slice berries into ⅕ inch (5 mm) thickness, or place whole strawberries upright or on the side to feature a round cross-section.
- Swap red strawberries for Japanese white strawberries, or pineberries, a hybrid between Japanese white strawberries and Florida strawberries.
- If strawberries are out of season, use seedless red or green grapes to make a Grape Shortcake.
- Finally, go for a three-layer cake with a golden ratio of 1 to 1 when the thickness of both the whipped cream and the sponge cake layer is about ½ inch (1 cm) thick.

How to make Japanese strawberry shortcake
Making a Japanese strawberry shortcake consists of a few steps, including preparing Genoise sponge cake, sugar syrup, fresh whipped cream, and assembling the cake.
Step 1. To make sponge cake, preheat the oven to 330°F (165°C). Line the bottom of a 6-inch (15 cm) cake pan with a piece of round parchment paper. Line the sides with parchment strips. In a large bowl, sift the flour with cornstarch and put aside.
Step 2. Place butter and milk in a small bowl over a container with hot water and let the butter melt. Mix and check the mixture temperature with a cooking thermometer - it must be 140°F (60°C).
Pro tip: ALternatively, use the microwave to heat the butter and milk in 30-second increments. Make sure to use a microwave-safe bowl.
Step 3. Place eggs, sugar, and honey in a heat-resistant bowl and beat with a hand whisk for 1 minute (photo 1).
Step 4. Put the bowl over a water bath or bain-marie and continue to mix with a whisk. Once the mixture reaches the temperature of 104°F (40°C), remove the bowl from the hot water bath.
Step 5. Using a hand electric mixer, start whisking the egg mixture on low speed for 1 minute. Then switch the mixer to high speed and beat for 10 minutes.
Step 6. Return the hand mixer to low speed and beat in slow circular motions for 1-2 minutes. Once you lift the beaters of the hand mixer, the batter should leave a ribbon-like mark that will remain for 3-4 seconds (photo 2).
Pro tip: Whisking the batter on low speed helps the large bubbles disappear.

Step 7. Sift ½ of the dry ingredients over the bowl and gently mix with a rubber spatula working from the bottom of the bowl while rotating it little by little.
Step 8. Add the remaining dry ingredients and mix in the same way. Rotate the bowl and mix until the flour disappears.
Step 9. Add two tablespoons of the batter to the milk and butter mixture and mix with a mini whisk. Pour this mixture into the principal preparation and gently mix the batter.
Step 10. Pour the batter into the prepared pan (photo 3) and tap the mold from 4 inches (10 cm) to remove the air bubbles. Bake in the preheated oven for 30 minutes.
Pro tip: The cake is ready when the gap between the pan and the cake appears, and a toothpick or a bamboo skewer is pulled from the center of the cake and remains clean.
Step 11. Remove the baked cake from the oven and tap the mold from 6 inches (15 cm) to prevent cake shrinkage. Let it cool in the pan for 10 minutes (photo 4).

Step 12. Flip it over and let the cake slip from the mold on a wire rack. Allow the cake to cool for 10 minutes. Then turn it over and let it cool completely.
Step 13. To make sugar syrup, put granulated sugar and water in a small saucepan and bring to a boil. When the sugar melts, remove from the heat and add vanilla extract. Let the syrup cool down.
Step 14. To make fresh whipped cream, pour cold heavy cream with icing sugar into a chilled bowl, and whisk with a hand whisk for 6 minutes. 6-minute cream falls in a thin line when you lift the whisk (photo 5). Stop whisking the cream at 6 minutes.
Attention: Making Japanese-style cakes, keep in mind that the whipped cream texture needed is significantly softer than what is used in Western sweets.
Step 15. Other stages of whipping the cream are the following:
- 7-minute stand: The cream is quite loose and is just enough to stay on the whisk. It is the perfect cream consistency to coat the entire surface of the cake (photo 6).

- 8-minute stand: At 8 minutes of hand whisking, the cream is about to stay on the whisk and then drop off. It is the right cream state for sandwiching the cake layers (photo 7).
- 9-minute stand: Cream makes soft corners or streaks when you lift the whisk. It is perfect for piping and cake decoration (photo 8).

Pro tip: The right cream consistently is a must for a beautiful finish to Japanese cakes. However, reaching the cream's correct state cream depends on its fat content.
Double cream may suddenly be overwhipped after 7 minutes. Heavy cream with 30% fat content has a softer finish, but if you hand whip it for more than 8 minutes, it may separate. So watch out for the cream's consistency after 6 minutes of hand whisking.
Step 16. To assemble the cake, use a serrated knife or a cake leveler to cut the bottom and the top of the cake at ⅕ inch (0.5 cm) thickness (you won't use them). Cut the remaining cake in half the thickness to get two round sponge layers.
Step 17. Wash and pat dry strawberries. Hull them, leaving 6 for decoration. Cut the rest in half lengthwise.
Step 18. Place the sponge cake layer on a turntable. Soak it with the syrup using a pastry brush. Divide the cream into two halves.
Step 19. Make an 8-minute stand of half the cream amount, and apply half of it to the sponge with an offset spatula.
Step 20. Arrange strawberry halves by lightly pressing them (photo 5). Apply another half of the 8-minute stand cream and smooth it with the spatula. Place the second cake layer on top, and press lightly.
Step 21. Whip the remaining half of the cream to reach a 7-minute stand. Apply plenty of the cream on top of the cake, and smooth it with the spatula while rotating the turntable. Let the cream protrude so that it drips down the sides.
Step 22. Fix the spatula at the 9 o'clock position and cover the sides with the cream that overflows. If it is not enough, add cream at any time.
Pro tip: Use a cake scraper to create stripes if desired.
Step 23. Smooth the rise of the edge of the top surface toward the center using a spatula. Wipe off the cream with a paper towel every time you smooth it with a spatula, and always smooth it with a clean spatula.
Pro tip: Minimize the movement of the spatula as the cream separates. The cream tends to become crumbly when you nap repeatedly, so using a looser cream is less likely to fail.
Step 24. Transfer the cake from the turntable to a cake board or a serving plate (photo 6). Insert the spatula between the turntable and the cake, lift the cake, put it on the plate from the back, and quickly pull out the pallet to the front.
Pro tip: Alternatively, use a cake lifter to help transfer the cake with the spatula.

Step 25. To decorate the cake, whip the remaining cream to stiff peaks, and place it into a piping bag fitted with Ateco pastry tip 829.
Step 26. Squeeze the cream a bit from the inside of the cake rim, and when the cream reaches the rim, gently pull it toward the center. Continue to decorate the top of the cake.
Step 27. Refrigerate the cake for 2-3 hours. Place halved or whole strawberries in the center of the cake before serving.

Expert Tips
- Use a kitchen scale for the precise measurements of ingredients.
- Sift dry ingredients twice to avoid lumps: the first time over a clean bowl and the second time - over the beaten eggs.
- Don't overmix the cake batter.
- Avoid overbaking: the longer you bake, the harder the cake becomes.
- Do not work near hot appliances or in a heated room when working with heavy cream. Make sure to chill the mixer's beaters and the bowl or whisk the cream over the ice bath.
- For the best results, opt for a hand whisk instead of an electric mixer. Avoid using a stand mixer to prevent overwhipping the cream.
- Ensure to dry strawberries thoroughly before adding them as a cake layer to prevent the sogginess of the cake and releasing juices into the whipped cream.
- Make ahead option: Make Japanese Christmas cake half a day in advance and refrigerate; the cream, sponge, and strawberries will beautifully blend together. Decorate the top of the cake with plump strawberries before serving.
Storing and freezing
Store this cake under a glass dome in the refrigerator for up to 2 days.
Can you freeze Japanese strawberry shortcake cake? It is not recommended to freeze the whole cake, but you can freeze the sponge cake for up to 3 months.
Thaw it in the fridge overnight or at room temperature for a few hours. Apply the fresh whipped cream and decorate with fresh strawberries.
Recipe FAQ
Strawberry cake is made with a sponge or regular cake layers sandwiched with either buttercream or cream cheese frosting and cooked strawberry filling. On the other hand, Japanese strawberry shortcake is made with fluffy sponge cake layers, fresh whipped cream, and fresh strawberries. The key difference lies in the type of cake layers used and the cream and fruit components that accompany them.
In the 1980s, the term Christmas cake meant unmarried women after the age of 25, as the cake was on discount after December 25th. Nowadays, the round shape of the cake with red and white colors duo, the Japanese Christmas cake, aka kurisumasu keki, symbolizes the Japanese flag. It was also inspired by American-style Christmas with Santa Claus, brought by Christian missionaries to Japan. Finally, this cake highlights the economic prosperity and technological advancements of Japan.
Kurisumasu Keki is a famous Japanese Christmas cake made with light and fluffy sponge cake, filled with fresh whipped cream, and decorated with fresh strawberries.
Kurisumasu Keki is the ultimate Christmas cake in Japan, readily available in the market during the festive season.
During the festive holiday season, this cake can be found in cake shops in Japan. However, if you reside in another location, you can buy it at a local Japanese grocery store or bakery. After Christmas day, it goes on discounts.
Love sponge cakes? Try these next!
If you like Japanese strawberry sponge cake, you may like other sponge cakes on the blog:
- Triple Berry Cake
- Italian Mimosa Cake
- Uruguayan Cake Chaja
- Fresh Fruit Cake
- Jordgubbstårta (Swedish Strawberry Cake)
- Or browse all the cake recipes.
HUNGRY FOR MORE? Subscribe to my newsletter and follow me on Facebook, Pinterest, and Instagram for my latest updates.
PrintRecipe card
Japanese Strawberry Shortcake (Japanese Christmas Cake)
Japanese strawberry shortcake, also known as Japanese Christmas cake or Kurisumasu Keki, is made with soft and fluffy sponge cake layers, sweetened whipped cream, and juicy fresh strawberries.
- Total Time: 1 hour
- Yield: 6 1x
- Category: Cakes
- Method: Baking
- Cuisine: Asian, Japanese, Korean
Ingredients
For the sponge cake:
- 140 g eggs, room temperature (see note #1)
- ⅓ cup (70 g) granulated sugar
- 2 teaspoons (14 g) honey
- ½ cup (60 g) all-purpose flour
- 1 ½ tablespoons (14 g) cornstarch
- ½ tablespoon (8 g) unsalted butter
- 2 ½ teaspoons (13 g) whole milk
- ¼ teaspoon vanilla extract
For sugar syrup:
- ⅕ cup (50 ml) water
- 1 tablespoon (15 g) granulated sugar
- 1 teaspoon vanilla extract
For fresh whipped cream:
- 1 ⅔ cups + 4 tablespoons (450 g) cold heavy cream, 30% fat
- 6 ½ tablespoons (50 g) icing sugar
For filling and decoration:
- 12.5 oz. (350 g) fresh strawberries
Instructions
- To make the sponge cake, preheat the oven to 330°F (165°C). Line the bottom of a 6-inch (15 cm) cake pan with a piece of round parchment paper. Line the sides with parchment strips. In a large bowl, sift the flour with cornstarch and put aside.
- Place butter and milk in a small bowl over a container with hot water and let the butter melt. Mix and check the mixture temperature with a cooking thermometer - it must be 140°F (60°C). Pro tip: You can use the microwave to heat the butter and milk in 30-second increments. Make sure to use a microwave-safe bowl.
- Place eggs, sugar, and honey in a heat-resistant bowl and beat with a hand whisk for 1 minute. Put the bowl over a water bath and continue to mix with a whisk. Once the mixture reaches the temperature of 104°F (40°C), remove the bowl from the hot water bath.
- Using a hand mixer, start whisking the egg mixture on low speed for 1 minute. Then switch the mixer to high speed and beat for 10 minutes. Return the hand mixer to low speed and beat in slow circular motions for 1-2 minutes. Once you lift the beaters of the hand mixer, the batter should leave a ribbon-like mark that will remain for 3-4 seconds.
- Sift ½ of the dry ingredients over the bowl and gently mix with a rubber spatula working from the bottom of the bowl while rotating it little by little. Add the remaining dry ingredients and mix in the same way. Rotate the bowl and mix until the flour disappears. Add two tablespoons of the batter to the milk and butter mixture and mix with a mini whisk. Pour this mixture into the principal preparation and gently mix the batter.
- Pour the batter into the prepared pan and tap the mold from 4 inches (10 cm) to remove the air bubbles. Bake in the preheated oven for 30 minutes. The cake is ready when the gap between the pan and the cake appears, and a toothpick or a bamboo skewer is pulled from the center of the cake and remains clean.
- Remove the baked cake from the oven and tap the mold from 6 inches (15 cm) to prevent cake shrinkage. Let it cool in the pan for 10 minutes. Flip it over and let the cake slip from the mold on a wire rack. Allow the cake to cool for 10 minutes. Then turn it over and let it cool completely.
- To make the sugar syrup, put granulated sugar and water in a small saucepan and bring to a boil. When the sugar melts, remove from the heat and add vanilla extract. Let the syrup cool down.
- To make the fresh whipped cream, Pour cold heavy cream with icing sugar into a chilled bowl, and whisk with a hand whisk for 6 minutes. 6-minute cream falls in a thin line when you lift the whisk. Stop whisking the cream at 6 minutes.
- To assemble the cake, use a serrated knife or a cake leveler to cut the bottom and the top of the cake at ⅕ inch (0.5 cm) thickness (you won't use them). Cut the remaining cake in half the thickness to get two round sponge layers. Wash and pat dry strawberries. Hull them, leaving 6 for decoration. Cut the rest in half lengthwise.
- Place the sponge cake layer on a turntable. Soak it with the syrup using a pastry brush. Divide the cream into two halves. Make an 8-minute stand (see note #2) of half the cream amount, and apply half of it to the sponge with an offset spatula. Arrange strawberry halves by lightly pressing them. Apply another half of the 8-minute stand cream and smooth it with the spatula. Place the second cake layer on top, and press lightly.
- Whip the remaining half of the cream to reach a 7-minute stand (see note #3). Apply plenty of the cream on top of the cake, and smooth it with the spatula while rotating the turntable. Let the cream protrude so that it drips down the sides.
- Fix the spatula at the 9 o'clock position and cover the sides with the cream that overflows. If it is not enough, add cream at any time.
- Smooth the rise of the edge of the top surface toward the center using a spatula. Wipe off the cream with a paper towel every time you smooth it with a spatula, and always smooth it with a clean spatula.
- Transfer the cake from the turntable to a cake board or a serving plate. Insert the spatula between the turntable and the cake, lift the cake, put it on the plate from the back, and quickly pull out the pallet to the front. Alternatively, use a cake lifter to help transfer the cake with the spatula.
- Place the remaining cream into a piping bag fitted with Ateco pastry tip 829. Squeeze the cream a bit from the inside of the cake rim, and when the cream reaches the rim, gently pull it toward the center. Continue to decorate the top of the cake.
- Refrigerate the cake for 2-3 hours. Place halved or whole strawberries in the center of the cake before serving.
Notes
- 140 g eggs approximately equals to 2.50 whole extra large chicken eggs (egg shell removed), or about ½ US cup of whole eggs.
- Cream at an 8-minute stand is about to stay on the whisk and then drop off. It is the right cream state for sandwiching the cake layers.
- Cream at a 7-minute stand is quite loose and is just enough to stay on the whisk.
- Use a kitchen scale for the precise measurements of ingredients.
- Sift dry ingredients twice to avoid lumps: the first time over a clean bowl and the second time - over the beaten eggs.
- Don't overmix the cake batter.
- Avoid overbaking: the longer you bake, the harder the cake becomes.
- Do not work near hot appliances or in a heated room when working with heavy cream. Make sure to chill the mixer's beaters and the bowl or whisk the cream over the ice bath.
- For the best results, opt for a hand whisk instead of an electric mixer. Avoid using a stand mixer to prevent overwhipping the cream.
- Ensure to dry strawberries thoroughly before adding them as a cake layer to prevent the sogginess of the cake and releasing juices into the whipped cream.
- Make ahead option: Make Japanese Christmas cake half a day in advance and refrigerate; the cream, sponge, and strawberries will beautifully blend together. Decorate the top of the cake with plump strawberries before serving.
Nutrition
- Serving Size: 1 slice
- Calories: 461
- Sugar: 27.6 g
- Sodium: 63 mg
- Fat: 31.5 g
- Saturated Fat: 18.7 g
- Carbohydrates: 41.1 g
- Fiber: 1.5 g
- Protein: 6 g
- Cholesterol: 193 mg
The nutritional information has been calculated using an online recipe nutrition calculator such as Verywellfit.com and is intended for informational purposes only. These figures should be used as a general guideline and not be construed as a guarantee.


Comments
No Comments