• Skip to primary navigation
  • Skip to main content
  • Skip to primary sidebar

Baking Like a Chef logo

  • ABOUT
  • RECIPES
  • CLUB
  • SHOP
menu icon
go to homepage
  • Recipes
  • Basics
  • Printables
  • Subscribe
  • About
search icon
Homepage link
  • Recipes
  • Basics
  • Printables
  • Subscribe
  • About
×

Want to learn sourdough?

START

Home » Recipe Index

Pistachio Sans Rival Recipe

Mar 29, 2024 · 27 Comments

Sliced pistachio Sans Rival cake on a serving board.

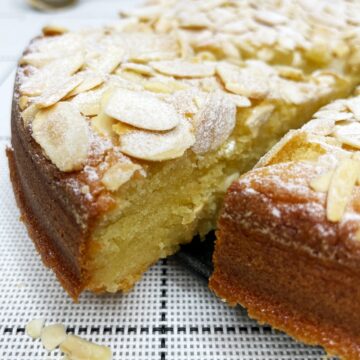
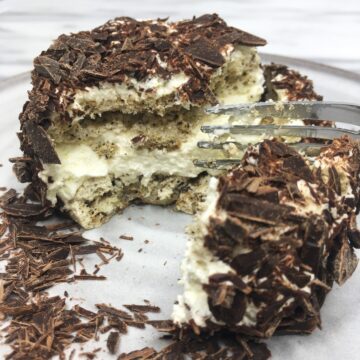
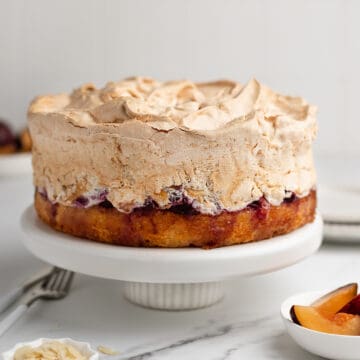
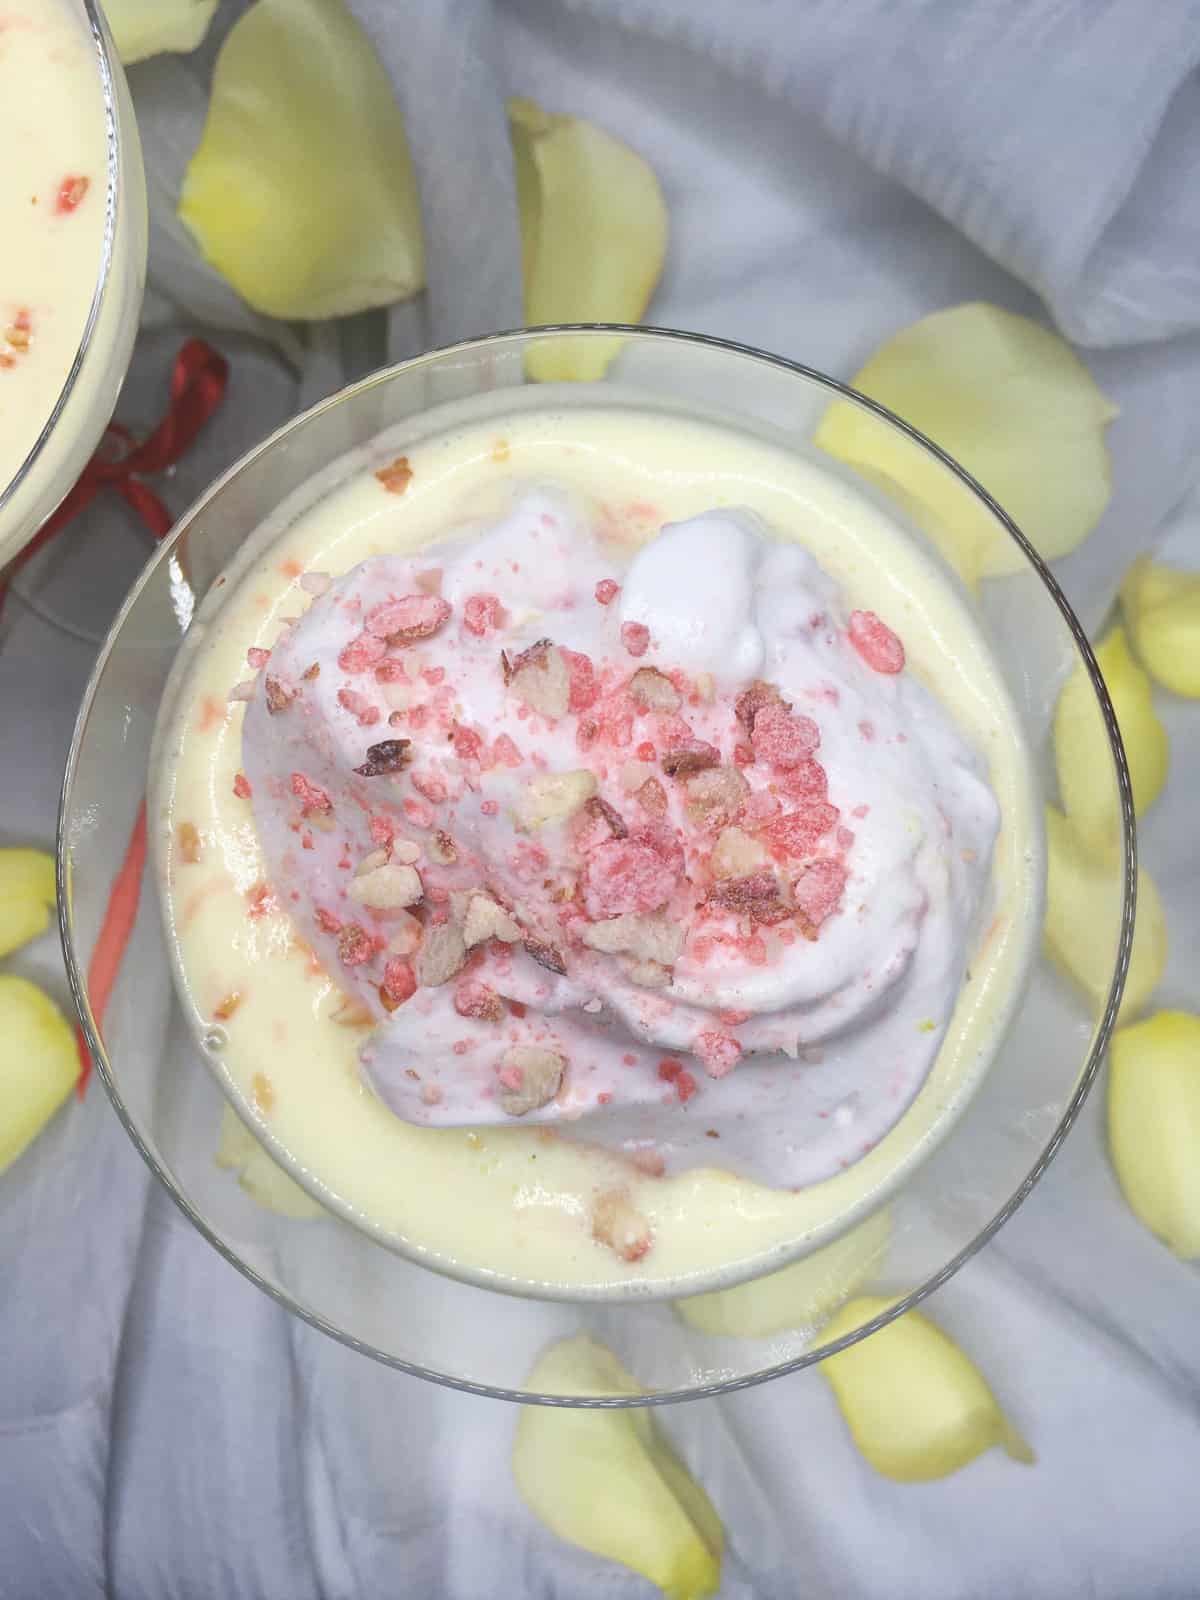
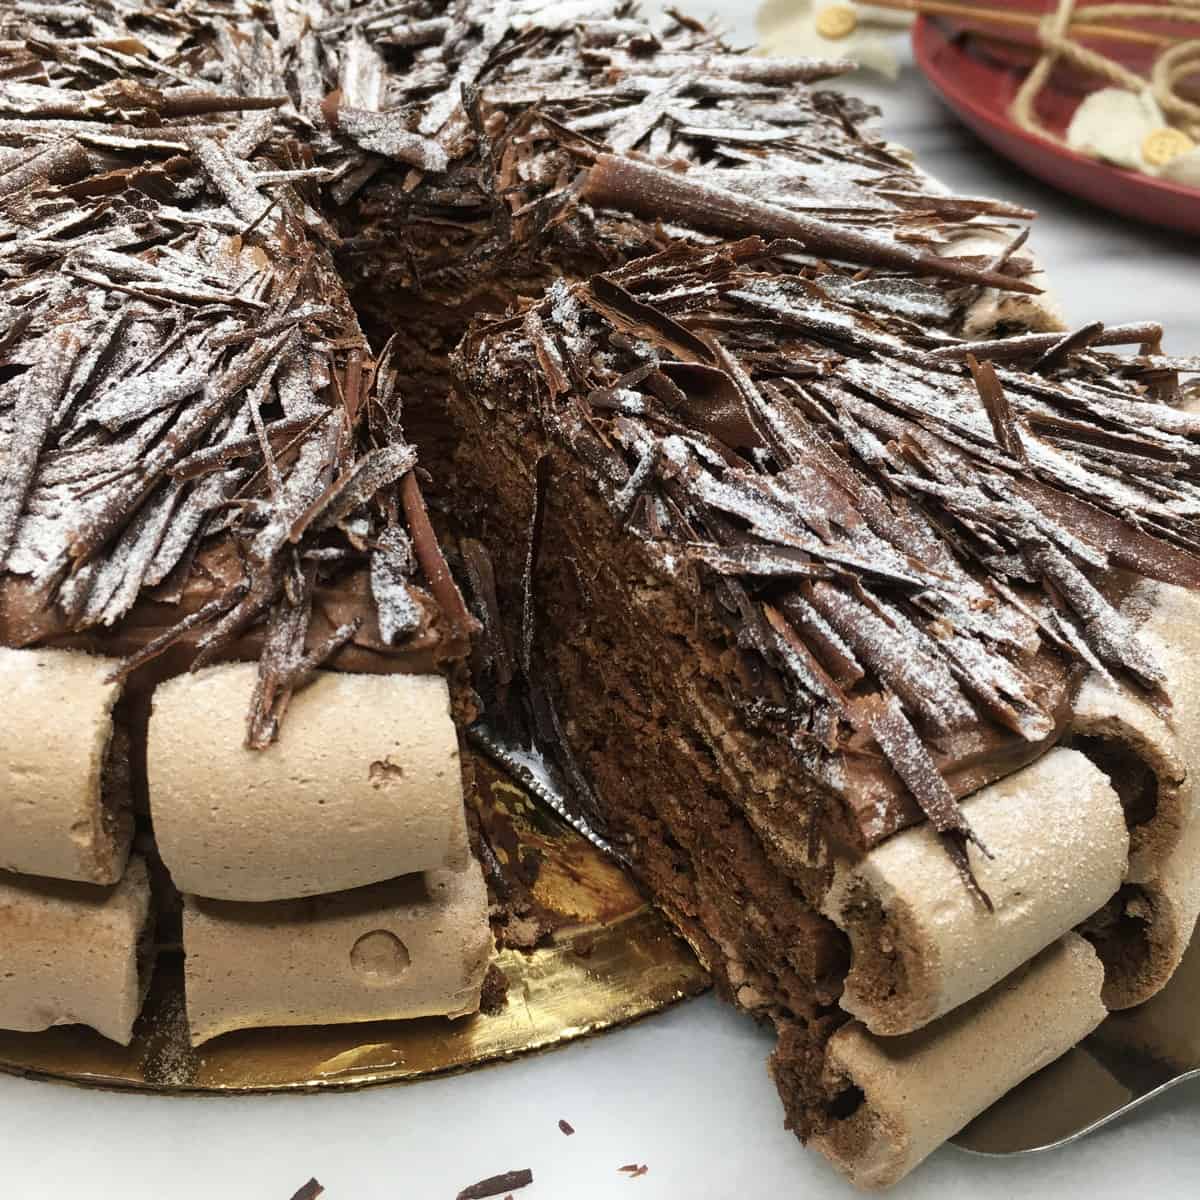
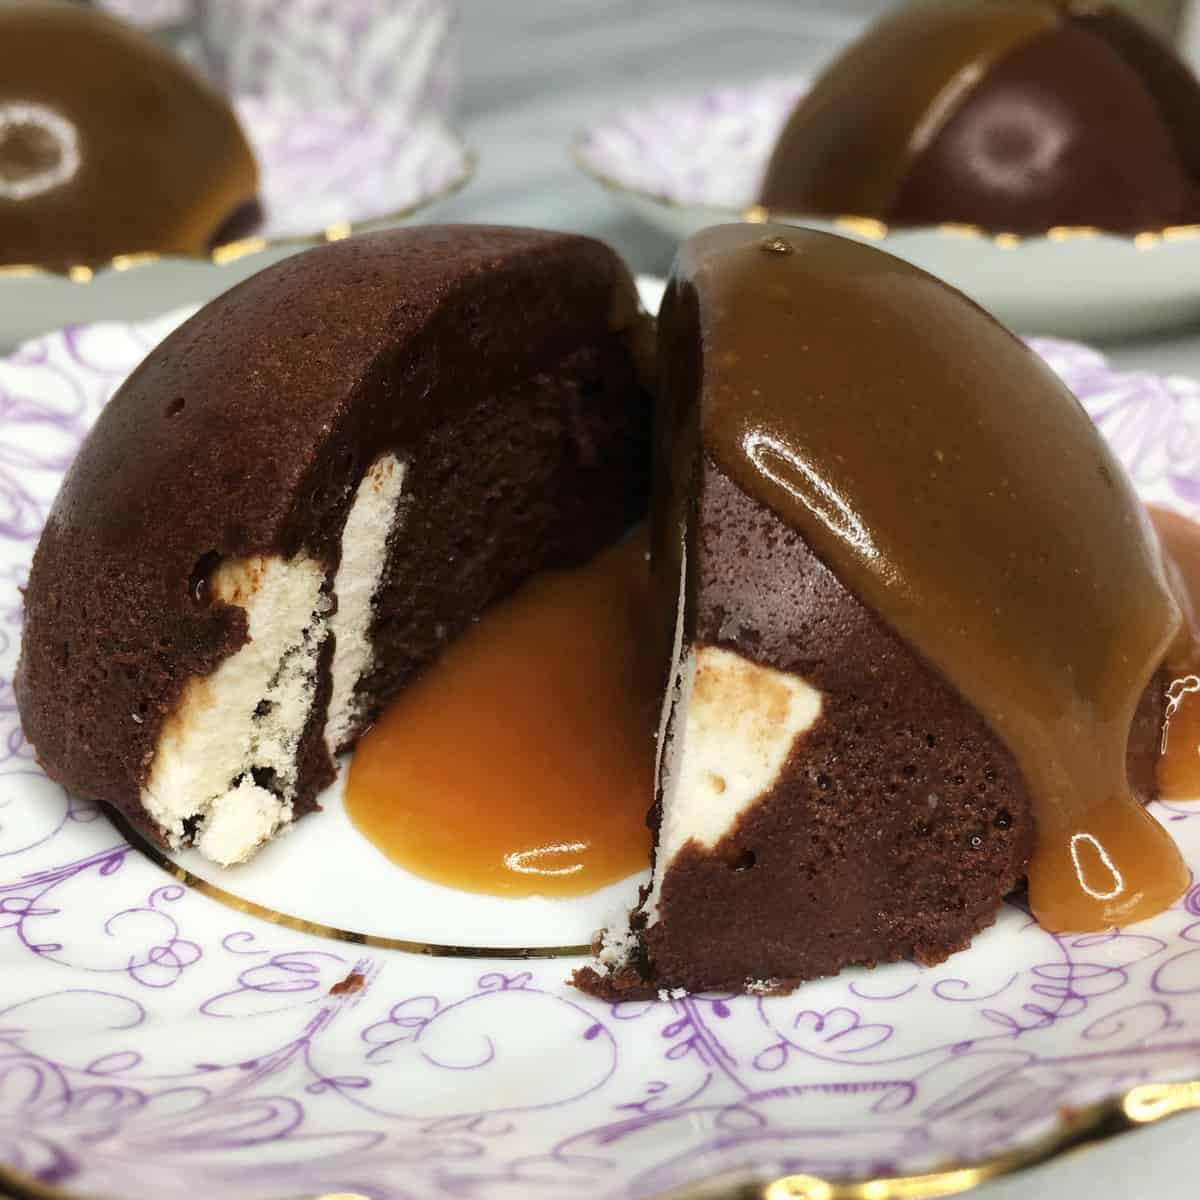
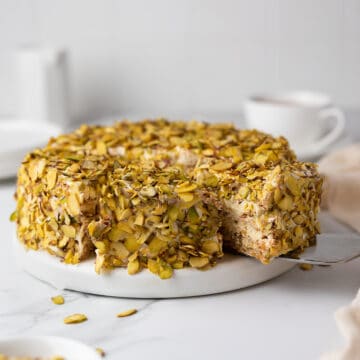
Pistachio Sans Rival is a nutty twist on a classic Filipino cake Sans Rival. It'ss made with pistachio dacquoise sandwiched with French buttercream and generously sprinkled with crunchy pistachios. Pure yumminess.

Sliced pistachio Sans Rival cake on a serving board.

Pistachio Sans Rival recipe

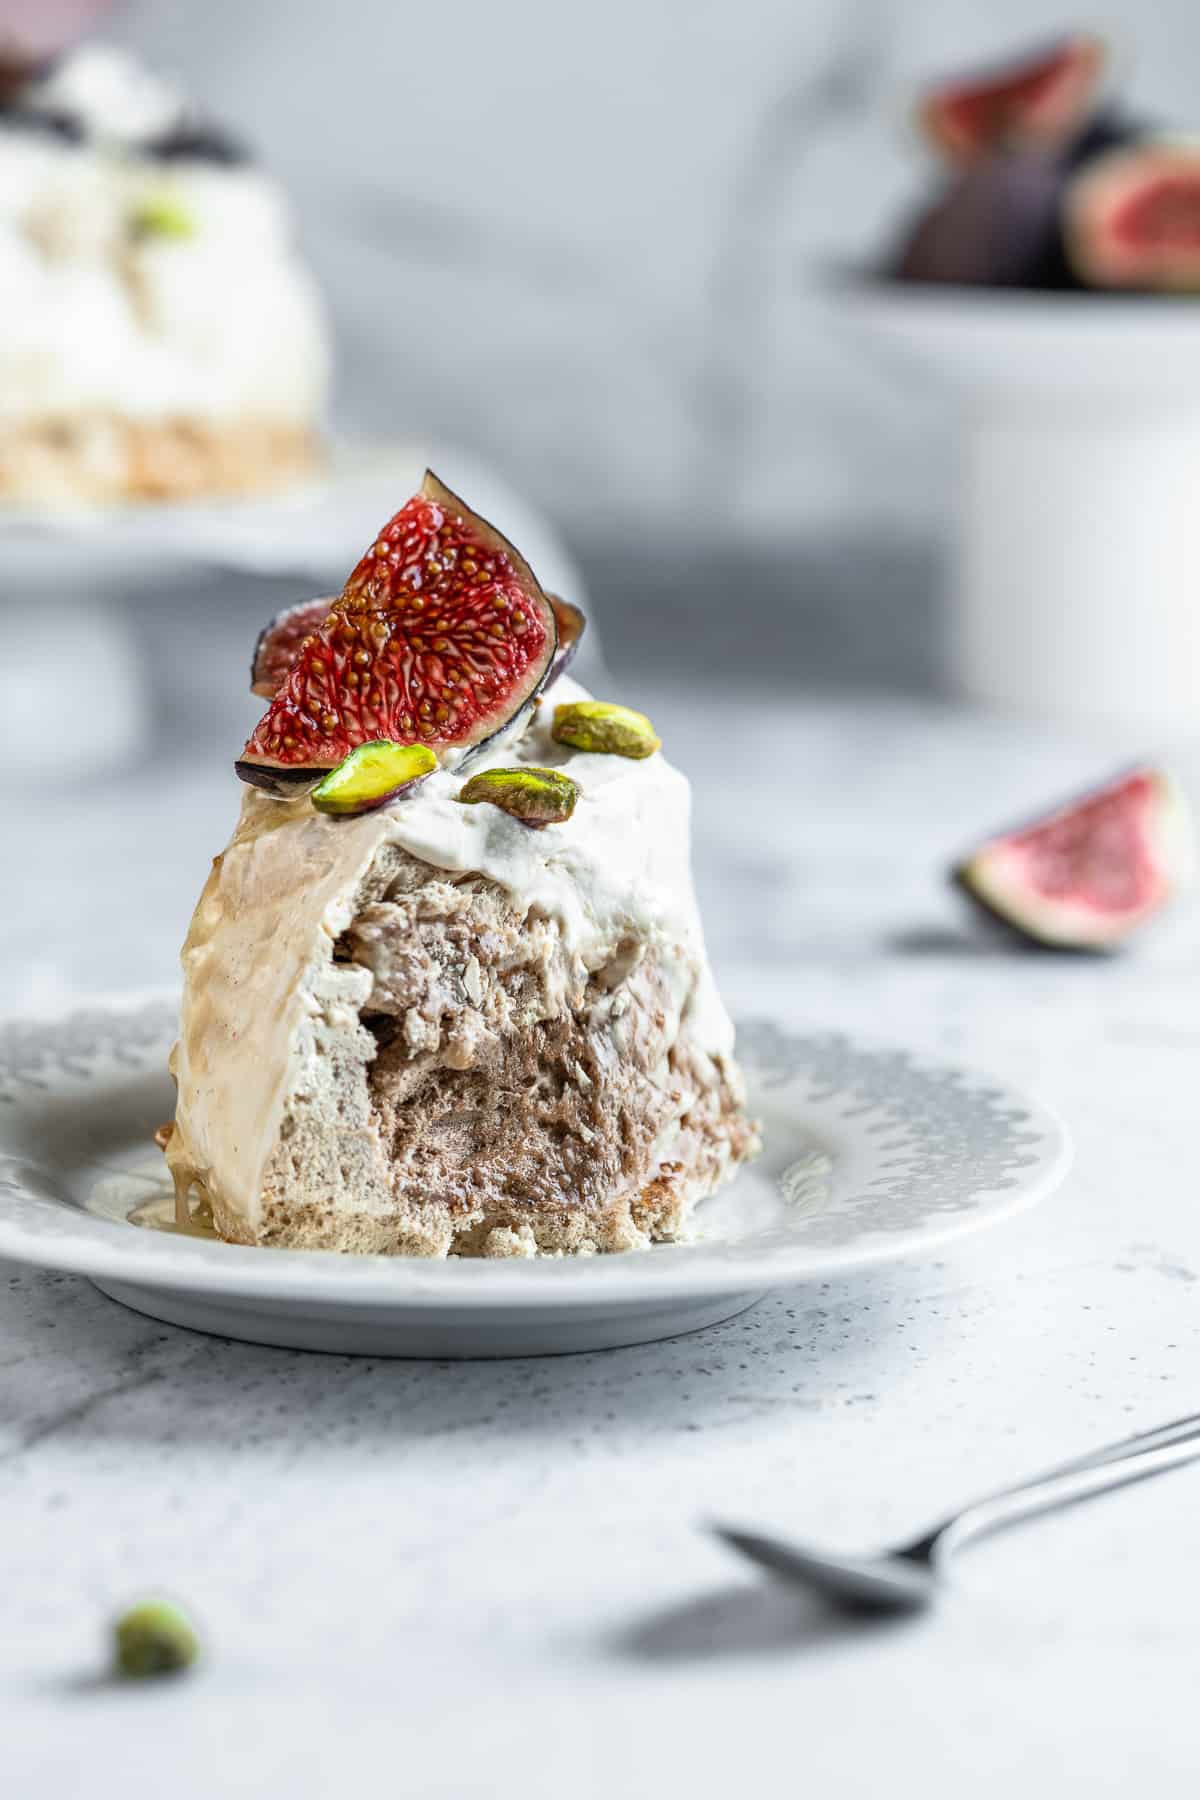
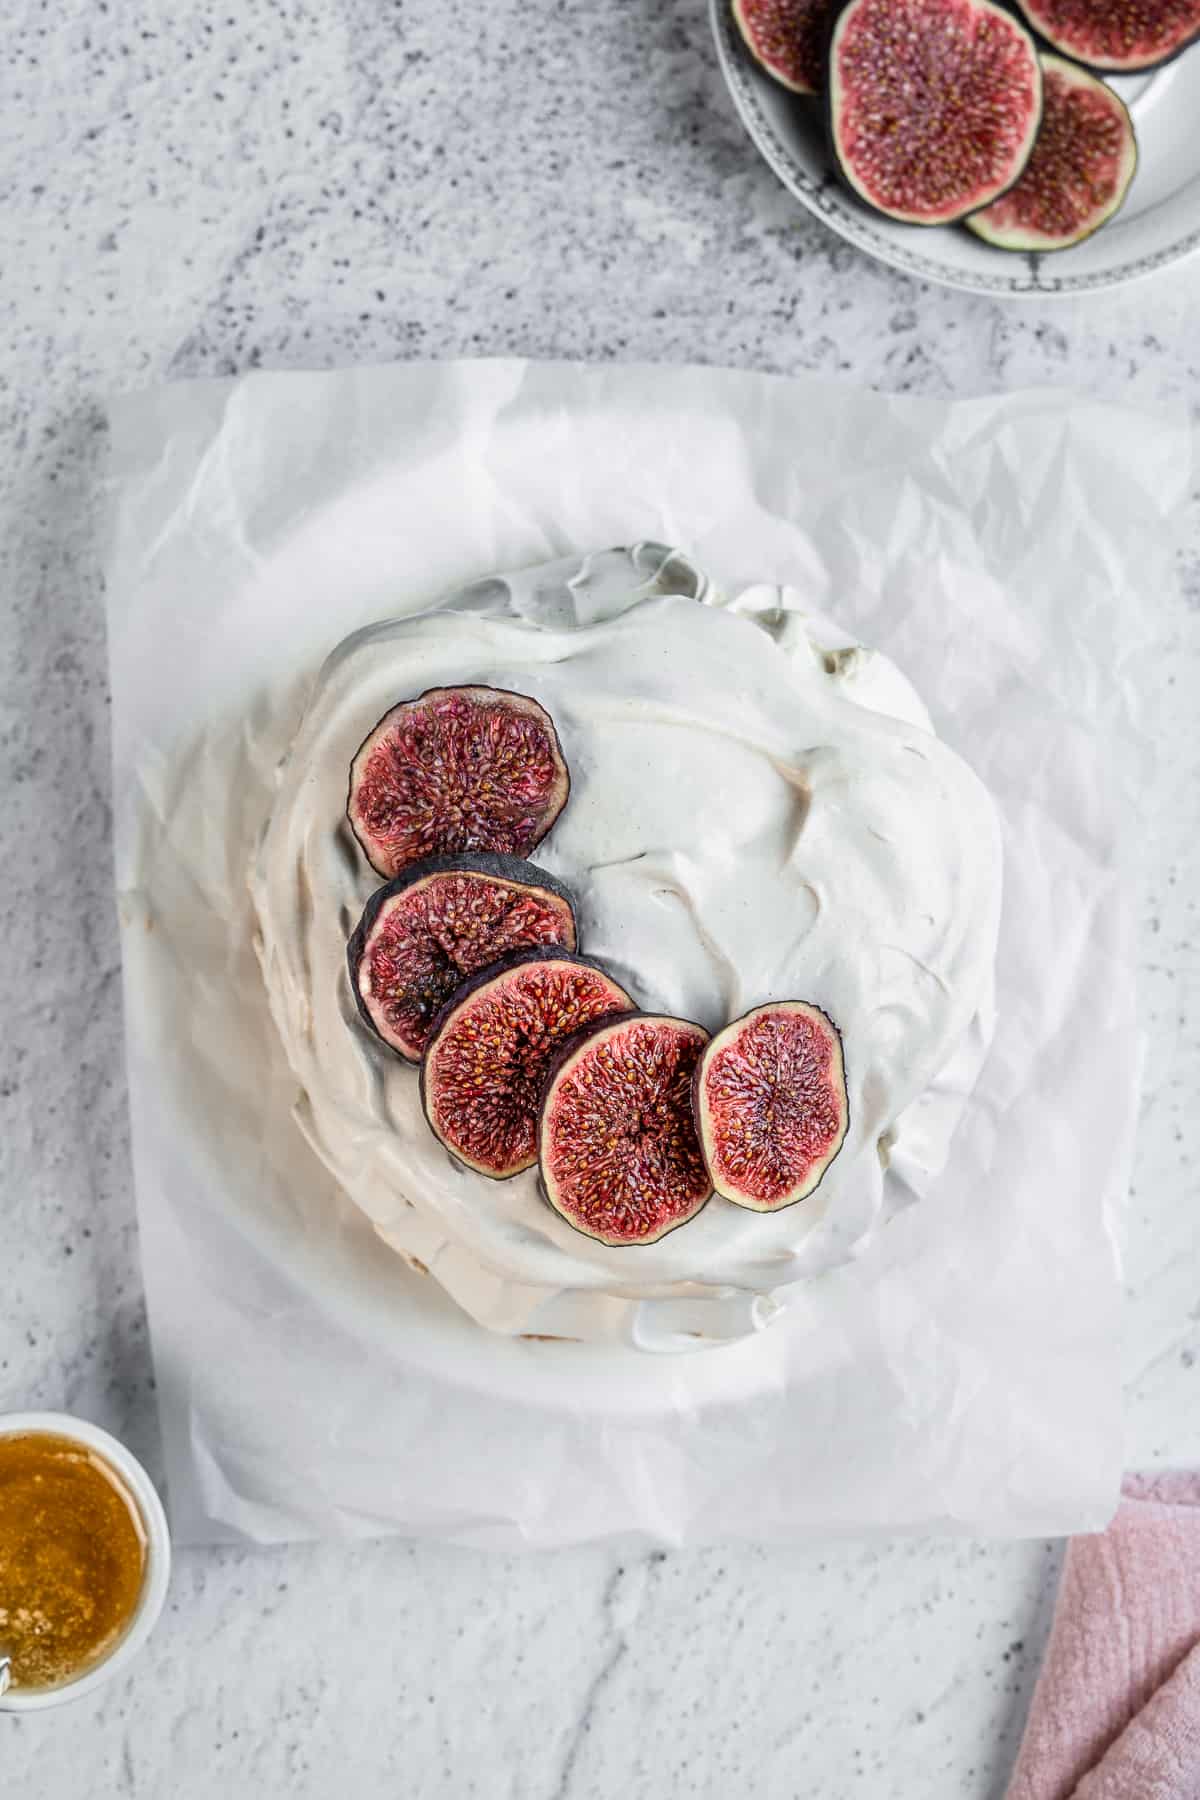
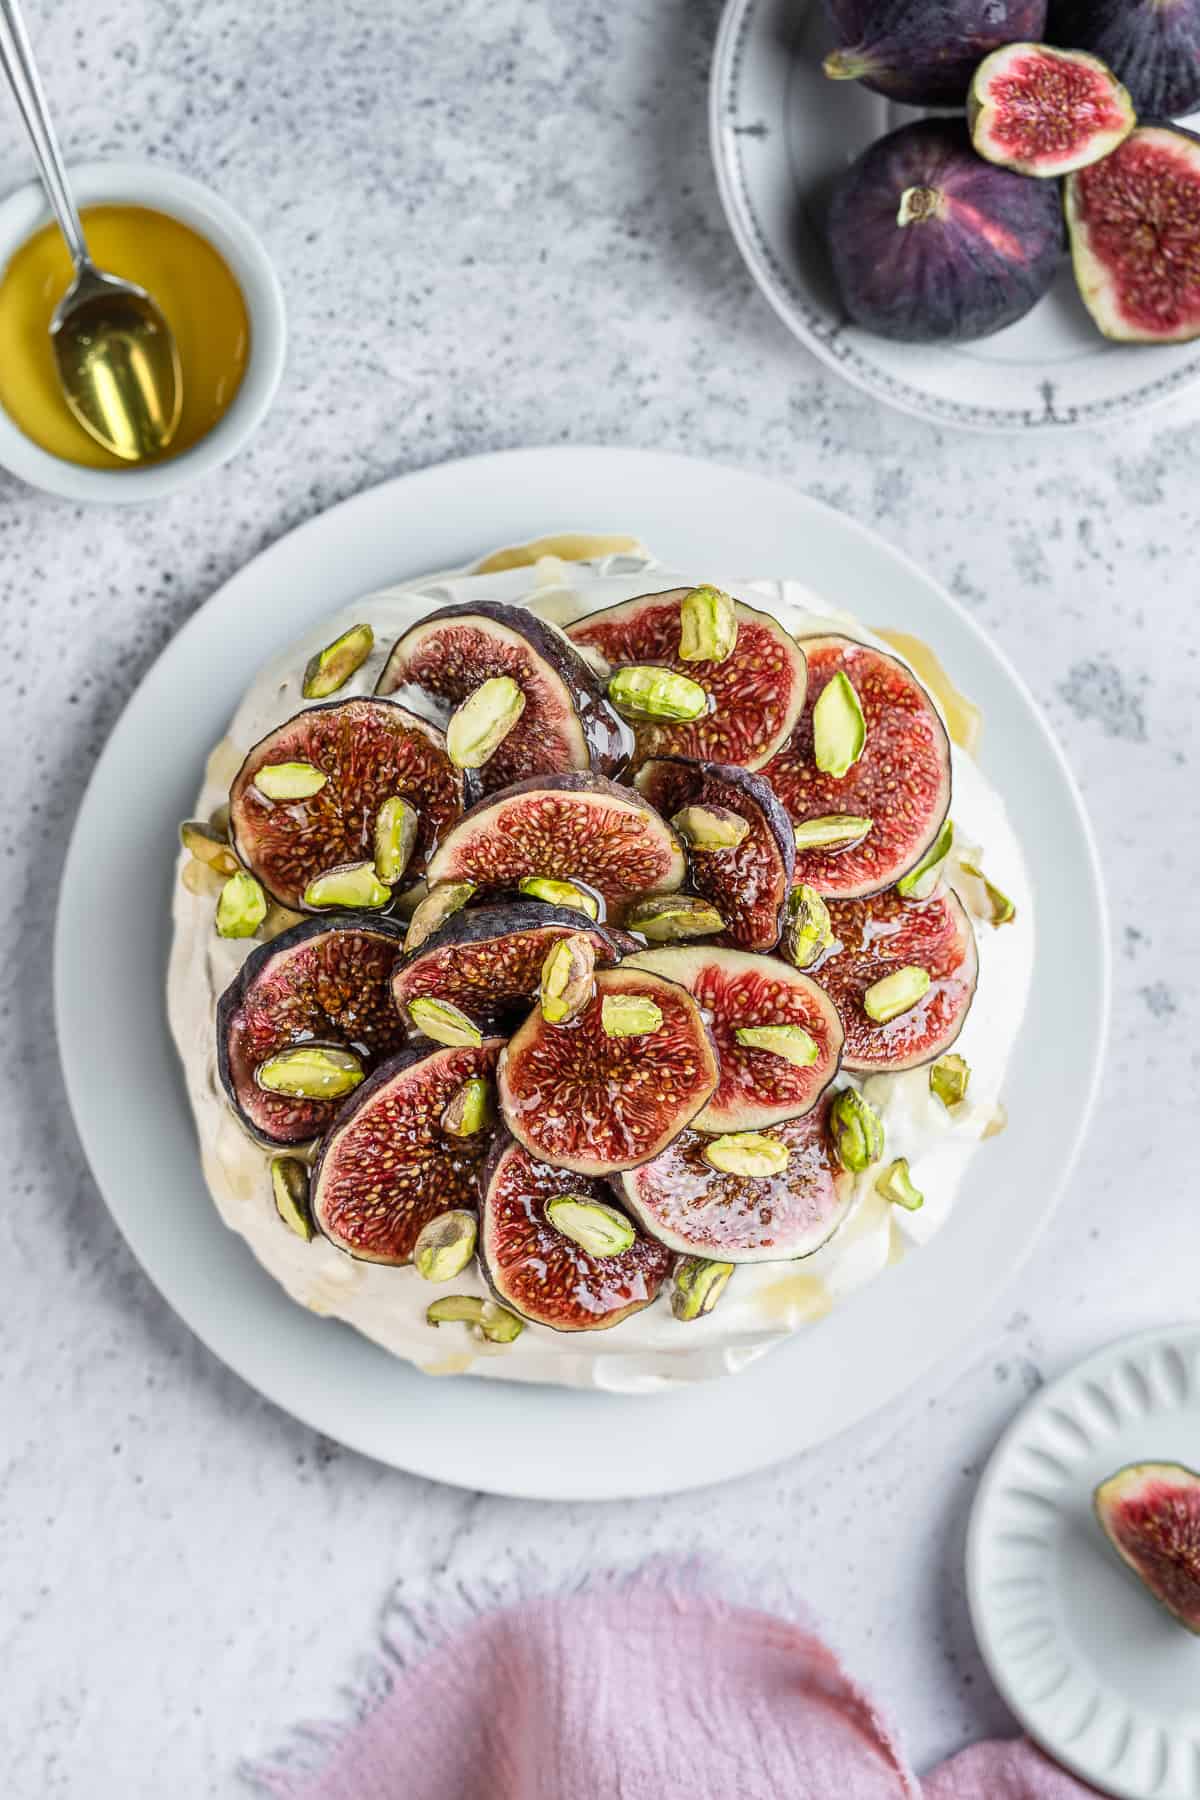
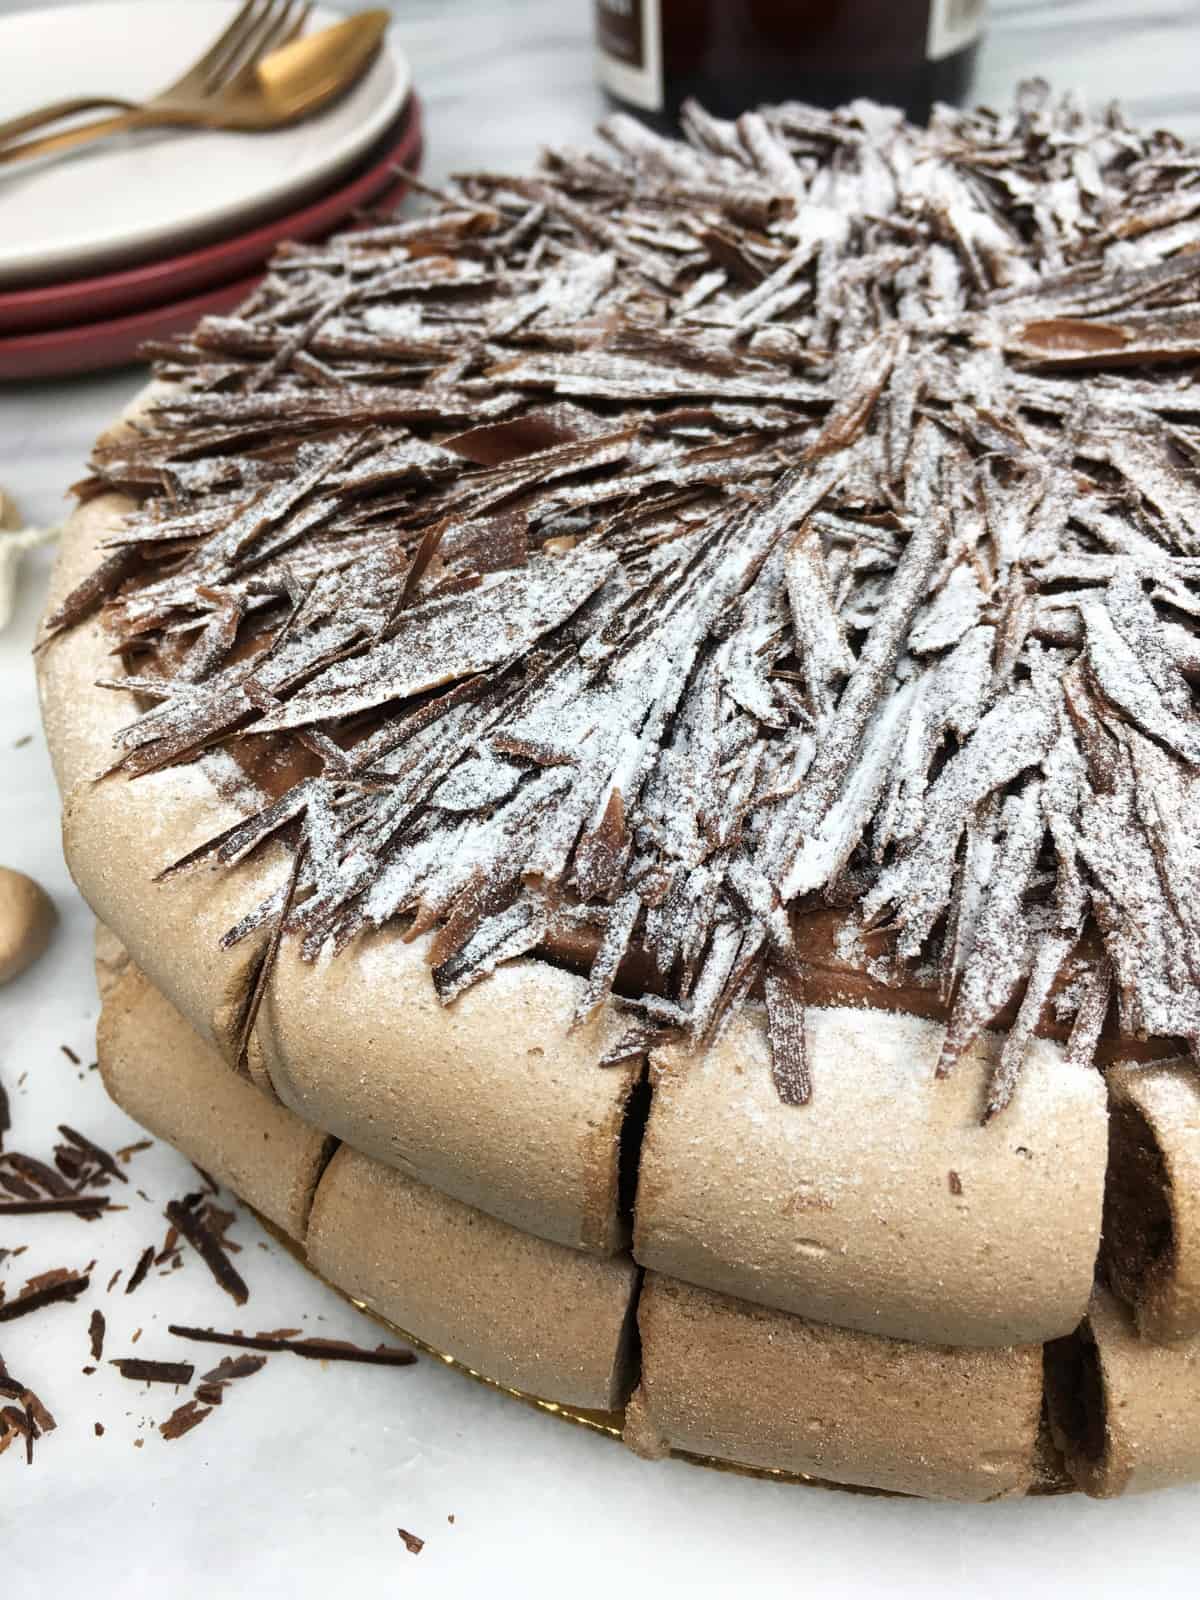
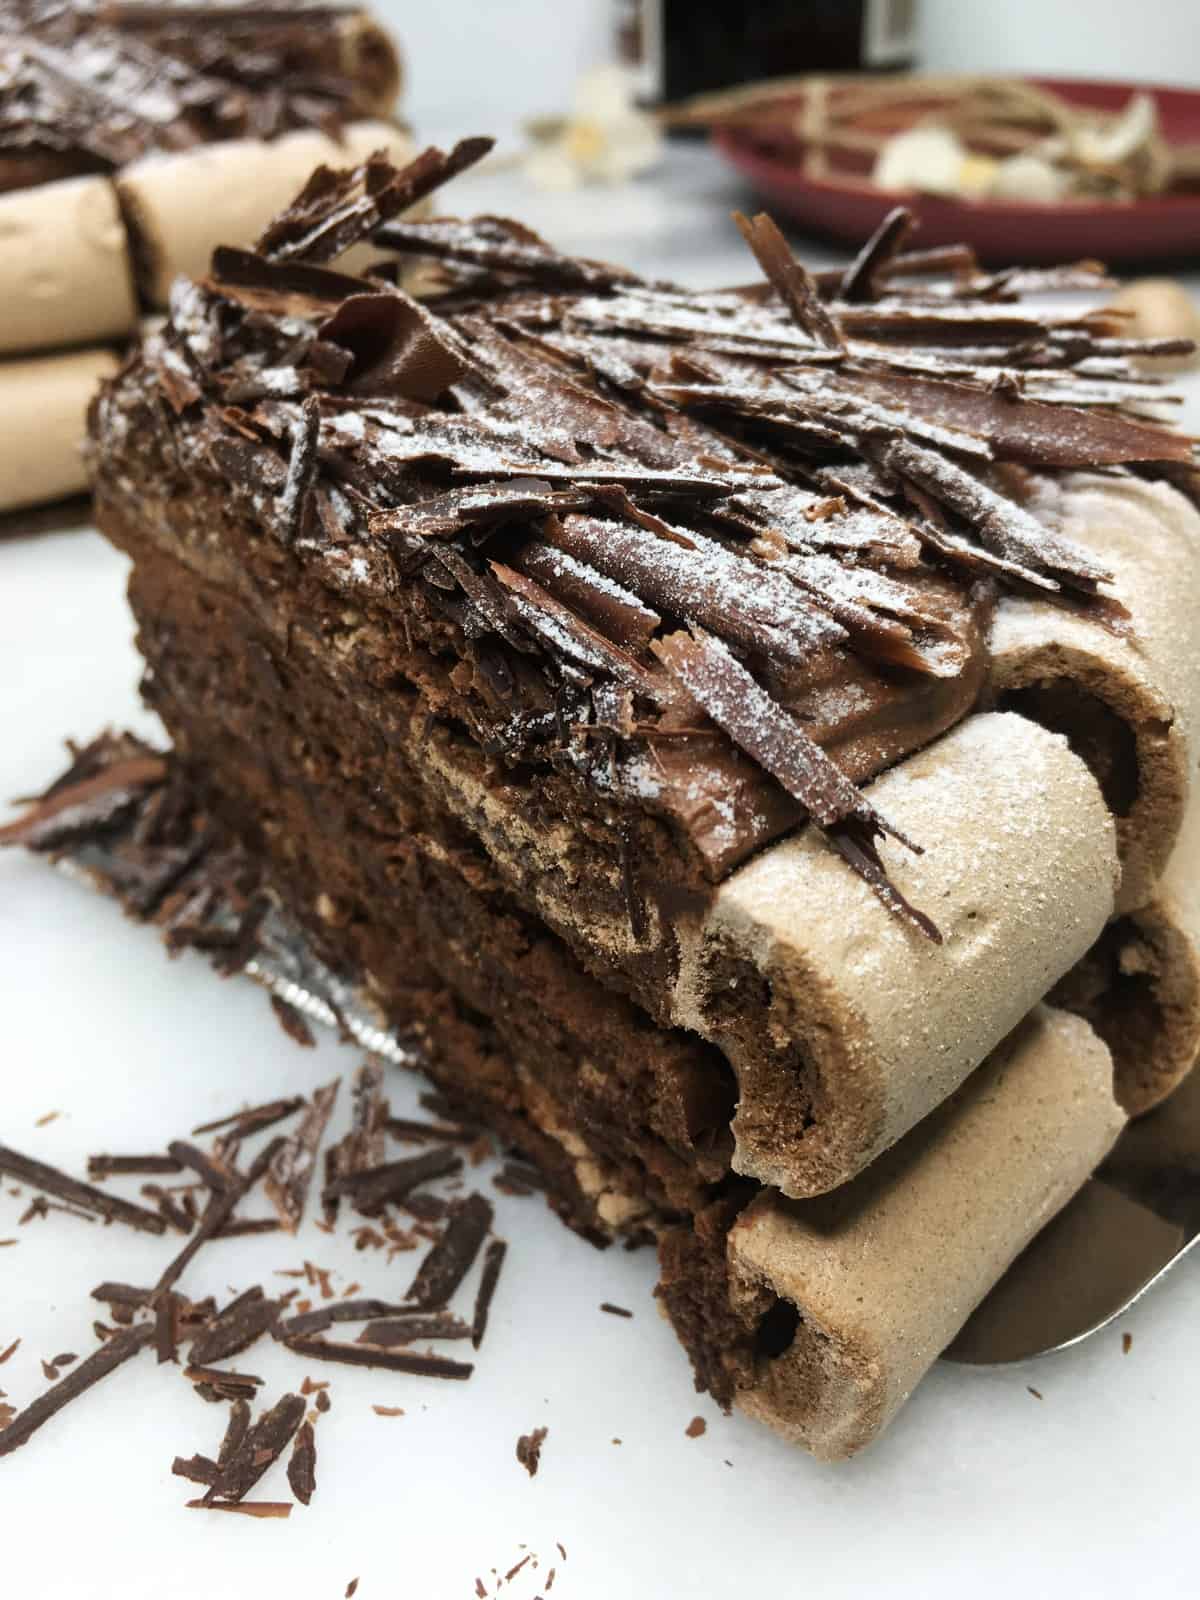
Pistachio Sans Rival is a multilayered cake with light and crispy dacquoise layers sandwiched with rich French buttercream (aka Sansrival icing). The cake is topped with chopped pistachio nuts, ensuring that every bite is full of nutty flavor.

[feast_advanced_jump_to]

Since the 1920s and 1930s, when the cashew Sans Rival was probably invented, silvanas (a cookie version of the Sans Rival) and other cake variations were created.

BAKING ESSENTIALS CHECKLIST

Sign up and get a list of the necessary baking tools and ingredients

FREE DOWNLOAD

Great news! You don't need to travel to the Philippines to try the authentic Sans Rival, which is served in many cafes, coffee shops, and bakeshops (Goldilocks, Contis). You can make it yourself.
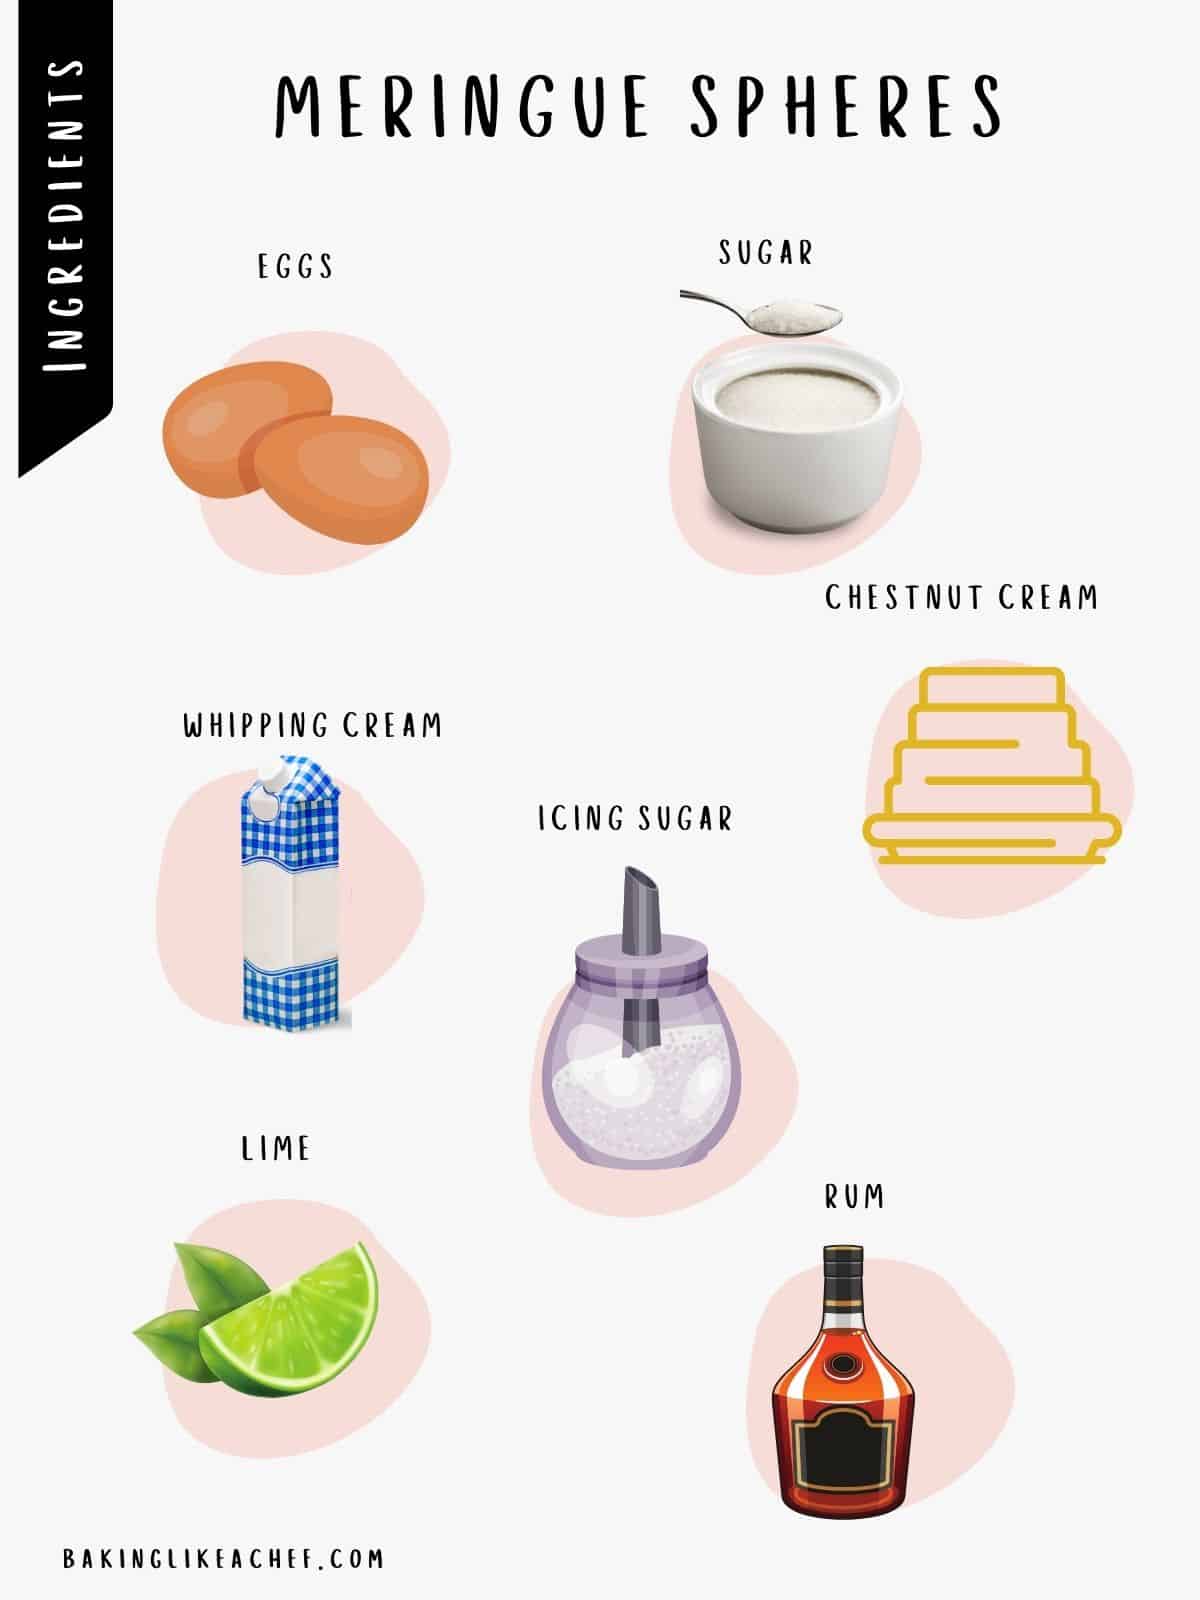
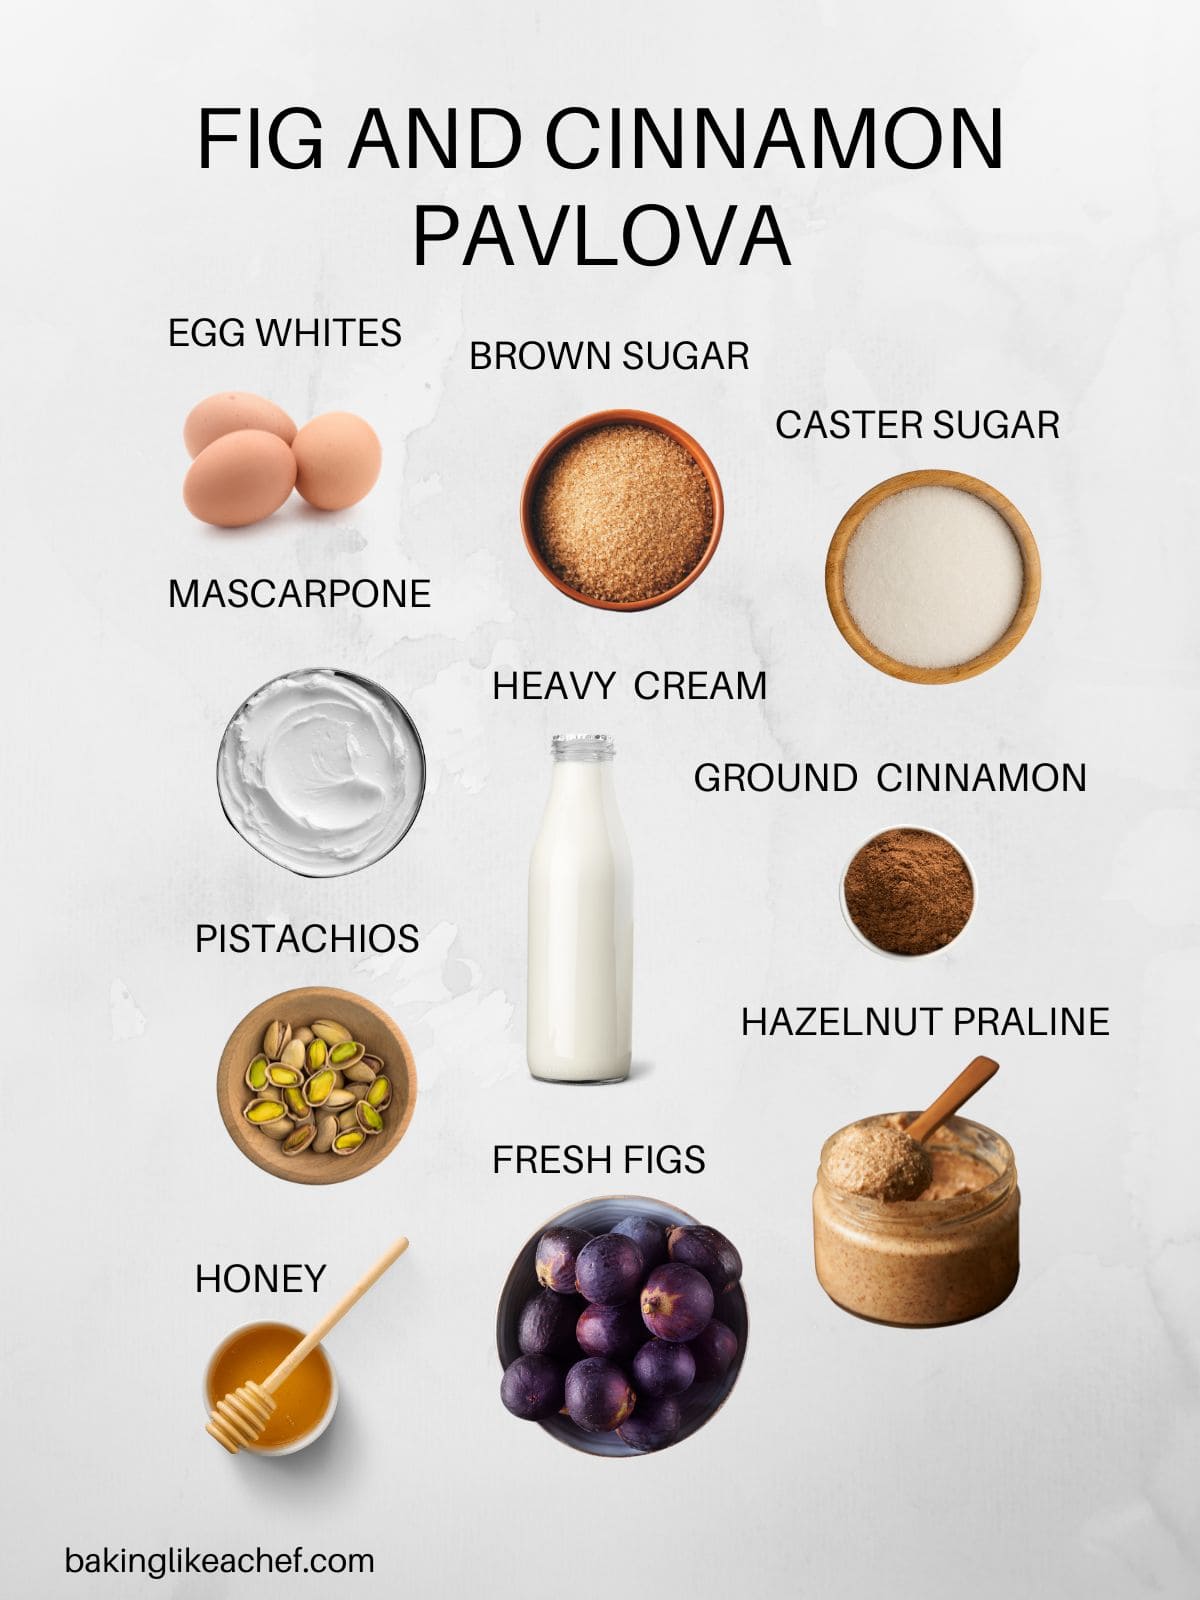
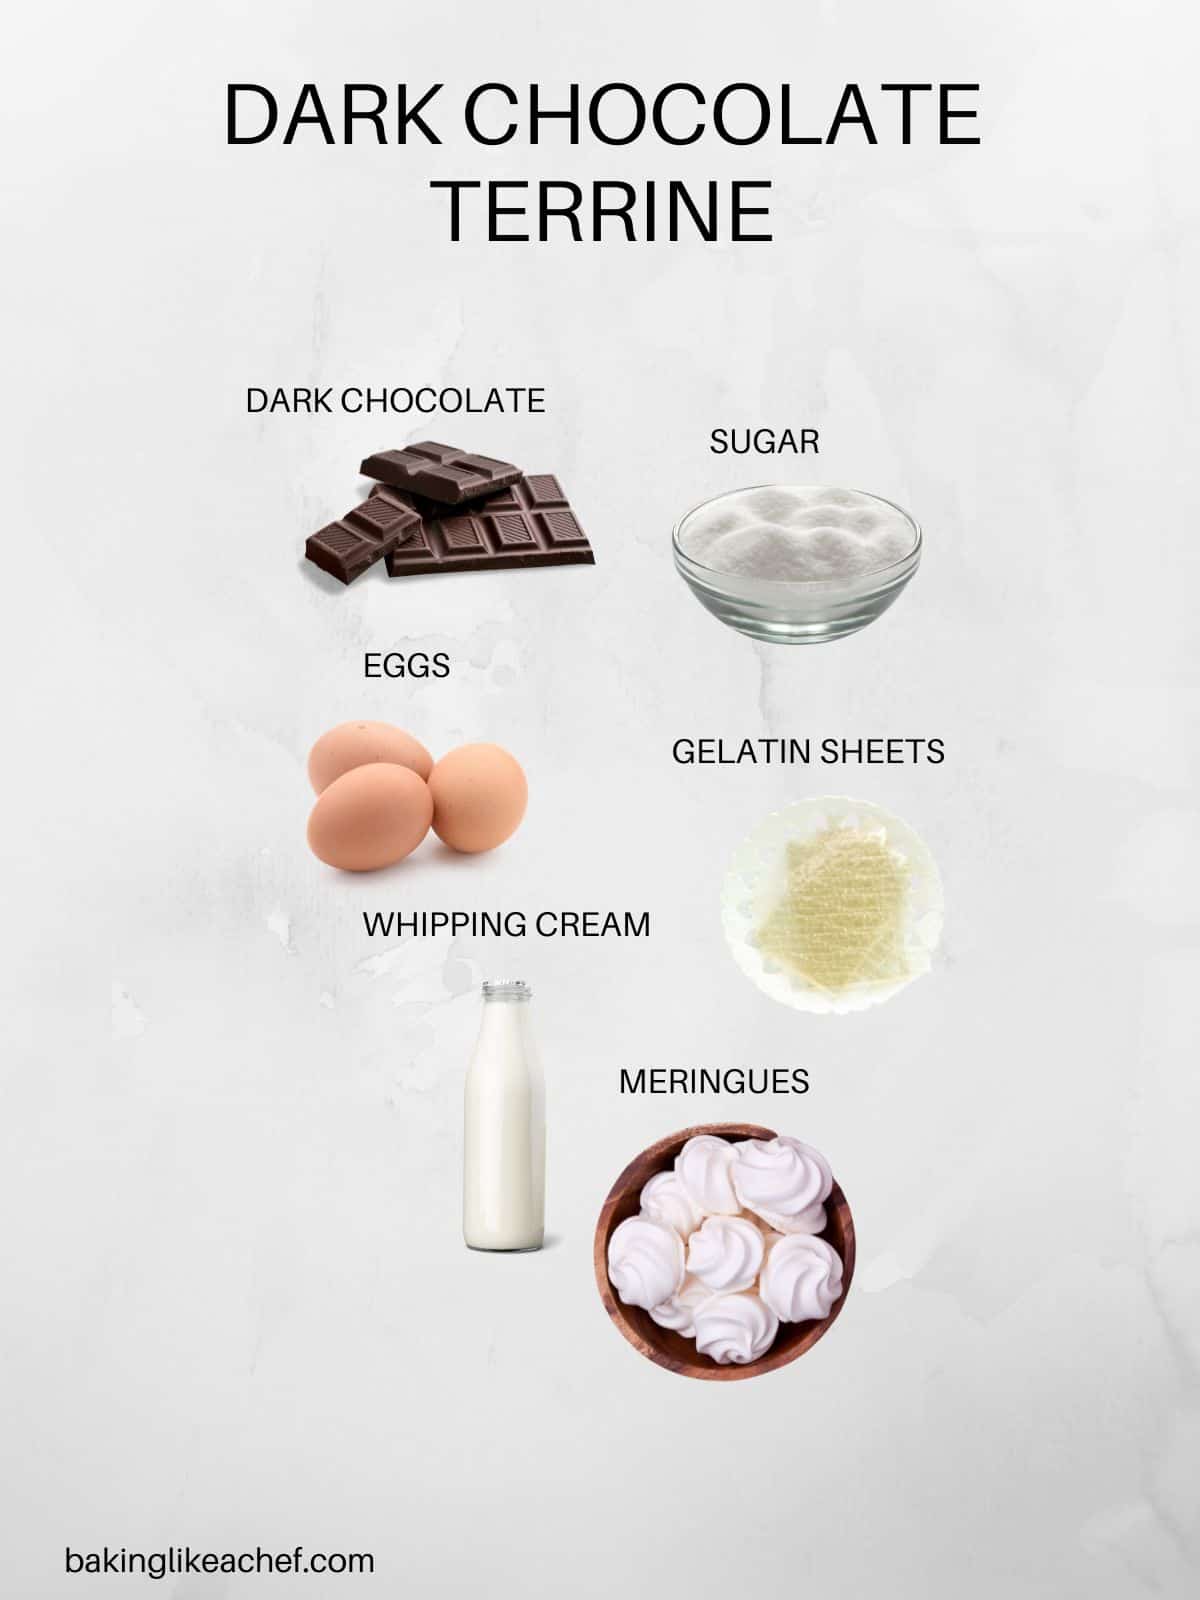
Ingredients

For ingredients and detailed instructions, refer to the recipe card below.

For pistachio dacquoise:

  • Pistachios: Use raw, unsalted pistachios and toast some to decorate the cake.
  • Egg whites (room temperature): Gives volume and structure to the meringue. 
  • Cream of tartar or lemon juice: Helps to stabilize the egg whites.
  • Sugar: Use caster sugar or superfine baker's sugar. You can process granulated sugar in a food processor for a few seconds to make your sugar superfine.

For French buttercream:

  • Egg yolks (room temperature): Create a rich, velvety buttercream frosting.
  • Unsalted butter: Choose butter with 82% fat content for the best flavor and texture.
  • Sugar: Use caster white sugar for sweetness.
  • Dark rum brings a beautiful flavor to the buttercream.

How to make pistachio Sans Rival step-by-step

  • Toast pistachios: Preheat oven to 300°F (150°C). Toast 1 ¼ cup (125g) pistachios for 15 minutes, then cool and chop.
  • Prepare cake rings: Reduce oven to 275°F (135°C). Line a baking sheet with parchment and place four 8-inch (20-cm) cake rings on top.
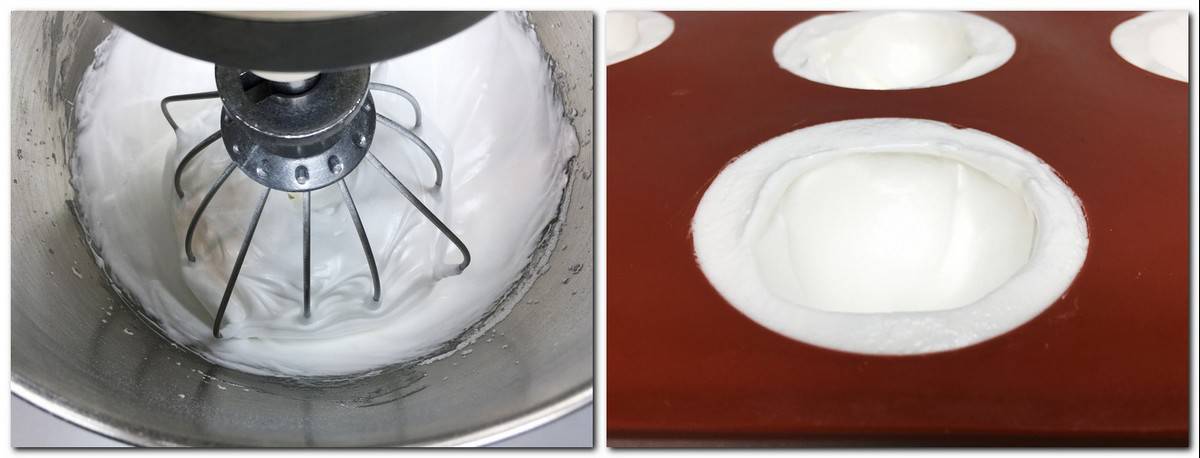
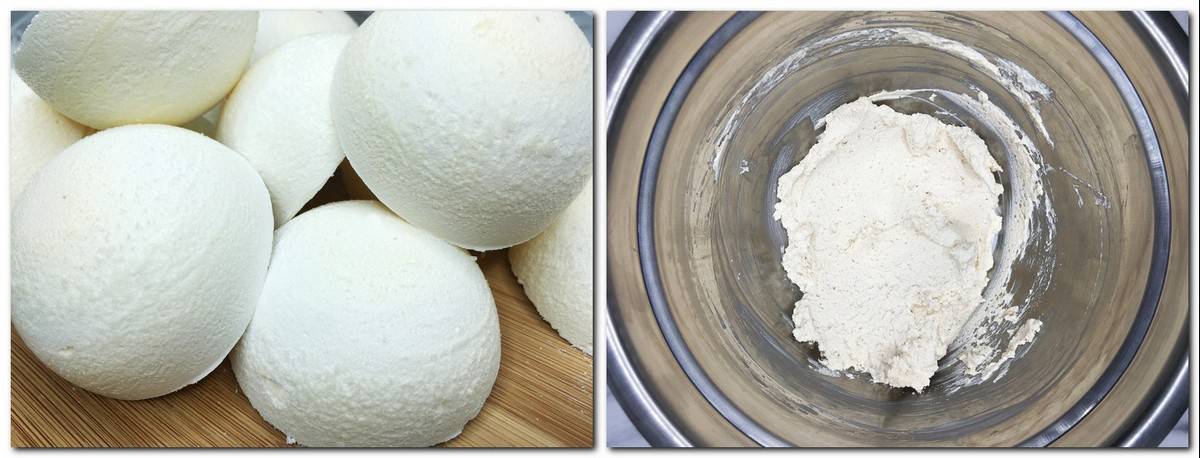
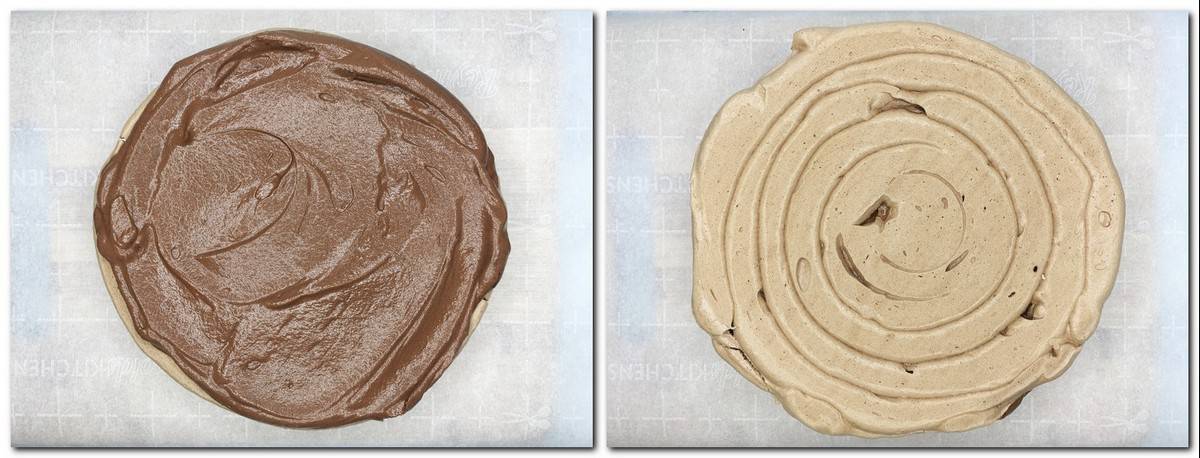
  • Make pistachio dacquoise: Beat egg whites with cream of tartar at medium speed, gradually adding sugar until soft peaks form. Increase speed and whisk until stiff peaks. Gently fold in chopped raw pistachios. Divide the mixture into cake rings, smooth with a spatula, or pipe into spirals. Bake for 1 hour until golden brown. Let rest 5 minutes, release edges with a knife, flip onto parchment, peel off the bottom layer, and cool completely.
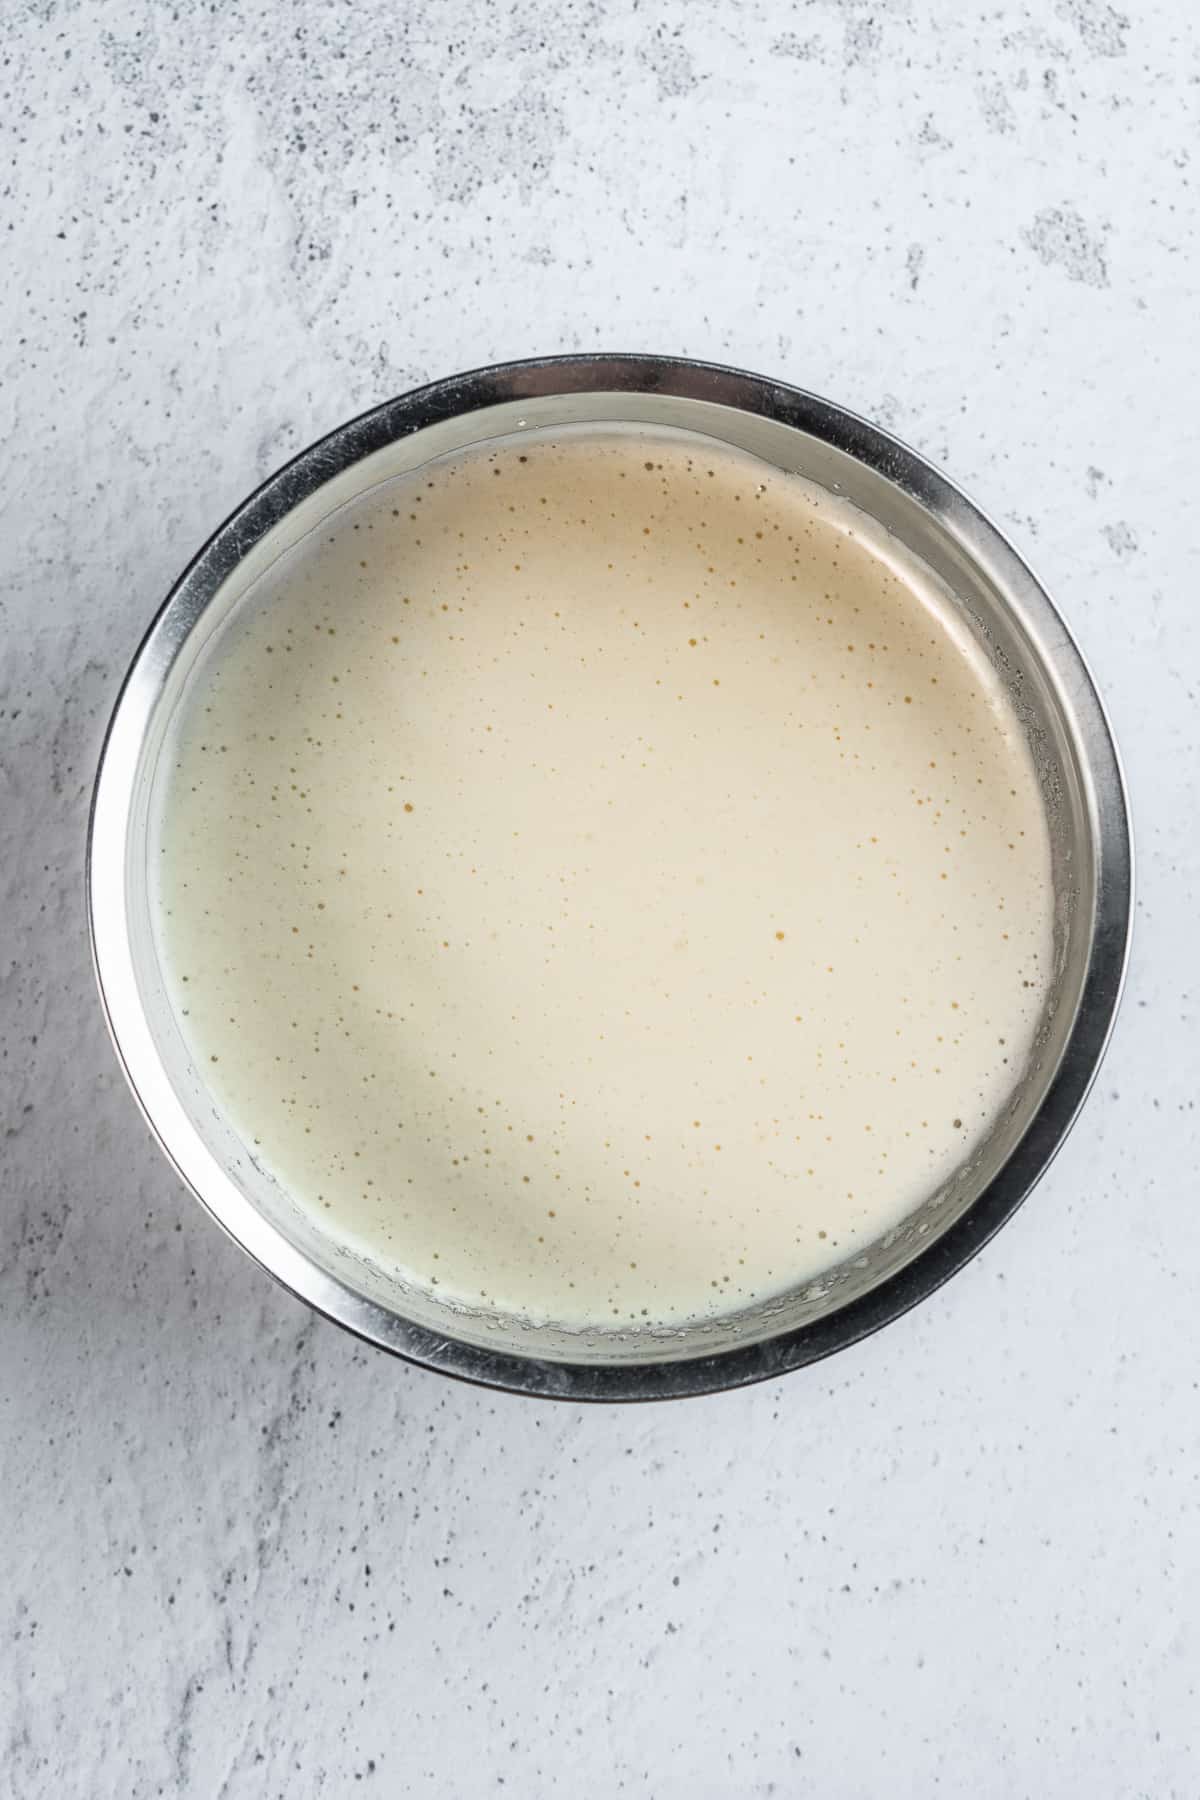
  • Make French buttercream: Beat egg yolks at high speed until pale and doubled in volume (8-10 min). Heat sugar and water to 240°F (115°C). Reduce mixer speed, slowly pour in hot syrup while whisking, and beat for 4 minutes until cool. In another bowl, beat softened butter until smooth. Add egg yolk mixture and dark rum, beating until creamy.
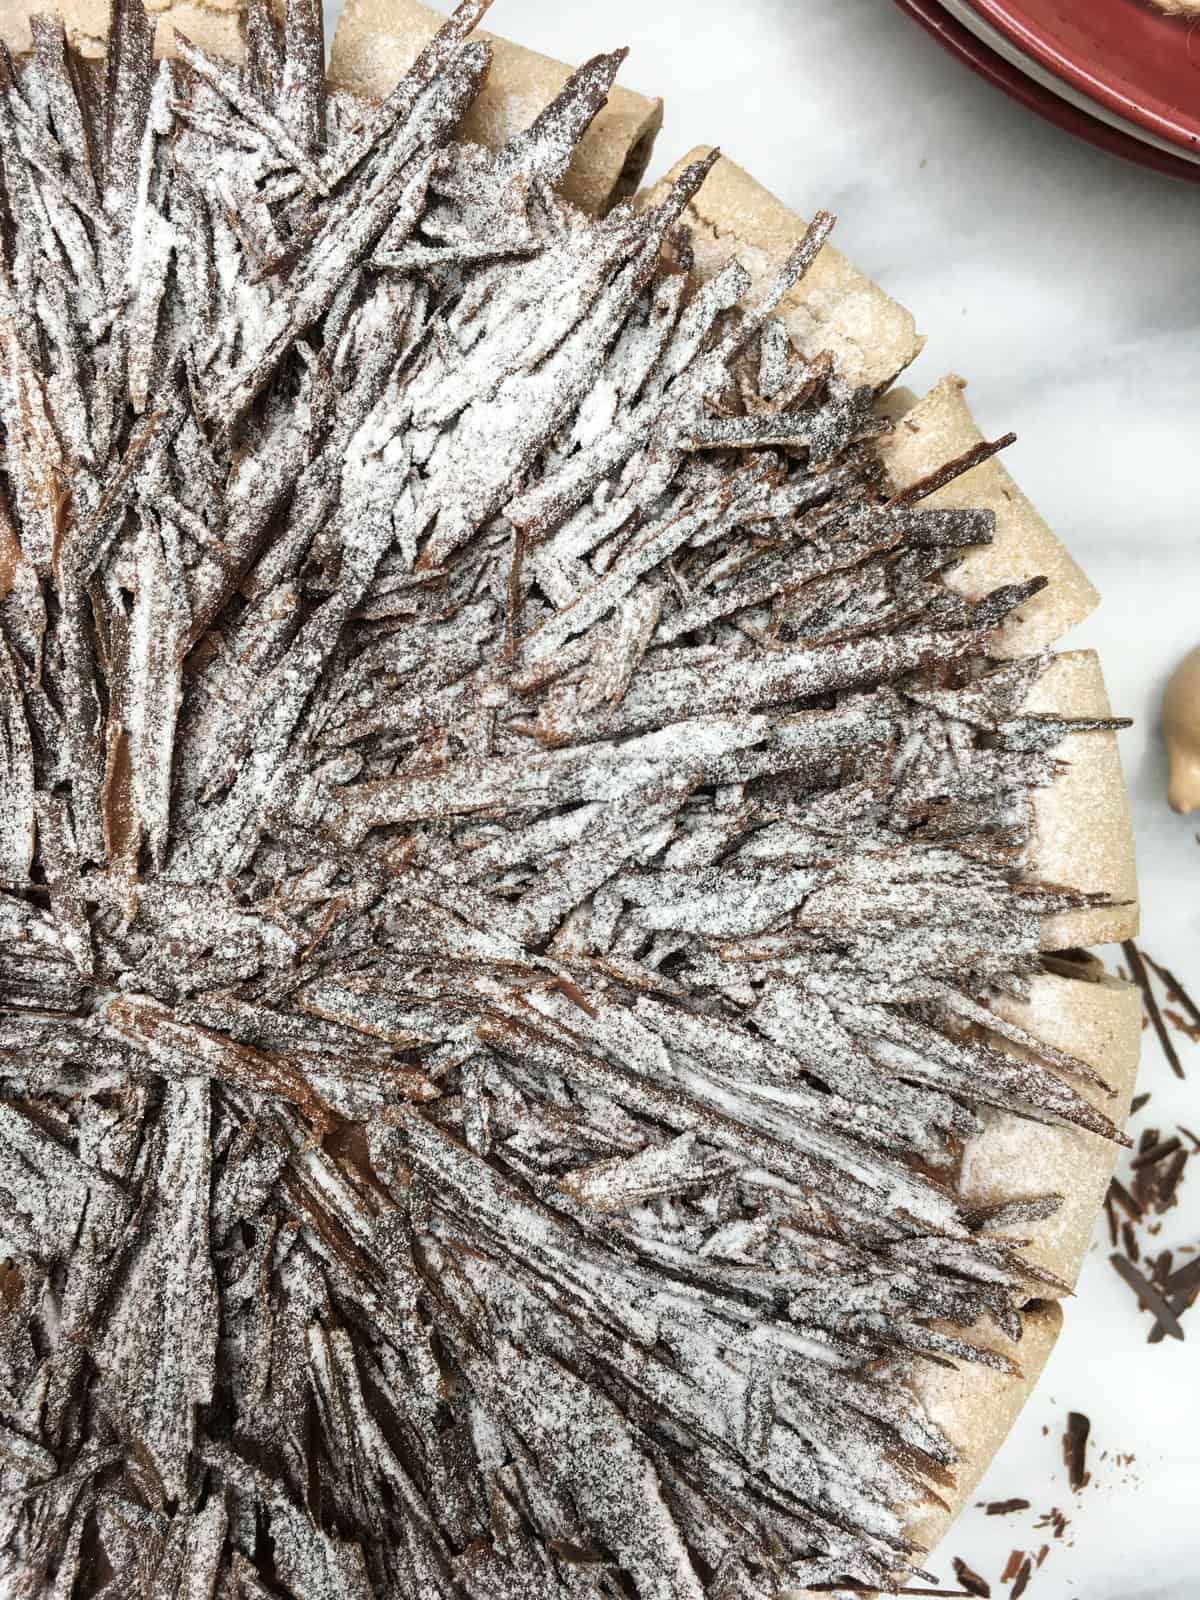
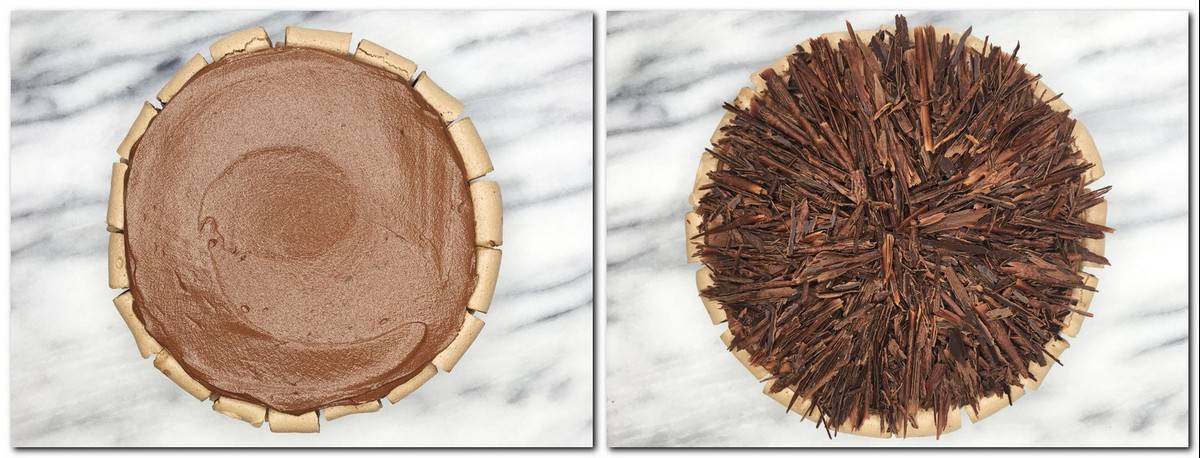
  • Assemble the cake: Place the first dacquoise disc on a cake board with a dab of buttercream. Spread buttercream, sprinkle chopped pistachios, and repeat for all layers. Frost the top and sides with remaining buttercream, coat with chopped toasted pistachios, and refrigerate overnight.
Pistachio Sans Rival on a serving board.

Expert Tips

  1. Do not over-mix the dacquoise mixture when you add chopped nuts; just combine.
  2. If you have only two cake rings, make the dacquoise twice (half of the recipe and another half) and bake two discs at a time.
  3. Bake the dacquoise one day in advance and store it in an airtight container, or simply cover it with a tea towel.
  4. Bring the cake to the counter 30 minutes before serving for the buttercream to soften. The dessert tastes best at room temperature.

Recipe variations

  • Change nutty flavors. Use your favorite nuts, such as peanuts or almonds, to make peanut or almond cake variations or a Filipino classic - cashew Sans Rival.
  • Decorate as you desire. Leave the cake plain (just covered with buttercream) or garnish with nuts. You can sprinkle chopped nuts over the cake or coat the sides.
  • Make the cake larger or smaller, square or rectangular. Recalculate the ingredients using this simple cake pan converter.

Storing and freezing

Store the pistachio Sans Rival cake refrigerated for up to 3 days. It is better to use an airtight container, as the buttercream absorbs smells in the fridge.

Freeze the cake well wrapped for up to one week. To thaw, bring it to the refrigerator overnight. To serve, let it stay at room temperature for 30 minutes.

Chef Jill Sandique says, "You want it chewy, keep it in the fridge. Want it crunchy, keep it in the freezer."

Recipe FAQ

What's the Sans Rival meaning?

In French, Sans rival means 'unrivaled,' where sans means 'without' and rival means 'rival.' So cake Sans Rival means 'a cake without rival.'

What's the Goldilocks Sansrival?

Goldilocks Sans Rival is an authentic Filipino cake sold in the Goldilocks bakeshop in Mandaluyong City, Philippines, and in Goldilocks' locations in the USA.

Do you need to freeze the cake before serving it?

No, there is no need to freeze it before serving. Instead, take it out of the fridge 30 minutes before serving it on the table. This time is required for the buttercream to soften.

Want more delicious and beautiful recipes? Subscribe to my newsletter and follow me on Facebook, Pinterest, and Instagram for my latest updates. If you make this recipe, please leave a star rating on the recipe card and comment below!

Love dacquoise cakes? Try these next!

  • Coconut dacquoise on a cake board.
    Coconut Dacquoise Cake Recipe
  • Sliced almond cake covered with flaked almonds on a white platter.
    Best Italian Almond Cake Recipe (Gluten-Free)
  • Pistachio dacquoise decorated with fresh strawberries on a white serving platter with berries and flatware on background.
    Pistachio Dacquoise With Strawberries
  • A slice of almond nougatine cake dusted with icing sugar on a red dessert plate.
    Nougatine Cake (6 Ingredients)
Print

Recipe card

Pistachio Sans Rival

Sliced pistachio Sans Rival cake on a serving board.
Print Recipe
Save Recipe Recipe Saved

5 Stars 4 Stars 3 Stars 2 Stars 1 Star

5 from 18 reviews

Pistachio Sans Rival is a nutty twist on a classic Filipino cake Sans Rival. Made with pistachio dacquoise stacked with rich French buttercream and generously sprinkled with crunchy pistachios, it is the most beautiful Filipino dessert cake.

  • Author: Irina Totterman
  • Total Time: 3 hours
  • Yield: 12 1x
  • Category: Cakes
  • Method: Baking
  • Cuisine: Filipino
  • Diet: Gluten Free

Ingredients

Scale

For pistachio dacquoise:

  • 6 large egg whites, room temperature
  • ¾ tablespoon cream of tartar
  • 1 cup (225 g) caster sugar
  • 1 cup (100 g) raw pistachios, finely chopped

For French buttercream:

  • ¾ cup (170 g) caster sugar
  • ½ cup (110 ml) water
  • 9 large egg yolks, room temperature
  • 1 ½ cups (235 g) unsalted butter, softened and cut into cubes
  • ½ teaspoon dark rum

For the decoration:

  • 1 ¼ cup (125 g) raw pistachios

* If needed, please refer to Baking Conversion Charts.

**Don't you have the correct baking pan on hand right now? Try this simple Cake Pan Converter!

Instructions

  1. Preheat oven to 300°F (150°C). Place 1 ¼ cup (125 g) raw pistachios on a baking sheet and bring them to the oven to toast for 15 minutes. Let the nuts cool, chop, and set aside for decoration.

  2. Decrease oven temperature to 275°F (135°C). Place four 8 inches (20 cm) cake rings on a baking sheet layered with parchment.

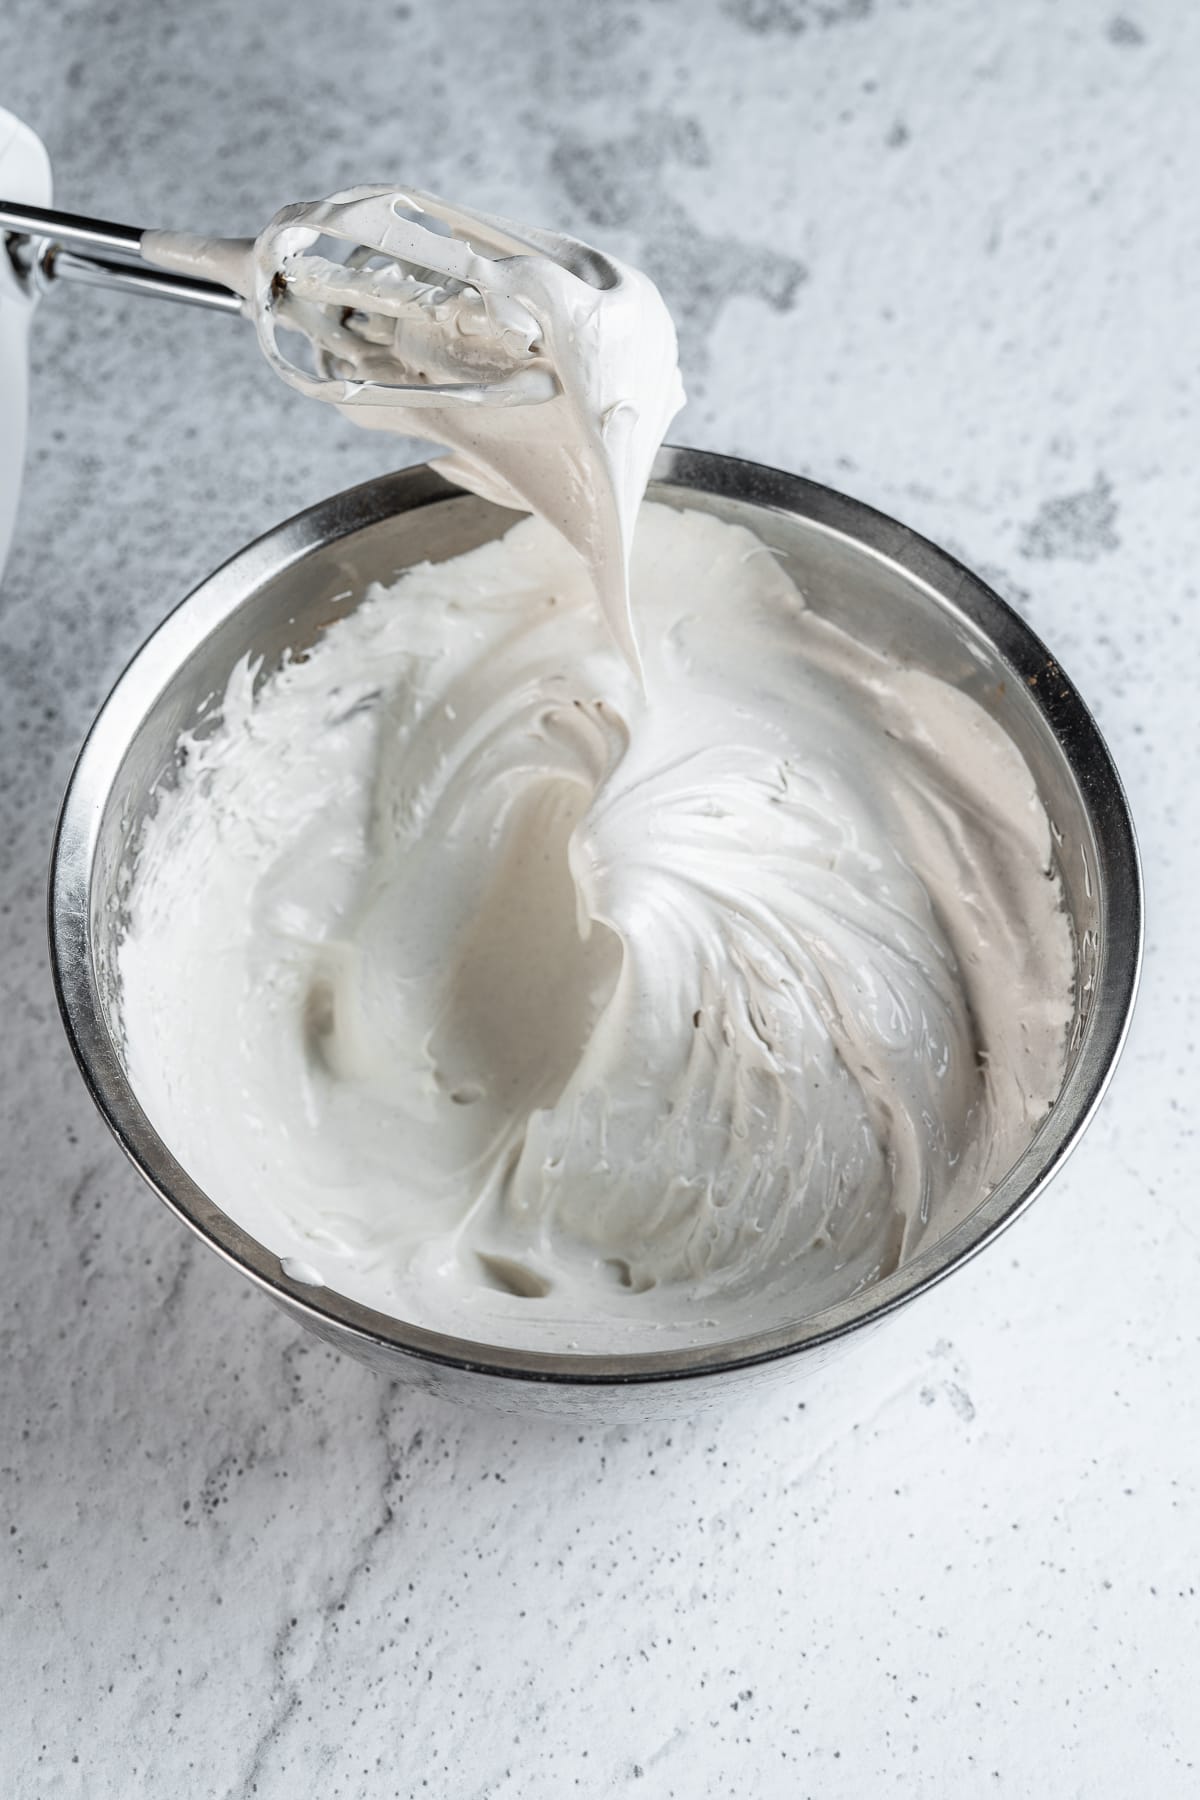
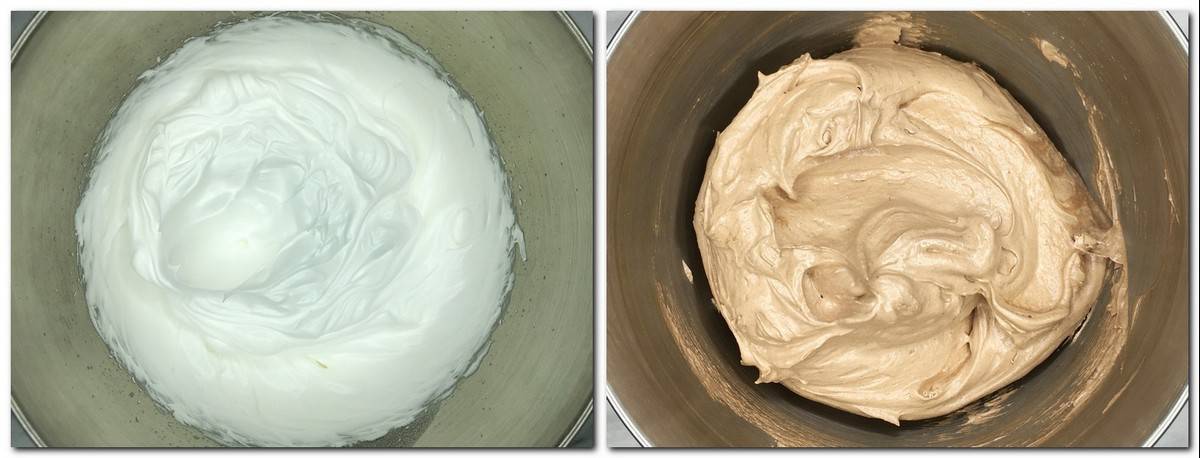
  3. To make pistachio dacquoise, place egg whites with cream of tartar in the bowl of a stand mixer fitted with the whisk attachment. Beat egg whites at medium speed for 1 minute, gradually adding sugar until soft peaks.

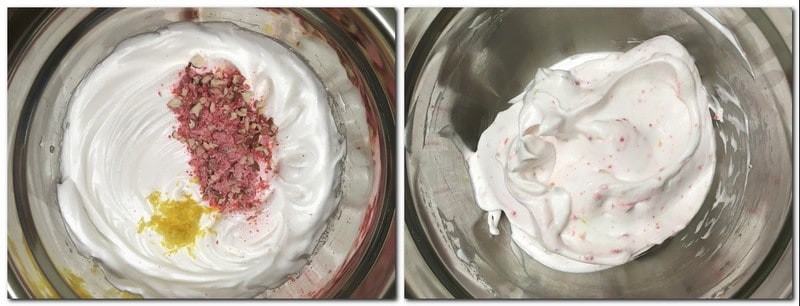
  4. Switch the mixer to high speed and whisk the meringue for about 4 to 5 minutes until stiff peaks. Add chopped raw pistachios and gently mix with a rubber spatula until just combined.

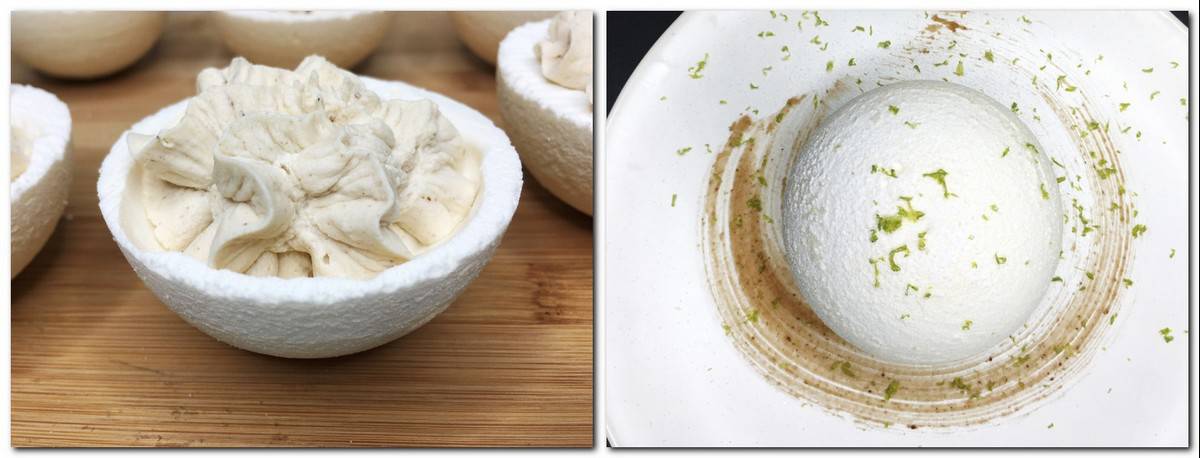
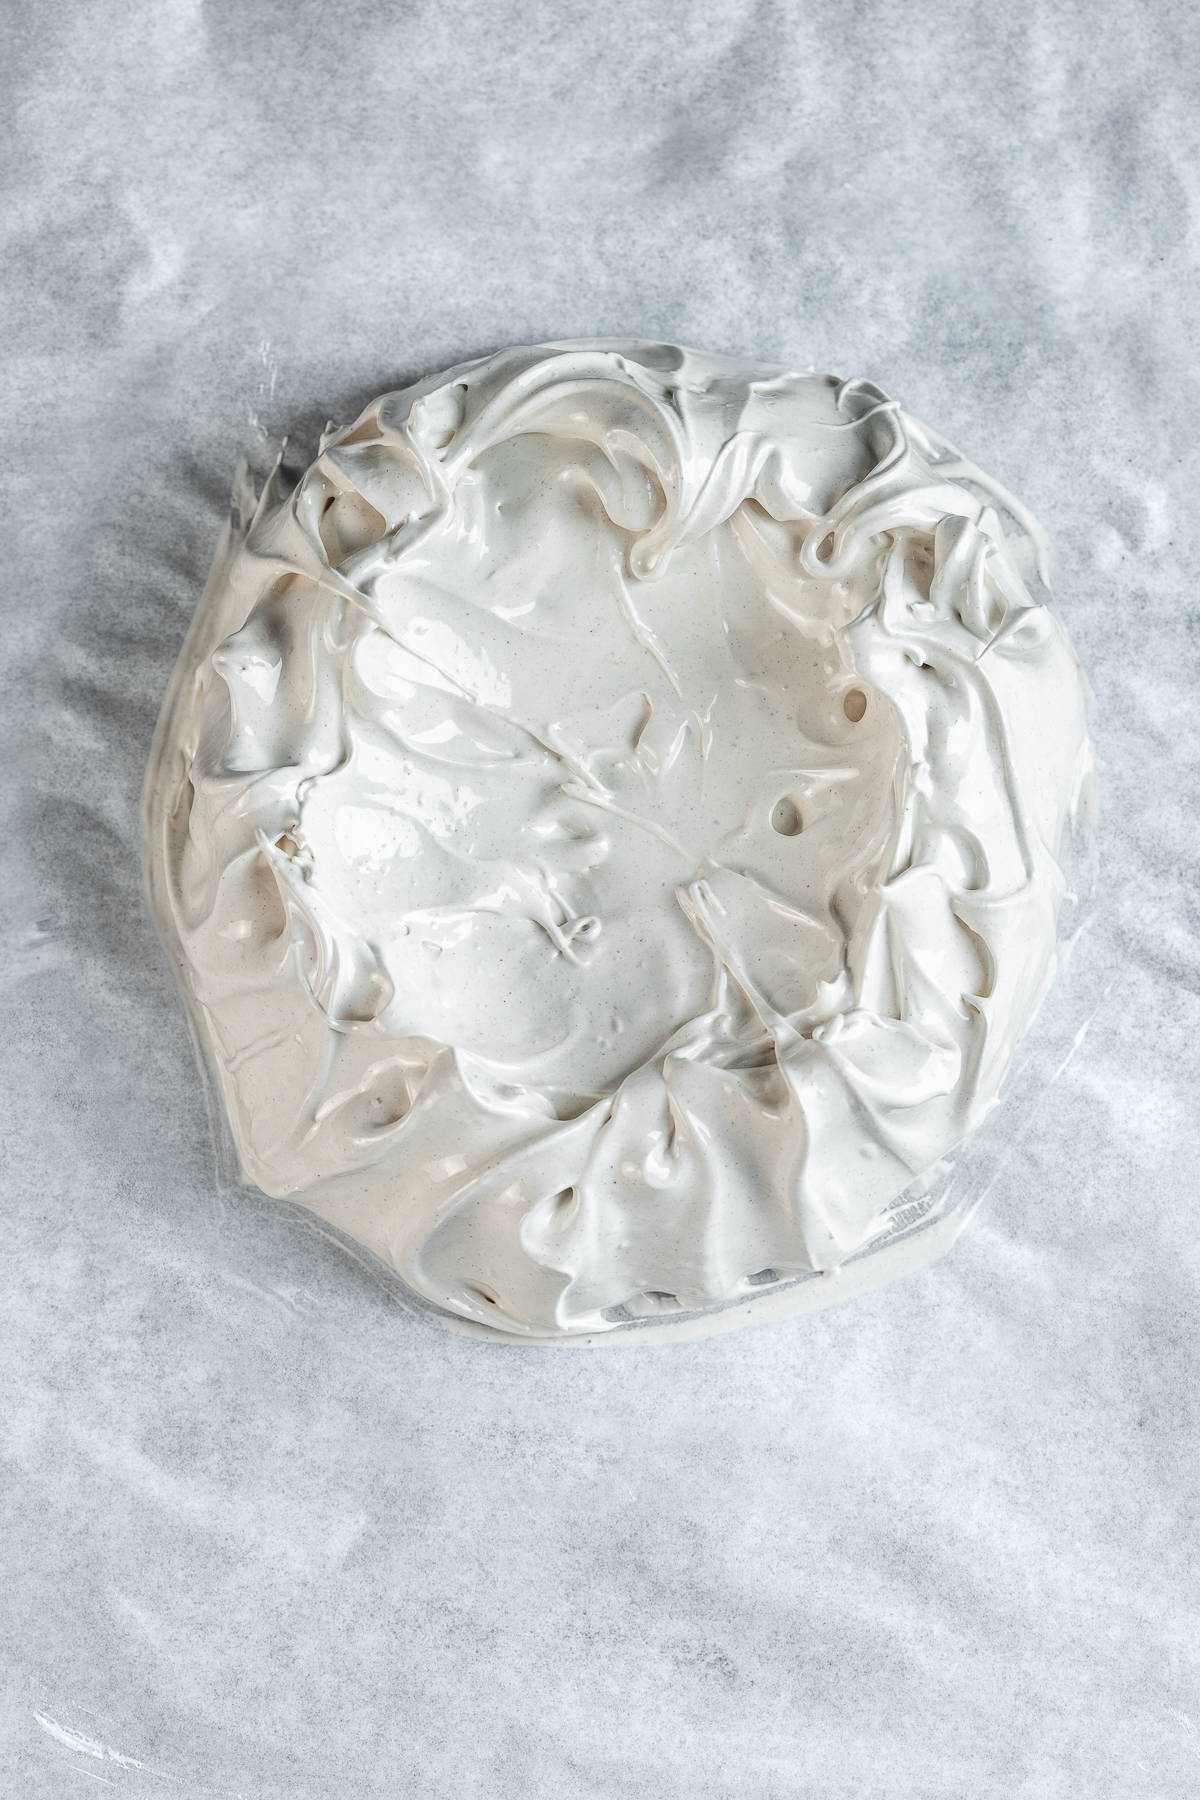
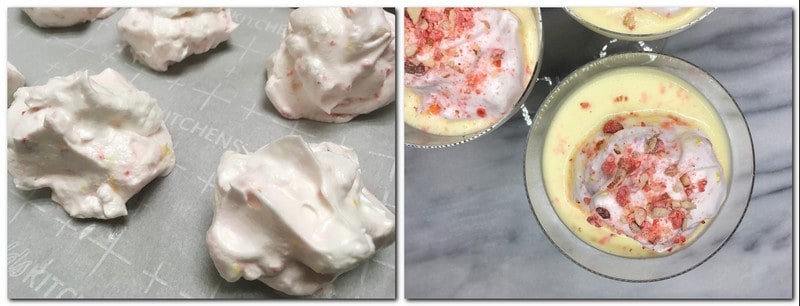
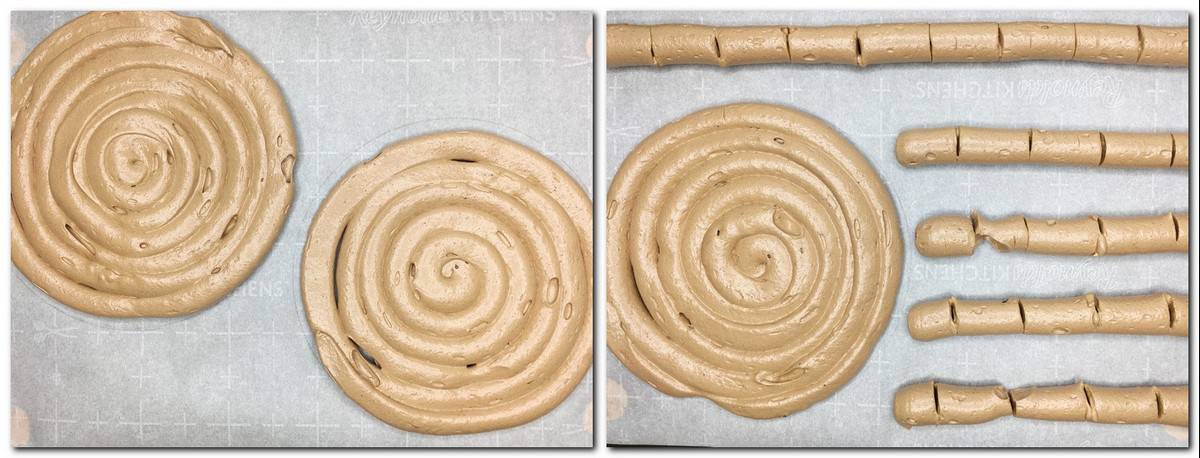
  5. Divide the meringue preparation equally into the prepared cake rings and spread evenly with a small spatula. Instead, you can pipe the pistachio mixture as a spiral using a pastry bag fitted with Ateco plain pastry tip 809.

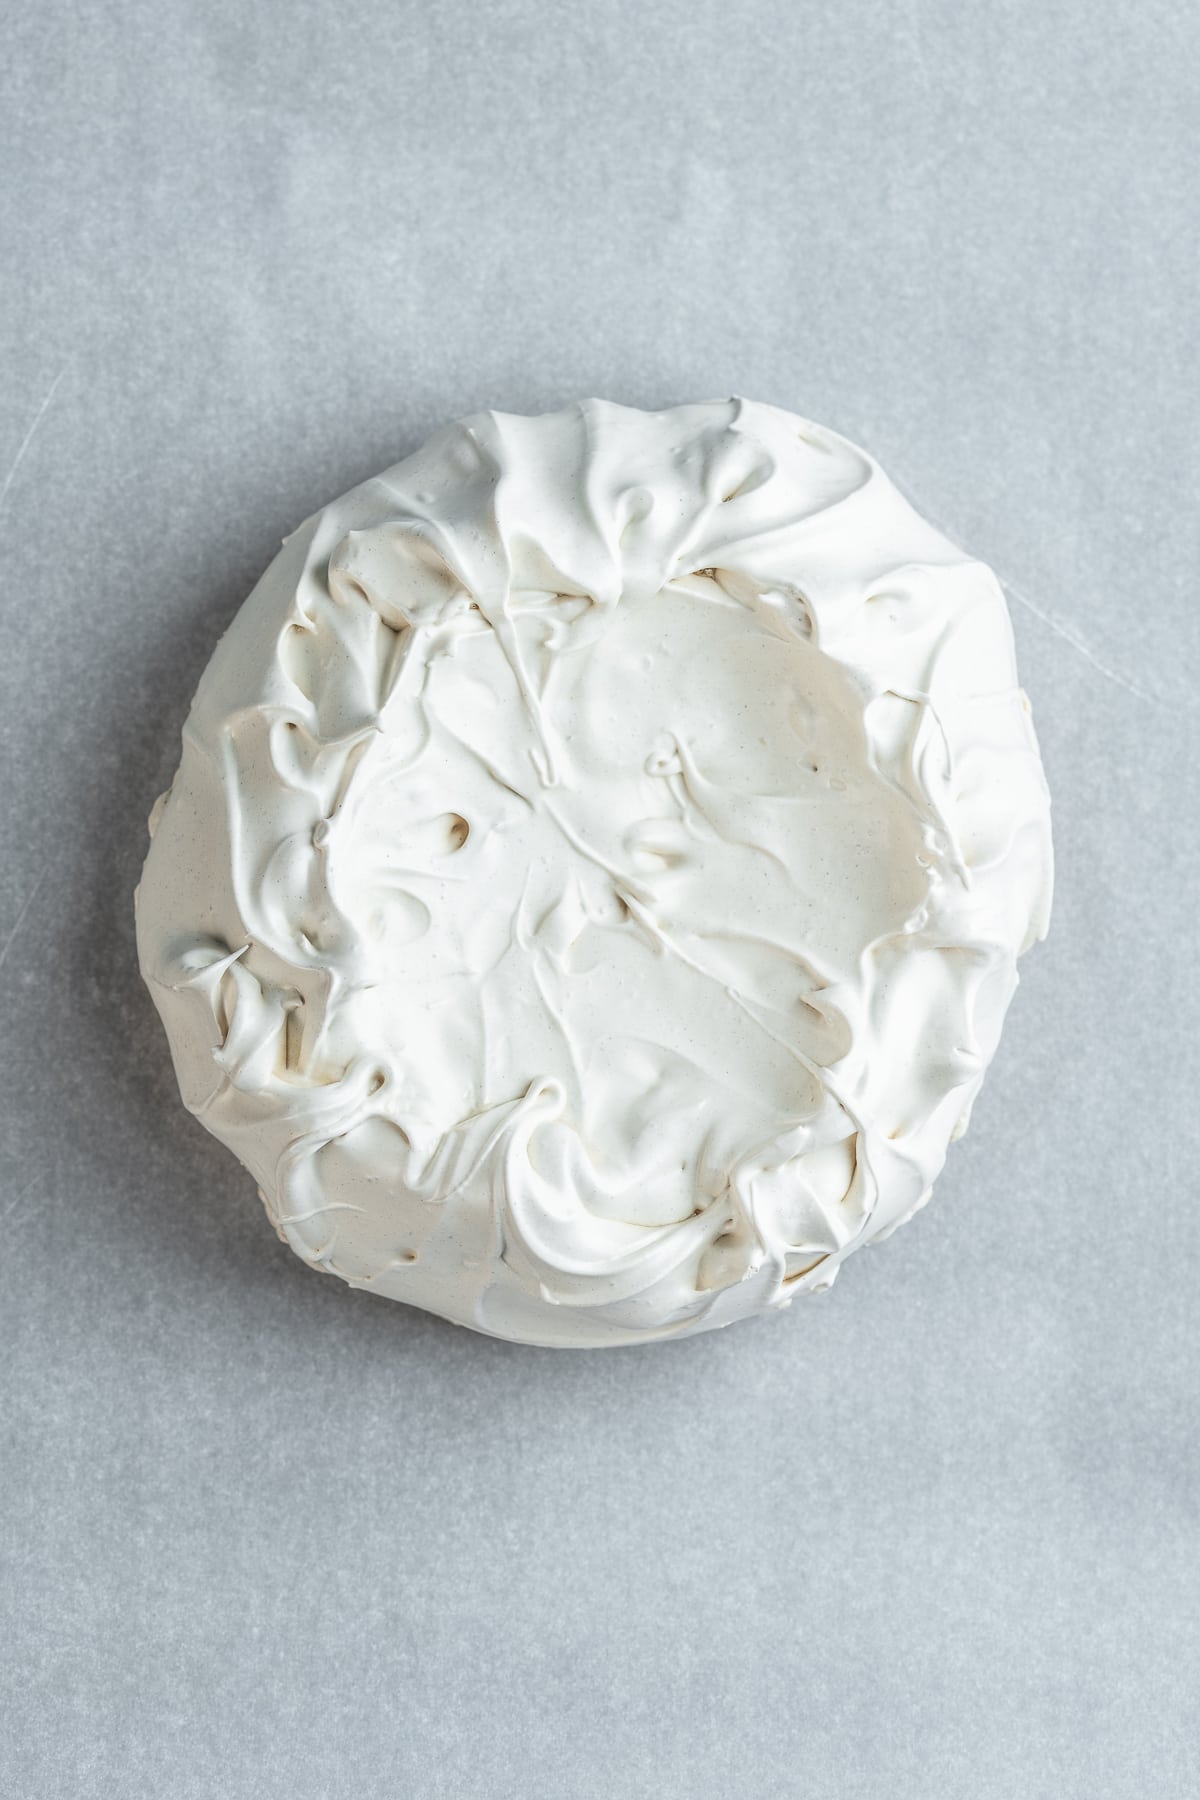
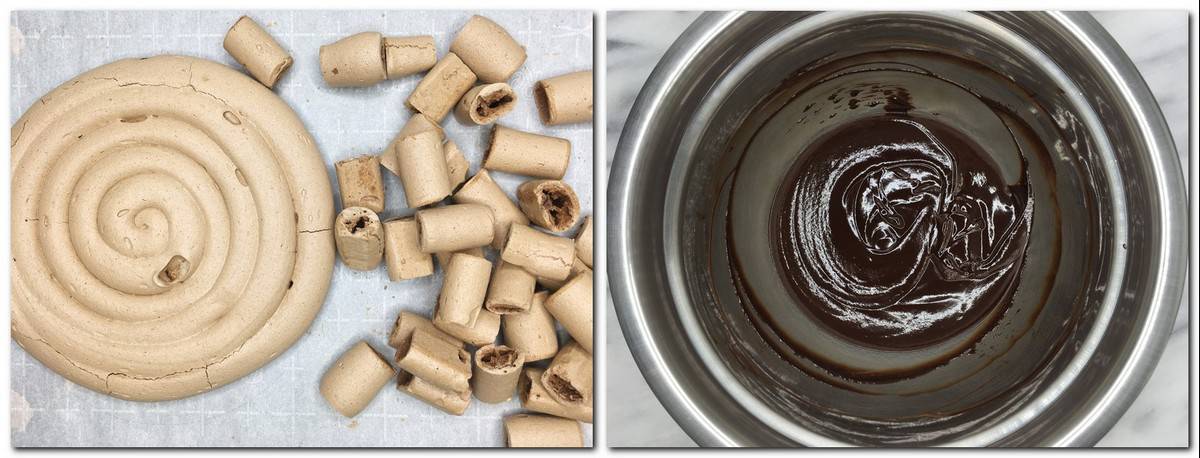
  6. Bake for 1 hour or until lightly golden brown. Let cool for 5 minutes; use a small knife to release the edges of the dacquoise discs, and remove the cake rings. Then, flip each of the discs onto another sheet of parchment paper. Finally, peel off the parchment from the bottom and allow it to cool completely.

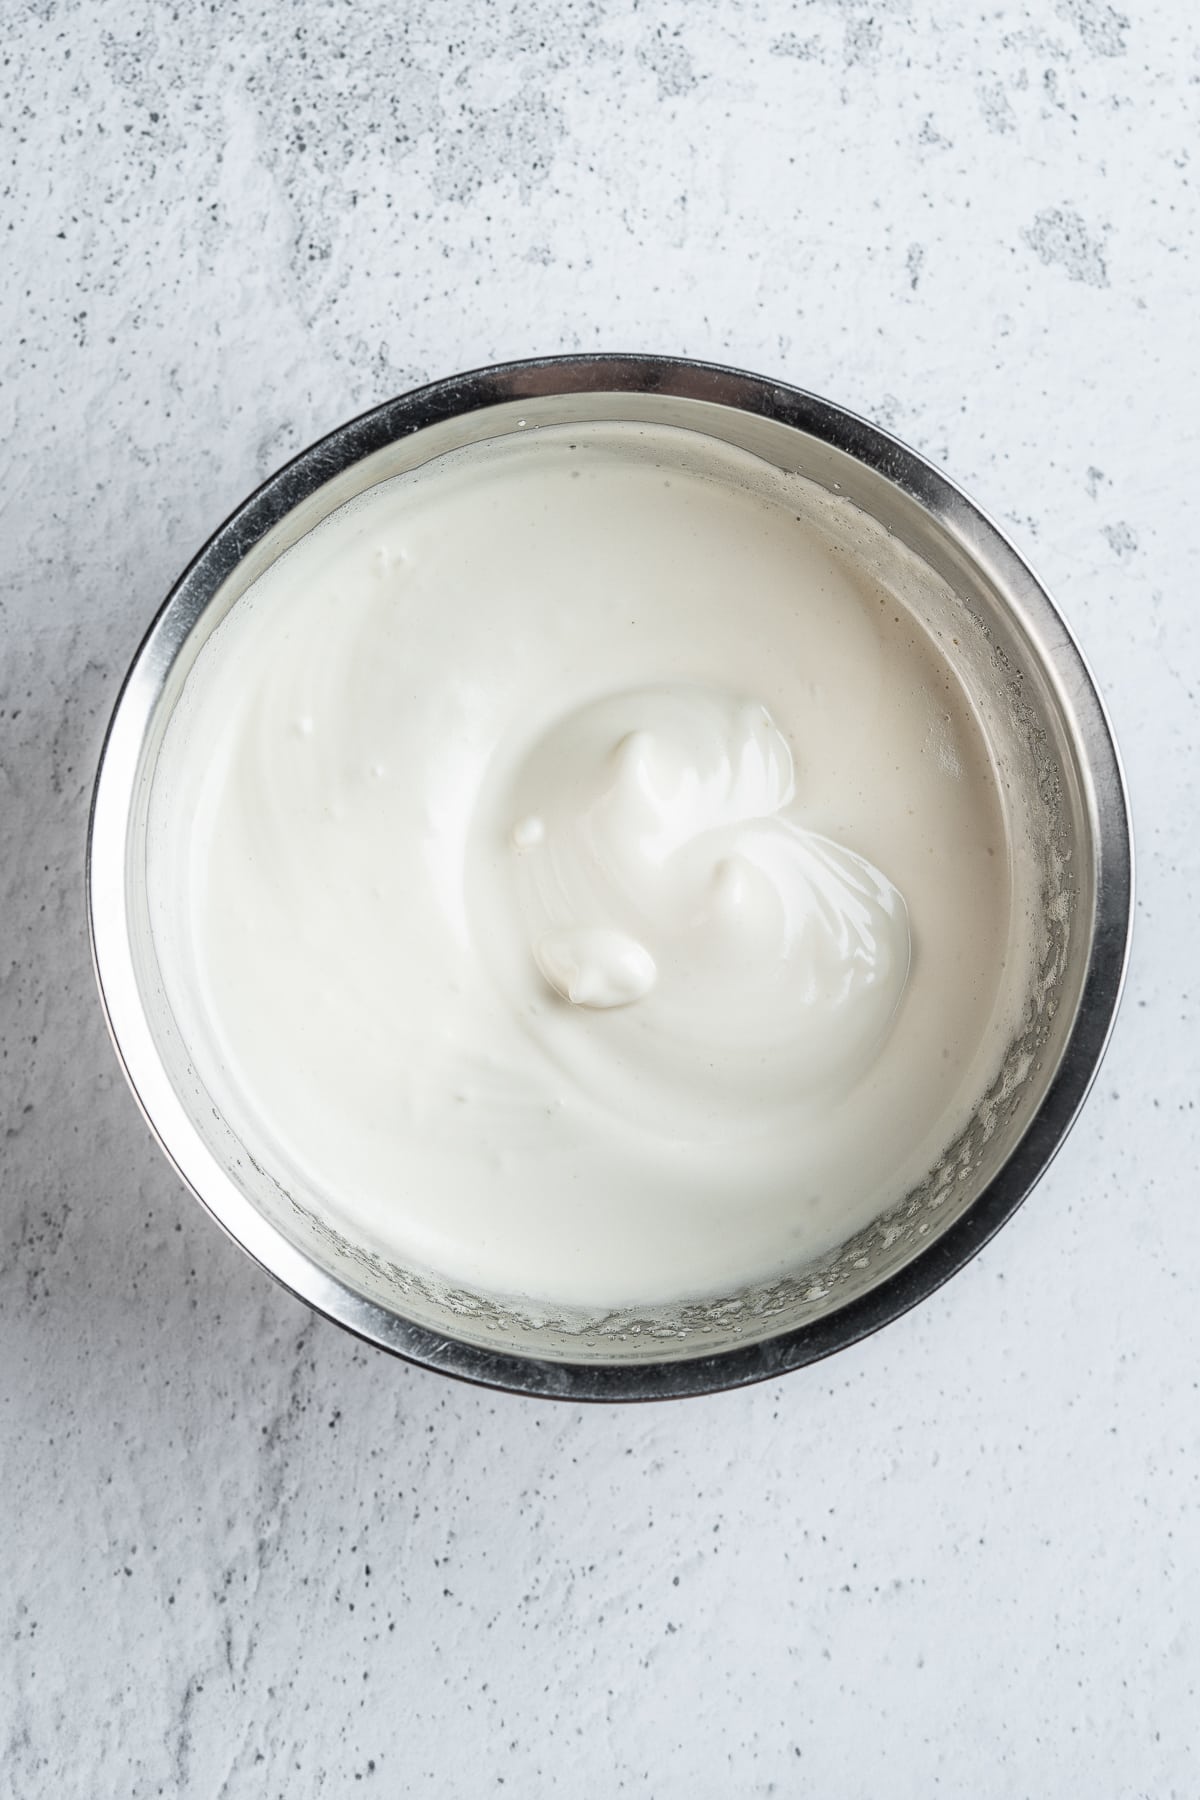
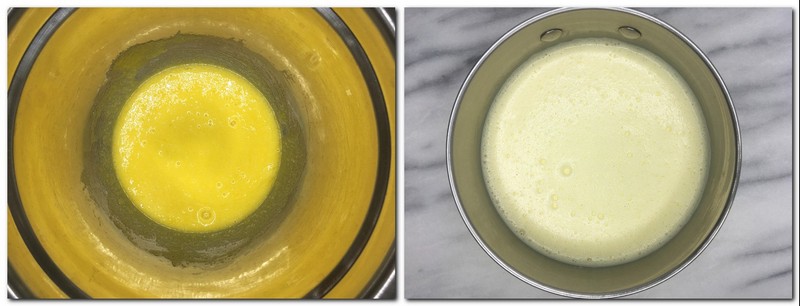
  7. To make the buttercream, whip egg yolks at high speed, using an electric mixer or stand mixer, until pale and doubled in volume, for about 8 to 10 minutes.

  8. Bring water and sugar in a heavy-bottomed saucepan over low heat. Cook sugar syrup until it reaches 240°F (115°C): use a cooking thermometer.

  9. Reset the mixer to low speed, and while whisking, pour the hot sugar syrup in thin streams into the beaten egg yolks and beat until the preparation cools down, for about 4 minutes. In a separate mixing bowl, beat the softened butter at low speed until smooth. Increase speed to medium, add the egg yolk/sugar mixture, and then dark rum. Beat until smooth and creamy.

  10. To assemble the cake, place a cake board on a flat surface and dot a little bit of the buttercream filling in the center of the board. Place the first dacquoise disc on the board and gently press to fix it. Spread buttercream on the top of the disc. Sprinkle with chopped pistachios.

  11. Repeat the process with the remaining three discs and the buttercream. Cover the top and sides of the torte with the remaining buttercream using a bent spatula. Sprinkle it all over with chopped toasted pistachios. Refrigerate overnight.

Notes

  1. Do not over-mix the dacquoise mixture when you add chopped nuts: just combine.
  2. If you have only two cake rings, you will need to make the dacquoise twice (half and half) and bake two discs at a time.
  3. Bake dacquoise one day in advance and store it in an airtight container, or simply cover it with a tea towel.
  4. Bring the cake to the counter 30 minutes before serving for the buttercream to soften. The dessert tastes best at room temperature.

Nutrition

  • Serving Size: 1 slice
  • Calories: 419
  • Sugar: 34.6 g
  • Sodium: 25 mg
  • Fat: 27.6 g
  • Saturated Fat: 12.3 g
  • Carbohydrates: 39.1 g
  • Fiber: 1.9 g
  • Protein: 7.9 g
  • Cholesterol: 199 mg

Thank you for following me on Pinterest, Facebook, and Instagram. Hashtag #bakinglikeachef so I can see your creations.

The nutritional information has been calculated using an online recipe nutrition calculator such as Verywellfit.com and is intended for informational purposes only. These figures should be used as a general guideline and not be construed as a guarantee.

The recipe was adapted from Heny Sison's recipe. It was initially published on December 31, 2021, but has been revised to include improved content and photos.

Cornstarch cookies (Biscoito de Maizena)

Sep 4, 2022 · Leave a Comment

Cornstarch cookies in a glass jar.

These delicious, light-textured Brazilian cornstarch cookies called biscoito de maizena or sequilhos are made with just three ingredients. Naturally gluten-free, you will love their melt-in-your-mouth texture.

Cornstarch cookies in a glass jar

This is one of the old cookie recipes that every Brazilian mother and grandmother use to make and decorate with fork cookies.

[feast_advanced_jump_to]

They are perfect for enjoying your favorite cup of coffee or espresso. What's the best? You will only need one bowl and about 25 minutes of your precious time to make these gems at home.

BAKING ESSENTIALS CHECKLIST

Sign up and get a list of the necessary baking tools and ingredients

FREE DOWNLOAD

Cornstarch cookies slightly resemble other melt-in-your-mouth melting moments cookies and cornstarch shortbread cookies made by adding all-purpose flour to cornstarch.

Halved cornstarch cookies on a white board

Why you should try this recipe

  • Biscoitos de maizena are a staple of each Brazilian household: they have that childhood flavor for every Brazilian.
  • The Brazilian recipes are a must-try. This easy recipe will have you making delicious cookies in no time.
  • Since they are made with cornstarch instead of wheat flour, they are naturally gluten-free.
  • The buttery cookies are customizable and fun to make with kids. The little ones love to make the dough by hand.
  • There is no need to worry about dishes; this one-bowl recipe will have you forgetting all about them.
  • Finally, the cookies make a perfect addition to your holiday cookie box. Just beautifully wrap it and give it as a gift.

Ingredients

Cornstarch cookies ingredients

For ingredients and detailed instructions, refer to the recipe card below.

  • Butter: While the traditional recipe is made with margarine, you can use unsalted butter for the intense buttery taste. To make cookies dairy-free, use vegan butter.

If you use margarine, look for low-flavored margarine. The intense flavor of margarine can change the taste of your sequilhos. So if you want a cheaper option, why not try this?

Make sure to bring the butter or margarine to room temperature about 1 hour before starting.

  • Cornflour is the main ingredient, a flour alternative used to make these cookies. It gives them that melt-in-your-mouth texture.

Don't replace it with potato starch or tapioca starch; you will not get the same result.

  • Sweetened condensed milk works as a sweetened and binding agent to make the cookie dough. You can make it at home: homemade condensed milk is easy and delicious.

Canned sweetened condensed milk by Nestle Carnation, Eagle Brand, and Longevity are all the most trusted brands in the American market.

How to make biscoito de maizena

Preheat the oven to 355 degrees F/180 degrees C. Prepare two baking sheets lined with parchment paper and set them aside.

In a large bowl, place the softened butter and condensed milk and beat with an electric mixer (photo 1).

Slowly add cornstarch, a little bit at a time, mixing with a wooden spoon, then continue mixing with your hands (photo 2). Knead the cookie dough well until smooth and homogeneous.

Photo 1: Butter and condensed milk mixture Photo 2: Ready cookies dough
PHOTO 1 PHOTO 2

Using your hands, roll the dough into small 1-inch balls (2.5 cm).

Place the balls on the prepared baking sheet, leaving a space of about 1 inch / 2.5 cm between the cookies. Flatten the top of each ball with a fork (photo 3).

Pro tip: Transfer the dough to a pastry bag fitted with a pastry tip and pipe the rose-looking cookies. Experiment with different tips and shapes, but you will probably need some skill since the dough is quite hard.

Bake cookies on top of your oven for 10 minutes (photo 4).

Photo 3: Unbaked cookies on parchment Photo 4: Baked cookies
PHOTO 3 PHOTO 4

They are ready once the bottom of the cookies becomes slightly golden. Wait to cool sweet treats on a wire rack and serve.

Biscoito de maizena cookies in a jar

Expert Tips

  1. Measure cornstarch correctly using a kitchen scale or measuring cups with a scoop and level method, the same as measuring the flour.
  2. The best way to make the dough is with a hand mixer; however, you can mix it without one too. Just use a rubber spatula instead.
  3. To make your cookies identical, use a teaspoon or melon baller to spoon the dough. 
  4. Bring the cookies to the fridge while preheating the oven if you make cookies on a hot day. Keep the second batch of cookies in the refrigerator while baking the first batch.
  5. If desired, you can bake cookies on greased cookie sheets (use butter or margarine).
  6. Don't overbake the sequilhos: they should look quite pale. Remove them from the oven once their bottoms begin to turn golden.

Recipe variations

The cornstarch cookie recipe is one of the most famous Brazilian recipes because it is easy to make yet rich in flavor.

Traditionally this uses just three ingredients, but some people like adding a pinch of salt or extra egg yolk for an even more delicious taste.

You can give your cookies a special touch of flavor without difficulty, and this recipe is proof.

  • Add half a teaspoon of lemon zest, a few drops of lemon extract or almond extract, or ¼ teaspoon of ground cinnamon; they will give a delightful flavor and perfume.
  • Add three tablespoons of shredded coconut to the dough to bring an exciting touch to the cookies' texture.  
  • Experiment with adding chocolate chips to make your recipe more special. 
  • Use a guava paste to make sequilhos with guava, also called casadinho in Portuguese. The tropical flavor of the guava paired well with cornstarch creates an exciting taste.
  • Dip your cookies in melted chocolate for an extra special finish, or add some cocoa powder to make chocolate cornstarch cookies.
  • Make traditional cookies with the single fork pattern or flatten them and create an 'X' design on top.
  • Braid or roll cookies and use different shapes, such as hearts, for Valentine's Day.
  • Sandwich cookies with your favorite filling, for example, buttercream, and enjoy.

Storing and freezing

Store maizena cookies in an airtight container in a dry, cool place for seven days.

Can you freeze cornstarch cookies? Don't freeze them. They taste dry and have a crumbly texture when thawed out for eating later down the line.

The best option is to freeze the cookie dough in batches or raw cookies for up to 3 months so that you can use it at a later date.

Recipe FAQ

What are biscoitos de maizena?

Biscoitos de maizena meaning cornstarch cookies, are melt-in-your-mouth famous Brazilian cookies. Made with cornstarch in place of regular flour, they are naturally gluten-free.

Do you have to chill the dough?

You don't need to chill the dough; bake your cookies right away.

Why did your cornstarch cookies spread?

The problem is that you used too much butter or condensed milk or not enough cornstarch. It is also good to chill the cookies for 30 minutes before baking; this optional step prevents them from spreading out.

Love cookies? Try these next!

  • A couple of French butter biscuits with a tea cup and a white plate on background.
    Palet Breton (French Butter Biscuits)
  • Halved oatmeal craisin cookie with other cookies in the background.
    Oatmeal Craisin Cookies
  • Cookie pieces on parchment with milk chocolate chunks and cookies on a dessert plate.
    Chocolate Chunk Cookie Recipe
  • A baked batch of macaroons on a baking sheet lined with parchment paper.
    Coconut Macaroons: Congolais or Rochers Coco

Want more delicious and beautiful recipes? Subscribe to my newsletter and follow me on Facebook, Pinterest, and Instagram for my latest updates. If you make this recipe, please leave a star rating on the recipe card and comment below!

Print

Recipe card

Cornstarch cookies (Biscoito de Maizena)

Cornstarch cookies in a glass jar.
Print Recipe
Save Recipe Recipe Saved

5 Stars 4 Stars 3 Stars 2 Stars 1 Star

No reviews

These delicious, light-textured Brazilian cornstarch cookies called biscoito de maizena or sequilhos are made with just three ingredients. Naturally gluten-free, you will love their melt-in-your-mouth texture.

  • Author: Irina Totterman
  • Total Time: 25 minutes
  • Yield: 35 cookies 1x
  • Category: Cookies
  • Method: Baking
  • Cuisine: Brazilian
  • Diet: Gluten Free

Ingredients

Scale
  • ½ can (197 g) sweetened condensed milk
  • 2 cups + 1 ½ tablespoons (250 g) cornstarch
  • 3.5 oz. (100 g) unsalted butter, softened

Instructions

  1. Preheat the oven to 355 degrees F/180 degrees C. Prepare two baking sheets lined with parchment paper and set them aside.

  2. In a large bowl, place the softened butter and condensed milk and beat with an electric mixer. Slowly add cornstarch, a little bit at a time, mixing with a wooden spoon, then continue mixing with your hands. Knead the cookie dough well until smooth and homogeneous.

  3. Using your hands, roll the dough into small 1-inch balls (2.5 cm). Place the balls on the prepared baking sheet, leaving a space of about 1 inch / 2.5 cm between the cookies. Flatten the top of each ball with a fork.

    Extra tip: if desired, transfer the dough to a pastry bag fitted with a pastry tip and pipe the rose-looking cookies. Experiment with different tips and shapes, but you will probably need some skill since the dough is quite hard.

  4. Bake cookies on top of your oven for 10 minutes. They are ready once the bottom of the cookies becomes slightly golden. Wait to cool sweet treats on a wire rack and serve.

Notes

  1. Measure cornstarch correctly using a kitchen scale or measuring cups with a scoop and level method, the same as measuring the flour.
  2. The best way to make the dough is with a hand mixer; however, you can mix it without one too. Just use a rubber spatula instead.
  3. To make your cookies identical, use a teaspoon or melon baller to spoon the dough. 
  4. Bring the cookies to the fridge while preheating the oven if you make cookies on a hot day. Keep the second batch of cookies in the refrigerator while baking the first batch.
  5. If desired, you can bake cookies on greased cookie sheets (use butter or margarine).
  6. Don't overbake the sequilhos: they should look quite pale. Remove them from the oven once their bottoms begin to turn golden.

Nutrition

  • Serving Size: 1 cookie
  • Calories: 66
  • Sugar: 3.1 g
  • Sodium: 8 mg
  • Fat: 2.8 g
  • Saturated Fat: 1.8 g
  • Carbohydrates: 9.6 g
  • Fiber: 0.1 g
  • Protein: 0.5 g
  • Cholesterol: 8 mg

Thank you for following me on Pinterest, Facebook, and Instagram. Hashtag #bakinglikeachef so I can see your creations.

The nutritional information has been calculated using an online recipe nutrition calculator such as Verywellfit.com and is intended for informational purposes only. These figures should be used as a general guideline and not be construed as a guarantee.

French Almond Cake (L'amandier Gateau)

Sep 4, 2022 · 19 Comments

Sliced French almond cake on a pan's base.

L'amandier is a French almond cake that is super moist and rich. It doesn't have any wheat flour, which makes it gluten-free.

This dessert melts in your mouth with its amazing nutty flavor profile; you will want to pamper yourself with every bite.

Sliced French almond cake on a pan's base

With the variety of flavors and types available, finding a good cake recipe can be difficult, especially for a gluten-free cake.

Not only that, but lots of flourless cakes just don't taste that great.

Most cakes rely on wheat flour for structure, but that is not the case with l'Amandier.

This gluten-free almond cake is made with almond flour, eggs, sugar, and butter.

It is super moist and rich. The almond flour gives it a nutty flavor and a beautiful texture.

If you have a sweet tooth and love almonds, you will fall in love with this simple almond cake.

And you might discover that making French cake recipes is one of the best things in life.

You will love French Chocolate Cake or Yogurt Cake once you make them. Or give the Chocolate Terrine recipe a try. It is gluten-free too.

BAKING ESSENTIALS CHECKLIST

Sign up and get a list of the necessary baking tools and ingredients

FREE DOWNLOAD

Moist almond cake sliced in a few pieces
[feast_advanced_jump_to]

What is l'Amandier?

L'Amandier, Amandier, or Namandier is a French fondant almond cake (or gâteau fondant aux amandes).

L'Amandier is translated as 'almond tree' in English, while namandier means almond cake. L'Amandier and Namandier both refer to the exact cake.

Amandier is a great tasting treat that is easy for your pronunciation. It sounds charming: amandier.

It is a flourless almond cake made with a few pantry staples such as eggs, sugar, butter, and almond flour. It looks like an excellent Jewish Passover cake, but it contains butter.

Interestingly, it has the same weight as eggs, sugar, almond flour, and half of the melted butter. Isn't it easy to remember? 

The origin of the cake is unclear. However, it closely resembles Saint Jacques cake or Tarta de Santiago.

So, l'Amandier is probably the French version of the Spanish almond cake with the addition of melted butter.

Why you should try this recipe

This tasty and lovely cake is made without wheat flour, so it is naturally gluten-free.

There is no doubt that this almond flour cake with the moist crumb will delight the whole family.

A gourmet cake, described as a "treasure of flavors," is totally worth making. It is flavorful, moist, and delicious.

Finally, this almond cake recipe (gateau aux amandes in French) is made within an hour and is perfect for teatime or brunch.

It would even work for a special occasion as an easy and quick birthday cake in terms of taste, texture, and ingredients, but also without much effort.

Just arrange a few fresh berries on top. Now that is a tasty-looking perfect cake.

Everything homemade tastes better, although you can buy l'Amandier cake mix on Amazon.

Ingredients

For ingredients and detailed instructions, refer to the recipe card below.

Also, read how to make a cake moist.

French almond cake ingredients

Butter: high-quality unsalted butter is the key ingredient of this moist almond cake. Don't replace it with margarine or brown butter.

Sugar: use granulated sugar or caster sugar to make the recipe. The cake is very sweet, so feel free to decrease the amount of white sugar by 10-20%.

To reach your personal right amount of sweetness, you will need to experiment with the sugar in the recipe next time.

Why next time? Because it is worth trying the authentic recipe first.

Eggs: use large eggs at room temperature. You don't need to separate the egg whites from the egg yolks.

Salt enhances the flavors of the cake, bringing it to the level of a masterpiece.

Almond extract: the recipe calls for bitter almond extract, but you can omit this ingredient if it isn't available.

It is not the same, but you can try to replace the bitter almond extract with vanilla extract.

Almond flour is one of the main ingredients of this ground almond cake. So choose almond flour of the best possible quality.

You can also make the ground almonds yourself by processing whole almonds in a food processor. Leave the skin on for a more intense almond flavor and pronounced taste.

Flaked almonds: use flaked or sliced almonds to decorate the cake. Please avoid slivered or whole almonds since they might sink into the batter while baking.

Powdered sugar or icing sugar is optional to dust the top of the cake.

How to make French almond cake

Preheat the oven to 355 degrees F/180 degrees C. Grease a 9-inch/23 cm springform pan with cooking spray or brush with softened butter.

Then cover the bottom and the sides of the pan with parchment. If allowed, instead, flour it.

Extra tip: if you use a regular cake pan, use precut circle cake pan liners (better than a circle of parchment paper) at the bottom of the pan to facilitate unmolding.

In a small saucepan, melt butter over low heat and let cool to room temperature. Or melt the butter in the microwave.

In a large mixing bowl, beat the egg with sugar and salt with a balloon whisk for 1 to 2 minutes (photo 1). 

Add the bitter almond extract and almond flour and mix until homogeneous. Add the cooled melted butter and gently mix again (photo 2). 

Photo 1: Eggs and sugar mixture Photo 2: Ready cake batter in a bowl
PHOTO 1 PHOTO 2

Pour the batter into the prepared pan (photo 3) and bake in the center of the oven for about 15-20 minutes. 

Using the oven mitts, remove the pan from the oven and sprinkle the surface of the cake with flaked almonds. Then bake again for 15-20 minutes (photo 4).

Photo 3: Cake batter in a pan Photo 4: Baked cake in a pan
PHOTO 3 PHOTO 4

Check the cake's doneness: if the blade of a knife or a cake tester inserted in the center of the cake comes out almost clean, the cake is ready.

Leave to cool in the mold to room temperature, then unmold. Let it cool completely on a wire rack and sprinkle with powdered sugar.

French almond cake close up

Recipe variations

The l'Amandier cake recipe is a traditional French recipe that calls for a few simple ingredients.

Though its flavor profile might seem sufficient, this classic and delicious cake has several variations.

For a hint of lemon, add a teaspoon of lemon extract, lemon juice, orange flower water, or dark rum to the batter.

Also, make a lemon glaze to top the cake or simply sprinkle it with orange or lemon zest.

Or spice up your cake with a pinch of ground cinnamon, ginger, or coriander powder.

You can also personalize this moist almond cake by adding candied fruit or chocolate chips to make it more special.

French chef Christophe Michalak replaces 40% of butter with mascarpone cheese and uses salt butter instead of unsalted.

How would you like that on your cake? So feel free to try the chef's version.

But how to make a flourless chocolate cake, you will need something that is not just cocoa powder.

The French use dark chocolate in their chocolate and almond cake recipe, which gives it a different flavor and taste. Covered with chocolate ganache, it is heavenly delicious.

Equipment

This cake requires a minimum of baking equipment. You will need a small saucepan or microwave-safe bowl to melt the butter.

Forget a hand-held mixer or stand mixer; a large bowl with a hand whisk is enough to make the cake batter. And it really seems like a one-bowl recipe.

You will also need a metal or silicone cake pan (not ceramic or glass), better a special pan - a springform pan - and a pastry brush to butter the tin.

What else? Prepare a wire rack and a dusting wand to decorate the cake.

Storage instructions

The cake tastes even better the next day. Keep it under a cake stand dome in a cool place for two days.

You can also keep it in the fridge for 3 to 4 days, covering it with plastic film or in an airtight container. Then, take the cake out 30 minutes before serving.

To freeze, let the almond cake cool completely, then cover it with double plastic wrap and aluminum foil. Next, bring the cake to the freezer for up to 2 months. 

To thaw, unwrap it and let it defrost on the countertop for 4-6 hours or in the fridge overnight.

Expert tips

  1. If the cake seems too runny after 30-40 minutes of baking, increase the baking time to 45 minutes. Cover the top of the cake with aluminum foil and get the cake more "baked."
  2. Use a 7-inch/18 cm leakproof springform pan to make this small French almond cake taller, or recalculate ingredients with a cake pan converter to keep the height of the cake.

FAQ

Is almond flour and almond meal the same?

The difference between almond flour and meal is mainly in their grind size. Flour has a fine texture and is made with blanched almonds (without skin). Almond meal, on the other hand, is coarse and contains almond skins.

What does almond cake taste like?

Almond cake is an extra soft cake with a delicate almond flavor and taste and melting texture in every bite.

What to serve with French almond cake

Serve French almond cake on its own, with a cup of coffee or tea, or accompany it with vanilla custard.

How many carbs are in flourless almond cake

Flourless almond cake (1 slice) contains 30.7 g of total carbs and 383 calories.

How long does almond cake last?

The almond cake lasts up to 2 days if stored in a cool place or the fridge for 3 to 4 days.

Love almond desserts? Try these next!

  • Fig and almond cake on a serving platter.
    Fresh Fig And Almond Cake Recipe
  • Sliced almond cake covered with flaked almonds on a white platter.
    Best Italian Almond Cake Recipe (Gluten-Free)
  • Almond milk crepes with fresh fruit.
    Almond Milk Crepes
  • A batch of Pink Praline on a stone board.
    Pink Praline - French Pink Pralines

Want more delicious and beautiful recipes? Subscribe to my newsletter and follow me on Facebook, Pinterest, and Instagram for my latest updates. If you make this recipe, please leave a star rating on the recipe card and comment below!

Print

Recipe card

French Almond Cake (L'amandier)

Sliced French almond cake on a pan's base.
Print Recipe
Save Recipe Recipe Saved

5 Stars 4 Stars 3 Stars 2 Stars 1 Star

5 from 5 reviews

L'amandier is a French almond cake that is super moist and rich. It doesn't have any wheat flour, which makes it gluten-free. This dessert melts in your mouth with its amazing flavor profile.

  • Author: Irina Totterman
  • Total Time: 55 minutes
  • Yield: 10 slices 1x
  • Category: Cakes
  • Method: Baking
  • Cuisine: French
  • Diet: Gluten Free

Ingredients

Scale

For the batter:

  • 5 large eggs
  • 1 ¼ cups (250 g) granulated sugar
  • 4.4 oz. (125 g) butter, melted
  • 2 ½ cups + 1 ½ tablespoons (250 g) almond flour
  • 5 drops of bitter almond extract (optional)
  • 1 pinch of salt

For decoration:

  • 1 oz. (30 g) flaked almonds
  • 1 tablespoon powdered sugar

Instructions

  1. Preheat the oven to 355 degrees F/180 degrees C. Grease a 9-inch/23 cm springform pan with cooking spray or brush with softened butter. Then cover the bottom and the sides of the pan with parchment. If allowed, instead, flour it.

    Extra tip: if you use a regular cake pan, use precut circle cake pan liners (better than a circle of parchment paper) at the bottom of the pan to facilitate unmolding.

  2. In a small saucepan, melt butter over low heat and let cool to room temperature. Or melt the butter in the microwave. In a large mixing bowl, beat the egg with sugar and salt with a balloon whisk for 1 to 2 minutes. Add the bitter almond extract and almond flour and mix until homogeneous.  Add the cooled melted butter and gently mix again.

  3. Pour the batter into the prepared pan and bake in the center of the oven for about  15-20 minutes. Using the oven mitts, remove the pan from the oven and sprinkle the surface of the cake with flaked almonds. Then bake again for 15-20 minutes.

  4. Check the cake's doneness: if the blade of a knife or a cake tester inserted in the center of the cake comes out almost clean, the cake is ready. Leave to cool in the mold to room temperature, then unmold. Let it cool completely on a wire rack and sprinkle with powdered sugar. 

Notes

  1. If the cake seems too runny after 30-40 minutes of baking, increase the baking time to 45 minutes. Cover the top of the cake with aluminum foil and get the cake more "baked."
  2. Use a 7-inch/18 cm leakproof springform pan to make this small French almond cake taller, or recalculate ingredients with a cake pan converter to keep the height of the cake.

Nutrition

  • Serving Size: 1 slice
  • Calories: 383
  • Sugar: 26.2 g
  • Sodium: 36 mg
  • Fat: 27 g
  • Saturated Fat: 8.2 g
  • Carbohydrates: 30.7 g
  • Fiber: 2.9 g
  • Protein: 9.5 g
  • Cholesterol: 120 mg

Thank you for following me on Pinterest, Facebook, and Instagram. Hashtag #bakinglikeachef so I can see your creations.

The nutritional information has been calculated using an online recipe nutrition calculator such as Verywellfit.com and is intended for informational purposes only. These figures should be used as a general guideline and not be construed as a guarantee.

Christmas Meringue Spheres

Oct 14, 2021 · 22 Comments

Meringue spheres served on a black slate board with a dessert plate and flowers aside.

Spoil Santa and yourself with these unique sphere mold desserts - meringue spheres - filled with chestnut whipped cream. Resembling snowballs, they make a gorgeous Christmas dessert. Want to serve it all year round? There is such an option too!

A single meringue ball served on a white plate with flowers aside

Indeed, there is something magical in these meringue spheres. Mostly, their uniqueness is that they represent one of the best sphere mold desserts.

The meringue shape and presentation make you wonder about what is inside. Is it a hollow meringue or a meringue ball filled with cream?

I used a chestnut whipped cream, but almost any cream made on the base of whipped cream will work.

At first, this dome meringue resembles a Pavlova dome, a mini-Pavlova dessert.

However, meringue half-spheres are crispy, without a marshmallow center. So, such a modified dessert would be called "à la Mini Pavlova."

You might be thinking that baking this sphere dessert is quite challenging.

Yes, it is at some point, but I have baked them a lot and perfected each step to share with you.

I guarantee that the three-ingredient foolproof meringue recipe below will not leave you a chance to fail during busy Christmas time.

So are you ready for one of the best Christmas desserts?

BAKING ESSENTIALS CHECKLIST

Sign up and get a list of the necessary baking tools and ingredients

FREE DOWNLOAD

[feast_advanced_jump_to]
Meringue spheres on a black platter with flowers and a plate with dessert on the background

Eight tips to make the perfect meringue

Tip #1. Keep a bowl and whisks clean and grease-free. A copper bowl is the best for whipping the meringue since the chemical reaction between the copper and eggs' protein helps egg whites hold their volume.

If you do not have such a bowl, simply use a stainless steel or glass bowl.

Tip #2. Gently separate egg whites from egg yolks: do not let any yolk into the egg whites.

To separate egg whites from egg yolks, crack cold eggs (straight from the fridge) into an egg separator. Please, read on how to separate eggs.

Tip #3. Keep egg whites at room temperature for 1 to 2 hours before you start making the meringue. Room temperature egg whites whip up quicker and easier.

Tip #4. Use caster sugar or superfine baker's sugar because it dissolves quicker. You can also make your superfine sugar using granulated white sugar and a food processor.

Baked meringue domes garnished with cream and fresh fruit on a white platter: Close up

Tip #5. Add sugar gradually, allowing it to dissolve before adding more. To test, rub a bit of meringue and feel no sugar granules in the meringue. 

Tip #6. Beat the meringue at low speed at the beginning and increase the speed to medium-high as you go.

Tip #7. Whisk the meringue till stiff peaks. To test, pull some meringue out on beaters or the whisk attachment on a standing mixer and look at it.

The meringue will curve over, resembling a bird's beak called "bec d'oiseaux" in French. A meringue at this stage will also stand straight up in a peak on your finger.

Moreover, if you turn the bowl upside down, the meringue at the peak stage holds proudly in the bowl!

Tip #8. Use the meringue immediately for the best results; otherwise, it will start breaking down.

A meringue sphere sprinkled with lime zest on a plate with flowers aside

Why you should try this recipe

  1. This meringue dessert has one of the best presentations ever and represents a meringue dessert made in silicone molds.
  2. Meringue balls make a unique Christmas dessert: scatter them on your holiday table as an edible decor or serve them individually as a dessert.
  3. The three-ingredient French meringue recipe is easy to make.
  4. The use of different types of creme to assemble meringue balls opens endless possibilities.
  5. Serving meringue half-spheres instead of spheres makes 12 individually served desserts.

Ingredients

Meringue spheres ingredients in pictures

For ingredients and detailed instructions, refer to the recipe card below.

Egg whites: the recipe calls for large egg whites. Using chilled eggs and an egg separator facilitates the separation of egg whites from the yolks.

Sugar: use caster sugar or make your superfine sugar. Just place the required amount of granulated white sugar in a food processor and grind it for about 1 to 2 minutes until the sugar appears like fine sand.

Icing sugar: make it yourself using a coffee grinder or use store-bought powdered sugar.

Chestnut cream: this French classic makes the whipped cream sweet and nutty.

If you have never tried chestnut cream, you will be surprised to discover that it is a delicious topping for crepes and waffles or to make sandwiched cookies.

Whipping cream: use your favorite brand of whipping cream with at least 35% or more milk fat.

Rum: Use dark rum or brandy. If you have kids, please, omit rum as an ingredient.

Lime: use organic, untreated lime and make the zest with a zester grater. Replace it with the zest of combawa (kaffir lime) or lemon zest.

How to make meringue spheres

Preheat oven to 185 degrees F/85 degrees C.

To make the meringue, beat egg whites in a stand mixer or using an electric mixer till they are mounted.

Gradually add caster (or superfine) sugar and whisk to get the glossy meringue (photo 1).

Stir in the icing (powdered) sugar with a rubber spatula. Place the meringue in a pastry bag with the cut end or Ateco plain pastry tip 806 and push it in the cavities of half-sphere molds.

Smooth the meringue on the whole half-sphere with the back of a teaspoon (photo 2), place silicone molds on the oven rack and bake for two hours.

Photo 1: Meringue in the bowl of a stand mixer Photo 2: Meringue into silicone molds
PHOTO 1 PHOTO 2

Take the meringues out of the oven and let them cool down. Then carefully remove the meringue half-spheres from the molds (photo 3).

To make chestnut whipped cream, whip whipping cream to get whipped cream.

Stir in the chestnut cream and dark rum using a rubber spatula (photo 4).

Photo 3: Baked hemispheres on a brown board Photo 2: Chestnut cream in a bowl
PHOTO 3 PHOTO 4

To assemble meringue spheres, make a small dot with chestnut whipped cream on a serving platter and fix a meringue hemisphere.

Garnish this and another hemisphere with cream (photo 5) and place one on top of another to form a ball.

Sprinkle the meringue dessert with icing (powdered) sugar and lime zest (photo 6). Assemble the rest of the baked hemispheres in the same way.

Photo 5: Baked hemispheres piped with cream Photo 6: Dessert served on a white plate
PHOTO 5 PHOTO 6

Recipe variations

These meringue spheres are filled with chestnut whipped cream wildly used by French chefs.

If you are not a fan of chestnut cream, make whipped cream and flavor it with a few drops of almond extract or one teaspoon of vanilla extract or rose water.

Another option is to make whipped cream scented with orange flower water, like in Banoffee Pie Cups Recipe.

If you are a coffee lover, you will enjoy coffee whipped cream from the recipe for Meringue Cake Merveilleux.

Chocolate lovers will appreciate meringue balls filled with white chocolate whipped cream used in the recipe for Brownie Cake or milk chocolate whipped cream used to pipe Banana Cupcakes.

If you want to serve meringues as half-sphere desserts, garnish meringue domes with whipped cream, top with fresh fruit, and sprinkle with icing (powdered) sugar. It makes a beautiful summertime dessert.

If you want to bring more fun to the dessert, make tinted meringue half-spheres or spheres. Just color the meringue.

It is preferable to use food coloring powder instead of liquid or gel since powder colors do not change the consistency of the meringue.

Add coloring powder with icing sugar to the meringue and mix with a rubber spatula. If the mixture seems streaky, it is okay: it will create beautiful patterns when baked.

Storage

Store the assembled dessert in the fridge for up to 24 hours. It is not recommended to freeze it.

Expert tips

  1. Please, read eight tips to make French meringue above in the post.
  2. Bake meringue half-spheres, placing silicone molds on the oven racks, but not on a baking sheet.
  3. To even the base of the baked meringue half-spheres, use a cheese or zester grater. This way, meringue hemispheres will match perfectly to each other while assembling the dessert.
  4. Make meringue half-spheres in advance and fill them with cream on the day of serving.

Frequently asked question

Can you make the dessert in advance?

You can bake meringue half-spheres even a few days in advance. Then store them on a kitchen counter uncovered, but keep them away from humidity. Fill the meringue hemispheres with cream and decorate when ready to serve.

Love desserts? Try these next

  • French meringue dessert Merveilleux with a fork on a dessert plate.
    French Meringue Dessert Merveilleux
  • Eton mess: crushed meringues topped with strawberries, and cream served on the white plates.
    Ottolenghi's Eton Mess
  • Sliced chocolate terrine shaped as a half-sphere with a fork on a dessert plate.
    Dark Chocolate Terrine (Terrine au Chocolat)
  • French dark chocolate mousse in glasses with a spoon full of mousse.
    French Chocolate Mousse (Mousse au Chocolat)

Want more delicious and beautiful recipes? Subscribe to my newsletter and follow me on Facebook, Pinterest, and Instagram for my latest updates. If you make this recipe, please leave a star rating on the recipe card and comment below!

Print

Recipe card

Christmas Meringue Spheres

Meringue spheres served on a black slate board with a dessert plate and flowers aside.
Print Recipe
Save Recipe Recipe Saved

5 Stars 4 Stars 3 Stars 2 Stars 1 Star

5 from 7 reviews

Spoil Santa and yourself with this unique meringue spheres filled with the chestnut whipped cream. Resembling snowballs, they make a gorgeous Christmas dessert. Want to serve it all-year-round? There is such an option too!

  • Author: Irina Totterman
  • Total Time: 3 hours
  • Yield: 6 1x
  • Category: Cookies
  • Method: Baking
  • Cuisine: French

Ingredients

Scale

For the meringue:

  • 3 egg whites
  • ⅓ cup + 5 ½ teaspoons (100 g) granulated sugar (see note #1)
  • ⅔ cup + 2 tablespoons (100 g) icing (powdered) sugar

For the chestnut whipped cream:

  • 2.6 oz (75 g) chestnut cream
  • ⅔ cup (150 g) whipping cream
  • 1 ½ teaspoons dark rum

For the decoration:

  • 1 tablespoon icing (powdered) sugar
  • 1 lime, zest

* If needed, please refer to Baking Conversion Charts.

Instructions

  1. Preheat oven to 185 F/85 C.
  2. To make the meringue, beat egg whites in a stand mixer or using an electric mixer till they are mounted. Gradually add caster (granulated) sugar and whisk to get the glossy meringue. Stir in the icing (powdered) sugar with a rubber spatula. Place the meringue in a pastry bag with the cut end or Ateco plain pastry tip 806 and push it in the cavities of half-sphere molds. Smooth the meringue on the whole half-sphere with the back of a teaspoon, place silicone molds on the oven rack and bake for two hours. Take the meringues out of the oven and let cool down. Then carefully remove the meringue half-spheres from the molds.
  3. To make chestnut whipped cream, whip whipping cream to get whipped cream. Stir in the chestnut cream and dark rum using a rubber spatula. 
  4. To assemble meringue spheres, make a small dot with chestnut whipped cream on a serving platter and fix a meringue hemisphere. Garnish this and another hemisphere with cream and place one on top of another to form a ball. Sprinkle the meringue dessert with icing (powdered) sugar and lime zest. Assemble the rest of the baked hemispheres in the same way.

Notes

  1. Process granulated white sugar in a food processor for 1 to 2 minutes to make it superfine. 
  2. Please, read eight tips to make French meringue in the post.
  3. Bake meringue half-spheres, placing silicone molds on the oven racks, but not on a baking sheet.
  4. To even the base of meringue half-spheres, use a cheese or zester grater. This way, meringue hemispheres will match perfectly to each other while assembling the dessert.
  5. Make meringue half-spheres in advance and fill them with cream on the day of serving. 

Nutrition

  • Serving Size: 1 meringue sphere
  • Calories: 255
  • Sugar: 40.7 g
  • Sodium: 25 mg
  • Fat: 7.8 g
  • Saturated Fat: 4.8 g
  • Carbohydrates: 44.1 g
  • Fiber: 0 g
  • Protein: 2.3 g
  • Cholesterol: 28 mg

Thank you for following me on Pinterest, Facebook, and Instagram. Hashtag #bakinglikeachef so I can see your creations.

The nutritional information has been calculated using an online recipe nutrition calculator such as Verywellfit.com and is intended for informational purposes only. These figures should be used as a general guideline and not be construed as a guarantee.

The recipe was adapted from http://www.femmeactuelle.fr/. It was originally published on November 27, 2018. The recipe has been revised to include improved content and photos. All posted pictures are mine.

Coconut Macaroons: Congolais or Rochers Coco

Sep 13, 2021 · 40 Comments

A baked batch of macaroons on a baking sheet lined with parchment paper.

Here is a recipe for French coconut macaroons (rochers coco) or congolais that are so easy to make and taste amazing. They are prepared with only 4-ingredients and take 30 minutes from start to finish.

Three baked macaroons on parchment paper

Have you ever heard of these fancy-sounding macaroon cookies called congolais in French, where the main ingredient is coconut?

The word "congolais" translates as "Congolese" in English, meaning residents from the Democratic Republic of the Congo, a former French colony.

The French call coconut macaroons rochers noix de coco, meaning "coconut rocks" in English, or simply rochers coco translated as "coco rocks."

But the most common English name for these cookies is French coconut macaroons.

They are iconic of classic French cuisine. The original recipe does not require sweetened condensed milk.

I have tried to make dozens of recipes for these cookies, with sweetened condensed milk and, without it, shredded coconut macaroons and made with desiccated coconut.

And I believe that I finally found a recipe for the best coconut macaroons without condensed milk.

These are my favorites. They are chewy on the inside and crisp and golden brown on the outside.

They are incredibly easy and quick to make. You will make perfect coconut macaroons following this step-by-step congolais recipe, and your cookies will look as pretty as mine.

Could you imagine that there is a National holiday devoted to coconut macaroons?

For example, National Macaroon Day is celebrated annually on May 31st.

BAKING ESSENTIALS CHECKLIST

Sign up and get a list of the necessary baking tools and ingredients

FREE DOWNLOAD

[feast_advanced_jump_to]
A small batch of French coconut macaroons on a marble table

What are coconut macaroons?

Macaroon, known as "congolais" or "rocher coco" in France, is a coconut cookie (rare almond cookie) made with sugar and egg whites.

Interestingly, the word "macaroon" comes from Italian maccarone meaning "paste."

But the true macaroons meaning behind this delicacy doesn't start until you take your first bite into its sweetness.

What's the difference between a coconut macaroon and a macaron?

Macaroon and macaron are classified as cookies, but they are pretty different.

Macaroon is a coconut-based cookie with a crisp and chewy exterior and a moist and chewy interior. Macaron is a different thing; it is a meringue-based cookie.

The correct macaroons pronunciation is "mac-uh-ROONs," while macarons pronunciation is "mac-uh-RONs."

You can easily spend hours in the kitchen stress-making French macarons.

Making French macaroons takes less than 30 minutes. Now, what would you choose to make?

Coconut macaroon cookies or rochers coco on a wooden board

Why you should try this recipe

This coconut macaroon recipe takes just minutes and can be made with simple ingredients found in your kitchen pantry.

By the way, it is a perfect way to use leftover egg whites. 

These delicious French coconut cookies are naturally gluten-free and are perfect for people with gluten intolerance.

These cookies are so adorable that you could make them with the family for a fun day baking.

You can quickly scale the recipe up or down depending on how many people you plan to serve.

So these little treats will be perfect for celebrating any occasion, and even small children can easily master the recipe.

Finally, if you want to give your favorite person a sweet treat during the holiday season, these best macaroons will make their mouths water.

Just pack them in an elegant box or jar and tie them with a stunning ribbon for the perfect present.

Ingredients

Coconut macaroons ingredients in pisctures

For ingredients and detailed instructions, refer to the recipe card below.

Shredded coconut: it is the star of this simple macaroon recipe. Please, don't confuse shredded coconut with much larger coconut flakes.

Fine-textured desiccated coconut can be used in place of the coarser, shredded coconut for the fluffier variety. This will give you a more compact cookie.

Once you open the coconut, please keep it in an airtight bag in the fridge or even in the freezer.

Please, choose unsweetened coconut over the sweetened one.

Sugar: use granulated sugar or caster sugar to make these fancy-ish sounding cookies - congolais.

Egg whites: the recipe calls for large egg whites. Separate them from egg yolks while the eggs are chilled. Use an egg separator if desired.

Applesauce: use unsweetened store-bought applesauce.

How to make coconut macaroons

Heat oven to 430 degrees F/220 degrees C. Line a baking sheet with parchment paper.

Place coconut and sugar in a large bowl. Add egg whites and applesauce and mix all with a large rubber spatula, and then by hand (photo 1).

Heat the mixture in a bain-marie/water bath until it reaches 122 degrees F/50 degrees C, stirring with a wooden spoon (photo 2).

Photo 1: Coconut mixture in a bowl Photo 2: Mixture in a bowl over water bath
PHOTO 1 PHOTO 2

Using a medium cookie scoop, a small ice cream scoop, or two spoons, scoop the coconut mixture into the prepared baking sheets.

Space the little mounds about 2 inches/5 cm apart (photo 3). Bake the macaroons for 6 to 7 minutes until golden brown.

Rotate the cookie sheets from front to back halfway through the baking time to ensure even baking.

Remove cookies from the oven and let cool on the baking sheet for about 5 minutes (photo 4).

Then transfer them to the cooling rack (aka wire rack) to cool them completely.

Photo 3: Scooped mixture on the parchment paper Photo 4: Baked cookies on the parchment
PHOTO 3 PHOTO 4

Recipe variations

Coconut macaroons recipes call for a variety of ingredients and methods to create your perfect cookies.

You can find them with or without condensed milk, as well as vanilla extract and almond extract too.

Some recipes call for coconut extract to enhance the coconut flavor of cookies.

Still, the choice of macaroons is a personal one. Some people like them plain, while others prefer the added chocolate flavor in their cookie treats.

Try drizzling or dipping yours in dark melted chocolate.

For now, just melt some chocolate in a double boiler or a microwave-safe bowl, stirring every 30 seconds. Then dip the bottoms of the macaroons in chocolate.

When you finish making the chocolate-dipped macaroons, be sure to shake off chocolate excess and place them on a lined baking sheet.

Refrigerate for a few minutes for the chocolate to set. This extra step is optional, though.

Dark chocolate is always a favorite, but you can't go wrong with milk or white chocolate either.

You can also add in some extra steps for an even more amazing treat during the holiday season.

For example, make sprinkle-loaded macarons: add one tablespoon sprinkles to the coconut macaroon dough. Then proceed with the recipe.

Or make jam-filled coconut rocher cookies. Just place a thin layer of coconut mixture onto the baking tray, add a bit of jam to the center, and top off with more coconut mixture.

You may need to use your hands to pat the mixture into any gaps.

Storing and freezing

Coconut macaroons can be stored in an airtight container at room temperature for 3 to 4 days or in the refrigerator for one week.

There are two options to freeze macaroons: before and after baking.

Option 1: before baking 

Place macaroons in an airtight container with parchment paper between each layer to prevent cookies from sticking together.

Bake frozen cookies, but add 2 to 4 extra minutes to the baking time.

Option 2: after baking: 

Keep macaroons on a baking sheet and freeze them. Once the cookies are frozen, transfer them to a Ziploc freezer bag and keep them for one month.

Thaw cookies at room temperature for 2 to 3 hours.

Expert tips

  1. 40 g egg whites approximately equal to 1 raw fresh egg white from extra large size chicken egg.
  2. If you want to make more compact macaroons, use a food processor to break shredded coconut down. In this case, measure coconut after it has been pulsed.
  3. Do not overbake your cookies, as they can easily dry out.

Frequently asked questions

What is the macaroons meaning?

Macaroons are a type of cookie made with egg whites, sugar, and ground almonds or coconut to give them their signature texture.

What is the coconut macaroons origin?

The macaroons history points to Venetian monks in the 8th or 9th century who made almond cookies for Catherine de' Medici. She was the one who brought the monks' cookies to France in the 16th century. According to another legend, the two French nuns paid for their lodging in Nancy, France, by making pastry and selling their macaroons. Thus, these were first known as u0022Sister's macaroons.u0022

Are these cookies gluten-free?

Coconut macaroons are naturally gluten-free since the recipe doesn't include any flour.

Can you use fresh coconut to make coconut macaroons?

The authentic recipe uses dry coconut. If you have fresh coconut, it is best to use it in another recipe because it will behave differently when baked.

How do you say coconut in French?

Coconut in French is noix de coco, pronounced as /nwa d(ə) ko.ko/.

How to make a bain-marie/water bath?

To make a bain-marie/water bath, fill a saucepan with about 2-3 inch/5-7 cm of water and bring it to a boil. Place the needed ingredients into a smaller saucepan or a bowl and put it on top of the first saucepan (make sure that there is some space between the water and the smaller container). Heat the mixture: once you need to remove the container from a bain-marie, be careful of hot steam!

Love coconut recipes? Try these next!

  • Coconut flan decorated with coconut chips and served on a white plate.
    Flan de Coco (Coconut Flan) Recipe
  • Coconut dacquoise on a cake board.
    Coconut Dacquoise Cake Recipe
  • Louise cake on a cake stand.
    Ottolenghi's Louise Cake With Plum And Coconut
  • Dipped spritz cookies in a cup with the rest of the cookies in the background.
    Spritz Bredele

Browse all the Cookie Recipes

Want more delicious and beautiful recipes? Subscribe to my newsletter and follow me on Facebook, Pinterest, and Instagram for my latest updates. If you make this recipe, please leave a star rating on the recipe card and comment below!

Print

Recipe card

Coconut Macaroons: Congolais or Rochers Coco

A baked batch of macaroons on a baking sheet lined with parchment paper.
Print Recipe
Save Recipe Recipe Saved

5 Stars 4 Stars 3 Stars 2 Stars 1 Star

5 from 15 reviews

Here is a recipe for coconut macaroons (rochers coco) or French congolais that are so easy and taste amazing. They are made with only 4-ingredients and take 30 minutes from start to finish.

  • Author: Irina Totterman
  • Total Time: 30 minutes
  • Yield: 10 macaroons 1x
  • Category: Cookies
  • Method: Baking
  • Cuisine: French
  • Diet: Gluten Free

Ingredients

Scale
  • 3.5 oz (100 g) shredded coconut
  • ⅓ cup + 1 tablespoon (90 g) granulated sugar
  • 2.5 tbsp (40 g) egg whites (see note #1)
  • ⅔ tbsp (10 g) unsweetened applesauce

** If needed, please refer to Baking Conversion Charts.

Instructions

  1. Preheat oven to 430 degrees F/220 degrees C. Line a baking sheet with parchment paper. Place coconut and sugar in a large bowl. Add egg whites and applesauce and mix all with a rubber spatula, and then by hand. Heat the mixture in a bain-marie/water bath until it reaches 122 F/50 C, stirring with a wooden spoon.
  2. Using a medium cookie scoop, a small ice cream scoop, or two spoons, scoop the mixture into a baking sheet, placing 2 inches/5 cm apart. Bake the macaroons for 6 to 7 minutes until golden brown. Rotate the baking sheet from front to back halfway through the baking time to ensure even baking. Remove cookies from the oven and let them cool on the baking sheet for about 5 minutes. Then transfer them on a wire rack to cool completely.

Notes

  1. 40 g egg whites approximately equal 1 raw fresh egg white from an extra large-sized chicken egg.
  2. If you want to make more compact macaroons, use a food processor to break shredded coconut down. In this case, measure coconut after it has been pulsed.
  3. Do not overbake your cookies, as they can easily dry out.
  4. Coconut macaroons can be stored in an airtight container at room temperature for 3 to 4 days.

Nutrition

  • Serving Size: 1 macaroon
  • Calories: 72
  • Sugar: 9.8 g
  • Sodium: 6 mg
  • Fat: 3.4 g
  • Saturated Fat: 3 g
  • Carbohydrates: 10.7 g
  • Fiber: 0.9 g
  • Protein: 0.8 g
  • Cholesterol: 0 mg

Thank you for following me on Pinterest, Facebook, and Instagram. Hashtag #bakinglikeachef so I can see your creations.

The nutritional information has been calculated using an online recipe nutrition calculator such as Verywellfit.com and is intended for informational purposes only. These figures should be used as a general guideline and not be construed as a guarantee.

The recipe was adapted from Christophe Felder at www.camille-patisserie.com. It was originally published on March 03, 2019. The recipe has been revised to include improved content and photos. All posted pictures are mine.

Gluten-free Rhubarb Crisp

Aug 27, 2021 · 10 Comments

Baked rhubarb with oatmeal crisp and a scoop of ice cream on a white dessert plate.

This gluten-free rhubarb crisp is simple and absolutely delicious. It is a perfect spring and summer dessert with rich and tart rhubarb, and flourless oatmeal crisp served with a scoop of vanilla ice cream on top.

Baked rhubarb with oatmeal crisp and a scoop of ice cream on a white dessert plate

You definitely have to make this flavor-packed rhubarb crisp to catch the rhubarb season.

I am not used to cooking or baking rhubarb, and this is my first recipe on the blog featuring rhubarb.

Some time ago, I learned that rhubarb mixes just as well with savory dishes and sweet desserts.

I found recipes integrating seasonal rhubarb with green and quinoa salads and salsa to accompany meats.

But my choice is falling on one of the best and easiest spring and summer desserts - rhubarb crisp.

Simple to make, this flourless rhubarb dessert takes a few minutes to prepare. 

Gluten-free, egg-free, peanut-free, in short, a treat that everyone will love.

This crisp is my other favorite dessert resembling one of the crumble recipes - Strawberry Crumble.

BAKING ESSENTIALS CHECKLIST

Sign up and get a list of the necessary baking tools and ingredients

FREE DOWNLOAD

[feast_advanced_jump_to]
Gluten-free oatmeal crisp with baked rhubarb on a spoon over a glass dish

Why you should try this recipe

  1. This rhubarb recipe makes a perfect summer dessert to enjoy in early summer, to be precise, from April to June.
  2. Almond flour crispy topping is a basic perfect crisp that can be used with other fresh fruit of your choice. 
  3. The recipe is gluten-free; so, it is safe for those with gluten sensitivity and celiac disease.
  4. Made in advance, it is a perfect entertaining treat to bring to potlucks.
  5. Served with a scoop of ice cream, this crisp makes a decadent dessert to finish a dinner party.

Ingredients

Rhubarb crisp ingredients in pictures

For ingredients and detailed instructions, refer to the recipe card below.

Rhubarb: use fresh rhubarb plants or replace them with frozen rhubarb if the fresh rhubarb is out of season. Green, pink, or red stalks are equally delicious.

Sugar: use granulated sugar or caster sugar for the rhubarb filling and golden brown sugar to make crip topping.

Heavy cream: the recipe calls for heavy cream with at least 36% fat content. You can replace it with whipping cream (30% fat content).

Cream added in the rhubarb filling is responsible for the smooth side of the dessert.

Vanilla extract: use Madagascar Bourbon Pure vanilla extract since it is the most full-flavored, among other vanilla extracts. Use alcohol-free vanilla flavor if you prefer.

Oatmeal: make sure to use certified gluten-free instant oatmeal to make this crisp.

Almond flour: it is used to keep the recipe gluten-free. Replace almond flour with hazelnut flour if desired.

Butter: use unsalted butter melted and slightly cooled. It helps bring the dry ingredients together into clumps.

Salt: a pinch of salt reduces the acidity of the rhubarb.

Crunchy, crisp, and flourless rhubarb served on two plates with an ice cream spoon

How to make rhubarb crisp

Preheat the oven to 355 degrees F/180 degrees C. To make crisp topping, place oatmeal, brown sugar, almond flour, and melted butter in a medium bowl and combine (photo 1).

To prepare rhubarb filling, wash and dice rhubarb into 1-inch/2.5 cubes.

In a separate large bowl, combine rhubarb, granulated sugar, cream, vanilla extract, salt (photo 2).

Photo 1: Gluten-free crisp topping in a bowl Photo 2: Rhubarb mixture in a bowl
PHOTO 1 PHOTO 2

Pour the rhubarb mixture into a 9.5-inch/24 cm glass pie baking dish. Sprinkle the crisp over the rhubarb preparation (photo 3).

Bake in the low half of the oven for 40 to 50 minutes or until crispy brown and bubbly (photo 4). Serve it hot, warm, or cold with a scoop of ice cream.

Photo 3: Crisp topping on top in a dish Photo 4: Rhubarb dessert in a pan
PHOTO 3 PHOTO 4

Recipe variations

One of the most common dessert combinations is rhubarb and strawberry.

For a twist on a classic, make gluten-free strawberry rhubarb crisp. Just replace one-third of the rhubarb with fresh strawberries that have been hulled and quartered.

Storage

Rhubarb crips is best eaten freshly baked. Store crisp leftovers covered with plastic film in the refrigerator for up to two to three days.

You can also freeze the unbaked dessert made in a metal or disposable foil pan (NOT a glass dish) wrapped in plastic for up to two days.

On the day of serving, bring it directly from the freezer into the oven and bake, adding a few extra minutes.

Expert tips

  1. Cut stalks of rhubarb into 1-inch/2.5 cm good-sized chunks to keep their shape after baking. You can also cut rhubarb into thinner slices if you prefer. 
  2. Use any oven-safe baking dish for baking the rhubarb crisp.  To re-calculate the amount of ingredients, use this simple Cake Pan Converter.
  3. You can also make the dessert in individual ramekins, placing them on a baking sheet. It will catch the fruit bubbling while baking. You may need to decrease the baking time by 5 to 10 minutes.
  4. Add a few chopped walnuts, chopped pecans, or slivered almonds to the crumble topping if desired.
  5. To reduce the amount of sugar in crips topping, replace some part of it with a few chopped Medjool dates.

Frequently asked questions

What's the difference between crisp and crumble?

Some people use "crisp" and "crumble" interchangeably, but there is a tiny difference between them. Crisp is more crunchy and made with oats, while crumble is mostly made without oats.

Are quick oats and instant oatmeal the same?

Quick oats and instant oatmeal are different forms of oats produced using two different cooking methods. Quick oats are rolled old-fashioned whole oat grains that have been steamed and flattened slightly to increase their surface area. Instant oatmeal or instant oats are rolled extra thin, milled finer, and have a moister consistency than quick oats.

Are there a difference between green, red or pink stalks?

Pink and red stems of rhubarb obviously look more attractive, but the pigments that give it this color are flavorless. However, the green stalks are just as delicious as the pink and red ones.

Can you eat rhubarb leaves?

The rhubarb leaves are considered toxic as they contain a toxin called oxalic acid. So make sure to trim them away.

How to make this recipe vegan

To make this rhubarb crisp vegan, replace white and brown sugar with cane sugar (or coconut sugar)and make sure to use dairy-free butter.

Can you make this crisp with frozen rhubarb?

Yes, you can make this crisp using frozen rhubarb, then thawed and drained. Add 1 teaspoon of corn starch as the thickener to the rhubarb filling in this case.

Look for gluten-free desserts? Try these next!

  • Warm strawberry clafoutis desserts resting on a wire rack after baking.
    Easy Strawberry Clafoutis (Clafoutis aux Fraises)
  • French dark chocolate mousse in glasses with a spoon full of mousse.
    French Chocolate Mousse (Mousse au Chocolat)
  • A baked batch of macaroons on a baking sheet lined with parchment paper.
    Coconut Macaroons: Congolais or Rochers Coco
  • French Meringue Cake Merveilleux on a cake round with chocolate shavings and a cup on background.
    French Meringue Cake Merveilleux

Browse all the Gluten-free Dessert Recipes

Want more delicious and beautiful recipes? Subscribe to my newsletter and follow me on Facebook, Pinterest, and Instagram for my latest updates. If you make this recipe, please leave a star rating on the recipe card and comment below!

Print

Recipe card

Gluten-free Rhubarb Crisp

Baked rhubarb with oatmeal crisp and a scoop of ice cream on a white dessert plate.
Print Recipe
Save Recipe Recipe Saved

5 Stars 4 Stars 3 Stars 2 Stars 1 Star

5 from 5 reviews

This gluten-free rhubarb crisp is simple and absolutely delicious. It is a perfect spring and summer dessert with rich and tart rhubarb and oatmeal crisp served with a scoop of vanilla ice cream on top.

  • Author: Irina Totterman
  • Total Time: 1 hour, 5 minutes
  • Yield: 3 1x
  • Category: Glute-free Desserts
  • Method: Baking
  • Cuisine: American
  • Diet: Gluten Free

Ingredients

Scale

For crisp topping:

  • 1 cup (95 g) gluten-free instant oatmeal
  • ⅓ cup + 1 tablespoon (80 g) brown sugar
  • 1 tablespoon (6 g) almond flour
  • 1.4 oz. (40 g) butter, melted

For rhubarb filling:

  • 12.3 oz. (350 g) fresh rhubarb, cut into cubes
  • ⅓ cup (75 g) granulated sugar
  • 2 ½ tablespoons (35 ml) heavy cream
  • ¼ teaspoon vanilla extract
  • 1 pinch of salt

* If needed, please refer to Baking Conversion Charts.

Instructions

  1. Preheat the oven to 355 degrees F/180 degrees C. To make crisp topping, place oatmeal, brown sugar, almond flour, and melted butter in a mixing bowl, and combine.
  2. To prepare rhubarb filling, wash and dice rhubarb into 1-inch/2.5 cubes. In a separate bowl, combine rhubarb, granulated sugar, cream, vanilla extract, salt. Pour the rhubarb mixture into a 9.5-inch/24 cm glass pie baking dish.
  3. Sprinkle the crisp over the rhubarb preparation. Bake in the low half of the oven for 40 to 50 minutes or until crispy brown and bubbly. Serve it hot, warm, or cold with a scoop of ice cream.

Notes

  1. Cut rhubarb into 1-inch/2.5 cm good-sized chunks to keep their shape after baking. You can also cut rhubarb into thinner slices if you prefer. 
  2. Use any oven-safe baking dish for baking the rhubarb crisp.  To re-calculate the amount of ingredients, use this simple Cake Pan Converter.
  3. You can also make the dessert in individual ramekins, placing them on a baking sheet. It will catch the fruit bubbling while baking. You may need to decrease the baking time by 5 to 10 minutes.
  4. Add a few chopped walnuts, chopped pecans, or slivered almonds to the crisp topping if desired.
  5. To reduce the amount of sugar in crips topping, replace some part of it with a few chopped Medjool dates.

Nutrition

  • Serving Size: 1 dessert bowl
  • Calories: 509
  • Sugar: 54.7 g
  • Sodium: 17 mg
  • Fat: 19 g
  • Saturated Fat: 11.2 g
  • Carbohydrates: 79.5 g
  • Fiber: 5.9 g
  • Protein: 6.8 g
  • Cholesterol: 47 mg

Thank you for following me on Pinterest, Facebook, and Instagram. Hashtag #bakinglikeachef so I can see your creations.

The nutritional information has been calculated using an online recipe nutrition calculator such as Verywellfit.com and is intended for informational purposes only. These figures should be used as a general guideline and not be construed as a guarantee.

The recipe was originally published on May 6, 2021. It has been revised to include improved content and photos. All posted pictures are mine. 

Fig And Cinnamon Pavlova

Aug 26, 2021 · 34 Comments

Fig and cinnamon Pavlova on a cake stand lined with parchment paper.

This fig and cinnamon Pavlova is a summer twist on a timeless Australian dessert. It is a stunning meringue combined with praline cream and decorated with fresh figs that are perfect for a special occasion or a dessert for whenever just because.

Fig and cinnamon Pavlova on a cake stand lined with parchment paper.

Have you ever been obsessed with any fruit? You will not believe how much I love figs and how I wait for fig season each year.

[feast_advanced_jump_to]

Once they first appear in a grocery store, I return home with a box of fresh figs each time I go shopping. So, I get the most out of fig season every year.

BAKING ESSENTIALS CHECKLIST

Sign up and get a list of the necessary baking tools and ingredients

FREE DOWNLOAD

After making Fig and almond cake and Fig tart with hazelnut praline, I am up for another sweet summer delight - fig and cinnamon Pavlova.

What is Pavlova?

Pavlova is a white meringue dessert with a gooey, almost toffee-like center topped with traditional whipped cream and fresh fruit. Pavlova dessert is usually served as a whole cake, but mini Pavlovas are another variation.

The origin of Pavlova is considered to be Australia or maybe New Zealand. It depends on who you ask. Australians and New Zealanders are proud of being the first to create the stunning dessert.

However, there is no doubt that the Pavlova cake was named after the Russian ballerina Anna Pavlova.

Fig and cinnamon Pavlova recipe

  • Fig Pavlova with brown sugar and cinnamon is quintessential of the fall season.
  • The recipe is easy and straightforward.
  • It is perfect for birthdays, anniversaries, and other celebrations.

Ingredients

Fig and cinnamon Pavlova ingredients.

For ingredients and detailed instructions, refer to the recipe card below.

  • Egg whites: The recipe calls for large egg whites at room temperature. It is easy to separate egg whites from egg yolks with an egg separator while the eggs are right from the fridge. Then, let egg whites warm up to room temperature for 30 to 60 minutes before you start making the meringue.

Pro tip: If you want to use up your egg yolks, don't miss my Italian pastry cream, Bavarian cream,or crème Anglaise recipes.

  • Sugar: Use regular granulated or caster sugar. Process granulated sugar in a food processor for a few seconds to make it superfine, which helps to whisk the meringue.
  • Brown sugar: Use golden brown sugar or replace it with dark brown muscovado sugar.
  • Ground cinnamon: Use Ceylon ground cinnamon, but if you want to intensify the flavor, you can consider trying Saigon cinnamon.
  • Hazelnut praline: Make hazelnut praline paste yourself or use a store-bought hazelnut praline.
  • Heavy cream: Choose heavy or heavy whipping cream with at least 30% fat content. Whisk the cold cream in a chilled metal bowl for the best results. Keep the empty container in the freezer for about 15 minutes before you start.
  • Pistachios: Use either raw or toasted unsalted pistachios.
  • Figs: Fresh seasonal figs are the stars of this Pavlova.
  • Honey: Use your favorite brand of honey as a topping. Please read my comprehensive guide if you want to learn how to liquify honey.
  • Mascarpone cheese: Use your favorite brand of mascarpone to stabilize whipped cream.
A single slice of fig Pavlova on a dessert plate.

How to make fig and cinnamon Pavlova

Step 1. Heat oven to 250°F (120°C). Get ready a large baking tray covered with parchment paper. Draw a 9-inch circle (23 cm in diameter) with a pencil and turn the baking paper so the drawn circle will face down.

Step 2. To make the meringue, prepare a bain-marie or water bath. In a large bowl, place egg whites, superfine white, and brown sugar, and combine with a hand whisk.

Step 3. Bring the bowl over a water bath and beat egg whites for 4 minutes, using the hand whisk (photo 1). Ensure that the water in the bath is not boiling: it has to simmer.

Step 4. Once the sugar is melted, take the bowl out of the water bath. Transfer the meringue mixture to the bowl of a stand mixer fitted with a whisk attachment.

Step 5. Whisk it at high speed for 5 minutes until the stiff peaks form. Add ground cinnamon and whisk for 20-30 seconds (photo 2).

Sugar and egg white mixture in a metal bowl.

PHOTO 1

Meringue stiff peaks on mixer beaters over the bowl.

PHOTO 2

Step 6. Spoon meringue into the center of the circle on a lined baking sheet. Shape the nest using a palette knife or the back of a spoon. Try to lift the edges of the meringue nest (photo 3).

Step 7. Bake in the preheated oven for 3 hours.

Step 8. Once the meringue is ready, turn the oven off, but do not remove the meringue from the oven. Let it cool with the closed oven door for 2 hours (photo 4). 

Shaped meringue shell on parchment paper.

PHOTO 3

Baked meringue shell on parchment paper.

PHOTO 4

Step 9. To make the praline cream, place cold heavy cream, cold mascarpone cheese, and hazelnut praline in a bowl of the stand mixer and whip cream for 1 minute. Refrigerate it till assembly (photo 5).

Step 10. To assemble Pavlova, cut figs into 1 cm thick rings. Place the cooled Pavlova meringue on a serving dish.

Step 11. Garnish the Pavlova center with the praline cream and arrange fresh figs (photo 6).

Praline mascarpone cream on a bowl.

PHOTO 5

Pavlova topped with cream and fig rounds on a parchment paper.

PHOTO 6

Step 12. Warm up the honey in a water bath, and add raw pistachios. Pour the honey and nuts mixture on top of the Pavlova. Serve immediately.

Fresh fig and Cinnamon Pavlova on a serving plate.

Expert Tips

  1. Ensure a metal bowl is clean and dry before whisking egg whites. Any residual moisture or grease traces prevent egg whites from whisking.
  2. Opt for homemade or store-bought superfine Baker's sugar.
  3. Don't open the oven door during baking.
  4. Avoid over-whisking the praline cream to prevent its splitting. If the cream begins to split, add some cold heavy cream and whisk again.
  5. Refrigerate the praline cream until assembling the dessert. Once you fill the meringue shell with cream and fresh figs, serve immediately.

Recipe variations

The original fig Pavlova recipe, a creation of Yotam Ottolenghi and Helen Goh, is made with dark brown muscovado sugar and flavored with cinnamon, but you can experiment.

  • Pavlova shell: Use different types of sugar, from golden brown sugar to cane sugar or white sugar.
  • Filling cream: Replace hazelnut praline paste with almond praline. Or simply replace praline cream with sugar-free whipped cream or French Chantilly cream.
  • Flavorings: Flavor the whipped cream with rose water, vanilla extract, or orange blossom water.
  • Fruits: Swap seasonal figs with other fresh fruit. If you want to learn about the different fruit flavor combinations and how to use them in baking, please download my fruit flavor pairing chart.

Storing and freezing

Once the Pavlova dessert is assembled, you should serve it right away. Store leftovers in the refrigerator for no longer than 24 hours.

Can you freeze fig and cinnamon Pavlova? Unfortunately, you cannot freeze the assembled Pavlova. But the meringue shell can survive in the freezer for up to three months.

To do so, transfer the cooled Pavlova meringue to a baking sheet lined with parchment and freeze for at least 3 hours.

Then, place it in a freezer bag, remove as much air as possible, seal and label the bag, and freeze for up to 3 months.

To thaw, simply bring the meringue back and let it sit at room temperature for 2 to 3 hours before assembling it.

Recipe FAQ

What is bain-marie?

Bain-marie is a fancy French term for a hot water bath.

How to make bain-marie?

To make a bain-marie, pour 3 inches (7.5-8 cm) of water in a saucepan, then place a heatproof bowl (another pot or a glass Pyrex bowl) on top of the pan. Ensure the top bowl fits snugly over the saucepan so the steam is trapped beneath it. Bring the water to a simmer, place ingredients into the top pan, and follow the recipe's instructions.

Love Pavlova desserts? Try these next!

  • Plum Pavlova
  • Christmas Pavlova wreath
  • Pavlova Roll (Meringue roulade)
  • Mandarin and Gingerbread Pavlova
  • Or browse all the cake recipes.

Want more delicious and beautiful recipes? Subscribe to my newsletter and follow me on Facebook, Pinterest, and Instagram for my latest updates. If you make this recipe, please leave a star rating on the recipe card and comment below!

Print

Recipe card

Fig And Cinnamon Pavlova

Fig and cinnamon Pavlova on a cake stand lined with parchment paper.
Print Recipe
Save Recipe Recipe Saved

5 Stars 4 Stars 3 Stars 2 Stars 1 Star

5 from 14 reviews

This fig and cinnamon Pavlova is a summer twist on a timeless Australian dessert. It is a stunning meringue combined with praline cream and decorated with fresh figs that are perfect for a special occasion or a dessert for whenever just because.

  • Author: Irina Totterman
  • Total Time: 4 hours, 15 minutes (plus resting time)
  • Yield: 12 1x
  • Category: Cakes
  • Method: Baking
  • Cuisine: Australian
  • Diet: Gluten Free

Ingredients

Scale

For the meringue:

  • ½ cup (122 g) egg whites, room temperature
  • ½ cup + 1 tablespoon (125 g) caster sugar 
  • ½ cup (100 g) brown sugar
  • 1 ½ teaspoons ground cinnamon

For the praline cream:

  • 1 tablespoon hazelnut praline
  • ⅔ cup + 3 (200 g) cold heavy cream, 30% fat
  • 1 ½ cups (360 g) cold mascarpone cheese

For assembling:

  • 1 oz. (30 g) raw pistachios 
  • 1 lb. (454 g) fresh figs
  • 3 tablespoons honey

*Don't you have the correct baking pan on hand right now? Try this simple Cake Pan Converter!

** If needed, please refer to Baking Conversion Charts.

Instructions

  1. Preheat oven to 250°F (120°C). Prepare a baking sheet covered with parchment paper.  Draw a circle of 9 inches (23 cm) in diameter with a pencil and turn the paper so that the ring will face down.
  2. To make the meringue, prepare a water bath. In a large heatproof bowl, place egg whites, caster, and brown sugar, and combine with a hand whisk.
  3. Bring the pot over the water bath and beat for 4 minutes, using the hand whisk. Make sure that the water of bain-marie is not boiling: it has to simmer.
  4. Once the sugar is melted, take the bowl out of the water bath and whisk on high speed for 5 minutes until the meringue becomes stiff and glossy. Add ground cinnamon and whisk for 20-30 seconds.
  5. Spoon the meringue into the center of the circle and shape the nest using a bent spatula or a metal spoon. Try to lift the edges of the meringue nest.
  6. Bake for 3 hours. Once the meringue is ready, do not remove it from the oven. Let the meringue cool in the switched-off oven for 2 hours. 
  7. To make the praline cream, place cold heavy cream, cold mascarpone, and hazelnut praline in a bowl of the stand mixer and whisk for 1 minute. Refrigerate it till assembly.
  8. To assemble the Pavlova, garnish the center of the dessert with the praline cream and arrange fresh figs cut into 1 cm thick rings. Warm honey in a water bath and add raw pistachios. Pour the honey and nuts mixture on top of the figs. Serve immediately.

Notes

  1. Make sure that a metal bowl is clean and dry before whisking egg whites. Any residual moisture or grease traces prevent egg whites from whisking.
  2. Opt for homemade or store-bought superfine Baker's sugar.
  3. Don't open the oven door during baking.
  4. Avoid over-whisking the praline cream to prevent its splitting. If the cream begins to split, add some cold heavy cream and whisk again.
  5. Refrigerate the praline cream until assembling the dessert. Once you fill the meringue shell with cream and fresh figs, serve immediately.  

Nutrition

  • Serving Size: 1 slice
  • Calories: 391
  • Sugar: 41.2 g
  • Sodium: 53 mg
  • Fat: 21.6 g
  • Saturated Fat: 11.5 g
  • Carbohydrates: 49.4 g
  • Fiber: 4 g
  • Protein: 5.4 g
  • Cholesterol: 61 mg

Thank you for following me on Pinterest, Facebook, and Instagram. Hashtag #bakinglikeachef so I can see your creations.

The nutritional information has been calculated using an online recipe nutrition calculator such as Verywellfit.com and is intended for informational purposes only. These figures should be used as a general guideline and not be construed as a guarantee.

The recipe was adapted from https://ottolenghi.co.uk/. It was originally published on September 14, 2018. The recipe has been updated and may differ from what was initially published.

Pink Praline - French Pink Pralines

Aug 17, 2021 · 46 Comments

A batch of Pink Praline on a stone board.

Specialties of the Lyon region in France, pink praline, or pralines roses, are almonds coated with caramelized and colored sugar. Follow this 5- ingredient French pralines recipe to make a real gourmet pleasure - a crisp pink treat. It takes 20 minutes from start to finish!

A batch of Pink Praline on a stone board; Close up

Have you ever heard about pink praline, one of the most famous French desserts?

For me, it started a few years ago when I was impressed by a tart recipe with a gorgeous red surface called Pink Praline Tart.

I was so eager to make it that I needed to figure out where to buy pink pralines.

These candied nuts can be found in candy shops across France, but luckily for me, living in the United States, there are pink praline candied almonds on Amazon.

Another way to enjoy these pink-coated almonds is to make them at home.

This pink praline recipe made in 20 minutes results in 1.5 lb/700 g of homemade pralines.

BAKING ESSENTIALS CHECKLIST

Sign up and get a list of the necessary baking tools and ingredients

FREE DOWNLOAD

[feast_advanced_jump_to]
Plastic gift bags with French Pink Pralines and a few almonds on a table
Pink praline featured in plastic bags (NOT recommended for prolonged storage or gifting)

What is pink praline?

Pink praline (or pralines roses) is a sweet confection made of almonds wrapped in red-colored cooked sugar, which can be flavored differently.

According to Selina Sykes,

... pralines roses - tiny caramelised almonds - are a taste of childhood no matter what your age is.

Pink praline is also called French pink pralines (plural form), rose praline, or red praline.

These are the same name for the original pralines, a delicious and unique French treat.

History of pink praline

The history of pink praline remains a bit of a mystery. It goes back to the 19th century. 

It is considered that the pastry chef of Saint-Genis-Sur-Giers created a famous pink praline brioche, also called Saint-Genix. 

Later, pink praline reached Lyonnais, who developed the original recipe.

In 1955, Auguste Pralus baked his buttery brioche with pink praliné - famous Praluline - that became his world-renowned unique creation.

It is the same brioche as brioche de Saint-Genix, which comes from the Rhône-Alpes region.

If you travel to France, visit Pralus to try the famous and beautiful brioches aux pralines. Its address is 32, rue de Brest 69002 Lyon, France.

Pralines roses or Pink Praline in a metal can and on the table

Why you should try French pralines recipe

  1. It is a simple recipe that gives 1.5 lb/700 g of delicious nuts coated with pink sugar.
  2. Pink praline makes a perfect gift for Christmas, St. Valentine's Day, or any other occasion.
  3. They are the best snack ever to satisfy a sweet tooth.
  4. Pink sugared almonds are kids friendly (no peanuts used) and gluten-free.
  5. They serve as an ingredient to make French pastries such as galette des Rois, sweet bread or brioches, Ile Flottante, and French souffle.

Ingredients

Pink praline ingredients in pictures

For ingredients and detailed instructions, refer to the recipe card below.

Almonds: use whole almonds of medium sizes, preferably toasted ones; although you can easily use raw almonds.

To toast almonds, bring them to the preheated oven at 300 F/150 C for 15 minutes.

Replace almonds with hazelnuts, for example, Piedmont hazelnuts, if desired.

The traditional recipe calls for almonds or hazelnuts and not pecans or walnuts.

Orange flower water: it brings a delicate flavor to French pink pralines. You can omit this ingredient or replace it with rose water.

Red food color: the red color is a signature of pink praline. Add food coloring as needed (it is usually enough to add about 7 drops of red food coloring to each cooking step).

Sugar: the recipe calls for white sugar, not brown sugar. Use granulated or caster sugar.

Water: use cold water or water at room temperature.

How to make pink praline

In a large frying pan, place one-third of the sugar (¾ cup/150 g), pour one-third of the water (1.35 fl oz/2.7 tbsp/40 ml) and add a few drops of red food color.

Stir the sugar mixture well with a wooden spatula or wooden spoon and bring it to a boil (photo 1). Once large bubbles start forming, add whole almonds.

Immediately lower the heat to medium heat, add orange flower water as a flavor and continue to stir constantly (photo 2).

Photo 1: Pan with red melted sugar Photo 2: Almonds coated with sugar in a pan
PHOTO 1 PHOTO 2

The red sugar syrup will begin to crystallize; keep stirring to coat the nuts thoroughly.

Once the sugar stops adhering to almonds, the nuts will look covered with pink powdered sugar (photo 3).

Transfer the contents of the pan onto a baking tray, or a flat surface covered with parchment paper and allow to cool (photo 4).

Collect the remaining pink-colored caramelized sugar for the second stage of cooking.

Clean up the pan and the wooden spatula or spoon with water and dry with a paper towel.

Photo 3: Almonds coated with sugar in a pan Photo 4: Sugared almonds on a parchment
PHOTO 3 PHOTO 4

Place almonds in a medium-sized pan and set aside.

In a small saucepan, place one-third of the sugar (¾ cup/150 g), one-third of water (1.35 fl oz/2.7 tbsp/40 ml), the remaining pink sugar, and a few drops of red food color, and allow to melt (photo 5).

Bring to a boil and cook until the mixture reaches the temperature of 255 degrees F/124 degrees C (use a candy thermometer).

Bring the pan with almonds over a moderate heat setting, pour the syrup over the nuts, and stir simultaneously (photo 6).

Once the almonds are coated well and look like they are covered with pink sugar, transfer the nuts onto the parchment again (photo 7).

Separate individual almonds and pink sugar. Clean up the pan and utensils again.

Photo 5: Sugar syrup in a saucepan Photos 6-7: Almonds in a pan and on parchment
PHOTOS 5-7

Repeat the last step of the candy coating one more time, using the remaining ingredients.

Make sure to check the right temperature of the sugar mixture. Add red food coloring, if necessary (photos 8-9).

Photo 8: Pink Praline in a pan Photo 9: Pink Pralines/candied almonds on the parchment
PHOTO 8 PHOTO 9

Expert tips

  1. Wear a shirt with long sleeves to protect your forearms during pink sugar coating.
  2. Add red food color to the second and third stages of cooking, if necessary. If the color is enough, omit food coloring (I usually add 7 drops of red coloring to each cooking step).
  3. Switch orange flower water for rose water, if you prefer, or make these caramelized nuts unflavored.
  4. Clean up your pan and wooden spatula between each step. To facilitate the process, pour some water into the pan and bring it to a simmer for 10 to 15 minutes. Dry utensils before use.
  5. Use a smaller pan for the second and third stages of cooking, layering nuts in a single layer and helping coat nuts better.
  6. Follow the same recipe and experiment with toasted hazelnuts, or mix almonds with hazelnuts, if you prefer.
  7. If you have a 160 degrees F/70 degrees C oven temperature regimen, dry out pink praline for 40 to 50 minutes. This step is optional but prolongs the shelf life of Pink Praline.
  8. Store in a cool, dry place between 60 degrees to 64 degrees F (16 to 18 C).
  9. To pack as a gift, use a paper-based bag or a gift box. Try to avoid packaging these candies in plastic or zip-top bag.

Frequently asked questions

What's the difference between French pralines and New Orleans pralines?

The word 'pralines' describes any candy made with nuts. Original French pralines represent pink-colored caramelized almonds. They differ from New Orleans pralines - crunchy pecans made with brown sugar, granulated sugar, light cream, butter, and pecan halves.

Can you double the praline recipe?

Yes, you can double the recipe, cooking the first step. However, to make the beautifully covered pink pralines, I strongly recommend dividing the nuts after the first step into two equal parts and cooking the second and the third steps separately for each half.

How to serve French pink pralines

Serve this sweet treat on its own as a snack, or sprinkle your favorite ice cream with crushed praline.

How to store pink praline

Store pink praline in an airtight container in a dry and cool place (between 60 degrees to 64 degrees F (16 to 18 C). Using this way, it will keep its bright color, flavor, and crunchiness for a long time (a few months).

Love quick desserts? Try these next!

  • A mason jar and a teaspoon over with hazelnut praline on a marble board.
    How To Make Hazelnut Praline Paste (3 Ingredients)
  • Banoffee pie cup served in a glass with a teaspoon on a saucer.
    Easy No-Bake Banoffee Pie Cups Recipe (15-Minute Dessert)
  • A marble teacup with hot chocolate, Christmas decorations, and tissue in the background.
    Best Chocolat Chaud (French Hot Chocolate)
  • Fig tiramisu cups in a serving board.
    Easy Fig Tiramisu (15-Minute Recipe)

Browse all the No-Bake Desserts

Want more delicious and beautiful recipes? Subscribe to my newsletter and follow me on Facebook, Pinterest, and Instagram for my latest updates. If you make this recipe, please leave a star rating on the recipe card and comment below!

Print

Recipe card

Pink Praline - French Pink Pralines

A batch of Pink Praline on a stone board.
Print Recipe
Save Recipe Recipe Saved

5 Stars 4 Stars 3 Stars 2 Stars 1 Star

5 from 20 reviews

Specialties of the Lyon region in France, pink praline or rose praline, are almonds coated with caramelized and colored sugar. Follow this 5-ingredient French Pralines recipe to make a real gourmet pleasure - a crisp pink treat!

  • Author: Irina Totterman
  • Total Time: 20 minutes
  • Yield: 1.5 lb. (700 g) 1x
  • Category: No-Bake Desserts
  • Method: Cooking
  • Cuisine: French

Ingredients

Scale
  • 8.8 oz (250 g) toasted almonds
  • 2 tsp (10 ml) orange flower water (optional)
  • 2 ¼ cups (450 g) granulated sugar 
  • 4 fl. oz. (120 ml) water
  • red food color

* If needed, please refer to Baking Conversion Charts.

Instructions

  1. In a large frying pan, place one-third of sugar (¾ cup/150 g), pour one-third of water (1.35 fl oz/2.7 tbsp/40 ml), and add a few drops of red food color. Stir well with a wooden spatula and bring to a boil. Once large bubbles start forming, add whole almonds.
  2. Immediately, low the heat to medium, add orange flower water as a flavor and continue to stir constantly. The red sugar syrup will begin to crystallize; keep stirring to coat the nuts thoroughly. Once the sugar stops adhering to almonds, the nuts will look covered with pink powdered sugar. Transfer almonds onto a baking sheet covered with parchment paper and allow to cool. Collect the remaining pink sugar for the second stage of cooking. Clean up the pan and wooden spatula with water and dry with a paper towel.
  3. Place almonds in a medium-sized pan and set aside. In a small saucepan, place one-third of sugar (¾ cup/150 g), one-third of water (1.35 fl oz/2.7 tbsp/40 ml), the remaining pink sugar, and a few drops of red food color, and allow to melt. Bring to a boil and cook until the temperature reaches 255 F/124 degrees C (use a cooking thermometer).
  4. Bring the pan with almonds over medium heat, pour the syrup over nuts, stirring at the same time. Once almonds are coated well and look like they are covered with pink sugar, transfer nuts onto parchment again. Separate nuts and pink sugar. Clean up the pan and utensil again.
  5. Repeat the last step one more time, using the remaining ingredients. Add red food coloring, if necessary.

Notes

  1. Wear a shirt with long sleeves to protect your forearms during pink sugar coating.
  2. To toast almonds, place nuts on a baking sheet and toast at 300 F/150 C for 15 minutes.
  3. Add red food color to the second and third stages of cooking, if necessary. If the color is enough, omit food coloring (I add 7 drops of red food coloring to each cooking step).
  4. Switch orange flower water for rose water, if you prefer, or make Pink Pralines unflavored.
  5. Clean up the pan and wooden spatula between each step. To facilitate the process, pour some water into the pan and bring it to a simmer for 10 to 15 minutes. Dry utensils before use.
  6. Use a smaller pan for the second and third stages of cooking, layering nuts in a single layer and helping coat nuts better.
  7. Follow the same recipe and experiment with toasted hazelnuts, or mix almonds with hazelnuts, if you prefer.
  8. If you have a 160 degrees F/70 degrees C oven temperature regimen, dry out pink praline for 40 to 50 minutes. This step is optional but prolongs the shelf life of pink nuts.
  9. Store in a cool, dry place between 60 to 64 F (16 to 18 C).
  10. To pack as a gift, use a paper-based bag or a gift box. Try to avoid packaging these candies in plastic or zip-top bag.

Nutrition

  • Serving Size: 70 g
  • Calories: 313
  • Sugar: 41.6 g
  • Sodium: 0 mg
  • Fat: 12.5 g
  • Saturated Fat: 1 g
  • Carbohydrates: 50.4 g
  • Fiber: 3.1 g
  • Protein: 5.3 g
  • Cholesterol: 0 mg

Thank you for following me on Pinterest, Facebook, and Instagram. Hashtag #bakinglikeachef so I can see your creations.

The nutritional information has been calculated using an online recipe nutrition calculator such as Verywellfit.com and is intended for informational purposes only. These figures should be used as a general guideline and not be construed as a guarantee.

The recipe was originally published on January 5, 2020. It has been revised to include improved content and photos. All posted pictures are mine.

Apple Juice Reduction

Jul 12, 2021 · 8 Comments

A teaspoon with apple juice reduction over a glass jar with apples in the background.

This naturally sweetened apple juice reduction is a great alternative to sugar in no-sugar-added dessert recipes. It also makes the perfect pairing with ice cream, overnight oats, crepes, or pancakes.

A teaspoon with apple juice reduction over a glass jar with apples in the background
Teaspoon with apple juice reduction

Who doesn't want to enjoy a dessert without feeling guilty about sugar? If you watch for sugar intake, you will love this recipe!

Apple juice reduction makes a great natural alternative to sugar in numerous baking recipes.

It is a new way to "sweeten differently and intelligently," according to Kiwi Forme And Nutrition.

The recipe is easy to make at home and gives you the freedom to start creating loa carb recipes.

This naturally sweetened apple juice reduction is perfect as the base of no-sugar-added dessert recipes or as a glaze for roasted meats.

You can also use it as an ice cream topping or drizzle over pancakes and waffles for breakfast.

Use it as a base for smoothies or mix it into your oatmeal instead of sugar.

The possibilities are endless once you have this naturally sweetened apple juice reduction in your kitchen pantry.

BAKING ESSENTIALS CHECKLIST

Sign up and get a list of the necessary baking tools and ingredients

FREE DOWNLOAD

[feast_advanced_jump_to]
Glass mason jar with apple juice reduction: Overhead view
Glass jar with apple juice reduction

What is apple juice reduction?

Apple juice reduction is an apple juice syrup made by cooking down apple juice until it becomes thick enough and syrupy.

Juice reduction contains less liquid and more intense flavors than the apple juice that started in the saucepan at the beginning of cooking time.

It happens as a result of the evaporation of the water during boiling.

Apple juice vs. apple cider

What is the difference between apple juice and apple cider? So let's get to the point.

A store-bought apple juice undergoes filtration to remove the pulp before being pasteurized.

So you can enjoy this refreshing drink for longer periods of time thanks to its extended shelf life.

Apple cider is made by washing and cutting up apples, then mashing them into a like-applesauce consistency.

This mash is wrapped in cloths to create the final product - apple cider.

Unlike filtered apple juice that has been stripped of its natural flavor and coloring through filtration processes, apple cider has its original pulp and sweetness intact.

How to use this juice reduction

The first and primary use of apple juice reduction is to replace refined sugar in no-sugar-added desserts.

Also, it is a natural way to sweeten your favorite desserts without adding sugar.

Create guilt-free crepes, pancakes, or waffles by topping them with naturally sweetened apple treat for breakfast.

Or serve French rice pudding topped off with this topping too!

This fruit juice reduction can also be used as a flavorful addition when cooking meats or vegetables like carrots, potatoes, onions, etc.

It brings an interesting taste and texture that enhances those dishes without overpowering flavors.

Cooked juice reduction in a mason jar with a spoon over
Juice reduction in a mason jar

Why you should try this recipe

  1. This is a basic recipe to make no-sugar-added desserts.
  2. Reducing apple juice to syrup is so simple that even a beginner cook can make it.
  3. This fruit juice reduction is a great alternative to refined sugar while cooking/baking and serving your desserts.

Ingredients

For ingredients and detailed instructions, refer to the recipe card below.

Apple juice: use an electric juicer to make freshly made apple juice. Please, try to avoid store-bought juice, which is pasteurized and may contain sweeteners and preservatives.

If you can find a store-bought unfiltered apple juice with no added sugar, you can use it.

Ground cinnamon: brings a beautiful flavor, you can omit this ingredient if desired.

How to make apple juice reduction

Pour freshly made apple juice into a heavy-bottomed saucepan (photo 1) and bring to a boil over high heat. Let it boil for about 45 minutes.

Stir regularly, but after the first 25 minutes of cooking, keep an eye on the saucepan to ensure the apple preparation doesn't burn: continue stirring constantly.

Cook until the juice takes on a nice syrupy consistency and has reduced to approximately ⅔ cup or 200 grams (photo 2). Add a pinch of ground cinnamon if desired and mix. Let it cool.

Photo 1: Apple juice in a saucepan Photo 2: Cooked apple preparation in a pan
PHOTO 1 PHOTO 2

Expert tips

  1. Replace homemade apple juice with a store-bought unfiltered apple juice with no added sugar.
  2. Store the apple juice reduction in a mason jar in the fridge for up to 5 days.

Frequently asked question

How do you know that apple juice reduction is made?

This juice reduction is made when it reduces by about ⅕ of its initial volume. It should be the consistency of apple puree but more liquid. It thickens as it cools down, especially once it is refrigerated.

Love sugar-free desserts? Try these next!

  • Sliced sugar-free banana coconut cake on a grey dessert plate.
    Sugar Free Banana Coconut Cake
  • Garnished sugar-free cream puffs.
    Sugar-Free Cream Puffs (Keto-Friendly)

Want more delicious and beautiful recipes? Subscribe to my newsletter and follow me on Facebook, Pinterest, and Instagram for my latest updates. If you make this recipe, please leave a star rating on the recipe card and comment below!

Print

Recipe card

Apple Juice Reduction

A teaspoon with apple juice reduction over a glass jar with apples in the background.
Print Recipe
Save Recipe Recipe Saved

5 Stars 4 Stars 3 Stars 2 Stars 1 Star

5 from 4 reviews

This naturally sweetened apple juice reduction is a great alternative to sugar in no-sugar-added dessert recipes. It also makes the perfect pairing with ice cream, overnight oats, crepes, or pancakes.

  • Author: Irina Totterman
  • Total Time: 50 minutes
  • Yield: 7 oz. (200 g) 1x
  • Category: No-sugar-added Desserts
  • Method: Cooking
  • Cuisine: French
  • Diet: Gluten Free

Ingredients

Scale
  • 1 liter freshly made apple juice
  • 1 pinch of ground cinnamon

* If needed, please refer to Baking Conversion Charts.

Instructions

  1. Pour freshly made apple juice into a heavy-bottomed saucepan and bring to a boil over high heat. Let it boil for about 45 minutes.
  2. Stir it regularly, but after the first 25 minutes of cooking, keep an eye on the saucepan to ensure the apple preparation doesn't burn: continue stirring constantly.
  3. Cook until the juice takes on a nice syrupy consistency and has reduced to approximately ⅔ cup or 200 grams. Add a pinch of ground cinnamon if desired and mix. Let it cool.

Notes

  1. Replace homemade apple juice with a store-bought unfiltered apple juice with no added sugar.
  2. Store the apple juice reduction in a mason jar in the fridge for up to 5 days.

Nutrition

  • Serving Size: 1 tablespoon
  • Calories: 36
  • Sugar: 8.4 g
  • Sodium: 2 mg
  • Fat: 0.1 g
  • Saturated Fat: 0 g
  • Carbohydrates: 9 g
  • Fiber: 0.1 g
  • Protein: 0.1 g
  • Cholesterol: 0 mg

Thank you for following me on Pinterest, Facebook, and Instagram. Hashtag #bakinglikeachef so I can see your creations.

The nutritional information has been calculated using an online recipe nutrition calculator such as Verywellfit.com and is intended for informational purposes only. These figures should be used as a general guideline and not be construed as a guarantee.

Peach Compote (Easy Recipe for Fresh or Frozen Peaches)

Jul 8, 2021 · 10 Comments

Peach compote served in a bowl, topped with a scoop of ice cream.

You will love this easy-to-make 4-ingredient fresh peach compote that goes well with plain yogurt, vanilla ice cream, or on its own when served over oatmeal or rice pudding. You can use frozen peaches for this recipe if the fresh ones are out of season.

Peach compote served in a bowl with a scoop of ice cream.

Peach compote recipe

Do you love peaches? Same here. This quick peach compote is everything you want on a warm summer day. It is sweet, fruity, and oven-free.

It is light enough for everyday snacking but pretty enough for special occasions, and kids and adults love it alike. Plus, it is the perfect way to use up seasonal peaches (or frozen ones when you miss summer).

[feast_advanced_jump_to]

Peach compote vs. peach sauce

Compote is a fruit dessert made from fresh or canned fruit, often simmered with sugar, water, or spices. It is popular in summer and even served unsweetened as a first food for babies.

Peach compote and peach sauce are nearly the same. Both use fruit and sugar, thickened by cooking down the juices. What is the difference? Compote is thicker and chunkier, while peach sauce is smoother and pourable.

Ingredients

For ingredients and detailed instructions, refer to the recipe card below.

  • Peaches: Use ripe yellow or white peaches. Fresh, frozen, or canned ones work.
  • Brown sugar: Swap with muscovado or white sugar if needed.
  • Butter: Use salted butter for the recipe.
  • Spice: Add ground cinnamon or swap it for ginger, star anise, cardamom, or add orange peel, licorice, or a cinnamon stick.

How to make peach compote

Blanch peaches in boiling water for 30 seconds, then transfer to an ice bath. Peel, pit, and cut into cubes.

In a medium saucepan, melt brown sugar and butter over medium-low heat until caramelized. Add peaches and ground cinnamon. Stir and cook 5-7 minutes until tender but still firm.

Transfer to a bowl, cool slightly, and serve.

Expert tips

  • Peel peaches with a vegetable peeler, or leave the skins on.
  • Cook underripe or frozen peaches a bit longer.
  • For a smoother compote, simmer longer and mash into a puree.
  • To thicken the compote, mix ½ teaspoon cold water with ½ teaspoon cornstarch, add to the nearly cooked fruit, and cook for a few more minutes.

How to serve peach compote

Make breakfast better with peach compote over overnight oats, homemade yogurt, granola, rice pudding, farmer's cheese, or chia pudding.

Try it on Dutch Baby, pancakes, crepes, French toast, or vanilla bean ice cream. It is even delicious with pork roast for a sweet-tangy twist.

For brunch or dessert, serve with almond nougatine and a glass of sweet white wine.

How to store it

You can store peach compote in an airtight container or a mason jar in the fridge for up to three days. Reheat it in the microwave just before serving. For longer storage, let the compote cool completely, then freeze it in a plastic container.

Love peach desserts? Try these next!

  • Peach and blueberry galette with a scoop of ice cream on top.
    Peach and Blueberry Galette: An Easy, Rustic Fruit Tart Recipe
  • Peaches fried with rosemary in a skillet: Close up.
    Caramelized Skillet Peaches
  • French peach panna cotta tart in a baking dish.
    Peach Panna Cotta Tart (French Peach Tart)
  • Puff pastry peach galette with a scoop of ice cream on a plate.
    Puff Pastry Peach Galette: Easy Summer Dessert

Want more delicious and beautiful recipes? Subscribe to my newsletter and follow me on Facebook, Pinterest, and Instagram for my latest updates. If you make this recipe, please leave a star rating on the recipe card and comment below!

Print

Recipe card

Easy Peach Compote Recipe

Peach compote served in a bowl, topped with a scoop of ice cream.
Print Recipe
Save Recipe Recipe Saved

5 Stars 4 Stars 3 Stars 2 Stars 1 Star

5 from 5 reviews

You will love this easy-to-make fresh peach compote that goes well as an excellent addition to yogurt, ice cream, or just as it is when served over oatmeal or rice pudding. You can use frozen peaches for this recipe if the fresh ones are out of season. 

  • Author: Irina Totterman
  • Total Time: 20 minutes
  • Yield: 4 1x
  • Category: Gluten-free Desserts
  • Method: Cooking
  • Cuisine: French
  • Diet: Gluten Free

Ingredients

Scale
  • 24.5 oz. (700 g) peaches
  • 1 ½ tablespoon (20 g) salted butter
  • 3 tablespoons (35 g) brown sugar
  • ¼ teaspoon ground cinnamon

* If needed, please refer to Baking Conversion Charts.

Instructions

  1. To peel peaches, boil peaches for 30 seconds, remove, and place them in an ice-water bath. Peel the peaches by gently rubbing the skin. Cut them in half, then quarters by pitting them. Then cut the quarters into large cubes.
  2. To make the peach compote, in a heavy-bottomed saucepan, place brown sugar and butter. Heat the pan over medium heat to obtain a caramel: place the pan over your stove without using utensils. Add the sliced peaches and ground cinnamon, and mix with a wooden spoon. Cook for 5 to 7 minutes over medium heat, occasionally stirring until all the peach pieces are cooked but still a bit firm.  Transfer to a bowl and let cool. 
  3. Serve the compote at room temperature plain, with vanilla ice cream, or almond nougatine.

Notes

  1. Peel peaches with a vegetable peeler, or leave the skins on.
  2. Cook underripe or frozen peaches a bit longer.
  3. For a smoother compote, simmer longer and mash into a puree.
  4. To thicken the compote, mix ½ teaspoon cold water with ½ teaspoon cornstarch, add to the nearly cooked fruit, and cook for a few more minutes. 
  5. Store it in an airtight container or a mason jar in the fridge for up to three days.

Nutrition

  • Serving Size: 1 small bowl
  • Calories: 173
  • Sugar: 33 g
  • Sodium: 31 mg
  • Fat: 4.8 g
  • Saturated Fat: 2.6 g
  • Carbohydrates: 33.2 g
  • Fiber: 4.1 g
  • Protein: 2.5 g
  • Cholesterol: 11 mg

Thank you for following me on Pinterest, Facebook, and Instagram. Hashtag #bakinglikeachef so I can see your creations.

The nutritional information has been calculated using an online recipe nutrition calculator such as Verywellfit.com and is intended for informational purposes only. These figures should be used as a general guideline and not be construed as a guarantee.

The recipe was originally published on July 08, 2021. It has been revised to include improved content and photos. 

Nougatine Recipe

Jul 3, 2021 · 12 Comments

Stacked almond nougatine pieces on parchment paper.

If you ever wanted to create your own nougatine recipe, here is your chance! Made with different kinds of nuts, nougatine has an amazing flavor profile. And it takes only 15 minutes of your time to make something delicious to enjoy in no time at all.

Stacked almond nougatine pieces on parchment paper
Stacked nougatine pieces

I love baking, but I don't always have time to make dessert, especially for unexpected guests.

It is also hard when you want to impress your family and friends with a delicious homemade treat, but you are busy or just not in the mood for it.

If you are looking for a quick and easy solution to this problem, then nougatine is the answer!

This recipe made with only three ingredients takes 15 minutes to make.

Just prepare a caramel, add the nuts you have on your hands, and spread into an oiled baking paper.

Voilà! You now have French nougatine that will be ready whenever your sweet tooth strikes again!

BAKING ESSENTIALS CHECKLIST

Sign up and get a list of the necessary baking tools and ingredients

FREE DOWNLOAD

[feast_advanced_jump_to]
Nougatine broken into pieces

What is nougatine?

Nougatine is a French word for the easy-to-make nut-based dessert with a single or two and more different nuts.

It usually takes the form of small, irregular pieces that can be enjoyed on their own or as a topping for other desserts.

Almonds are the most popular flavor, but pistachios also do well in this area.

Why? Because they hold up well to more intense heat and don't go bad quickly as some other nuts do.

Nougatine vs. nougat

Nougatine refers to a clear or brown nut-based bark obtained by cooking sugar until converted into caramel.

On the other hand, nougat is a sweet, egg whites-based candy made from sugar, honey, and nuts.

You will find it in different variations - with nuts (hazelnuts, almonds, etc.), mixed with toasted nuts, candied fruits, crystallized fruits like strawberries.

Nougats can also be coated with cocoa beans. The chocolate-covered variety of nougat became popular in America after World War II.

History of nougatine

Nougatine is a delicate confectionery that was first discovered in the 1850s by a confectioner Jean-Louis-Bourumeau.

In 1862, Napoleon III and his wife, Empress Eugenie, visited Nevers when nougatine acquired its current fame.

During that visit, Empress Eugenie was offered nougatine, "a specialty in the order of gluttony."

The dessert became so popular among her Court ladies-in-waiting that it quickly spread throughout Paris.

Ever since then, it appears that everyone can appreciate how delicious these treats are.

Almond nougatine dessert on parchment
Almond nougatine

French nougatine variations

French Wikipedia offers an extensive list of different types of French nougatine.

Named after its origin, Nevers nougatine (nougatine de Nevers in French) is made with sugar, chopped almonds, and coated with royal icing.

The Duchesse d'Angoulême is a nougatine filled with almond praline. It is made in sticks a bit over 1-inch/2.5 cm centimeters long and wrapped in gold or silver paper.

Fumay slates are small plates of nougatine covered with blue chocolate. And there are many more!

Nougatine recipe

Nougatine, as a golden treat of nuts and sugar, has infinite flavor possibilities.

The basic recipe is easy to follow for anyone where sugar is cooked with water over medium heat until it becomes caramel. Then flaked almonds are added while constantly stirring.

Most people make almond nougatine; others experiment with pistachios, hazelnuts, and sesame seeds.

Some chefs create nougatine as the main flavor in their cakes, such as Nougatine Cake and cookies.

Other chefs pair the nougatine up with savory dishes (roasted chicken or pan-fried mushrooms) to bring more depth during mealtime.

Different types of nougatines are made using different methods. There are three types of nougatine preparation: dry, cooked sugar, and glucose fondant nougatine.

Dry nougatine is based on making dry caramel. Cooked sugar nougatine is made with adding water.

Glycose fondant nougatine is what the chefs make because it is more resistant to humidity, perfect for ready-made items.

Glucose also prevents the sugar from crystallizing during cooking and especially from melting too quickly.

Nougatine decoration on parchment paper
Nougatine decoration

How to serve nougatine

Serve nougatine broken into pieces to make a sweet gourmet treat.

Or sprinkle the crushed nougatine over a summer fruit compote, whipped cream, or ice cream.

You can use the nougatine broken or cut into pieces to decorate cakes with elaborate decorations.

Why you should try this recipe

  1. This easy nougatine recipe requires only three ingredients and is made in 15 minutes.
  2. French nougatine is a perfect sweet treat for kids and adults, and it makes a stunning decoration for desserts.
  3. It makes a great edible gift during holidays.
  4. Plus, it's gluten-free and vegan-friendly!

Ingredients

Nougatine ingredients in pictures
Nougatine ingredients

For ingredients and detailed instructions, refer to the recipe card below.

Sugar: use the finest possible sugar, caster sugar, or baker's sugar: it melts faster.

Almonds: use flaked almonds. You can replace them with slivered almonds, whole or chopped hazelnuts, macadamia nuts, pistachios, or a mix of nuts.

For the taste buds' pleasure, try to experiment with sesame seeds, organic pepitas, or a mixture of seeds (sesame seeds, flax seeds, and poppy seeds).

The use of different nuts and seeds brings different flavors, tastes, and visual appearances.

The more nuts or seeds used in the recipe, the more fragile nougatine is. As a result, it is less sweet but more flavorful than if it had been made with a little nut or seed content.

You should try to use nuts from 30 to 100% of the weight of the sugar. Toast them yourself (the recipe is below) or use store-bought flaked toasted almonds.

Water: it is used as a liquid to make wet caramel.

How to make almond nougatine

Preheat the oven to 300 degrees F/150 degrees C. Place flaked almonds on a baking sheet and toast in the oven for about 5 to 7 minutes. Watch for the color: almonds should get a slightly golden color.

Prepare a parchment paper sheet and use a pastry brush or a silicone brush to oil parchment with grapeseed oil.

To make the caramel, place sugar and water in a heavy-bottomed saucepan and bring it over medium heat (photo 1).

Shake the pot regularly to distribute the heat: do not use utensils. The sugar syrup will start to get a golden color (photo 2).

Photo 1: Boiling sugar syrup in a saucepan Photo 2: Golden-colored sugar syrup in a pan
PHOTO 1 PHOTO 2

Once the sugar dissolves and turns into a beautiful golden caramel, remove the saucepan from the heat.

Add flaked almonds and quickly stir with a wooden spatula. To get the desired color of the nougatine, bring the mixture over medium heat for a few seconds, stirring vigorously (photo 3).

Pour the mixture onto the prepared parchment. Spread it out in an even, thin layer with a wooden spatula or oiled blade (photo 4).

Photo 3: Caramel with almonds in a saucepan Photo 4: Nougatine spread onto parchment
PHOTO 3 PHOTO 4

You can also use a prepared in advance oiled rolling pin to roll out the nougatine gently. Let it cool for at least 25 minutes.

Break the nougatine into pieces and use it as desired.

Expert tips

  1. Be careful working with hot caramel. Make sure kids are kept out of the kitchen while working with hot sugar.
  2. Replace grapeseed oil with vegetable oil.
  3. To make your nougatine thicker, pour the hot nougatine mixture onto parchment paper and spread it a bit. Cover with the second sheet of parchment on top and roll the mixture out with a rolling pin into a layer of desired thickness before it hardens. Let it cool. 
  4. To cut the nougatine into desired shapes, use an oiled slicing knife while the nougatine is hot.
  5. Store nougatine flat on parchment paper in an airtight container for up to 1 month. Nougatine should be protected from moisture: avoid storing it in a refrigerator. 
  6. Avoid making nougatine on humid days.

Frequently asked question

Should you add lemon juice or vinegar to make nougatine?

Don't use lemon juice or vinegar to make your nougatine. They invert the sucrose and reduce the rigidity of the nougatine. As a result, the nougatine risks getting brittle. 

Love quick desserts? Try these next!

  • French dark chocolate mousse in glasses with a spoon full of mousse.
    French Chocolate Mousse (Mousse au Chocolat)
  • Banoffee pie cup served in a glass with a teaspoon on a saucer.
    Easy No-Bake Banoffee Pie Cups Recipe (15-Minute Dessert)
  • A marble teacup with hot chocolate, Christmas decorations, and tissue in the background.
    Best Chocolat Chaud (French Hot Chocolate)
  • Fig tiramisu cups in a serving board.
    Easy Fig Tiramisu (15-Minute Recipe)

Want more delicious and beautiful recipes? Subscribe to my newsletter and follow me on Facebook, Pinterest, and Instagram for my latest updates. If you make this recipe, please leave a star rating on the recipe card and comment below!

Print

Recipe card

Nougatine Recipe

Stacked almond nougatine pieces on parchment paper.
Print Recipe
Save Recipe Recipe Saved

5 Stars 4 Stars 3 Stars 2 Stars 1 Star

5 from 5 reviews

 If you ever wanted to create your own nougatine recipe, here is your chance! Made with different kinds of nuts, nougatine has an amazing flavor profile. And it takes only 15 minutes of your time to make something delicious to enjoy in no time at all.

  • Author: Irina Totterman
  • Total Time: 15 minutes
  • Yield: 3 1x
  • Category: No-Bake Desserts
  • Method: Cooking
  • Cuisine: French
  • Diet: Gluten Free

Ingredients

Scale
  • ⅓ cup (75 g) caster sugar
  • 1 tablespoon water
  • 1.7 oz. (50 g) flaked almonds
  • ¼ teaspoon grapeseed oil

* If needed, please refer to Baking Conversion Charts.

Instructions

  1. Preheat the oven to 300 degrees F/150 degrees C. Place flaked almonds on a baking sheet and toast in the oven for about 5 to 7 minutes.  Watch for the color: almonds should get a slightly golden color.
  2. Prepare a parchment paper sheet and use a pastry brush or a silicone brush to oil parchment with grapeseed oil.
  3. To make the caramel, place sugar and water in a heavy-bottomed saucepan and bring it over medium heat. Shake the pot regularly to distribute the heat: do not use utensils. The sugar syrup will start getting a golden color. Once the sugar dissolves and turns into a beautiful golden caramel, remove the saucepan from the heat.
  4. Add flaked almonds and quickly stir with a wooden spatula. To get the desired color of the nougatine, bring the mixture over medium heat for a few seconds, stirring vigorously. Pour the mixture onto the prepared parchment and spread it into an even, thin layer with a wooden spatula or oiled blade. You can also use a prepared in advance oiled rolling pin to roll out the nougatine gently. Let it cool for at least 25 minutes.
  5. Break the nougatine into pieces and use it as desired.

Notes

  1. Be careful working with hot caramel. Make sure kids are kept out of the kitchen while working with hot sugar.
  2. Replace grapeseed oil with vegetable oil.
  3. To make your nougatine thicker, pour the hot nougatine mixture onto parchment paper and spread it a bit. Cover with the second sheet of parchment on top and roll the mixture out with a rolling pin into a layer of desired thickness before it hardens. Let it cool. 
  4. To cut the nougatine into desired shapes, use an oiled slicing knife while the nougatine is hot.
  5. Store nougatine flat on parchment paper in an airtight container for up to 1 month. Nougatine should be protected from moisture: avoid storing it in a refrigerator. 
  6. Avoid making nougatine on humid days.

Nutrition

  • Serving Size: 1 piece of medium size
  • Calories: 201
  • Sugar: 25.7 g
  • Sodium: 0 mg
  • Fat: 9.3 g
  • Saturated Fat: 0.7 g
  • Carbohydrates: 26.1 g
  • Fiber: 1.3 g
  • Protein: 4.3 g
  • Cholesterol: 0 mg

Thank you for following me on Pinterest, Facebook, and Instagram. Hashtag #bakinglikeachef so I can see your creations.

The nutritional information has been calculated using an online recipe nutrition calculator such as Verywellfit.com and is intended for informational purposes only. These figures should be used as a general guideline and not be construed as a guarantee.

Caramelized Skillet Peaches

Jun 27, 2021 · 30 Comments

Peaches fried with rosemary in a skillet: Close up.

It's time to take skillet-fried peaches and turn these caramelized peaches served with ice cream into a new unmatched experience. They also make the perfect partnership with coffee and whipped cream. But, of course, they are good on French toast and their own too.

Peaches fried with rosemary in a skillet: Close up.
Fried peaches in a skillet

Summertime has arrived again, which means there is no better time than now to enjoy some good old-fashioned vanilla ice cream.

What could be sweeter? Imagine serving a scoop of your favorite homemade ice cream with deliciously juicy caramelized peaches.

[feast_advanced_jump_to]

Or imagine topping off your cast iron skillet with warm caramelized peaches and luscious caramel sauce with generously scooped delicious frozen goodness. The same applies to caramelized apples and pan-fried bananas.

BAKING ESSENTIALS CHECKLIST

Sign up and get a list of the necessary baking tools and ingredients

FREE DOWNLOAD

These beautiful fruity servings make any evening special - whether it is just for two people indulging after dinner or as an addition to family festivities around holidays.

Caramelized peaches served with scoops of ice cream on a plate
Caramelized peaches and ice cream

Peaches and rosemary combination

The two are aromatically similar but not the same.

A lot of people don't like rosemary whatsoever, while others love the flavor.

It all depends on what you are looking for as far as tastes go!

If adding to brunches or salads, then either would be okay. However, if tossing them into savory dishes, it stands out more against dishes with bittersweet sauces.

The natural sweetness of peaches goes perfectly with this green herb. The rosemary taste compliments the fruit well, and it adds a layer of depth to an otherwise basic dish.

To discover, you should definitely try Peach Rosemary Galette! Its subtle flavors are delicious with a light-bodied white or rosé.

Warm peaches and ice cream

Do you know what goes great with ice cream? Peaches.

Do you know what else goes great with peaches? Caramelizing those peaches in a skillet and then topping them off with a scoop of homemade vanilla ice cream.

It is an unbeatable flavor combination, and you are going to love this recipe as much as I do!

All you need are some fresh peaches, butter, honey, and rosemary.

The hardest part is waiting for the peaches to caramelize in a skillet - which only takes about 10 minutes!

Caramelization: honey vs. sugar

What are the differences between different types of caramelization?

Some recipes call for sugar (white or brown sugar), others - honey. As a result of this difference in ingredients, caramelized food tastes different too.

The difference in taste is due to the different caramelization reactions.

The hydrolysis of fructose from honey and glucose from sugar by heat would do much to explain why honey tastes significantly different from its more common counterpart, white sugar.

Honey also contains trace amounts of amino acids, such as lysine and phenylalanine, which break down into aromatic-tasting organic molecules.

An important distinction between sweetening with honey versus sugar is that when cooking or baking with honey, it takes more patience than using straight granulated sugar.

Why? Because it is solid at room temperature and becomes liquid only when heated.

In other words, you have to cook a dish longer for the flavor from the honey to come through completely.

Still, honey is actually a better choice because it caramelizes more evenly than sugar.

It has advantages over sugar because it is less sweet, so you can use less and not risk being too sweet.

Additionally, adding spices to the honey gives you an added layer of complexity in flavor.

Peaches being caramelized into bubbling caramel in a skillet
Peach caramelization

Why you should try this recipe

  • This caramelized peaches recipe is a perfect summer dessert served with ice cream, especially during peach season.
  • This dessert is a no-bake one when you do not need to turn on the oven.
  • It is the easiest dessert, requiring only four ingredients.

Ingredients

For ingredients and detailed instructions, refer to the recipe card below.

  • Peaches: use yellow or white ripe peaches, not overripe. Replace fresh peaches with nectarines or apricots if desired.
  • Honey: the recipe calls for honey, the main ingredient of caramelization.

Use your favorite honey, but try to avoid buckwheat honey with a strong flavor profile.

  • Rosemary: it brings a beautiful, refreshing flavor to this elegant dessert. Omit it if you are not a fan of this green herb, or replace it with a pinch of ground cinnamon.
  • Butter: use unsalted butter to make this recipe.
  • Vanilla ice cream: this ingredient is optional and is used for serving. It is up to you to use store-bought ice cream or make vanilla ice cream yourself.

Replace it with unsweetened, sugar-free whipped cream to decrease the carbs load.

How to caramelize peaches

Wash and dry peaches. Cut them in half, remove the pit, and slice peach halves into ½-inch/about 1.5 cm thick wedges.

Melt butter in a large skillet over medium-high heat. Add peach slices in a single layer, honey, and rosemary (photo 1).

Cook to caramelize, occasionally stirring, for about 7 to 9 minutes (photo 2). 

Photo 1: Peaches with rosemary in a pan Photo 2: Caramelizing peaching in a skillet
PHOTO 1 PHOTO 2

Let buttery peaches cool down before eating so as not to burn your mouth.

Then, serve warm peaches in a frying pan or on a plate with their caramel sauce and vanilla ice cream.

Expert Tips

  1. Peel peaches if preferred. Read on how to remove peach skins in the FAQ section.
  2. Chop rosemary needles finely if desired. They are a bit tough if left as a whole.
  3. To bring a hint of cinnamon, add a pinch of ground cinnamon while cooking.
  4. Top caramelized peaches with flaked almonds or coarsely crushed pistachios to bring additional texture and a different flavor profile.

Frequently asked questions

How to peel peaches?

Plunge the peaches into boiling water for 30 seconds to soften them so that they are easily peeled. Remove from hot water, place them in an ice bath for 5 minutes to stop cooking, and peel.

Can you make this recipe with frozen peaches?

Yes, absolutely. Thaw peaches, drain them, and follow the recipe.

What herbs or spices go well with peaches?

Besides rosemary, peaches go well with verbena, basil, tarragon, and thyme. They also pair great with cinnamon, cloves, ginger, or cardamom for some spice.

Love peach desserts? Try these next!

  • Puff pastry peach galette with a scoop of ice cream on a plate.
    Puff Pastry Peach Galette: Easy Summer Dessert
  • French peach panna cotta tart in a baking dish.
    Peach Panna Cotta Tart (French Peach Tart)
  • Peach and blueberry galette with a scoop of ice cream on top.
    Peach and Blueberry Galette: An Easy, Rustic Fruit Tart Recipe
  • Peach clafoutis slice on a red dessert plate.
    Easy Fresh Peach Clafoutis

Want more delicious and beautiful recipes? Subscribe to my newsletter and follow me on Facebook, Pinterest, and Instagram for my latest updates. If you make this recipe, please leave a star rating on the recipe card and comment below!

Print

Recipe card

Caramelized Skillet Peaches

Peaches fried with rosemary in a skillet: Close up.
Print Recipe
Save Recipe Recipe Saved

5 Stars 4 Stars 3 Stars 2 Stars 1 Star

5 from 14 reviews

It's time to take skillet-fried peaches and turn these caramelized peaches served with ice cream into a new unmatched experience. They also make the perfect partnership with coffee and whipped cream. But, of course, they are good on their own too.

  • Author: Irina Totterman
  • Total Time: 20 minutes
  • Yield: 2 1x
  • Category: No-Bake Desserts
  • Method: Cooking
  • Cuisine: French
  • Diet: Gluten Free

Ingredients

Scale
  • 3 peaches
  • 3.5 oz. (100 g) honey
  • 1 ½ tablespoon (20 g) unsalted butter
  • 1 spring of rosemary
  • vanilla ice cream (optional)

* If needed, please refer to Baking Conversion Charts.

Instructions

  1. Wash and dry peaches. Cut them in half, remove the pit, and slice peach halves into ½-inch/about 1.5 cm thick wedges. Melt butter in a large skillet over medium-high heat. Add peach slices in a single layer, honey, and rosemary. Cook to caramelize, occasionally stirring, for about 7 to 9 minutes. 

  2. Let buttery peaches cool down before eating so as not to burn your mouth. Then, serve warm peaches in a frying pan or on a plate, with their caramel sauce, aside with vanilla ice cream.

Notes

  1. Peel peaches if preferred. Read one how to peel peaches in the FAQ section.
  2. Chop rosemary needles finely if desired. They are a bit tough if left as a whole.
  3. Top caramelized peaches with flaked almonds or coarsely crushed pistachios to bring additional texture and a different flavor profile.

Nutrition

  • Serving Size: 1 portion
  • Calories: 128
  • Sugar: 19.8 g
  • Sodium: 2 mg
  • Fat: 5.6 g
  • Saturated Fat: 3.3 g
  • Carbohydrates: 20.2 g
  • Fiber: 2.3 g
  • Protein: 1.9 g
  • Cholesterol: 14 mg

Thank you for following me on Pinterest, Facebook, and Instagram. Hashtag #bakinglikeachef so I can see your creations.

The nutritional information has been calculated using an online recipe nutrition calculator such as Verywellfit.com and is intended for informational purposes only. These figures should be used as a general guideline and not be construed as a guarantee.

Easy Strawberry Clafoutis (Clafoutis aux Fraises)

Apr 19, 2021 · 24 Comments

Warm strawberry clafoutis desserts resting on a wire rack after baking.

Treat yourself to this easy French dessert-strawberry clafoutis. Fresh berries baked in a rich, creamy custard make a sweet and cozy treat for breakfast, dessert, or any occasion that calls for something special.

Freshly baked strawberry clafoutis in white ramekins cooling on a wire rack.

Strawberry clafoutis recipe

Traditionally made with black cherries, clafoutis is a classic French dessert that's just as delicious with strawberries or any seasonal fruit. When made with other fruits, it is called a flognarde-but no matter the name, this dish is pure comfort.

[feast_advanced_jump_to]

You might see it spelled clafouti, but the correct French spelling is clafoutis (pronounced klah-foo-tee, with a silent "s").

According to NPR, clafoutis is "the epitome of the French grandmotherly dessert: unpretentious, easy to make, and blissfully comforting." It originated in the Limousin region of France and gets its name from a word meaning "brimming over."

This custardy dessert is made by pouring a crepe-like batter over fruit, then baking until golden. It can be served warm or cold-both are heavenly.

BAKING ESSENTIALS CHECKLIST

Sign up and get a list of the necessary baking tools and ingredients

FREE DOWNLOAD

Why you will love this recipe

  • It is a no-fuss summer dessert.
  • Works beautifully with strawberries, peaches, apricots, or any ripe fruit (just peel thicker-skinned ones).
  • Perfect for breakfast, brunch, or dinner.
  • One of the best French strawberry desserts to celebrate the season.

Ingredients

For ingredients and detailed instructions, refer to the recipe card below.

  • Strawberries: Fresh, seasonal strawberries, especially from a local farm or market, are ideal. But frozen ones work too (no need to thaw), or swap in any ripe seasonal fruit.
  • Sugar: Use granulated or caster sugar.
  • Eggs: Use large eggs at room temperature. An egg separator makes separating yolks easier.
  • Milk: Whole milk is recommended.
  • Heavy cream: Can be replaced with whole milk if needed.
  • Cornstarch: Used to thicken the custard-no flour needed.

How to make strawberry clafoutis

Preheat oven to 390°F (200°C). Butter two 12-oz. porcelain ramekins or one large ramekin and sprinkle with sugar.

Wash, drain, and hull strawberries with a strawberry huller. Cut them in halves or quarters and arrange in the ramekins (photo 1).

In a bowl, whisk together cornstarch, sugar, salt, whole egg, and beaten yolk. Add milk and cream, mixing until smooth.

Pour the batter over the berries. Bake for 35-40 minutes until puffed and golden.

Serve warm or chilled, straight from the ramekins. Dust with icing sugar before serving.

Expert Tips

  • Use a blender to make the batter for ease and speed.
  • Add ½ teaspoon of vanilla extract or rose water to enhance the flavor.
  • For an exotic twist, stir ½ teaspoon of shredded coconut into the batter.
  • If your strawberries aren't sweet enough, sprinkle them with a little sugar before adding the batter.
  • Serve the clafoutis as is or dress it up with fresh berries, whipped cream, Mascarpone, vanilla ice cream, or a drizzle of maple syrup.

How to store it

Store leftover clafoutis in a tightly covered container in the refrigerator for up to 3 days.

Love custards? Try these next!

  • Coconut flan decorated with coconut chips and served on a white plate.
    Flan de Coco (Coconut Flan) Recipe
  • Ready cherry French dessert clafoutis served in individual dishes on a striped kitchen towel.
    Clafoutis Aux Cerises (French Clafoutis)
  • A slice of Far Breton on top of the prune custard.
    French Prune Custard Cake
  • Peach clafoutis slice on a red dessert plate.
    Easy Fresh Peach Clafoutis

Want more delicious and beautiful recipes? Subscribe to my newsletter and follow me on Facebook, Pinterest, and Instagram for my latest updates. If you make this recipe, please leave a star rating on the recipe card and comment below!

Print

Recipe card

Strawberry Clafoutis (Clafoutis aux Fraises)

Warm strawberry clafoutis desserts resting on a wire rack after baking.
Print Recipe
Save Recipe Recipe Saved

5 Stars 4 Stars 3 Stars 2 Stars 1 Star

5 from 9 reviews

Satisfy your sweet tooth with this easy French dessert - strawberry clafoutis. Seasonal berries baked in a rich, dense custard make a perfect dessert to entertain your guests or treat yourself for breakfast or at any night of the week. 

  • Author: Irina Totterman
  • Total Time: 55 minutes
  • Yield: 2 1x
  • Category: Custards
  • Method: Baking
  • Cuisine: French
  • Diet: Gluten Free

Ingredients

Scale
  • 7 oz. (200 g) fresh strawberries
  • 1 whole large egg
  • 1 large egg yolk
  • ½ cup + 1 tablespoon (130 ml) whole milk
  • ½ cup + 1 tablespoon (130 ml) heavy cream
  • ⅓ cup (75 g) granulated sugar
  • ½ pinch of salt
  • 3 ⅓ tablespoons (30 g) corn starch
  • 1 tablespoon icing (powdered) sugar (optional)

*Don't you have the correct baking pan on hand right now? Try this simple Cake Pan Converter!

** If needed, please refer to Baking Conversion Charts.

Instructions

  1. Preheat the oven to 390°F (200°C). Grease two 12-oz. porcelain ramekins or one large ramekin with butter and sprinkle with granulated sugar. Wash strawberries under cool water, drain in a colander, and hull them using a strawberry huller. Cut berries into halves or quarters lengthwise and place them at the bottom of the prepared mold/s. 
  2. In a mixing bowl, combine cornstarch, sugar, and salt. Add the whole egg and the beaten yolk and mix with a hand whisk. Add milk, heavy cream, and mix until you obtain a smooth batter. Pour the preparation over strawberries.
  3. Bake for 35 to 40 minutes until puffy and golden brown. Serve warm or cold from ramekins or a baking dish. Dust with icing (powdered) sugar.

Notes

  1. Watch the video on how to hull strawberries with a strawberry huller.
  2. Use a blender to make the batter if desired.
  3. To flavor your clafoutis, add ½ teaspoon of vanilla extract or rose water.
  4. For a more exotic flavor, stir ½ teaspoon of shredded coconut into the batter. 
  5. If your strawberries are not sweet enough, sprinkle berries with a bit of sugar before adding the batter, and serve your clafoutis sprinkled with icing sugar.

Nutrition

  • Serving Size: 12 oz. ramekin
  • Calories: 560
  • Sugar: 47.5 g
  • Sodium: 128 mg
  • Fat: 31.4 g
  • Saturated Fat: 18 g
  • Carbohydrates: 65.8 g
  • Fiber: 2 g
  • Protein: 8.5 g
  • Cholesterol: 295 mg

Thank you for following me on Pinterest, Facebook, and Instagram. Hashtag #bakinglikeachef so I can see your creations.

The nutritional information has been calculated using an online recipe nutrition calculator such as Verywellfit.com and is intended for informational purposes only. These figures should be used as a general guideline and not be construed as a guarantee.

French Lemon Cream Tart (Gluten-free)

Apr 17, 2021 · 20 Comments

Sliced French lemon cream tart on a cake board.

French lemon cream tart is a sophisticated and elegant lemon dessert made with a flourless coconut dacquoise, tangy lemon cream, and beautiful Italian meringue. No flour, no crust, just pure indulgence.

Sliced French lemon cream tart on a cake board

This lemon cream tart (Tarte à la crème de citron in French) is quite unusual. You will be thrilled to discover that there is no need for laborious tart shell preparation.

[feast_advanced_jump_to]

Forget making traditional shortcrust pastry by sweating at rolling the tart dough, pressing it into a tart pan, and baking it with pie weights. This unique crustless lemon tart offers a delightful twist.

Lemon tart topping is made with pure lemon juice and has such a soft texture that you will be impressed while making it.

BAKING ESSENTIALS CHECKLIST

Sign up and get a list of the necessary baking tools and ingredients

FREE DOWNLOAD

The tart is pipped with Italian meringue that is safe to eat, alternated with lemon cream, and sprinkled with lime zest.

You might also like other lemon desserts like Lemon Curd Cake, French lemon tart, or lemon poppy seed bars.

Crustless tart topped with lemon cream and meringue and sprinkled with lime zest

Lemon cream tart recipe

  • It is a simple tart recipe, easy peasy to make.
  • The creamy lemon tart topping has a perfect balance with the sweet meringue. It is ideal for filling delicious pastries like French cream puffs, chouquettes, and eclairs.
  • Flourless lemon tart is a gluten-free dessert.
  • It is very refreshing and is perfect for finishing a heavy meal.

Ingredients

French lemon cream tart ingredients

For ingredients and detailed instructions, refer to the recipe card below.

  • Eggs: Use large whole eggs and egg whites at room temperature. To make the meringue, use pasteurized egg whites to serve the tart for kids, pregnant women, or if you are concerned about salmonella bacteria in raw eggs.

Pro tip: Please, read on how to pasteurize eggs at home.

  • Sugar: To make a coconut dacquoise, use caster sugar or process granulated sugar with a food processor to make it superfine. To make the meringue, use any white sugar.
  • Lemon juice: Make it yourself using a citrus juicer. Avoid using bottled lemon juice that is incredibly sour, tart, and sometimes even bitter. Fresh lemon juice is essential to make lemon cream.
  • Gelatin: You will need a ½ gelatin sheet with a strength of 200 bloom.
  • Butter: The recipe calls for softened unsalted butter. Take it out of the fridge 1 to 2 hours before you start.
  • Lime and lemon zest: use untreated citrus to make the zest with a zester grater.
  • Shredded coconut is the base of coconut dacquoise.
  • Almond flour is another dacquoise ingredient to make the tart's base.
Lemon tart slice on a white plate

How to make French lemon cream tart

Step 1. To make the lemon cream, get fresh lemon juice using a citrus juicer. Soak half of the gelatin sheet in cold water for 10 minutes.

Step 2. Pour lemon juice, add sugar, drained gelatin, lemon zest (from 3 lemons), and eggs in a small saucepan and mix.

Step 3. Heat the egg mixture over medium heat to 185°F (85°C), constantly stirring - use an instant-read thermometer (photo 1). Pass the preparation through a fine-mesh sieve to get the zests.

Step 4. Cover the lemon mixture with plastic film in contact and let it cool. When the preparation is about 113°F (45°C), add the softened butter little by little and mix it with a rubber spatula (photo 2).

Photo 1: Lemon cream mixture in a saucepan Photo 2: lemon cream in a bowl
PHOTO 1 PHOTO 2

Step 5. Cover the cream with a piece of plastic wrap in contact and refrigerate overnight.

Step 6. To make coconut dacquoise, preheat the oven to 355°F (180°C). Butter an 8-inch (20 cm) cake ring and place it on a baking sheet covered with parchment paper.

Step 7. In a bowl, mix almond flour and coconut and set aside. Using a stand or electric mixer, beat egg whites with a pinch of salt until stiff.

Step 8. Gradually add caster sugar to get a glossy meringue (photo 3). Using the spatula, gently incorporate the dry mixture in two batches (photo 4).

Photo 3: Meringue in a bowl Photo 4: Dacquoise preparation in a bowl
PHOTO 3 PHOTO 4

Step 9. Transfer the preparation to a pastry bag with Ateco plain pastry tip 809 or a cut tip and push a spiral into the cake ring (photo 5).

Step 10. Bake for 15 to 20 minutes (photo 6). Let cool on a wire rack.

Photo 5: Piped dacquoise into a cake ring Photo 6: Baked dacquoise in a ring
PHOTO 5 PHOTO 6

Step 11. To make Italian meringue, whisk egg whites with a stand or electric mixer until they are foamy.

Step 12. Pour water into a stainless steel bowl, add sugar, and heat to 250°F (121°C), checking it with a cooking thermometer.

Step 13. Slowly pour the hot sugar syrup into the egg whites, constantly whisking. Beat the meringue until it is cooled down (photo 7).

Step 14. To assemble the tart, place coconut dacquoise on a serving platter or a cake board. Transfer the meringue to a pastry bag with Ateco plain pastry tip 809.

Step 15. Pipe large balls on the dacquoise in a circular pattern, skipping a "spot" that will be filled with the cream. Using a hand-held blow torch, brown the meringue until slightly brown.

Step 16. Place lemon cream in a pastry bag fitted with Ateco plain pastry tip 809 and pipe large drops between the piped meringue balls. Press on the pastry bag, then lift to obtain the drops (photo 8).

Photo 7: Meringue in a bowl Photo 8: Decorated lemon cream tart on a cake board
PHOTO 7 PHOTO 8

Step 17. Using a Microplane, zest the lime over the tart. Refrigerate for at least 2 hours.

A sliced lemon cream tart served on a cake board with meringues in the background

Expert Tips

  1. Use pasteurized egg whites if you are concerned about raw eggs.
  2. Pipe the meringue and lemon cream filling in staggered rows or any pattern you prefer.
  3. Decorate the tart with slices of candied lemon if desired.
  4. To omit meringue, double the creamy filling and pipe it over the tart. Decorate it with small store-bought meringues and lime zest.
  5. To make a 9-inch tart or a more extensive crowd pleaser, use this simple cake pan converter to re-calculate the ingredients.
  6. Make-ahead option: Prepare the lemon cream and bake a coconut dacquoise one day in advance. Keep the tart's base in an airtight container overnight. The next day, assemble the tart and serve.

Storing and freezing

Store creamy lemon tart in the refrigerator for 2-3 days. It is not recommended to freeze any part of the dessert.

Recipe FAQ

Can you make a French lemon cream tart ahead of time?

You can prepare the lemon cream and coconut dacquoise ahead of time. Store the tart's base in an airtight container overnight. On the following day, assemble and serve the tart.

Love pies and tarts? Try these next!

  • French Strawberry Tart
  • Plum Frangipane Tart
  • Strawberry Pistachio Tart
  • French Pumpkin Pie
  • Or browse all the tart recipes

Want more delicious and beautiful recipes? Subscribe to my newsletter and follow me on Facebook, Pinterest, and Instagram for my latest updates. If you make this recipe, please leave a star rating on the recipe card and comment below!

Print

Recipe card

French Lemon Cream Tart

Sliced French lemon cream tart on a cake board.
Print Recipe
Save Recipe Recipe Saved

5 Stars 4 Stars 3 Stars 2 Stars 1 Star

5 from 10 reviews

French lemon cream tart is a sophisticated and elegant lemon dessert. It is made with a coconut dacquoise base and a tangy lemon cream beautifully balanced with Italian meringue. 

  • Author: Irina Totterman
  • Total Time: 1 hour, 30 minutes (plus chilling time)
  • Yield: 6 1x
  • Category: Tarts
  • Method: Baking
  • Cuisine: French
  • Diet: Gluten Free

Ingredients

Scale

For the lemon cream:

  • 1 ½ large eggs, room temperature
  • ⅓ cup (75 g) granulated sugar
  • ⅓ cup (75 g) fresh lemon juice
  • 3 lemons, finely-grated lemon zest
  • ½ gelatin sheet, 200 bloom
  • 3.2 oz. (90 g) unsalted butter, softened

For coconut dacquoise:

  • 3 large egg whites, room temperature
  • 1 pinch of salt
  • ⅓ cup + 2 tablespoons (100 g) caster sugar
  • 1.6 oz. (45 g) shredded coconut
  • ½ cup + 2 tablespoons (60 g) almond flour

For Italian meringue:

  • 2 large egg whites, room temperature
  • 7 teaspoons (35 g) water
  • ½ cup + ½ tablespoon (120 g) granulated sugar

For decoration:

  • ½ lime, zest

*Don't you have the correct baking pan on hand right now? Try this simple Cake Pan Converter!

** If needed, please refer to Baking Conversion Charts.

Instructions

  1. To make the lemon cream, get fresh lemon juice by using a citrus juicer. Soak half of the gelatin sheet in cold water for 10 minutes.
  2. Pour fresh lemon juice, add sugar, drained gelatin, lemon zest (from 3 lemons), and eggs in a small saucepan and mix. Heat the mixture over medium heat to 185°F (85°C), constantly stirring. Pass the preparation through a fine-mesh sieve to get the zests.
  3. Cover it with plastic film in contact and let it cool. When the preparation is about 113°F (45°C), add the softened butter little by little and mix with a rubber spatula. Cover the cream with plastic in contact and refrigerate overnight.
  4. To make coconut dacquoise, preheat the oven to 355°F (180°C). Butter an 8-inch (20 cm) cake ring and place it on a baking sheet covered with parchment paper. In a bowl, mix almond flour and coconut and set aside.
  5. Using a stand mixer or an electric mixer, beat egg whites with a pinch of salt until stiff. Gradually add caster sugar to get a glossy meringue. Using the spatula, gently incorporate the dry mixture in two batches.
  6. Transfer the preparation to a pastry bag with Ateco plain pastry tip 809 or a cut tip and push a spiral into the cake ring. Bake for 15 to 20 minutes. Let cool on a wire rack.
  7. To make Italian meringue, whisk egg whites with a stand or electric mixer until they are foamy. Heat sugar with water to 250°F (121°C), checking it with a cooking thermometer. Slowly pour the sugar syrup into the egg whites, constantly whisking. Beat the meringue until it is cooled down.
  8. To assemble the tart, place coconut dacquoise on a serving platter or a cake board. Transfer the meringue to a pastry bag fitted with Ateco plain pastry tip 809.
  9. Pipe large balls on the dacquoise in a circular pattern, skipping a "spot" that will be filled with the cream. Using a hand-held blow torch, brown the meringue until slightly brown.
  10. Place lemon cream in a pastry bag fitted with Ateco plain pastry tip 809 and pipe large drops between the piped meringue balls. Using a zester grater, zest the lime over the tart. Refrigerate for at least 2 hours.

Notes

  1. Make sure to use pasteurized egg whites if you are concerned about raw eggs.
  2. Pipe the meringue and lemon cream in staggered rows or any pattern you prefer.
  3. Decorate the tart with slices of candied lemon if desired.
  4. To make this lemon cream tart without meringue, double the cream and pipe it over the tart. Decorate it with small store-bought meringues and lime zest.
  5. Make-ahead option: Prepare the lemon cream and bake a coconut dacquoise one day in advance. Keep the tart's base in an airtight container overnight. The next day, assemble the tart and serve.

Nutrition

  • Serving Size: 1 slice
  • Calories: 404
  • Sugar: 50.1 g
  • Sodium: 125 mg
  • Fat: 21.2 g
  • Saturated Fat: 12.5 g
  • Carbohydrates: 53.1 g
  • Fiber: 1.8 g
  • Protein: 3.8 g
  • Cholesterol: 79 mg

Thank you for following me on Pinterest, Facebook, and Instagram. Hashtag #bakinglikeachef so I can see your creations.

The nutritional information has been calculated using an online recipe nutrition calculator such as Verywellfit.com and is intended for informational purposes only. These figures should be used as a general guideline and not be construed as a guarantee.

The recipe was adapted from www.notretemps.com. It was originally published on May 07, 2018. The recipe has been revised to include improved content and photos. 

Blanc-manger (Blancmange)

Apr 9, 2021 · 10 Comments

Glass jars with blancmange, fruit coulis, and fresh fruit and a tea towel in the background.

For a light and fresh dessert, try this easy French blanc-manger (known as blancmange in English) - made with a few ingredients. Served in glasses or small jars, it is perfect for family gatherings or entertaining parties.

Glass jars with blancmange, fruit coulis, and fresh fruit and a tea towel in the background

Blanc-manger means "white dish" in Old French. It also means it has to be made with white ingredients.

In modern French, the word blanc is translated as "white," and the word manger is the verb "to eat."

Blancmange is a sister of Italian panna cotta, Middle Eastern muhallebi, Chinese annin tofu, Hawaiian haupia, and Puerto Rican tembleque.

Blanc-manger is made in different ways: with whole milk, with or without heavy cream, with sweetened condensed milk, cottage cheese, coconut milk, almond milk, corn starch, rice flour, gelatin, agar-agar, etc.

BAKING ESSENTIALS CHECKLIST

Sign up and get a list of the necessary baking tools and ingredients

FREE DOWNLOAD

[feast_advanced_jump_to]
A spoon with blanc-manger, red fruit coulis, and raspberry over a glass jar: Close up

What is blanc-manger?

Blanc-manger (blancmange in English) is a fancy-sounding dessert made with milk or heavy cream, sugar and thickened with gelatin, agar-agar, or cornstarch.

It is served cold in glasses, ramekins, small glass jars, or as a dessert set in a mold. Authentically white, it can also be made in different colors.

Blancmange variations

Blancmange is delicious all on its own or served with various toppings, for example, berry coulis (the recipe is below).

Serve it with other fruit coulis, such as mango, blackberry, banana, orange puree, or passion fruit pulp.

Decorate your blanc-manger with mango ribbons or wedges, fresh pomegranate or kumquats, half of the canned or fresh apricot, pineapple, or kiwi cut into cubes.

For your gourmet pleasure, serve the dessert with figs poached in sweet red wine.

Sprinkle the blancmange with toasted flaked almonds, shredded coconut, fresh or toasted coconut shaving, white chocolate shavings, or cranberries and raisins mixture.

Bring the final touch to the dessert with lime zest and a mint leaf.

Why you should try this recipe

  1. It is an easy old recipe already made in the Middle Ages but still relevant today. 
  2. The blancmange is perfect for serving at birthday or wedding parties, family gatherings, or entertaining parties.
  3. Using different fruit, blanc-manger makes a colorful dessert at any time of the year.
A glass with blancmange, fruit coulis, and fresh red fruit; a pink towel in the background

Ingredients

For ingredients and detailed instructions, refer to the recipe card below.

Almond milk: use unsweetened almond milk or make it yourself.

Heavy cream: the recipe calls for heavy cream with at least 36% fat content. Replace it with whipped cream (30% fat content) or whole milk.

Whipped cream: use your favorite brand of whipped cream with 30% fat content.

Gelatin: use gelatin sheets with a strength of 200 bloom.

Sugar: use granulated white sugar or replace it with caster sugar.

Vanilla pod: the best is to use Madagascar vanilla bean to make the dessert.

Red fruit: use any combination of red fruit (strawberries, raspberries, blueberries, or blackberries) to make a coulis.

How to make blancmange

To make red fruit coulis, mix the fruits and sugar in a food processor, except a few for the decoration (photo 1).

Pass it through a fine-mesh sieve to obtain a coulis (photo 2). Refrigerate.

Photo 1: Mixed red fruit in a bowl Photo 2: Ready fruit coulis in a bowl
PHOTO 1 PHOTO 2

To make blanc-manger, soak gelatin in cold water for 10 minutes. Split the vanilla bean in half, lengthwise.

Pour almond milk and heavy cream into a saucepan. Add sugar and vanilla pod (photo 3), bring to a boil, and let it simmer for a few minutes.

Take the pan from the heat, add drained gelatin to the hot mixture, and mix.

Pour it in a shallow dish, cover with plastic film in contact and refrigerate for at least 4 hours.

Whisk whipping cream with an electric mixer into whipped cream (photo 4).

Photo 3: Milk mixture in a saucepan Photo 4: Whipped cream in a bowl
PHOTO 3 PHOTO 4

Take the milk preparation from the refrigerator. Add a few spoons of the whipped cream to the almond blancmange and mix with a hand whisk.

Then pour the blancmange into the whipped cream. Gently mix by lifting the mixture with the whisk (photo 5).

Transfer the blancmange to a pastry bag with the cut tip and push it into glasses/small glass jars. Refrigerate for about 2 hours.

To serve, pour 1 to 2 tablespoons red fruit coulis on top of the blancmange. Decorate with fresh fruit and serve (photo 6). 

Photo 5: Blancmange in a bowl Photo 6: Served blanc-manger in a small glass jar
PHOTO 5 PHOTO 6

Expert tips

  1. Make sure to mix a little whipped cream with the main preparation before putting it in the whipped cream to incorporate well.
  2. If the blancmange is "lumpy" after adding it to the whipped cream, continue to mix gently until it becomes homogeneous. 

Frequently asked questions

What is red fruit coulis?

Red fruit coulis is a liquid sauce made from pureed and strained red fruit. Coulis is a great way to dress up desserts. Red fruit coulis is rich in vitamins C, especially blackcurrant, and minerals (calcium, magnesium, iron, and potassium).

What is the difference between blancmange and custard?

Blancmange is a cooked dessert with the use of thickeners (corn starch, gelatin, agar-agar, etc.). Custard is softer and made with eggs.

Love easy desserts? Try these next!

  • French Chocolate Mousse
  • French Rice Pudding
  • Banoffee Pie Cups
  • Browse all the No-Bake Desserts

Want more delicious and beautiful recipes? Subscribe to my newsletter and follow me on Facebook, Pinterest, and Instagram for my latest updates. If you make this recipe, please leave a star rating on the recipe card and comment below!

Print

Recipe card

Blanc-manger (Blancmange)

Glass jars with blancmange, fruit coulis, and fresh fruit and a tea towel in the background.
Print Recipe
Save Recipe Recipe Saved

5 Stars 4 Stars 3 Stars 2 Stars 1 Star

5 from 4 reviews

For a light and fresh dessert, try this easy French Blanc-manger (known as Blancmange in English) - made with a few ingredients. Served in glasses or small jars, it is perfect for family gatherings or entertaining parties.

  • Author: Irina Totterman
  • Total Time: 40 minutes (plus chilling time)
  • Yield: 4 1x
  • Category: No-Bake Desserts
  • Method: No-Bake
  • Cuisine: French
  • Diet: Gluten Free

Ingredients

Scale

For blanc-manger:

  • ½ cup + 2 teaspoons (125 ml) unsweetened almond milk
  • ½ cup + 2 teaspoons (125 ml) heavy cream
  • 1 cup + 4 teaspoons (250 ml) whipped cream
  • 2 gelatin sheets
  • 4 ½ tablespoons (65 g) granulated sugar
  • 1 vanilla bean

For red fruit coulis:

  • 1 oz. (30 g) strawberries
  • 1 oz. (30 g) raspberries
  • 1 oz. (30 g) blueberries
  • 1 tablespoon (15 g) granulated sugar

* If needed, please refer to Baking Conversion Charts.

Instructions

  1. To make red fruit coulis, mix the fruits and sugar in a food processor (except a few for the decoration). Pass it through a fine-mesh sieve to obtain a coulis. Refrigerate.
  2. To make blanc-manger, soak gelatin in cold water for 10 minutes. Split the vanilla bean in half, lengthwise. Pour almond milk and heavy cream into a saucepan. Add sugar and vanilla pod, bring to a boil and let it simmer for a few minutes. Take the pan from the heat, add drained gelatin to the hot mixture, and mix. Pour it in a shallow dish, cover with plastic film in contact and refrigerate for at least 4 hours.
  3. Whisk whipping cream with an electric mixer into whipped cream. Take the milk preparation from the refrigerator. Add a few spoons of cream to the almond blancmange and mix with a hand whisk. Then pour the blancmange into the whipped cream. Gently mix by lifting the mixture with the whisk.
  4. Transfer the blancmange to a pastry bag with the cut tip and push it into glasses/small glass jars. Refrigerate for about 2 hours.
  5. To serve, pour 1 to 2 tablespoons red fruit coulis on top of the blancmange. Decorate with fresh fruit and serve. 

Notes

  1. Make sure to mix a little whipped cream with the main preparation before putting it in the whipped cream to incorporate well.
  2. If the blancmange is "lumpy" after adding it to the whipped cream, continue to mix gently until it becomes homogeneous. 

Nutrition

  • Serving Size: 1 serving glass
  • Calories: 394
  • Sugar: 21.5 g
  • Sodium: 58 mg
  • Fat: 31.9 g
  • Saturated Fat: 19.6 g
  • Carbohydrates: 25.6 g
  • Fiber: 1 g
  • Protein: 4.8 g
  • Cholesterol: 114 mg

Thank you for following me on Pinterest, Facebook, and Instagram. Hashtag #bakinglikeachef so I can see your creations.

The nutritional information has been calculated using an online recipe nutrition calculator such as Verywellfit.com and is intended for informational purposes only. These figures should be used as a general guideline and not be construed as a guarantee.

Riz au lait (French Rice Pudding)

Apr 2, 2021 · 38 Comments

Glass jar with a spoon full of French rice pudding topped with caramel.

Made with real vanilla bean, this beautifully creamy French rice pudding, or riz au lait, is a popular French dessert and the best breakfast option. Try this traditional, timeless French pudding recipe, or bring a new flavor to an old favorite.

A spoon with rice pudding and caramel with jars in the background

There is nothing easier than making French rice pudding. For every French, it is a grandmother's dessert with the beautiful taste of childhood.

It is a comforting breakfast or a gourmet dessert easily made at home for the rest of the world.

[feast_advanced_jump_to]

What is French rice pudding?

French rice pudding, or riz au lait, is a traditional French dessert with rice cooked in milk flavored with vanilla bean.

Its cooking principle is simple: rice grains must absorb the milk while slowly cooking rice.

BAKING ESSENTIALS CHECKLIST

Sign up and get a list of the necessary baking tools and ingredients

FREE DOWNLOAD

The name of this recipe, riz au lait, originates from the French words 'riz' for rice and 'lait' for milk.

Three glass jars with riz au lair topped with salted butter caramel

The best rice for rice pudding

To make a tasty and creamy rice pudding, it is essential to choose the correct rice.

  • It has to have the ability to absorb the liquid as much as possible. So, round short-grain rice is the best dessert rice due to the rounded grains.
  • It has to be rich in starch, so it tends to stick together during cooking. Therefore, it gives a signature creamy texture to the dessert.

The French use special round white rice called "riz rond." Risotto rice with short and round grains has the same qualities as pudding rice.

That is why Arborio rice, Carnaroli, and Vialone Nano rice are the best choice to succeed in pudding making.

Two glass jars with rice pudding and rice grains in the background

French rice pudding recipe

  • Rriz au lait recette is a quick and easy grandmother's recipe.
  • It is made with pantry staples - simple ingredients like rice, milk, sugar, and vanilla. 
  • For every French, it is a childhood dessert; every French grandmother knows the secrets of the best pudding recipe.
  • It is a perfect comfort food for serving breakfast, brunch, or finishing a refined dinner.

Ingredients:

For ingredients and detailed instructions, refer to the recipe card below.

  • Rice: Use short grain round rice such as riz rond (in France) or risotto rice such as Arborio rice, Carnaroli, and Vialone Nano rice found in grocery stores or on Amazon.
  • Milk: The recipe calls for whole milk, but use low-fat milk if desired. To make rice pudding dairy-free, use soy, rice, oat, or almond milk (1 liter) instead of milk and heavy cream.
  • Heavy cream: Use heavy cream with at least 30% fat content. Replace it with full fat milk if desired.
  • Sugar: Use granulated or caster sugar interchangeably. Or replace granulated sugar with brown sugar or a sweetener. You can decrease the amount of sugar used to cook the rice.
  • Vanilla bean: Use Madagascar vanilla beans for the best flavor. You can replace a vanilla pod with 1 sachet of vanilla sugar, 1 teaspoon vanilla paste, 1 teaspoon vanilla extract, or approximately 1 tablespoon of vanilla syrup - a delicious recommendation from French chef Raymond Blanc.

How to make riz au lait

Step 1. To make rice pudding, split a vanilla bean in half lengthwise and scrape off the seeds with a knife's tip (photo 1).

Step 2. Pass the rice under cold water several times until the water is clear (photo 2). 

Pro tip: Washing rice helps remove the excessive starch. If you plan to make rice pudding in the morning, soak rice overnight and rinse it the next day.

Photo 1: Vanilla bean, a knife, seeds on a board Photo 2: Rice over a sieve
PHOTO 1 PHOTO 2

Step 3. Immerse it in a large saucepan of boiling water and simmer/blanch for 2-3 minutes. Drain the rice using a colander or a fine-mesh sieve, but don't rinse it out (photo 3).

Pro tip: Simmering the rice for a couple of minutes is called bursting the grains. This step allows the rice to better release the starch, but also to be able to absorb more milk. 

Step 4. Pour milk, heavy cream, place the vanilla pod and scraped vanilla seeds in a medium saucepan and bring over medium-high heat. 

Step 5. Once it starts to boil, pour in the drained rice. Reduce the heat to low, and cook for about 30 to 40 minutes, stirring regularly with a wooden spoon. 

Pro tip: remember to stir regularly with a spoon to prevent the pudding from sticking to the bottom of the pan

Step 6. Add sugar and let gently simmer for another 2 minutes. Remove from the heat, and let cool (photo 4).

Photo 3: Blanched rice over sieve Photo 4: Cooked rice pudding in a saucepan
PHOTO 3 PHOTO 4

Step 7. Making caramel sauce is an optional step. Pour sugar into a small saucepan and cook over medium heat.

Pro tip: Don't use utensils. Just shake the pot over the stove until the caramel gets an amber color.

Step 8. Remove from the heat, pour the warm cream, constantly stirring (be careful of the splash). Add butter and mix for about one minute over low heat (photo 5).

Step 9. Discard the vanilla bean once the rice has cooled (photo 6).

Photo 5: Caramel in a saucepan Photo 6: Rice pudding with a spoon in a bowl
PHOTO 5 PHOTO 6

To serve, divide riz au lait into dessert cups or jars. Pour hot caramel over the dessert. Bon appétit!

A spoon with French rice pudding mixed with caramel over a glass jar

Expert Tips

  1. For more creaminess, reduce the rice to 2.8 to 3.5 oz. (80 to 100 g) for 1 liter of milk.
  2. The rice is ready when it is soft and creamy and absorbs almost all the liquid. Remember that the rice will finish soaking up milk as it cools.
  3. If the rice is too compact when cooled, add a little warm milk to soften it.
  4. Make the caramel once ready to serve rice pudding. If it hardens, warm it up over low heat.
  5. Be careful not to overcolor the caramel to avoid it becoming bitter.
  6. Replace homemade caramel with the store-bought one or Bonne Maman® confiture de lait.
  7. Serve rice pudding warm, lukewarm, or chilled. Once it is cooled at room temperature, place the dessert in the refrigerator for at least 1 hour.

Recipe variations

The desired flavor has to be added to milk at the beginning of rice cooking. The flavor has to be distilled in liquid, but there are some exceptions.

For French chef Cyril Lignac,

...rice pudding is a great passion, especially since we can bring it lots of different flavors.

  • Vanilla: It is a classic flavor of French rice pudding. Split vanilla bean in half lengthwise, scrape the seeds over a saucepan. Infuse the vanilla pod in the milk/cream mixture throughout the cooking and remove it at the end or before serving.
  • Cinnamon: Cook rice with a cinnamon stick, then discard it. Or divide the rice pudding into individual ramekins and sprinkle with ground cinnamon.
  • Cardamom: Add ½ tablespoon ground cardamom to the milk/cream mixture and cook the rice.
  • Lavender: Add 1 to 2 drops of lavender essential oil when adding sugar, and cook for another two minutes.
  • Ginger: Add 2 to 3 cm of peeled fresh ginger to the milk/cream mixture and cook. Discard it once riz au lait is ready.
  • Anise: Use 1 whole anise star to infuse a creamy mixture. Remove it after cooking.
  • Chocolate: Add 1.7-3.5 oz. (50-100 g) grated dark, milk, or white chocolate to the milk mixture and continue cooking as directed in the recipe.
  • Nutella: Add 3 tablespoons Nutella hazelnut spread to the hot rice pudding (while off the heat) and mix gently.
  • Citrus: Add orange or lemon zests to the milk mixture and cook the rice. Or add 1.4 oz. (40 g) chopped candied orange peel at the end of cooking. Also, decorate the top of the dessert with citrus zests.
  • Pink Praline: Grind 3.5 oz. (100 g) Pink Praline and add to the cooked rice pudding and mix gently.
  • Rose water: Add 1 tablespoon of rose water to bring a romantic touch to the dessert.
  • Matcha tea: Add a little matcha green tea powder to the milk/cream mixture to get a nice color and a unique taste to your dessert.
  • Pistachios: Add 1.7 oz. (50 g) pistachio paste to the hot rice off the heat. Once serving, sprinkle the dessert with ground pistachios and serve with a scoop of rose ice cream.

How to serve rice pudding

Enjoy rice pudding warm, at room temperature, or chilled.

To serve rice pudding, use regular bowls, ramekins, glasses, or small cups. You can even create verrines by superimposing the different layers: rice pudding, fruit coulis, and fresh fruit. Just be creative.

  • To serve it cold, cover the cooled pudding with plastic wrap in contact and refrigerate for 1 to 3 hours before serving.
  • Add 3.5-7 oz. (100 -200 g) the cold sugar-free whipped cream to the chilled rice pudding to lighten the dessert.
  • Mix cold rice pudding with vanilla custard chilled overnight.
  • Garnish it with dried fruit (apricots, prunes, raisins, etc.) previously macerated for 10 minutes in rum or black tea. 
  • Sprinkle rice pudding with caramelized hazelnuts, almonds, chopped toasted pistachios, flaked almonds, or muesli.
  • Top it with berries (fresh raspberries, half-strawberries, blackberries), fresh or stewed fruits (peach, mango, etc. ), dust with icing (powdered) sugar, and decorate with a small sprig of rosemary or mint.
  • Pour liquid honey, maple syrup, salted butter caramel, or red berries, or rhubarb compote on top of the dessert. 

Storing and freezing

Store French rice pudding in an airtight container or a bowl with plastic in contact in the refrigerator for up to 2 days.

Can you freeze rice pudding? You can freeze it in individual air-tight containers for up to three months. To thaw, bring the dessert to the refrigerator for a few hours.

Recipe FAQ

Why do you have to wash the rice?

Rice adds starch for a creamy texture in the pudding, but the French wash it to remove dust and excess starch. This step also shortens cooking time to just 45 minutes.

Why should you blanch the rice?

Blanching rice involves soaking/cooking it in boiling water for 3 to 5 minutes to increase absorption capacity. This process allows for greater milk absorption. However, if you don't have time or miss this step, it's not a problem. Simply cook the rice a bit longer for a slightly firmer texture in your pudding.

Can you make rice pudding in advance?

Prepare rice pudding a day in advance. Allow it to cool, then cover it tightly with plastic wrap to keep the surface of the pudding from drying out. Refrigerate overnight and serve the following day.

Can you cook rice pudding in the oven?

You can cook rice pudding in the oven. Place all the ingredients in an ovenproof pot and cook at 355°F (180°C) for 1 hour 40 minutes, stirring regularly.

Love quick desserts? Try these next!

  • Banoffee Pie Cups
  • French Chocolate Mousse
  • Fig Tiramisu
  • Or browse all the no-bake desserts

Want more delicious and beautiful recipes? Subscribe to my newsletter and follow me on Facebook, Pinterest, and Instagram for my latest updates. If you make this recipe, please leave a star rating on the recipe card and comment below!

Print

Recipe card

Riz au lait (French rice pudding)

Glass jar with a spoon full of French rice pudding topped with caramel.
Print Recipe
Save Recipe Recipe Saved

5 Stars 4 Stars 3 Stars 2 Stars 1 Star

5 from 19 reviews

French rice pudding, or riz au lait, is a traditional French dessert made with rice cooked in milk flavored with real vanilla bean.

  • Author: Irina Totterman
  • Total Time: 45 minutes
  • Yield: 4 1x
  • Category: No-Bake Desserts
  • Method: Cooking
  • Cuisine: French
  • Diet: Gluten Free

Ingredients

Scale

For rice pudding:

  • 4.2 oz. (120 g) Arborio rice
  • 3 cups + 3 ½ tablespoons (750 ml) whole milk
  • 1 cup + 1 ½ tablespoons (250 ml) heavy cream
  • ¼ cup (55 g) granulated sugar
  • 1 vanilla bean

For caramel:

  • ⅓ cup (75 g) granulated sugar
  • 1 ½ tablespoons (20 g) salted butter
  • 3 ½ tablespoons (50 ml) heavy cream

* If needed, please refer to Baking Conversion Charts.

Instructions

  1. To make rice pudding, split a vanilla bean in half lengthwise and scrape off the seeds with the tip of a knife.
  2. Rinse the rice thoroughly with running cold water to remove the starch.
  3. Immerse it in a large saucepan of boiling water and simmer/blanch for 3 minutes. Using a colander or a fine-mesh sieve, drain the rice.
  4. Pour milk, heavy cream, place both the vanilla pod and seeds in a medium-to-large saucepan and bring to a boil. Pour in the drained rice, reduce the heat to low, and cook for about 30 to 40 minutes, stirring regularly with a wooden spatula. 
  5. Add sugar and cook for another 2 minutes. Remove from the heat, let cool. 
  6. To make caramel, pour sugar in a small saucepan and cook over medium heat. Don't use utensils. Just shake the pot over your stove until the caramel gets an amber color.
  7. Remove from the heat, pour the warm cream, constantly stirring (be careful of the splash). Add butter and mix for about one minute over low heat.
  8. To serve, discard the vanilla bean once the rice has cooled and divide riz au lait into dessert cups/bowls. Pour hot caramel over the dessert.

Notes

  1. For more creaminess, reduce the rice to 2.8 to 3.5 oz. (80 to 100 g) for 1 liter of milk.
  2. The rice is ready when it is soft and creamy and has absorbed almost all of the liquid. Please, remember that the rice will finish soaking up milk as it cools.
  3. If the rice is too compact when cooled, add a little warm milk to soften it.
  4. Make the caramel once ready to serve rice pudding. If it hardens, warm it up over low heat.
  5. Be careful not to overcolor the caramel to avoid it becoming bitter.
  6. Replace homemade caramel with the store-bought one or Bonne Maman® confiture de lait.
  7. Serve rice pudding warm, lukewarm, or chilled. Once it is cooled at room temperature, place the dessert in the refrigerator for at least 1 hour.

Nutrition

  • Serving Size: 1 jar
  • Calories: 639
  • Sugar: 43.8 g
  • Sodium: 134 mg
  • Fat: 38.7 g
  • Saturated Fat: 23.6 g
  • Carbohydrates: 66.8 g
  • Fiber: 1.8 g
  • Protein: 12.4 g
  • Cholesterol: 134 mg

Thank you for following me on Pinterest, Facebook, and Instagram. Hashtag #bakinglikeachef so I can see your creations.

The nutritional information has been calculated using an online recipe nutrition calculator such as Verywellfit.com and is intended for informational purposes only. These figures should be used as a general guideline and not be construed as a guarantee.

Floating Islands Dessert

Mar 23, 2021 · 12 Comments

Meringue sphere covered with caramelized hazelnuts on crème Anglaise with the rest of the dessert.

French floating islands dessert is a delicate and fluffy meringue islands floating in a pool of Crème Anglaise, a creamy vanilla custard. Topped off with caramelized hazelnuts, this modern take brings a touch of elegance to any dinner.

Meringue sphere covered with caramelized hazelnuts on crème Anglaise with the rest of the dessert

Loved by kids and adults, the floating island, or île flottante in French, is one of the quintessential desserts of French cuisine.

And if you are looking for a light and fancy sweet treat to finish your dinner party, the floating island meringue will serve the purpose.

[feast_advanced_jump_to]

It also is perfect for serving during Christmas time as a white dessert. Equally, it applies to meringue spheres baked using the same silicone half-sphere molds.

BAKING ESSENTIALS CHECKLIST

Sign up and get a list of the necessary baking tools and ingredients

FREE DOWNLOAD

What is floating island dessert?

Floating island dessert is a creamy and melting dessert where the foaming meringue resembling an island floats on a vanilla custard sauce (crème Anglaise). The dessert is also known as oeufs à la neige, meaning "snow eggs" in English.

It is often called a floating dessert, floating island meringue, French dessert floating island, or Iles Flottantes. But don't confuse it with another delicious dessert called bird's milk.

Sliced floating island dessert with a teaspoon and custard on a dessert plate: Close up

Floating island recipe

  • This floating island recipe is easy, straightforward, and requires simple ingredients, nothing fancy.
  • It is also gluten-free, so everyone will enjoy it regardless of dietary needs.
  • With the make-ahead option, you can save time. Prepare in advance and refrigerate until ready to serve.
  • Plus, this quick dessert is perfect for gatherings and parties. Instead of the traditional spherical shape, simply serve it as half-spheres. This way, you will have delicious treats to satisfy 12 people.

Ingredients

Floating island dessert ingredients

For ingredients and detailed instructions, refer to the recipe card below.

  • Sugar: Use a superfine type of sugar: caster sugar or baker's sugar, to make the meringue. Process it with a food processor for a few seconds to make granulated white sugar superfine.
  • Eggs: Take whole eggs out of the refrigerator and separate egg whites from egg yolks using an egg separator. Then bring both egg whites and the yolks to room temperature.
  • Water is used to make sugar syrup while caramelizing nuts.
  • Hazelnuts: Use store-bought roasted hazelnuts or roast nuts yourself in the oven at 355°F (180°C) for 12 minutes. Replace hazelnuts with almonds, pecans, pistachios, or nuts mix.
  • Butter: The recipe calls for unsalted butter.
  • Salt enhances the flavor of caramelized nuts. Replace it with fleur de sel if desired.
  • Milk: Use whole milk to make creme Anglaise. To lighten up the dessert, replace it with low-fat milk. To make it the opposite, to increase the richness of creme Anglaise, replace half of the whole milk with heavy cream.
  • Vanilla bean: Use Madagascar vanilla beans or replace a vanilla bean with one sachet of vanilla sugar.
Meringue sphere with poured custard served on a red dessert plate: Close up

How to make floating island dessert

Step 1. To make crème Anglaise, split the vanilla bean lengthwise and scrape the seeds. Mix egg yolks with scraped seeds of the vanilla pod and sugar using a hand whisk.

Pro tip: Consult the creme Anglaise recipe for step-by-step photographed explanations, helpful tips, and tricks.

Step 2. Place milk in a small saucepan and bring to a boil. Pour the hot milk into the egg yolk mixture, stirring constantly.

Step 3. Bring everything into the saucepan back and cook over low to medium heat for about 7 to 10 minutes, stirring and tracing "8" with a wooden spatula. Do not let the custard boil!

Step 4. Stop cooking just before boiling (using a cooking thermometer, check the temperature that has to be between 179-183°F or 82-84°C). Don't exceed the custard's temperature of 185°F (85°C).

Pro tip: If you do not have a cooking thermometer, use the test. Wait until the white foam disappears. If the custard coats the back of a spoon well and holds a trace while drawing your finger across it, creme Anglaise is ready.

Step 5. Pass it through a fine sieve or chinois strainer into another bowl set over a larger container with ice cubes so the cooking stops. Cover with plastic film in contact and refrigerate until serving.

Step 6. To make the meringue, preheat the oven to 355°F (180°C). Place room temperature egg whites in a large grease-free bowl or the bowl of a stand mixer. Use an electric whisk or stand mixer with a whisk attachment to beat egg whites at moderate speed.

Step 7. Increase the speed and continue until soft peaks are formed. Gradually add the caster sugar and whisk to get the glossy meringue with stiff peaks (photo 1).

Step 8. Using a brush, lightly oil the cavities of the silicone half-sphere molds.

Pro tip: Read more about how to bake with silicon molds and how to clean them.

Step 9. Transfer the meringue to a pastry bag fitted with Ateco plain pastry tip 809 and push it into half-spheres. Or use a large spoon instead, then even top with a bent spatula (photo 2).

Photo 1: Meringue in a bowl Photo 2: Meringue into half-spheres of the silicone mold
PHOTO 1 PHOTO 2

Step 10. Bake for 3 minutes on the middle rack of the oven (no baking sheet is required).

Step 11. Remove the mold from the oven, and let it stand for a few minutes (photo 3). Turn out the mold onto parchment paper and slightly press each silicone half-sphere to release the baked mounds of meringue (photo 4).

Step 12. Transfer meringues to parchment and refrigerate until ready to assemble.

Photo 3: Meringue half-spheres in the mold Photo 4: Meringue half-spheres on parchment paper
PHOTO 3 PHOTO 4

Step 13. To caramelize hazelnuts, roast hazelnuts at 355°F (180°C) for 12 minutes.

Step 14. Place water and sugar in a saucepan and cook till the temperature is 239°F (115°C). Add the roasted nuts and caramelize them while constantly stirring with a wooden spoon.

At first, hazelnuts will be covered with sugar syrup (photo 5); then, they will get coated with sugar (photo 6).

Photo 5: Hazelnuts coated with syrup in a saucepan Photo 6: Sugared nuts in a pan
PHOTO 5 PHOTO 6

Finally, the sugar will start melting and caramelizing, coating the nuts. At this point, add butter and salt, stirring constantly.

Step 15. Transfer caramelized hazelnuts to parchment paper and let cool (photo 7).

Step 16. Crush lightly using a food processor (photo 8) and keep in an airtight plastic box.

Photo 7: Caramelized hazelnuts on parchment paper Photo 8: Crushed nuts on parchment
PHOTO 7 PHOTO 8

To serve, assemble two half-spheres, and roll them into crushed caramelized nuts. Pour crème Anglaise into individual bowls and arrange a meringue sphere over the custard sauce.

Meringue sphere topped with chopped nuts floating on crème Anglaise with a spoon: Overhead view

Expert Tips

  1. Refer to the creme Anglaise recipe to learn how to make the perfect vanilla custard.
  2. Use grapeseed oil or vegetable oil to brush silicone half-spheres before baking.
  3. Make-ahead option: Make crème Anglaise, cover with plastic in contact, and store in the fridge for up to 2 days. Make caramelized nuts and keep them in an airtight container. Bake meringue half-spheres, turn them on parchment, and store them in an airtight container in the refrigerator for up to 4 hours.

How to serve it

The floating islands desserts is traditionally served on a chilled crème Anglaise with different toppings:

  • Caramel sauce drizzled or swirled over the dessert.
  • Caramel arranged like a ball of spun sugar.
  • Nuts like hazelnuts, pistachios, toasted almonds, or pink praline sprinkled over vanilla custard.
  • Fresh berries and fruits are in season (strawberries, raspberries, bananas, kiwi) topped over the floating islands.
  • A mint leaf placed on top of the dessert.

Recipe variations

There are several versions of the floating island dessert: the different ways to form and cook the meringue.

  • Poached meringue or œufs à la neige represents a French classic. Make large quenelles from the meringue using two tablespoons. Then place them in a poaching liquid (simmering milk or water), cook for a few minutes, and remove with a slotted spoon.
  • Baked meringue is a modern take on a classic. Create little heaps of meringue on a prepared baking dish lined with parchment paper, and let them bake to perfection.

Storing and freezing

The assembled floating island should be served and eaten on the same day. But you can make crème Anglaise, caramelize nuts, and bake the meringue half-spheres in advance.

Can you freeze the floating island? Unfortunately, you can't freeze the floating island dessert, the same as crème Anglaise.

Recipe FAQ

What dessert is called a floating island?

A floating island, also known as Ile Flottante, is a classic French dessert made with meringue floating on a cream Anglaise.

What is floating island in French?

A floating island is translated as Œufs à la neige in French, meaning "eggs in snow."

Who invented floating island?

A floating island was invented by the great cook Auguste Escoffier at the end of the 19th century. However, the dessert wasn't made with the meringue; it was based on Savoy biscuit, apricot jam, whipped cream, and custard.

How to make modern floating island dessert?

Baking the meringue in half-sphere silicone molds in a modern twist on a classic dessert. For other fancy presentation, alternative options include using muffin molds or ramekins.

Love meringue desserts? Try these next!

  • Pavlova Roll
  • French Meringue Cake Merveilleux
  • Large Meringue
  • Vanilla meringue cake
  • Meringue mushrooms
  • Or browse all the cake recipes

Want more delicious and beautiful recipes? Subscribe to my newsletter and follow me on Facebook, Pinterest, and Instagram for my latest updates. If you make this recipe, please leave a star rating on the recipe card and comment below!

Print

Recipe card

Floating Island Dessert

Meringue sphere covered with caramelized hazelnuts on crème Anglaise with the rest of the dessert.
Print Recipe
Save Recipe Recipe Saved

5 Stars 4 Stars 3 Stars 2 Stars 1 Star

5 from 6 reviews

Floating island dessert is a stunning French dessert, consisting of fluffy meringue atop a custard sea (creme Anglaise). Garnished with caramelized hazelnuts, it adds an elegant touch to any dinner.

  • Author: Irina Totterman
  • Total Time: 50 minutes
  • Yield: 6 1x
  • Category: Gluten-free
  • Method: Baking
  • Cuisine: French
  • Diet: Gluten Free

Ingredients

Scale

For meringue:

  • ⅓ cup + 1 teaspoon (80 g) caster sugar
  • ⅔ cup + 1 tablespoon (180 g) egg whites, room temperature (see note #1)

For crème Anglaise:

  • 2 cups + 2 tablespoons (500 ml) whole milk
  • 6 large egg yolks, room temperature
  • ⅓ cup (75 g) granulated sugar
  • 1 vanilla bean (or 1 sachet of vanilla sugar)

For caramelized nuts:

  • ⅓ cup + 2 tablespoons (100 g) granulated sugar
  • 5 teaspoons (25 g) water
  • 7 oz. (200 g) roasted hazelnuts
  • 2 teaspoons (10 g) unsalted butter
  • 1 small pinch of salt

* If needed, please refer to Baking Conversion Charts.

Instructions

  1. To make crème Anglaise, split the vanilla bean lengthwise and scrape the seeds. Mix egg yolks with vanilla seeds (or vanilla sugar) and sugar using a hand whisk.
  2. Place milk in a small saucepan and bring to a boil. Pour the hot milk into the egg yolk mixture, stirring constantly.
  3. Bring everything into the saucepan back and cook over low to medium heat for about 7 to 10 minutes, stirring and tracing "8" with a wooden spatula. Stop cooking just before boiling (using a cooking thermometer, check the temperature that has to be between 179-183°F (82-84°C). Don't exceed the custard's temperature of 185°F (85°C)!
  4. Pass it through a fine-mesh sieve or chinois strainer into another bowl set over a larger container with ice cubes so that the cooking stops. Cover with plastic film in contact and refrigerate until serving.
  5. To make the meringue, preheat the oven to 355°F (180°C). Using a stand or electric mixer, beat egg whites at moderate speed, then increase the speed and continue until soft peaks are formed. Gradually add the caster sugar and whisk to get the glossy meringue with stiff peaks.
  6. Using a brush, lightly oil the cavities of the half-sphere molds. With a pastry bag fitted with Ateco plain pastry tip 809 or simply with a spoon, place the meringue into half-spheres and even top with a bent spatula. Bake for 3 minutes on the middle rack of the oven (no baking sheet is required).
  7. Remove the mold from the oven, and let it stand for a few minutes. Turn out the mold onto parchment paper and slightly press each half-sphere to release the baked meringue. Refrigerate until ready to assemble.
  8. To caramelize nuts, roast hazelnuts at 355°F (180°C) for 12 minutes. Place water and sugar in a saucepan and cook till the temperature is 239°F (115°C). Add the toasted nuts and caramelize them while constantly stirring with a spatula. At first, hazelnuts will be covered with the sugar syrup; then, they will get coated with sugar. Finally, the sugar will start melting and caramelizing, coating the nuts. At this point, add butter and salt, stirring constantly.
  9. Transfer caramelized hazelnuts to parchment paper and let cool. Crush lightly using a food processor and keep in an airtight plastic box.
  10. To serve the dessert, assemble two half-spheres, and roll them into crushed caramelized nuts. Pour crème Anglaise into a serving plate and arrange a meringue sphere over the custard sauce. 

Notes

  1. 180 g egg whites, approximately equal to 5 ½ raw fresh egg whites from large-sized chicken eggs.
  2. While making crème Anglaise, make sure to stir the custard evenly with a wooden spatula. Do not let the custard boil! Once the white foam has disappeared and the custard coats the back of a spatula well and holds a trace while drawing your finger across it, crème Anglaise is ready. Use this test if you do not have a cooking thermometer.
  3. To prevent crème Anglaise from overcooking, use a container with ice cubes or a cold water bath to cool the custard as quickly as possible.
  4. If the custard has boiled and got overcooked (the eggs coagulate and form lumps), strain it through a fine-mesh sieve and give it a few mixer strokes to remove all the lumps. Your custard will become smooth again.
  5. Use grapeseed oil or vegetable oil to brush silicone half-spheres before baking.
  6. Make-ahead option: Make crème Anglaise, cover with plastic in contact, and store in the fridge for up to 2 days. Make caramelized nuts and keep them in an airtight container. Bake meringue half-spheres, turn them on parchment and store them in an airtight container in the refrigerator for up to 4 hours.

Nutrition

  • Serving Size: 1 meringue sphere
  • Calories: 501
  • Sugar: 48.7 g
  • Sodium: 82 mg
  • Fat: 28.9 g
  • Saturated Fat: 5.6 g
  • Carbohydrates: 52.7 g
  • Fiber: 3.2 g
  • Protein: 13.7 g
  • Cholesterol: 222 mg

Thank you for following me on Pinterest, Facebook, and Instagram. Hashtag #bakinglikeachef so I can see your creations.

The nutritional information has been calculated using an online recipe nutrition calculator such as Verywellfit.com and is intended for informational purposes only. These figures should be used as a general guideline and not be construed as a guarantee.

The recipe was adapted from https://www.mercotte.fr. It was originally published on December 14, 2018. The recipe has been revised to include improved content and photos.

Best Italian Almond Cake Recipe (Gluten-Free)

Mar 2, 2021 · 18 Comments

Sliced almond cake covered with flaked almonds on a white platter.

This divine Italian almond cake - torta Elvezia - is made with almond-meringue layers (almond dacquoise) alternated with buttercream and toasted flaked almonds. Serving up to 12 people, the cake makes a perfect celebration. What's more? It is gluten-free!

Sliced almond cake covered with flaked almonds on a white platter

This almond dacquoise cake is the obvious appearance on the blog after cashew dacquoise cake Sans Rival, its pistachio version - Pistachio Sans Rival, gorgeous coconut dacquoise, and beautiful pistachio dacquoise.

[feast_advanced_jump_to]

Italian almond dacquoise cake Elvezia, or torta Elvezia, is a typical Mantuan dessert with a Swiss name. The correct spelling of the cake is "Helvetia," the Latin name of Switzerland.

BAKING ESSENTIALS CHECKLIST

Sign up and get a list of the necessary baking tools and ingredients

FREE DOWNLOAD

It was invented by Swiss confectioners - the Samson  Putscher family, when they moved to the Italian Province of Mantua from Switzerland in the late 1700s.

So, this Italian almond cake is a beautiful combination of Swiss pastry techniques with Italian ingredients. As per Giallo Zafferano, it is a cake "with a Swiss heart but born in Italy."

Almond dacquoise cake topped with sliced almonds with a cup in the background

Italian almond cake recipe

  • Italian almond layer cake is extraordinary in every bite. It consists of three almond dacquoise layers sandwiched with the buttercream and generously sprinkled with sliced almonds.
  • It is one of the best Italian almond cake recipes, along with almond ricotta cake.
  • The cake made with almond flour is gluten-free (no wheat flour is added). It serves a crowd of 12 with and without gluten intolerance.
  • The cake is perfect for a morning cup of coffee, an afternoon cup of tea, and anytime during the day.

Ingredients

For ingredients and detailed instructions, refer to the recipe card below.

  • Eggs: use an egg separator to separate the egg whites from the yolks while the eggs are chilled. Then make sure to bring them both to room temperature.
  • Sugar: use caster sugar or process granulated sugar in a food processor for a few seconds to make the sugar superfine.
  • Almond flour: the recipe calls for blanched, finely ground almond flour to make the cake. Try to avoid coarse almond meal made out of whole raw almonds.

You can replace almond flour with homemade ground almonds. For best results, use blanched almonds and blitz them in the food processor until they have the right "sandy" texture. But be careful not to turn them into almond butter!

While measuring almond flour or ground almonds, spoon it from a container gently into a measuring cup. Please, do not pack or press it down.

  • Rice flour: use white rice flour.
  • Acacia honey is the most neutral honey among others. Replace it with glucose if desired.
  • Butter: use unsalted softened butter. Take it out of the fridge 1 to 2 hours before you start.
  • Vanilla bean brings a beautiful flavor to the buttercream. Use Madagascar vanilla beans. You can replace it with vanilla or almond extract for a more prominent nutty almond flavor.
  • Sliced almonds: use store-bought toasted sliced almonds or toast nuts yourself in the oven at 300°F (150°C) for 10 to 15 minutes.
  • Icing sugar: make it yourself with a coffee grinder or use store-bought powdered sugar to dust the ready cake.

Recipe variations

Authentic Elvezia cake combines almond dacquoise, tasty zabaglione, and a delicious cocoa buttercream. 

The Italian almond layer cake recipe below is the adapted version of the Elvezia cake created by Italian pastry chef Luca Montersino.

Nowadays, different versions enriched with hazelnut flour, whipped cream, and chocolate chips also exist. So, you are free to experiment.

A slice of almond cake on a wooden dessert plate with flowers in the background

How to make Italian almond cake

Preheat the oven to 355°F (180°C). Prepare three parchment paper sheets and draw three 8.5 inches/22 cm diameter discs. Flip these paper sheets so that the drawn circles will be facing down.  

Make the almond dacquoise

Place egg whites and ¾ cup plus 1 tablespoon (185 g) caster sugar in a saucepan and beat with a hand whisk. Continue whisking and bring the mixture over low heat to warm up (photo 1).

Remove the egg whites/sugar mixture from the heat and beat slowly with an electric hand mixer or stand mixer.

Gradually increase to medium speed and whisk for about 5-7 minutes, then finish the meringue at high speed (photo 2).

Photo 1: Whisked egg whites in a bowl Photo 2: Meringue in a bowl
PHOTO 1 PHOTO 2

Place almond flour, ¾ cup +2 ½ tablespoons (205 g) caster sugar, and rice flour in a bowl of the food processor and crush the dry ingredients until homogeneous.

Add the flour mixture to the meringue in two-three times and gently mix with a rubber spatula (photo 3).

Transfer the preparation to a pastry bag fitted with Ateco plain pastry tip 809 and pipe three dacquoise disks in a spiral shape within the pencil marks (photo 4).

Alternatively, spread the meringue mixture with an offset spatula instead of making a spiral with a pastry bag and a tip.

Photo 3: Meringue preparation in a bowl Photo 4: Meringue-based spiral on parchment paper
PHOTO 3 PHOTO 4

Bake in the middle position of the oven for 12 to 15 minutes. Then, remove the dacquoise disks from the oven and let them cool on a wire rack (photo 5).

Expert tip: Do not try to peel off the biscuit when it is hot: it breaks easily.

Make buttercream

Place egg yolks with the scraped vanilla seeds in a stand mixer's bowl and whisk.

In a saucepan, place water, honey (warm it up in a microwave for a few seconds in advance), and granulated sugar and bring to a boil.

Once the syrup reaches 250°F (121°C) - use a candy thermometer - pour the sugar syrup into the egg yolks while whisking. Continue to whisk for the mixture to cool down and become whitish (photo 6).

Photo 5: Baked dacquoise disk on parchment Photo 6: Egg yolks/sugar mixture in a bowl
PHOTO 5 PHOTO 6

Add the softened butter cubes, one at a time, and continue whisking till the cream becomes smooth and homogeneous (photo 7). 

Assemble the cake

Cut the dacquoise disks' edges with a knife to get the right circles. Cover the first dacquoise disk with the buttercream, and sprinkle with toasted almonds. Place the second disk and repeat the operation (photo 8).

Photo 7: Buttercream in a bowl Photo 8: Cream topped with sliced almonds
PHOTO 7 PHOTO 8

Finally, put with the third disk and cover the cake's top and edges with buttercream.

Sprinkle the cake with the flaked almonds (photos 9 - 10). Dust the top of the cake with icing (powdered) sugar. Refrigerate for at least 2 hours.

Photo 9: Top of the cake covered with almonds Photo 10: Cakes' edges covered with almonds
PHOTO 9 PHOTO 10

Expert Tips

  1. Don't overmix the dacquoise mixture: it must remain airy before baking.
  2. Roast flaked almonds in the oven at 300°F (150°C) for 15 minutes.
  3. Serve the cake at room temperature: take it out of the fridge 30 minutes before serving.
  4. Make ahead option: Bake dacquoise disks in the evening and keep them in a cool place. Assemble the cake the next day.

Storing and freezing

Store the cake in an airtight container in the refrigerator for up to 2-3 days.

You can freeze the cake or individual slices covered with plastic wrap, then aluminum foil for up to 1 week. To thaw, bring the cake to the fridge overnight. To serve, let it stay at room temperature for 30 minutes.

Recipe FAQ

What is Italian cake made of?

Italian almond cake is made with almond dacquoise layers sandwiched with buttercream and generously sprinkled with toasted flaked almonds.

Love Italian desserts? Try these next!

If you like this delicious Italian almond cake, you may love other Italian desserts on the website.

  • Italian Carrot Cake
  • Italian Sponge Cake
  • Authentic Italian Tiramisu
  • Torta Paradiso
  • Browse all the cake recipes

Want more delicious and beautiful recipes? Subscribe to my newsletter and follow me on Facebook, Pinterest, and Instagram for my latest updates. If you make this recipe, please leave a star rating on the recipe card and comment below!

Print

Recipe card

Italian Almond Cake

Sliced almond cake covered with flaked almonds on a white platter.
Print Recipe
Save Recipe Recipe Saved

5 Stars 4 Stars 3 Stars 2 Stars 1 Star

5 from 5 reviews

This divine Italian almond cake - torta Elvezia - is made with almond-meringue layers (almond dacquoise) alternated with buttercream and sliced almonds. Serving up to 12 people, the cake makes a perfect celebration. What's more? It is gluten-free!

  • Author: Irina Totterman
  • Total Time: 2 hours
  • Yield: 12-13 1x
  • Category: Cakes
  • Method: Baking
  • Cuisine: Italian
  • Diet: Gluten Free

Ingredients

Scale
For the dacquoise:
  • 1 cup + 3 ½ tablespoons (300 g) egg whites (see note #1)
  • ⅔ cup + 2 ½ tablespoons (185 g) caster sugar
  • 2 ⅔ cups + 4 tablespoons (280 g) almond flour
  • ⅔ cup + 4 tablespoons (205 g) caster sugar
  • 7 ½ tablespoons (75 g) rice flour
For the buttercream:
  • ⅔ cup + 3 ½ tablespoons (200 g) granulated sugar
  • 6 ½ large (112 g) egg yolks (see note #2)
  • 4 tablespoons (60 g) water
  • ½ tablespoon (10 g) acacia honey
  • 14.1 oz. (400 g) butter, softened
  • ½ vanilla bean
For the decoration:
  • 7 oz. (200 g) toasted flaked almonds
  • 1 tablespoon icing sugar

*Don't you have the correct baking pan on hand right now? Try this simple Cake Pan Converter!

** If needed, please refer to Baking Conversion Charts.

Instructions

  1. Preheat the oven to 355°F (180°C). To make the almond dacquoise, place egg whites and ¾ cup plus 1 tablespoon (185 g) caster sugar in a saucepan and beat with a hand whisk. Continue whisking and bring the mixture over low heat to warm up.
  2. Remove the egg whites/sugar mixture from the heat and beat with an electric or stand mixer at a slow speed. Gradually increase to medium speed and whisk for about 5-7 minutes, then finish the meringue at high speed to get the glossy meringue.
  3. Place almond flour, ¾ cup +2 ½ tablespoons (205 g) caster sugar, and rice flour in a bowl of the food processor and crush the dry mixture until homogeneous. Add this mixture to the meringue to two-three times and mix with a rubber spatula.
  4. Prepare three parchment paper sheets and draw three discs with a diameter of 8.5 inches/22 cm. Flip these paper sheets so that the drawn circles will be facing down.
  5. Transfer the preparation to a pastry bag fitted with Ateco plain pastry tip 809 and pipe three dacquoise disks in a spiral shape within the pencil marks. Bake for 12 to 15 minutes. Remove the ready dacquoise disks from the oven and let them cool.
  6. To make the buttercream, place egg yolks with the scraped vanilla seeds in a stand mixer bowl and whisk. In a saucepan, place water, honey (warm it up in a microwave for a few seconds in advance), and granulated sugar and bring to a boil.
  7. Once the syrup reaches 250°F (121°C), pour the sugar syrup into the egg yolks while whisking. Once the mixture cools down and becomes whitish, add the softened butter cubes, one at a time, and continue whisking till the cream becomes smooth and homogeneous. 
  8. To assemble the cake, cut the dacquoise disks' edges with a knife to get the right circles. Cover the first dacquoise disk with the buttercream, and sprinkle with toasted almonds.
  9. Place the second disk and repeat the operation. Finally, put with the third disk and cover the cake's top and edges with buttercream. Sprinkle the cake all over with flaked almonds. Dust the top of the cake with icing (powdered) sugar. Refrigerate for at least 2 hours.

Notes

  1. 300 g egg whites approximately equal to 9 raw fresh egg whites from large-sized chicken eggs.
  2. 112 egg yolks approximately equal to 6.5 raw fresh egg yolks from large-sized chicken eggs.
  3. Don't overmix the dacquoise mixture: it must remain airy before baking.
  4. Spread the meringue mixture with an offset spatula instead of making a spiral with a pastry bag and a tip.
  5. Roast sliced almonds in the oven at 300°F/150°C for 15 minutes.
  6. Serve the cake at room temperature: take it out of the fridge 30 minutes before serving.
  7. Make ahead option: Bake dacquoise disks in the evening and keep them in a cool place. Assemble the cake the next day.

Nutrition

  • Serving Size: 1 slice
  • Calories: 664
  • Sugar: 47.6 g
  • Sodium: 205 mg
  • Fat: 45.7 g
  • Saturated Fat: 18 g
  • Carbohydrates: 59 g
  • Fiber: 4.3 g
  • Protein: 12.3 g
  • Cholesterol: 173 mg

Thank you for following me on Pinterest, Facebook, and Instagram. Hashtag #bakinglikeachef so I can see your creations.

The nutritional information has been calculated using an online recipe nutrition calculator such as Verywellfit.com and is intended for informational purposes only. These figures should be used as a general guideline and not be construed as a guarantee.

The recipe was originally published on November 8, 2018. It has been revised to include improved content and photos. All the posted pictures are mine.

Ile Flottante With Pink Praline (Easy Recipe)

Jan 30, 2021 · 27 Comments

Meringue on top of cream Anglaise topped with chopped pink praline in a glass.

If you are looking for an elegant and sophisticated dessert on Valentine's Day or just because this Ile flottante recipe is a good way to go. It is an easy and delicious gluten-free egg dessert made in less than an hour. Plus, there is a make-ahead option!

Meringue on top of cream Anglaise topped with chopped pink praline in a glass: Close up

Ile flottante (plural îles flottantes), or a floating island dessert, cannot beat any other festive dessert. This light and airy foaming meringue resembling meringue islands on a pool of crème Anglaise is perfect to cap off a heavy, calorie-laden celebratory dinner.

[feast_advanced_jump_to]

This delightful treat takes a classic French dessert and adds a modern twist. Made with the signature Pink Praline, it brings a beautiful pop of color and a delicious new taste to this elegant dessert.

BAKING ESSENTIALS CHECKLIST

Sign up and get a list of the necessary baking tools and ingredients

FREE DOWNLOAD

What is Ile Flottante?

Ile Flottante, or oeufs à la neige, meaning snow eggs, are French meringues floating on a vanilla custard sauce (creme Anglaise) and topped with praline or spun sugar. It translates as a floating island in English.

Originally, at the end of the 19th century, Ile flottante was made from slices of sponge cake, soaked with liquor, separated with apricot jam, and served with custard.

Today, it is made of egg whites poached in warm milk, cooked over a water bath, or baked in the oven and then placed on the custard.

Two martini glasses tied with red ribbon served with Ile Flottante with rose petals around

Why you should try this recipe

  • The île flottante recipe (ile flottante recette) is easy to make and requires a few simple ingredients.
  • You can always swap pink praline for other candied nuts or prepare it yourself a few days ahead.
  • Finally, this dessert is the cutest romantic treat on Valentine's Day, perfect to accompany a "heavy" holiday dinner.
Ile Flottante in a martini glass: Overhead view; yellow rose petals are in the background

Ingredients

For ingredients and detailed instructions, refer to the recipe card below.

  • Milk: Use whole milk to make the recipe. Opt for full-fat milk to make the best creme Anglaise.
  • Heavy cream: The recipe calls for heavy cream with at least 30% fat content.
  • Vanilla bean: Use the most flavorful Madagascar vanilla beans.
  • Egg yolks and egg whites: separate them using an egg separator while the eggs are chilled. Then bring both to room temperature.
  • Caster sugar is superfine sugar that dissolves more efficiently while making the meringue. You can process granulated sugar in a food processor for a few seconds to make it superfine.
  • Lemon zest: Use unwaxed organic lemon to make the zest.
  • Pink praline: Make Pink Praline yourself or purchase crushed pink praline on Amazon. Replace it with pistachios or toasted almonds if desired.

Recipe variations

If you are eager to try out ile flottant recipe with baked meringue (recipe is below) instead of poached meringue, here are some fun ways to make the recipe your own.

Omit the fancy-sounding Pink Praline and top it with candied nuts or roasted almonds, pistachios, hazelnuts, etc.

Choose crushed amaretti cookies, chopped praline, or candied citrus. Or drizzle caramel over your meringue for more indulgence.

No time for making creme Anglaise? No worries. A delicious alternative is melting vanilla ice cream and then letting the meringue float on top. It is not the same but a tasty and easy way to enjoy ile flottant.

How to make Ile flottante

Making ile flottant includes a few simple steps:

  • Preparing creme Anglaise
  • Making the meringue
  • Assembling the dessert

Make creme Anglaise

Heat milk, heavy cream, scraped vanilla seeds, and the emptied vanilla bean in a small, heavy-bottomed saucepan.

In a separate bowl, mix egg yolks and sugar with a hand whisk (photo 1). Add the hot milk and cream mixture to the egg yolks and sugar, stirring constantly, and pour back into the saucepan. Cook over low heat, constantly stirring with the whisk.

It takes a few minutes when the custard starts thickening, coats the back of a spoon, and reaches a temperature of 180°F (82°C): use a candy thermometer to check.

Pro tip: Read about tips and tricks on how to make perfect creme Anglaise.

Take the saucepan from the heat and pour the vanilla sauce into a clean bowl. Remove the empty vanilla bean from the custard (photo 2) and cover it with plastic film in contact. Let it cool down on the counter or refrigerator until 73°F (23°C).

Photo 1: Egg yolks/sugar mixture in a bowl Photo 2: Creme Anglaise in a saucepan
PHOTO 1 PHOTO 2

Make the meringue

Preheat the oven to 300°F (150°C). Beat egg whites with an electric or stand mixer fitted with the whisk attachment at low speed until frothy.

Gradually add sugar, increase the speed, and whisk the meringue at medium speed until sugar dissolves and stiff peaks form. It may take up to 10 minutes.

Pro tip: Meringue whipped at medium speeds for a more extended period is more stable than made at high speed.

Add crushed pink praline with lemon zest to the whipped egg whites (photo 3) and gently mix with a rubber spatula (photo 4). 

Photo 3: Egg whites with lemon zest and pink praline Photo 4: Meringue in a bowl
PHOTO 3 PHOTO 4

Place one large tablespoon of the meringue on a baking tray covered with parchment paper (photo 5).

Continue with the rest of the whites (you will get six meringue mounds). Bake for about 5 minutes and let cool afterward.

Serve ile flottante

Pour creme Anglaise on the bottom of the martini glasses or glass bowls and place the meringue on each serving. Sprinkle with chopped pink praline and serve (photo 6).

Photo 5: Meringues on parchment paper Photo 6: Ile Flottante served in martini glasses: Overhead view

Expert Tips

  1. Check the readiness of creme Anglaise with a cooking thermometer. If you do not have it, look for a "coating" on the back of a spoon with custard. Read about when Creme Anglaise is done.
  2. Make Pink Praline yourself or purchase pink crushed pralines on Amazon.
  3. Make-ahead option: make the meringue and refrigerate it for up to 3 hours. Prepare creme Anglaise in advance and keep it covered with plastic wrap in contact in the fridge for up to 2 days. Then serve Ile flottante dessert in a minute. 

Storing and freezing

For the best results, make the meringues no more than 1 to 2 hours before serving. If longer, it tends to form beads of liquid on the surface. However, you can prepare creme Anglaise 2 days in advance and refrigerate it.

Can you freeze ile flottant? No, you cannot freeze any part of this dessert.

Recipe FAQ

What is Ile Flottante in English?

Ile flottants means floating island in English.

Can you make Ile flottante in advance?

You can make creme Anglaise two days in advance and keep it covered with plastic wrap in contact in the fridge. Make the meringues in advance, but on the same day, refrigerate for up to 1-2 hours. Then serve Ile flottante dessert within a few minutes.

Love holiday desserts? Try these next!

  • Heart-Shaped Puzzle Cookies
  • Rosewater Meringue Roulade
  • Raspberry Oreo Cheesecake
  • Browse all Valentine's Day Recipes

Want more delicious and beautiful recipes? Subscribe to my newsletter and follow me on Facebook, Pinterest, and Instagram for my latest updates. If you make this recipe, please leave a star rating on the recipe card and comment below!

Print

Recipe card

Ile Flottante With Pink Praline

Meringue on top of cream Anglaise topped with chopped pink praline in a glass.
Print Recipe
Save Recipe Recipe Saved

5 Stars 4 Stars 3 Stars 2 Stars 1 Star

5 from 14 reviews

Ile flottante, or floating island dessert, is a classic French dessert - a light and airy floating meringue with creme Anglaise. It is made in less than an hour, plus there is a make-ahead option.

  • Author: Irina Totterman
  • Total Time: 50 minutes
  • Yield: 6 1x
  • Category: Gluten-Free Desserts
  • Method: Baking
  • Cuisine: French

Ingredients

Scale

For creme Anglaise:

  • 11.5 fl oz (340 ml) whole milk
  • 3.5 fl oz (105 ml) heavy cream, 30% fat
  • 1 vanilla bean, split lengthwise
  • 4 large egg yolks (70 g) egg yolks, at room temperature
  • 5 tablespoons (70 g) granulated sugar

For the meringue:

  • 4 large egg whites (150 g) egg whites, at room temperature
  • 6 ½ tablespoons (90 g) caster sugar
  • ½ teaspoon lemon zest
  • 1.2 oz. (35 g) Pink Praline

For the decoration:

  • 0.5 oz. (15 g) chopped pink praline

* If needed, please refer to Baking Conversion Charts.

Instructions

  1. To make creme Anglaise, heat milk, heavy cream, scraped vanilla seeds, and the emptied vanilla bean in a small, heavy-bottomed saucepan.

  2. In a separate bowl, mix egg yolks and sugar with a hand whisk. Add the hot milk and cream mixture, stirring constantly, and pour back into the saucepan. Cook over low heat, constantly stirring with the whisk. It takes a few minutes when the custard starts thickening, coats the back of a spoon, and reaches a temperature of 180°F (82°C): use a candy thermometer.

  3. Take the saucepan out of the heat and pour the vanilla sauce into a clean bowl. Remove the empty vanilla bean from the custard and cover it with plastic film in contact. Let it cool down on the counter or in the refrigerator until 73°F (23°C).

  4. To make the meringue, preheat the oven to 300°F (150°C). Beat egg whites with an electric mixer or a stand mixer fitted with the whisk attachment at low speed until frothy. Gradually add sugar, increase the speed, and whisk the meringue at medium speed until sugar dissolves and stiff peaks form. It may take up to 10 minutes. Add crushed pink praline with lemon zest to the whipped egg whites and gently mix with a rubber spatula.

  5. Place one large tablespoon of the meringue on a baking tray covered with parchment paper. Continue with the rest of the whites (you will get 6 meringue mounds). Bake for about 5 minutes and let cool afterward.

  6. To serve, pour creme Anglaise on the bottom of the martini glasses or glass bowls and place the meringue on top of each serving. Sprinkle with chopped pink praline and serve.

Notes

  1. Check the readiness of creme Anglaise with a cooking thermometer. If you do not have it, look for a "coating" on the back of a spoon with custard. 
  2. Make Pink Praline yourself or purchase pink crushed pralines on Amazon.
  3. Make-ahead option: make the meringue and refrigerate it for up to 3 hours. Prepare creme Anglaise in advance and keep it covered with plastic wrap in contact in the fridge for up to 2 days. Then serve Ile flottante dessert in a minute. 

Nutrition

  • Serving Size: 1 floating meringue
  • Calories: 260
  • Sugar: 33.1 g
  • Sodium: 61 mg
  • Fat: 11.5 g
  • Saturated Fat: 5.6 g
  • Carbohydrates: 33.8 g
  • Fiber: 0.2 g
  • Protein: 7.4 g
  • Cholesterol: 189 mg

Thank you for following me on Pinterest, Facebook, and Instagram. Hashtag #bakinglikeachef so I can see your creations.

The recipe was adapted from http://www.leparisien.fr/. It was originally published on January 07, 2019. The recipe has been revised to include improved content and photos. All posted pictures are mine.

The nutritional information has been calculated using an online recipe nutrition calculator such as Verywellfit.com and is intended for informational purposes only. These figures should be used as a general guideline and not be construed as a guarantee.

French Chocolate Mousse (Mousse au Chocolat)

Jan 18, 2021 · 47 Comments

French dark chocolate mousse in glasses with a spoon full of mousse.

Nothing beats this 5-star French chocolate mousse recipe! This smooth and light creamy mousse au chocolat combined with tangy raspberries is a chocolate dessert you will dream about. Only a few ingredients are required to make this quick and romantic dessert.

A glass with French chocolate mousse topped with raspberries and chocolate shavings: Close up

What is better than a luscious dark chocolate mousse? Here is the best French chocolate mousse recipe (mousse au chocolat in French) adapted from chef Cyril Lignac.

[feast_advanced_jump_to]

Mousse au chocolat is a light and creamy French chocolate dessert made with pure chocolate, whipped cream, and beaten egg whites. Due to a combination of sweet chocolate with acidic raspberries, it is sweet but not too sweet.

BAKING ESSENTIALS CHECKLIST

Sign up and get a list of the necessary baking tools and ingredients

FREE DOWNLOAD

This combo brings the right balance in taste and calls for the mousse's correct title - raspberry chocolate mousse.

Single glass with French mousse au chocolat: Close up

What is a mousse?

Mousse (translated from French "foam") is food with incorporated air bubbles that give a light and airy texture to the dish.

A mousse is classified into sweet and savory. Sweet mousse is mostly made of whipped cream, mounted egg whites, or both and flavored with caramel, chocolate, and fruit puree.

The airy texture of a savory mousse is due to whipped egg whites. It is usually made of meat, fish, cheese, and vegetables.

French chocolate mousse history

The first mention of chocolate mousse, or mousse au chocolat, appeared in 1750, and it belongs to Menon, a French culinary writer. He was applying it to the "foam" of a chocolate drink.

However, the origin of the real chocolate mousse known today remains secret.

Some food historians believe that it was created in the 18th century by Charles Fazi, a Swiss servant of King Louis XVI.

Others think that it would instead be invented by the French Post-Impressionist painter Toulouse-Lautrec in Montmartre. 

He would have added a little cocoa to a mousse, naming his invention as "chocolate mayonnaise"!

A teaspoon full of dark chocolate mousse with glass and raspberries on a marble board

How to melt chocolate

There are three methods to melt chocolate:

  • Double boiler method (or hot water bath). Break the chocolate into small pieces and place it into a glass or metal bowl placed on top of a saucepan half full with simmering water. Allow chocolate to melt, stirring constantly.
  • Microwave method. Place pieces of chocolate in a microwave-safe bowl and microwave at medium power (50%) for 30 seconds. Remove and stir.

Repeat this step every 30 seconds with stirring in between until small lumps remain. Remove the bowl from the microwave and stir to complete the melting.

  • The direct heat method is usually used to melt the chocolate added to the butter. Heat chocolate over very low heat, stirring constantly. Remove it from the heat with small lumps remaining and stir.
A glass of French mousse topped with fresh raspberries and shaved chocolate: Overhead view

Why you should try this recipe

  • This dark chocolate mousse recipe is straightforward: it is made with simple ingredients and is easy to follow and make the recipe.
  • It is a classic French dessert made from scratch, and it tastes like in Paris. It's a chocolate lover's dream.
  • This decadent mousse au chocolat is perfect to finish the meal with a note of delicacy.

Ingredients

French chocolate mousse ingredients in pictures

For ingredients and detailed instructions, refer to the recipe card below.

  • Chocolate: Use the best quality 70% dark chocolate: Scharffen Berger dark chocolate, Valrhona dark chocolate, or Lindt Excellence dark chocolate.

Replace dark chocolate with different chocolates (milk or white chocolate), or switch half of the dark chocolate with half of the milk chocolate if desired.

  • Butter: The recipe calls for unsalted butter.
  • Eggs: Use an egg separator to separate egg whites and egg yolks while eggs are chilled. Place the whites and yolks aside to get to room temperature. It is essential to use eggs, especially egg yolks, at room temperature to prevent chocolate from seizing.
  • Icing sugar: Make it at home using a coffee grinder or use store-bought powdered sugar.
  • Heavy cream: Use heavy or heavy whipping cream with at least 30% fat content.
  • Raspberries: Use fresh raspberries to make this classic chocolate and raspberry combination. Omit fresh berries if they are out of season.

You might argue that a classic French chocolate mousse is made of chocolate and eggs without adding cream, and you would be correct.

But this traditional chocolate mousse with added whipped cream (which lightens the mousse) is also served in France.

For example, chocolate mousse recipes created by French chefs such as Philippe Conticini, Gaston Lenôtre, Christophe Michalak, and Christophe Felder contain whipping cream.

Recipe variations

Authentic French chocolate mousse is made with dark chocolate.

  • You can easily replace half of the dark bittersweet chocolate with milk chocolate.
  • If you prefer milk or white chocolate, please, go for it! Your mousse will turn out lovely as well.

How to make French chocolate mousse (Mousse au Chocolat)

Separate egg whites from egg yolks. In a chilled large bowl, whip cold whipping cream with icing sugar until soft peaks (photo 1).

In a separate bowl, using an electric mixer, whip whites with a pinch of salt until stiff peaks form and put them aside (photo 2). 

Photo 1: Whipped cream in a bowl Photo 2: Beaten egg whites in a glass bowl
PHOTO 1 PHOTO 2

Break the chocolate into small pieces in a medium bowl and melt with butter in a double boiler at a low simmer, stirring occasionally.

Once the chocolate is almost melted (with small lumps left), mix with a large rubber spatula, pour into another bowl, and continue to stir while cooling (photo 3).

Add egg yolks one by one to the melted chocolate while mixing (photo 4).

Photo 3: Melted chocolate in a bowl Photo 4: Chocolate/egg yolks mixture in a bowl
PHOTO 3 PHOTO 4

Stir the whipped cream in the chocolate/egg yolk mixture (photo 5).

Gently fold egg whites into the main mix with the spatula, but do not stir (photo 6).

Photo 5: Chocolate/cream mixture in a bowl Photo 6: Dark chocolate mousse in a bowl
PHOTO 5 PHOTO 6

Arrange half of the raspberries at the bottom of three serving glasses and divide the mousse between them (photo 7).

Cover glasses with plastic wrap and refrigerate for at least two hours, preferably overnight.

Decorate the mousse's top with the remaining fresh raspberries, chocolate shavings, and gold sugar pearls before serving (photo 8).

Photo 7: Dessert in glasses Photo 8: Dessert with raspberries, chocolate in glasses
PHOTO 7 PHOTO 8

Expert Tips

  1. Separate eggs when they are cold. Then put them aside for them to come to room temperature. It is essential to use eggs, especially egg yolks, at room temperature to prevent chocolate from seizing.
  2. For the best results, whip cream and beat egg whites BEFORE melting the chocolate to be ready to incorporate these ingredients into the chocolate mixture without waiting.
  3. Use top-quality chocolate (70% cacao): Scharffen Berger dark chocolate, Valrhona dark chocolate, or Lindt Excellence dark chocolate.
  4. Let the melted chocolate cool before adding egg yolks.
  5. Add a pinch of ground cinnamon while folding in egg whites if you prefer.
  6. To make chocolate shavings, scrape along the flat side of a chocolate bar using a small knife or a vegetable peeler. 

How to serve chocolate mousse

  • Serve chocolate mousse (or mousse au chocolat in French) in champagne or martini glasses, ramekins or espresso mugs, individual cups or individual bowls, or make chocolate dessert cups.
  • Top mousse au chocolat with fresh raspberries, making raspberry chocolate mousse (the recipe is below).
  • Pipe a homemade whipped cream, Chantilly cream, or ice cream on top of the dessert and sprinkle with chocolate chips, shavings, or duo chocolate curls.
  • Top the mousse with homemade meringue and toast it with a blow torch.
  • Alternate layers of your favorite cookie crumbs and chocolate mousse. Sprinkle the top of the mousse with cookies.
  • Dust the mousse with cocoa powder and decorate with meringues and pink sugar pearls.
  • Peel kiwis, cut them into small cubes, and arrange them on top of chocolate mousse.
  • Sprinkle the dessert with toasted chopped nuts, for example, pistachios or salted almonds.
  • Serve the mousse with cat tongue cookies or ladyfingers.

Storing and freezing

Store mousse au chocolat in the refrigerator for up to 24 hours maximum.
French chefs consider that the ideal chocolate mousse is prepared the day before.

Can you freeze chocolate mousse? You can freeze it: wrap glasses or ramekins with chocolate mousse in plastic film and freeze for up to 3 months. To thaw, place the mousse in the refrigerator for 2 to 3 hours.

Food safety

It is well known that eating uncooked eggs can cause salmonella food poisoning.

It seems that this concern is most prevalent in the USA and Canada, while raw eggs are widely used in Europe to make the famous Italian dessert tiramisu.

To eliminate your concern about eating raw eggs, use pasteurized eggs for this recipe. Consuming raw eggs is not advisable for pregnant women and babies.

Recipe FAQ

What's the difference between mousse and pudding?

Mousse is made by folding whisked egg whites and/or whipped cream into a flavored base. Incorporated air bubbles give a light and fluffy texture to the mousse. Pudding is made of milk and sugar base cooked with cornstarch to get a thicker, dense consistency.

What's the best chocolate to make chocolate mousse?

It is essential to use good quality chocolate - 70% cacao dark chocolate. The darker the chocolate, the more intense the chocolate flavor and the less sweetness you will get.

How to prevent chocolate from seizing

In rare cases, when chocolate melts, it becomes a dry and rough mass instead of a smooth and shiny mixture. To prevent this issue, use clean and dry bowls and metal utensils since chocolate seizes once it comes into contact with water. Also, melt chocolate in a double boiler over simmering water, but not boiling. Do not cover the saucepan with a lid. It prevents any condensation of water on the inside of the lid and bowl.

Love chocolate desserts? Try these next!

  • A marble teacup with hot chocolate, Christmas decorations, and tissue in the background.
    Best Chocolat Chaud (French Hot Chocolate)
  • Sliced decorated chocolate ganache tart on a marble table.
    French Chocolate Ganache Tart Recipe
  • Sliced Royal chocolate cake on a golden cake board with crepes Gravottes on background.
    Royal Chocolate Cake / Trianon
  • Concord cake (gâteau Concorde) on a marble board with dessert plates in the background.
    Concorde Cake (Gateau Concorde)

Want more delicious and beautiful recipes? Subscribe to my newsletter and follow me on Facebook, Pinterest, and Instagram for my latest updates. If you make this recipe, please leave a star rating on the recipe card and comment below!

Print

Recipe card

French Chocolate Mousse (Mousse au Chocolat)

French dark chocolate mousse in glasses with a spoon full of mousse.
Print Recipe
Save Recipe Recipe Saved

5 Stars 4 Stars 3 Stars 2 Stars 1 Star

5 from 22 reviews

Nothing beats this 5-star French dark chocolate mousse recipe! This smooth and light creamy mousse au chocolat combined with tangy raspberries is a chocolate dessert you will dream about. Only a few ingredients are required to make this quick and romantic dessert.  

  • Author: Irina Totterman
  • Total Time: 20 minutes
  • Yield: 3 1x
  • Category: Gluten-Free Desserts
  • Method: No Bake
  • Cuisine: French

Ingredients

Scale
  • 4.4 oz (125 g) dark chocolate
  • 0.3 oz (10 g) butter
  • 3 eggs
  • ⅓ cup (75 ml) whipping cream
  • 4 ½ tbsp (35 g) powdered (icing) sugar
  • 1 pinch of salt
  • 4.4 oz (125 g) raspberries
  • pink sugar pearls and chocolate shavings for decoration

* If needed, please refer to Baking Conversion Charts.

    Instructions

    1. Separate egg whites from egg yolks. In a chilled large bowl, whip cold whipping cream with icing (powdered) sugar until soft peaks form.
    2. In a separate clean bowl, beat egg whites with a pinch of salt until they are firmly mounted and put aside. 
    3. Break the chocolate into small pieces in a medium bowl and melt with butter in a double boiler at a low simmer, stirring occasionally. Once the chocolate is almost melted (with small lumps left), mix with a large rubber spatula, pour into another bowl, and continue to stir while cooling. Add egg yolks at room temperature one by one to the melted chocolate while mixing.
    4. Stir the whipped cream in the chocolate/egg yolk mixture. Gently fold egg whites into the main mix with the spatula (do not stir).
    5. Arrange half of the raspberries at the bottom of three serving glasses and divide the mousse between them. Cover glasses with plastic film and refrigerate for at least two hours, preferably overnight. Decorate the mousse's top with the remaining fresh raspberries, chocolate shavings, and pink sugar pearls before serving.

    Notes

    1. Separate egg whites and egg yolks when they are cold. Then put them aside to come to room temperature. It is essential to use eggs, especially egg yolks, at room temperature to prevent chocolate from seizing.
    2. Whip whipping cream and beat egg whites BEFORE melting chocolate to be ready to incorporate these ingredients into the chocolate mixture without waiting.  
    3. Use a top-quality 70% dark cocoa chocolate: Scharffen Berger dark chocolate or Valrhona dark chocolate, or Lindt Excellence dark chocolate.
    4. Allow the melted chocolate to cool before adding egg yolks.
    5. Add a pinch of ground cinnamon while folding in egg whites if you prefer.
    6. To make chocolate shavings, scrape along the flat side of a chocolate bar using a small knife or a vegetable peeler. 

    Nutrition

    • Serving Size: 1 glass
    • Calories: 451
    • Sugar: 35.1 g
    • Sodium: 123 mg
    • Fat: 27.6 g
    • Saturated Fat: 16.6 g
    • Carbohydrates: 42.4 g
    • Fiber: 4.1 g
    • Protein: 9.8 g
    • Cholesterol: 209 mg

    Thank you for following me on Pinterest, Facebook, and Instagram. Hashtag #bakinglikeachef so I can see your creations.

    The nutritional information has been calculated using an online recipe nutrition calculator such as Verywellfit.com and is intended for informational purposes only. These figures should be used as a general guideline and not be construed as a guarantee.

    The recipe was adapted from https://gourmand.viepratique.fr/. It was originally published on March 27, 2019. The recipe has been revised to include improved content and photos.

    Mont Blanc Cake (Chestnut Cream Cake)

    Jan 13, 2021 · 12 Comments

    Mont Blanc cake covered with chestnut vermicelli with a cup, a candle, glasses on a table.

    Mont Blanc cake (chestnut cream cake) is a signature French dessert made with crunchy meringue, whipped cream, and chestnut vermicelli. "Curious" and elegant, this meringue cake makes every bite mouthwatering.

    Mont Blanc cake covered with chestnut vermicelli with a cup, a candle, glasses on a table

    Famous cake Mont Blanc... It is named after the highest mountain Le Mont Blanc in the Alps, meaning"white mountain" in French. Sprinkled with icing (powdered) sugar, it really resembles a snow-capped mountain.

    Mont Blank cake is a combination of the "riot" of chestnut vermicelli, slightly sweetened whipped cream, and the crunchy meringue.

    I have been thinking of making a Mont Blanc recipe since I accidentally watched a video on piping the chestnut vermicelli. 

    I need to admit that it is fun to make and, more pleasure, see how the cake is being swept out of the serving plate within minutes.

    The "chestnut mess" as an unusual appearance of the cake makes a deal for guests. Tasting the cake, one of my friends said, "I like new experiments!"

    Well, I love to experiment in baking too. That is why this chestnut cream cake is on the blog.

    [feast_advanced_jump_to]

    Mont Blanc origin

    The chestnut puree dessert made with whipped cream and meringue has an Italian origin, but in the 17th century, it became famous in France.

    Mont Blanc cake, or Mont-Blanc gateau in French, has been a signature dessert served at the Parisian tea shop Angelina since 1903. Later, in the 2010s, many French chefs created different variations of this dessert.

    It is the most popular French dessert in Japan, where pumpkin, squash, and other puree are used instead of chestnut.

    BAKING ESSENTIALS CHECKLIST

    Sign up and get a list of the necessary baking tools and ingredients

    FREE DOWNLOAD

    Cake topped with chestnut cream like vermicelli with glasses in the background

    What is chestnut cream?

    Chestnut cream or crème de marrons in French has been a specialty of the French Ardèche since 1885. It is made from broken candied chestnuts, sugar, and vanilla. 

    The French use it as a spread for the morning toast or add to yogurts and cottage cheese instead of white sugar.

    Chestnut cream is also used to make this famous French Mont Blanc dessert, French Saint-Honoré, or Italian tiramisu with chestnut cream. It is ideally paired with sweet red wine.

    According to Cuisine et Vins de France,

    The chestnut cream goes with everything and comes to enhance the simplest preparations. 

    Why you should try this recipe

    1. Mont Blanc recipe is gluten-free and is perfect for serving to everyone.
    2. This classic French pastry combines three textures: crunchy meringue, smooth and creamy whipped cream, and sweet, nutty chestnut vermicelli.
    3. It has the right balance of sweetness.
    4. The recipe is easy and fun to make, especially with kids. They like to help decorate the cake.
    5. The cake is so elegant that it is perfect for a birthday party and a bridal shower.

    Ingredients

    For ingredients and detailed instructions, refer to the recipe card below.

    Egg whites: using an egg separator, separate egg whites with the yolks while the eggs are chilled. Then let the whites get to room temperature before you start.

    Sugar: the recipe calls for caster sugar or superfine baker's sugar. To make superfine sugar out of granulated sugar, process it in a food processor for s few seconds.

    Icing sugar: make it at home using a coffee grinder or use powdered sugar.

    Chestnut puree: use unsweetened chestnut puree. It is one of the cake's stars, and it cannot be replaced with another puree.

    Chestnut cream: it is another French ingredient to make chestnut cream.

    Dark rum: replace it with cognac if desired.

    Whipping cream: use your favorite brand of whipping cream with at least 30% fat content.

    A single slice of the cake with the rest of Mont Blanc in the background

    How to make Mont Blanc cake

    Preheat the oven to 185 F/85 C. Use a pencil and draw five circles (6-inch/16 cm, 5-inch/13 cm, 4-inch/10 cm, 3-inch/7 cm, and 2-inch/5 cm in diameter) on two sheets of parchment paper. Turn them over and place them on two baking sheets.

    To make the meringue, whisk egg whites with an electric mixer or a stand mixer until stiff.

    Gradually add the caster sugar and beat to get glossy meringue (photo 1). Finally, add icing (powdered) sugar and gently mix with a rubber spatula (photo 2).

    Photo 1: Beaten egg whites with caster sugar Photo 2: Ready meringue in a bowl
    PHOTO 1 PHOTO 2

    Place the meringue in a pastry bag with Ateco plain pastry tip 806. Pipe 4 meringue dots in the corners of a baking sheet and place parchment to fix it.

    Pipe five meringue disks as spirals over the drawn circles on parchment paper (photos 3-4). Bake for 2 hours and then let cool.

    Photos 3-4: Meringue disks of different diameter piped on the parchment paper
    PHOTOS 3-4

    To make whipped cream, whisk whipping cream with icing (powdered) sugar until firm (photo 5). Place ⅔ of the cream in a pastry bag with Ateco plain pastry tip 806.

    To assemble the cake, place the largest cooled meringue disk on a cake board or a serving plate.

    Push whipped cream in a spiral using a pastry bag with Ateco plain pastry tip 806 (photo 6).

    Photo 5: Whipped cream in a bowl Photo 6: Piped cream on top of meringue disk
    PHOTO 5 PHOTO 6

    Place the second disk (5-inch/13 cm in diameter), garnish it with whipped cream. Continue the same way for the last three disks (photo 7).

    Use the rubber spatula and cover the cake with the remaining whipped cream. With a bent spatula, smooth the cream from bottom to top. 

    To make chestnut cream, using a mixer, mix chestnut puree, chestnut cream, and dark rum until homogenous (photo 8). Pass the cream through a fine-mesh sieve.

    Photo 7: Meringue disks alternated with whipped cream Photo 8: Chestnut cream in a bowl
    PHOTO 7 PHOTO 8

    Transfer the cream to a pastry bag fitted with a vermicelli tip or a bird nest pastry tip (photo 9). 

    Pipe the chestnut vermicelli in overlapping circles to cover the cake's entire surface (photo 10).

    Decorate with gold sugar pearls. Refrigerate for 2 hours. Right before serving, sprinkle the cake with icing (powdered) sugar.

    Expert tips

    1. 100 g egg whites approximately qual 3 raw fresh egg whites from large size chicken eggs.
    2. Replace caster sugar with superfine sugar. Process granulated sugar in a food processor for a few seconds to make it superfine.
    3. Pipe meringue kisses with the remaining meringue placing them around meringue disks.
    4. Use Wilton tip 3, Alteco tip 2, or even larger Alteco piping tips 4 to 8 instead of vermicelli tip if you cannot find that special tip. Ideally, use a 2- to 3-mm plain round tip.
    5. Do not over-pipe the cake with chestnut cream (you might not use all the cream) to prevent vermicelli from sliding down.
    6. Decorate the top of Mont Blanc cake with a candied chestnut if desired.
    7. Mont Blanc dessert is best served within a few hours since chestnut cream tends to dry out on top of the cake.
    8. Serve the cake with sweet wines, for example, French wines Rivesaltes or Banyuls.

    Frequently asked questions

    Can you make Mont Blanc cake in advance?

    You can make meringue disks one day in advance. But it is recommended to assemble the cake on the day of serving since chestnut cream piped as vermicelli tends to dry out.

    Can you freeze Mont Blanc cake?

    Yes, once you cover the cake with whipped cream, wrap the cake (with a cake board) in plastic film and freeze overnight. The next day, remove the plastic and let the cake sit for about 5 minutes. Garnish Mont Blanc with chestnut vermicelli and place in the fridge for the other 2 hours to thaw.

    Love meringue cakes? Try these next!

    • French Meringue Cake Merveilleux
    • Chocolate Concorde Cake
    • Rosewater Meringue Roulade
    • Browse all the Cake Recipes

    Want more delicious and beautiful recipes? Subscribe to my newsletter and follow me on Facebook, Pinterest, and Instagram for my latest updates. If you make this recipe, please leave a star rating on the recipe card and comment below!

    Print

    Recipe card

    Mont Blanc Cake - Chestnut Cream Cake

    Mont Blanc cake covered with chestnut vermicelli with a cup, a candle, glasses on a table.
    Print Recipe
    Save Recipe Recipe Saved

    5 Stars 4 Stars 3 Stars 2 Stars 1 Star

    5 from 6 reviews

    Mont Blanc cake (chestnut cream cake) is a signature French dessert made with crunchy meringue, whipped cream, and chestnut vermicelli. "Curious" and elegant, this meringue cake makes every bite mouthwatering.

    • Author: Irina Totterman
    • Total Time: 3 hours
    • Yield: 6 1x
    • Category: Cakes
    • Method: Baking
    • Cuisine: French
    • Diet: Gluten Free

    Ingredients

    Scale

    For French meringue:

    • 100 g egg whites (see note #1)
    • ⅓ cup + 2 tablespoons (100 g) caster sugar (see note #2)
    • ⅔ cup  + 2 tablespoons (100 g) icing (powdered) sugar

    For chestnut cream:

    • 7 oz. (200 g) unsweetened chestnut puree
    • 3.5 oz. (100 g) chestnut cream
    • ⅔ teaspoon dark rum

    For the whipped cream:

    • 2 cups (460 g) whipping cream
    • ⅓ cup (40) g icing sugar

    *Don't you have the correct baking pan on hand right now? Try this simple Cake Pan Converter!

    ** If needed, please refer to Baking Conversion Charts.

    Instructions

    1. Preheat the oven to 185 F/85 C. Use a pencil and draw five circles (6-inch/16 cm, 5-inch/13 cm, 4-inch/10 cm, 3-inch/7 cm, and 2-inch/5 cm in diameter) on two sheets of parchment paper. Turn them over and place them on two baking sheets.
    2. To make the meringue, whisk egg whites with an electric mixer or a stand mixer until stiff. Gradually add the caster sugar and beat to get glossy meringue. Finally, add icing (powdered) sugar and gently mix with a rubber spatula.
    3. Place the meringue in a pastry bag with Ateco plain pastry tip 806. Pipe 4 meringue dots in the corners of a baking sheet and place parchment to fix it. Pipe five disks as spirals over the drawn circles on parchment paper. Bake for 2 hours and then let cool.
    4. To make whipped cream, whisk whipping cream with icing (powdered) sugar until firm. Place ⅔ of the cream in a pastry bag with Ateco plain pastry tip 806.
    5. To assemble the cake, place the largest cooled meringue disk on a cake board or a serving plate. Push whipped cream in a spiral using a pastry bag with a tip of 10 mm. Place the second disk (5-inch/13 cm in diameter), garnish it with whipped cream. Continue the same way for the last three disks.
    6. Use the rubber spatula and cover the cake with the remaining whipped cream. With a bent spatula, smooth the cream from bottom to top.
    7. To make chestnut cream, using a mixer, mix chestnut puree, chestnut cream, and dark rum until homogenous. Pass the cream through a fine-mesh sieve. Transfer the cream to a pastry bag fitted with a vermicelli tip or bird nest pastry tip.  
    8. Pipe the chestnut vermicelli in overlapping circles to cover the cake's entire surface. Decorate with gold sugar pearls. Refrigerate for 2 hours. Right before serving, sprinkle the cake with icing (powdered) sugar.

    Notes

    1. 100 g egg whites approximately qual 3 raw fresh egg whites from large size chicken eggs.
    2. Replace caster sugar with superfine sugar. Process granulated sugar in a food processor for a few seconds to make it superfine.
    3. Pipe meringue kisses with the remaining meringue placing them around meringue disks.
    4. Use Wilton tip 3, Alteco tip 2, or larger Alteco piping tips as 4 to 8 instead of vermicelli tip if you cannot find that special tip. Ideally, use a 2- to 3-mm plain round tip.
    5. Do not over-pipe the cake with chestnut cream (you might not use all the cream) to prevent vermicelli from sliding down.
    6. Decorate the top of Mont Blanc cake with a candied chestnut if desired.
    7. Mont Blanc dessert is best served within a few hours since chestnut cream tends to dry out on top of the cake.
    8. Serve the cake with sweet wines, for example, French wines Rivesaltes or Banyuls.

    Nutrition

    • Serving Size: 1 slice
    • Calories: 469
    • Sugar: 49 g
    • Sodium: 43 mg
    • Fat: 23.8 g
    • Saturated Fat: 14.8 g
    • Carbohydrates: 59.9 g
    • Fiber: 1.7 g
    • Protein: 3.5 g
    • Cholesterol: 85 mg

    Thank you for following me on Pinterest, Facebook, and Instagram. Hashtag #bakinglikeachef so I can see your creations.

    The nutritional information has been calculated using an online recipe nutrition calculator such as Verywellfit.com and is intended for informational purposes only. These figures should be used as a general guideline and not be construed as a guarantee.

    The recipe was adapted from http://www.marieclaire.fr and https://www.cuisineactuelle.fr. It was originally published on March 03, 2018. The recipe has been revised to include improved content and photos. All posted pictures are mine.

    Best Chocolat Chaud (French Hot Chocolate)

    Jan 1, 2021 · 25 Comments

    A marble teacup with hot chocolate, Christmas decorations, and tissue in the background.

    Enjoy this easy 2-ingredient French hot chocolate recipe for authentic chocolat chaud, a Parisian chocolate drink. You are only 10 minutes away from the best chocolate experience of your life.

    A marble teacup with hot chocolate, Christmas decorations, and tissue in the background

    Whenever you look for a delicious dessert to finish your weekend brunch, come back from a ski descent to warm up, or need comfort on a weekday, French hot chocolate (Chocolat chaud in French) is your remedy and pure pleasure.

    [feast_advanced_jump_to]

    If you are a purist who pays great attention to what you eat and drink, you must bring the best hot chocolate into your life.

    If you love French cuisine and consider it the best in the world, you will appreciate this Parisian hot chocolate drink.

    BAKING ESSENTIALS CHECKLIST

    Sign up and get a list of the necessary baking tools and ingredients

    FREE DOWNLOAD

    And finally, if you are one of the true chocolate lovers, this chocolate intense paired with a beautiful hot chocolate quote will be enough to satisfy your craving.

    A cup of French hot chocolate held in a hand: Close up

    What is hot chocolate?

    Hot chocolate, hot cocoa, or le chocolat chaud in French, is a hot drink made with real chocolate or cocoa powder (also sometimes sugar) added to milk or water.  

    You will love the sound of hot chocolate in French: 'chocolat chaud' [ʃɔ.kɔ.la ʃo]; listen to native French speakers.

    The history of a chocolate-based drink can be said to date back to 2 thousand years ago, when the Mayans first created it. Over time, it became popular in Europe and had various adaptations.

    Nowadays, it is different depending on the country. For example, while American hot chocolate looks pretty diluted, Italian hot chocolate is quite dense. French hot chocolate is rich and is made with milk and melted chocolate.

    The French usually start the day with a hot drink (coffee or tea) which is the star of a French style breakfast. Drinking hot chocolate takes third place among the breakfast habits of the French.

    Why you should try this recipe

    • French hot chocolate, with its velvety texture and rich chocolate taste, is an intense chocolate-tasting experience to try and start making it regularly.
    • The delicious hot chocolate drink is perfect anytime: enjoy it for breakfast, have it as a snack in the middle of the day, or finish your dinner as a dessert.
    • It is a comforting ritual to indulge in on cold nights in the middle of winter and early mornings during rainy days.
    • You will fall in love with this easy 2-ingredient original hot chocolate recipe. It is guaranteed.
    • Finally, this liquid chocolate drink makes a romantic treat shared with your loved one by the fire.

    Ingredients

    For ingredients and detailed instructions, refer to the recipe card below.

    • Milk: To make the recipe below, use whole or semi-skimmed (in the UK). Please, avoid skimmed milk called in the UK and skim milk called in the States.

    You can replace milk with vegetable milk (oat or coconut milk, for example), but do not switch milk for fruit, vanilla, or flavored coconut drinks since they modify the taste of chocolate.

    • Chocolate is one of the main ingredients to make the recipe. Opt for top-quality dark chocolate (60 to 70% cacao). Purchase it as dark chocolate bars or chocolate callets. Please do not use baking chocolate or chocolate chips for the best results.

    Recipe variations

    While this typical hot chocolate recipe sounds basic, there are many variations to customize this drink. 

    • A little touch with warm spices, even a pinch of cayenne pepper, makes a difference to French sipping chocolate.
    • Add a pinch of cinnamon or scraped vanilla seeds of vanilla bean pods to soften the taste of your hot chocolate.
    • Use a bit of ground pepper, anise, or/and/or cloves to make your drink spicy, especially during cold winter days.
    • Add ground ginger and cardamom to make a tangy hot chocolate.
    • But when adding spices to hot chocolate, be careful with the amount; otherwise, they can mask the taste.

    Interestingly, against the popular belief that real hot chocolate can only be made with milk, the French love their hot chocolate with water.

    But whether you prefer milk or water, you can make life easier by preparing this homemade hot chocolate mix in advance. Store it in an airtight container and enjoy a cozy cup anytime you like.

    How to make French hot chocolate

    Chop the chocolate into small pieces with a serrated knife and set it aside. Pour milk into a medium saucepan and heat the milk over medium heat until hot.

    Remove from heat, add chopped chocolate to hot milk, and stir with a hand whisk letting the chocolate melt.

    Bring the pan back for a slow simmer over low or medium-low heat for 1 minute, constantly whisking. Pour the hot chocolate into the cups and serve immediately.

    A white cup with chocolat chaud, Christmas decorations, and a pink tea towel in the background

    Expert tips

    1. Use top-quality chocolate, ideally bittersweet chocolate (60 to 70% cacao).
    2. Make sure to add chocolate off the heat to make the hot chocolate smooth.
    3. Top your hot chocolate with fresh whipped cream if desired.
    4. Decrease the amount of chocolate, but not less than 2.5 oz./70 g, according to your taste.

    How to choose the best chocolate

    Good quality chocolate is the key to making French hot chocolate. So what kind of chocolate is best? The best is to go for bittersweet chocolate, between 60 and 70% cacao.

    If you want to taste rich chocolate, do not choose one below 50% cacao. But do not exceed 70% either; otherwise, the bitterness will dominate your hot chocolate drink.

    Can you use a dark chocolate bar? Yes, it is easy to dose the chocolate due to its squares, and much more cream-like thanks to the butter in the bar.

    Choose one of the top-quality dark chocolate bars: Ghirardelli dark chocolate 60% cacao, Scharffen Berger semi-sweet chocolate 62% cacao, Lindt dark chocolate 70% cacao, or Moser Roth dark chocolate 70% cacao.

    In any way, choosing chocolate to make French-style hot chocolate, respect your tastes. According to the French Le Journal des Femmes,

    Dark, milk, white, or other chocolate will be equally suitable, only the texture and intensity of the cocoa will be modified.

    How to serve it

    To get the whole French experience, serve Parisian hot chocolate warm, or let it sit for a few hours to enrich the chocolate taste. Reheat it before serving if needed. And then serve your drink in the most beautiful cup and enjoy.

    • The French usually serve hot chocolate in small cups: demitasse cups, coffee cups containing about 2 to 3 fl. oz. or 60 to 90 ml. or pretty tiny teacups.
    • You can serve your chocolate drink plain or add a few drops of vanilla extract, a few flecks of coarse salt, or a pinch of sea salt or fleur de sel to accentuate the flavor.
    • You can also add granulated or brown sugar, honey, caramel, espresso powder, you name it.
    • Top your hot chocolate with sugar-free whipped cream for an irresistible gourmet touch. Flavor it with a bit of ground cinnamon if you desire.
    • Or add a few pieces of mini dehydrated marshmallows, duo chocolate curls, or chocolate vermicelli sprinkles. And why not add all three?
    • Enjoy your hot chocolate drink with French madeleines or financiers. Yes, you want to indulge and feel like you are in Parisian cafés. And it is not surprising why French and Parisian hot chocolate are used interchangeably.

    Storage instructions

    You can store the leftover hot chocolate in the refrigerator for up to 3 days.

    Film your chocolate drink with plastic wrap or pour it into a sealed container and refrigerate it. To reheat, use a microwave or low heat.

    Recipe FAQ

    Can you make French chocolate with water instead of milk?

    You can replace milk with water. It will be less creamy and thick than the milk-based chocolate drink, but it will be lower in calories if you watch them out. You can also use half the milk and half water if you desire.

    How to thicken hot chocolate

    To thicken the hot chocolate, add more chocolate or bring a saucepan with hot chocolate to a low boil, stirring for 2-3 minutes until the mixture thickens. You can also use whole milk and heavy cream to make your drink creamier.

    How long can you keep hot chocolate in the fridge?

    You can keep hot chocolate in a sealed container or covered with plastic wrap in the fridge for up to 3 days.

    Love chocolate desserts? Try these next!

    • French Chocolate Cake
    • French Dark Chocolate Mousse
    • Chocolate Cherry Financiers
    • Royal Chocolate Cake - Trianon
    • Browse all the Cake Recipes

    Want more delicious and beautiful recipes? Subscribe to my newsletter and follow me on Facebook, Pinterest, and Instagram for my latest updates. If you make this recipe, please leave a star rating on the recipe card and comment below!

    Print

    Recipe card

    Chocolat Chaud (French hot chocolate)

    A marble teacup with hot chocolate, Christmas decorations, and tissue in the background.
    Print Recipe
    Save Recipe Recipe Saved

    5 Stars 4 Stars 3 Stars 2 Stars 1 Star

    5 from 11 reviews

    Enjoy this easy 2-ingredient French hot chocolate recipe to make authentic chocolat chaud, a Parisian chocolate drink to enjoy any time of the day. You are only 10 minutes away from the best of life's chocolate experiences.

    • Author: Irina Totterman
    • Total Time: 10 minutes
    • Yield: 2 demitasse cups 1x
    • Category: No-Bake Desserts
    • Method: No-Bake
    • Cuisine: French
    • Diet: Gluten Free

    Ingredients

    Scale
    • 1 cup (240 ml) milk
    • 3.5 oz. (100 g) bittersweet chocolate

    * If needed, please refer to Baking Conversion Charts.

    Instructions

    1. Chop chocolate with a serrated knife and place it aside. Pour milk into a saucepan and heat over medium heat until hot. Remove from heat, add chopped chocolate and stir with a hand whisk until the chocolate is melted.
    2. Bring the pan back over low or medium-low heat for 1 minute, constantly whisking. Pour the hot chocolate into the cups and serve immediately.

    Notes

    1. Use high-quality bittersweet chocolate (60 to 70% cacao).
    2. Make sure to add chocolate off the heat to make the hot chocolate smooth.
    3. Top your hot chocolate with whipped cream if desired.
    4. Decrease the amount of chocolate, but not less than 2.5 oz./70 g, according to your taste.

    Nutrition

    • Serving Size: 1 demitasse cup
    • Calories: 362
    • Sugar: 18.4 g
    • Sodium: 58 mg
    • Fat: 24 g
    • Saturated Fat: 14.4 g
    • Carbohydrates: 27.5 g
    • Fiber: 4.3 g
    • Protein: 8.4 g
    • Cholesterol: 10 mg

    Thank you for following me on Pinterest, Facebook, and Instagram. Hashtag #bakinglikeachef so I can see your creations.

    The nutritional information has been calculated using an online recipe nutrition calculator such as Verywellfit.com and is intended for informational purposes only. These figures should be used as a general guideline and not be construed as a guarantee.

    Meringue Mushrooms for Yule Log

    Dec 19, 2020 · 34 Comments

    Meringue mushrooms on a marble board.

    Crunchy, sweet, and absolutely adorable, Yule log meringue mushrooms are a versatile treat. Enjoy them as a dessert, give them as edible gifts, or use them to decorate your Buche de Noel or Christmas Yule log. Get ready for fun in the kitchen and pure joy when serving.

    The meringue mushroom recipe is perfect for both dry and rainy days. Maida Heatter, the author of numerous dessert cookbooks, lives in a humid climate. She "made these innumerable times in Miami Beach, where it is almost always humid, they [meringue mushrooms] are always perfect."

    Meringue mushrooms on a marble board

    Meringue mushrooms

    Also known as Yule Log mushrooms, these are little edible gems that are not only adorable but also super easy to make. With just four ingredients (without cream of tartar and lemon juice) and basic piping skills, you can make them in no time!

    BAKING ESSENTIALS CHECKLIST

    Sign up and get a list of the necessary baking tools and ingredients

    FREE DOWNLOAD

    Mushroom meringue cookies add a whimsical touch to Christmas Yule Logs and woodland cakes, like Bûche de Noël and Tree Stump Cake. They also make a delightful edible gift and a perfect addition to a Christmas cookie box.

    Now, let me show you how to make meringue mushrooms so everyone around will be impressed by your baking skills. Yes, they will!

    [feast_advanced_jump_to]

    Ingredients

    For ingredients and detailed instructions, refer to the recipe card below.

    First, let's chat about ingredients. You just need four simple ingredients:

    • Egg whites - large egg whites at room temperature.
    • Icing sugar - the same as powdered and confectioners' sugar.
    • Unsweetened cocoa powder
    • Dark chocolate - melted dark chocolate (read how to melt chocolate) or replace it with milk, white chocolate, or chocolate chips.

    Dark chocolate brings a more realistic look to meringue mushrooms under the cap. You can also use royal icing or buttercream instead of melted chocolate to "glue" meringue caps and stems.

    A batch of mushroom meringues on white serving plate

    How to make meringue mushrooms step-by-step

    Preheat the oven to 210°F (100°C). Line a baking sheet with parchment paper. 

    Step 1. To make Swiss meringue, place egg whites in the clean bowl of a stand mixer or a large metal bowl.

    Step 2. Add powdered (icing) sugar and whip egg whites with a hand whisk a few times. Put the bowl over the bain-marie or water bath and beat egg whites with a whisk until foamy.

    Step 3. When the meringue mixture is hot, remove the bowl from the heat and beat it with a stand or electric mixer until it cools completely. The meringue will have a glossy appearance with stiff peaks. Use it right away.

    Hard meringue in a metal bowl

    Step 4. Transfer meringue to a large piping bag with a round piping tip of ½" (12 mm). Pipe 4 meringue dots in the corners of the prepared baking sheet and place parchment paper. It will fix the paper during pipping and baking.

    For the caps of the mushrooms, keep holding the piping bag upright to the baking sheet and smoothly squeeze the bag. Push the meringue into a plain round shape (photo 1).

    Once the perfect shape is obtained, stop squeezing and slowly remove the bag off to the side to avoid creating a peak on top. If needed, use a wet fingertip to flatten the spike of the meringue dome.

    Step 5. Hold the pastry bag upright on the baking sheet to pipe the meringue stems. Start piping gently, forming a stem's base, then lift the bag while squeezing. Make sure to make the pointed end by pulling up the bag (photo 2). Caps and stems should be placed 1 inch (2.5 cm) apart.

    Pro tip: The size of mushroom caps and the height of stems may vary: while the caps may average 1 to 2 inch (2.5 cm to 5 cm) rounds and about 1 inch (2.5 cm) high, the stems may get about 1 inch (2.5 cm) tall.

    Step 6. Sprinkle mushroom caps with cocoa powder.

    Photo 1: Piped mushrooms caps and stems with cocoa powder Photo 2: Meringue stems on parchment
    PHOTO 1 PHOTO 2

    Step 7. Bake caps and stems for 1 hour. Once the meringues are ready, let them cool and detach from parchment paper.

    Step 8. To assemble meringue mushrooms, carefully select and arrange the caps and stems to achieve the most visually appealing size and shape combinations. Melt chocolate according to any of the ways described in the chocolate mousse recipe.

    Then, use one of the provided methods for assembly.

    • Make a small hole on the bottom of each cap with the tip of a small paring knife. Fill the hole and the top of the stems with a little melted dark chocolate. Insert the stems into the hole under the caps. Place the mushrooms upside down and refrigerate to allow the chocolate to set.
    • Slightly trim the tops of the mushroom stems evenly using a serrated knife. Using a small offset spatula, coat the bottom of the cap with melted chocolate (photo 3). Dip the tip of a mushroom stem into the chocolate and twist it gently to attach the cap and stem together (photo 4). Place the assembled mushroom upside down on a wire rack lined with parchment and allow the chocolate to set.
    Photo 3: Meringue caps with melted chocolate on Photo 4: Assembled meringue mushrooms on parchment paper
    PHOTO 3 PHOTO 4

    Pro tip: Don't worry about slightly crooked stems: they will appear perfect when flipped over. However, adjust any completely fallen stems.

    Step 9. Sprinkle a little cocoa powder on the upright meringue mushrooms to give them a freshly emerged look from a soft earth patch.

    Yule log mushrooms on a marble board

    Expert Tips

    1. Make sure egg whites are at room temperature.
    2. Pipe different rounds and lengths of mushroom caps and stems.
    3. Make a few extra stems since some of them may fall during baking.
    4. Once meringue caps and stems are baked, keep the oven door slightly ajar to allow the meringues to cool, although it is optional.
    5. Keep the baked caps and stems uncovered for a few days in an airtight container before you assemble the mushrooms.
    6. Store ready-made meringue mushrooms in an airtight container for a few weeks.
    7. While presenting a Bûche de Noël, decorate a serving platter with meringue mushrooms, fixing them with melted chocolate. It will prevent them from breaking when they accidentally fall while serving the log to a holiday table.

    Storing and freezing

    Store the cooled meringue mushrooms in an air-tight container, preferably a tin box, at room temperature for up to two weeks.

    Can you freeze meringue mushrooms? To freeze meringue mushrooms, place them on parchment flat and freeze them. After one hour, transfer meringues to an airtight container and keep them in the freezer for several weeks.

    To thaw, bring them to room temperature for about an hour. 

    Recipe variations

    • Replace cocoa powder with sifted freeze-dried strawberry powder on meringue mushroom caps.
    • Use red food coloring to make meringue mushroom tops:
      • Once the meringue is ready, divide the preparation into two halves. Add a few drops of red food coloring to one half and mix for about 30 seconds.
      • Pipe the white meringue to make stems, and pipe mushroom caps using the red-colored meringue.
      • Take a small amount of white meringue with a toothpick and make dots on red meringue caps. Then, bake as directed.
    • Experiment with a mushroom shape and size of mushroom meringues. According to Maida Heatter, "Smaller or larger mushrooms are equally attractive." Pastry chef Caitlin Dysart exaggerates meringue mushrooms, her favorite decoration of a traditional Bûche de Noël.
    • Make more realistic mushrooms by rubbing cocoa powder into the baked meringues and buffing their caps and stems.

    Recipe FAQ

    What are the mushrooms made of Buche de Noel?

    Meringue mushrooms are the perfect decoration for Buche de Noel or Christmas Yule log cake. Prepare them ahead of time to adorn the Christmas dessert.

    Why did my meringue mushrooms crack?

    Meringue mushrooms crack due to high oven temperature or sudden temperature changes. Prevent this by baking them at a low temperature and allowing them to cool in the switched-off oven.

    Can you store meringue mushrooms in the fridge?

    Meringue mushrooms are sensitive to humidity. To keep their crunch texture, it is not recommended to keep them in the fridge.

    Love Christmas cookies? Try these next!

    • Mini Gingerbread Men Cookies
    • Chocolate Banana Pecan Cookies
    • Cranberry Oatmeal Cookies
    • Bredele Cookies
    • Christmas Cookie Ornaments
    • Or browse all the cookie recipes

    Want more delicious and beautiful recipes? Subscribe to my newsletter and follow me on Facebook, Pinterest, and Instagram for my latest updates. If you make this recipe, please leave a star rating on the recipe card and comment below!

    Print

    Recipe card

    Meringue Mushrooms Recipe

    Meringue mushrooms on a marble board.
    Print Recipe
    Save Recipe Recipe Saved

    5 Stars 4 Stars 3 Stars 2 Stars 1 Star

    5 from 16 reviews

    Crunchy, sweet, and utterly irresistible, these meringue mushrroms are a versatile treat. Enjoy them as a dessert, give them as edible gifts, or use them to adorn your Buche de Noel or Christmas Yule log.

    • Author: Irina Totterman
    • Total Time: 1 hour, 30 minutes
    • Yield: 20 1x
    • Category: Cookies
    • Method: Baking
    • Cuisine: French

    Ingredients

    Scale

    For Swiss meringue:

    • 4 large egg whites, room temperature
    • 2 cups (250 g) powdered (icing) sugar

    For the finish:

    • 1 tablespoon cocoa powder
    • 2 oz (60 g) dark chocolate 

    * If needed, please refer to Baking Conversion Charts.

    Instructions

    1. Preheat the oven to 210°F (100°C). Line a baking sheet with parchment paper.

    2. To make Swiss meringue, place egg whites in the clean bowl of a stand mixer or a large metal bowl. Add powdered (icing) sugar and whip egg whites with a hand whisk a few times. Put the bowl over the bain-marie or water bath and beat egg whites with a whisk until foamy.

    3. When the meringue mixture is hot, remove the bowl from the heat, and beat it with a stand or electric mixer until it cools completely. The meringue will have a glossy appearance with stiff peaks. Use it right away.

    4. Transfer meringue to a large piping bag with a round piping tip ½" (12 mm). Pipe 4 meringue dots in the corners of the prepared baking sheet and place parchment paper. It will fix the paper during pipping and baking.

    5. To pipe the meringue stems, hold the pastry bag upright on the baking sheet. Start piping gently, forming a stem's base, then lift the bag while squeezing. Make sure to make the pointed end by pulling up the bag.

    6. For the caps of the mushrooms, keep holding the piping bag upright to the baking sheet and smoothly squeeze the bag. Push the meringue into a plain round shape. Once the perfect shape is obtained, stop squeezing and slowly remove the bag off to the side to avoid creating a peak on top. If needed, use a wet fingertip to flatten the spike of the meringue dome.

    7. The size of mushroom caps and the height of stems may vary: while the caps may average 1 to 2 inch (2.5 cm to 5 cm) rounds and about 1 inch (2.5 cm) high, the stems may get about 1 inch (2.5 cm) tall. Caps and stems should be placed 1 inch (2.5 cm) apart. Sprinkle mushroom caps with cocoa powder. Bake caps and stems for 1 hour. Once the meringue is ready, let it cool and detach from parchment paper.

    8. To assemble meringue mushrooms, carefully select and arrange the caps and stems to achieve the most visually appealing size and shape combinations. Melt chocolate in a double boiler or microwave.

    9. Then, use one of the provided methods for assembly. Don't worry about slightly crooked stems: they will appear perfect when flipped over. However, adjust any completely fallen stems.

    10. Slightly trim the tops of the mushroom stems evenly using a serrated knife. Using a small offset spatula, coat the bottom of the cap with melted chocolate. Dip the tip of a mushroom stem into the chocolate and twist it gently to attach the cap and stem together. Place the assembled mushroom upside down on a wire rack lined with parchment and allow the chocolate to set. 

    11. Another way to assemble the meringue mushrooms is to make a small hole on the bottom of each cap with the tip of a small paring knife. Fill the hole and the top of the stems with a little melted dark chocolate. Insert the stems into the hole under the caps. Place the mushrooms upside down and refrigerate to allow the chocolate to set.

    12. Sprinkle cocoa powder on the upright meringue mushrooms to give them a freshly emerged look from a soft earth patch.

    Notes

    1. Make sure egg whites are at room temperature.
    2. Pipe different rounds and lengths of mushroom caps and stems.
    3. Make a few extra stems since some of them may fall during baking.
    4. Once meringue caps and stems are baked, keep the oven door slightly ajar to allow the meringues to cool, although it is optional.
    5. Keep the baked caps and stems uncovered for a few days in an airtight container before you assemble the mushrooms.
    6. Store ready-made meringue mushrooms in an airtight container for a few weeks.
    7. While presenting a Bûche de Noël, decorate a serving platter with meringue mushrooms fixing them with melted chocolate. It will prevent them from breaking when they accidentally fall while serving the log to a holiday table.

    Nutrition

    • Serving Size: 1 meringue mushroom
    • Calories: 61
    • Sugar: 13.1 g
    • Sodium: 8 mg
    • Fat: 0.5 g
    • Saturated Fat: 0.3 g
    • Carbohydrates: 13.5 g
    • Fiber: 0.1 g
    • Protein: 0.9 g
    • Cholesterol: 0 mg

    Thank you for following me on Pinterest, Facebook, and Instagram. Hashtag #bakinglikeachef so I can see your creations.

    The nutritional information has been calculated using an online recipe nutrition calculator such as Verywellfit.com and is intended for informational purposes only. These figures should be used as a general guideline and not be construed as a guarantee.

    The recipe was originally published on May 05, 2018. It has been revised to include improved content and photos.

    Christmas Pavlova Wreath

    Nov 12, 2020 · Leave a Comment

    Christmas Pavlova wreath on a serving plate.

    This Christmas Pavlova wreath is a festive meringue with a marshmallow-like center and crispy exterior, perfect for the festive time of the year. Topped with fresh fruit and sweetened whipped cream, it is the most delicious way to celebrate Christmas. 

    Christmas Pavlova wreath on a serving plate.

    Love for Pavlova doesn't depend upon a day or a holiday. If you have a sweet tooth for Pavlova dessert, you could probably eat this Australian (or New Zealand) invention every day.

    In the summertime, make the most delicious Cinnamon Pavlova and benefit from fresh figs.

    [feast_advanced_jump_to]

    Closer to the fall, take turns with Plum Pavlova. Also, try experimenting with making cherry boozy Pavlova by replacing plums with cherries.

    BAKING ESSENTIALS CHECKLIST

    Sign up and get a list of the necessary baking tools and ingredients

    FREE DOWNLOAD

    Finally, once the most festive season arrives, enjoy gingerbread in all its kinds: Gingerbread Pavlova, Gingerbread cookie ornaments, and the tastiest French Gingerbread Loaf.

    A single slice of Pavlova wreath on a dessert plate.

    Pavlova wreath recipe

    • Christmas Pavlova wreath represents a decorative sign of Christmas. It is a perfect fit for those who have snow in winter.
    • With effortless making, it is a last-minute holiday dessert.
    • It is a festive twist on classic Pavlova.
    • This elegant dessert is great for those with dietary restrictions since it is gluten-free.
    • You can create your own Pavlova using fruit preserves and fresh fruits of your choice.

    Ingredients

    For ingredients and detailed instructions, refer to the recipe card below.

    • Egg whites: Use large egg whites at room temperature. Use an egg separator to separate egg whites from the yolks while the eggs are chilled. Then let egg whites reach room temperature: it helps them reach their volume when beaten.
    • Sugar: The recipe calls for superfine white sugar - caster sugar. To facilitate whisking the meringue, process granulated sugar in a food processor for a few seconds to make it superfine.
    • White vinegar helps stabilize the whisked egg whites while making the meringue. Replace it with the same amount of lemon juice or cream of tartar.
    • Corn starch is essential to creating a soft marshmallow center, a Pavlova dessert's signature. You can replace it with potato starch.
    • Heavy cream: Opt for cold heavy or heavy whipping cream with at least 30% fat content.
    • Icing sugar: Make it yourself with a coffee grinder or use store-bought powdered sugar.
    • Vanilla extract: Use Madagascar Bourbon pure vanilla extract or replace it with an alcohol-free vanilla flavor if preferred.
    • Fresh fruits: Use a combination of fresh red berries (fresh strawberries, raspberries, etc.) or fruits of your choice.
    Meringue wreath with red fruit on top on a serving plate.

    How to make Christmas Pavlova wreath

    Step 1. Preheat the oven to 230°F (110°C). Prepare a baking sheet covered with parchment paper.

    Step 2. Mark an 8-inch (20 cm) circle on the baking parchment and flip the paper ink-side down to ensure no marks transfer to the meringue. 

    Step 3. To make the meringue, place egg whites in a large mixing bowl and beat with an electric whisk at high speed.

    Step 4. Gradually add sugar, one spoon at a time, beating until sugar dissolves and the meringue forms stiff peaks (photo 1).

    Step 5. Add cornflour and white wine vinegar, and whisk until just combined, about 20 to 30 seconds (photo 2).

    Meringue with a stiff peak on a mixer beater over the bowl.

    PHOTO 1

    Meringue in a metal bowl.

    PHOTO 2

    Step 6. Using a large metal spoon, spoon 8 to 10 large dollops of meringue close together to form a wreath shape (photo 3).

    Step 7. Bake in the preheated oven at 230°F (110°C) for 20 minutes, then reduce heat to 210°F (100°C). Bake for a further 1 hour 15 minutes. 

    Step 8. Turn off the oven and allow Pavlova to cool, with the oven door closed, for about 3 to 4 hours (photo 4).

    Meringue mounds on parchment paper.

    PHOTO 3

    Baked meringue wreath on parchment paper.

    PHOTO 4

    Step 9. To make sweetened whipped cream, beat heavy cream, powdered (icing) sugar, and vanilla until soft peaks form.

    Pro tip: Consult the Chantilly cream recipe for step-by-step photographed explanations, helpful tips, and tricks.

    Step 10. To assemble Pavlova, place the meringue wreath on a serving platter and top with the sweetened whipped cream (photo 5).

    Step 11. Decorate Pavlova with fresh strawberries, raspberries, pomegranate seeds, and chopped pistachios (photo 6).

    Meringue wreath topped with whipped cream.

    PHOTO 5

    Decorated Pavlova wreath on a serving platter.

    PHOTO 6

    To serve, sprinkle pavlova with powdered (icing) sugar if desired.

    Christmas Pavlova wreath on a serving platter.

    Expert Tips

    1. Ensure you use a clean bowl and avoid even a tiny drop of egg yolk while separating the eggs.
    2. If fresh fruits are out of season, sprinkle the top of Pavlova with fruit preserves, freeze-dried berries, and chopped nuts.
    3. Assemble Pavlova at the last minute, right before serving.
    4. Make ahead option: Prepare the meringue base a day ahead and keep it in the oven. Alternatively, bake the Pavlova shell two days in advance and store it in a sealed container in a cool, dry area. Chill the bowl and whip the cream, then cover it with plastic film and refrigerate for up to one day. Finally, assemble the dessert before serving.

    Recipe variations

    Christmas Pavlova is a classic for those who live in Australia and New Zealand.

    Shaped traditionally as a dome or wreath or making mini Pavlovas topped with whipped cream and seasonal fruits is what this holiday offers best.

    • Experiment with the number of meringue rounds to shape the wreath. Typically, it ranges from 8 to 12.
    • Play with fruit jams, preserves, and your favorite fruits to bring new tastes and flavors. You will want to bring the holiday colors like red, white, and green with fresh raspberries, pomegranate seeds, and mint leaves.
    • Use other Pavlova toppings such as oranges, chocolate sauce, red and green sprinkles, you name it.

    Storing and freezing

    Pavlova is best assembled at the moment of serving. Store leftover Pavlova in the fridge and consume it within 24 hours.

    If making the Pavlova base in advance, store it in an airtight container in a dry, cool place. Don't refrigerate it; otherwise, it will absorb moisture and lose its crispness.

    Can you freeze the Pavlova dessert? It is not recommended to freeze the assembled Pavlova, but you can freeze the meringue shell.

    Bring the baking tray with the meringue to the freezer for a few hours. Once it is solid, double cover the meringue shell with plastic wrap, then aluminum foil, and freeze for up to one month.

    To thaw, unwrap it, place it on a serving platter, and let it thaw for about 3 hours at room temperature.

    Recipe FAQ

    Why does Pavlova go brown after baking?

    If Pavlova turns brown after baking, it was baked in the hot oven. You might need to check the oven temperature with an instant-read oven thermometer and experiment. Next time, try to bake Pavlova at a slightly lower temperature but a bit longer.

    What causes Pavlova to collapse?

    Pavlova usually cracks and collapses due to rapid temperature changes. To prevent it, the Pavlova base has to be cooled down slowly: leave your Pavlova in the oven overnight. If you are in a hurry, leave it in the oven for at least 3 to 4 hours.

    How to store a Pavlova

    Store the assembled Pavlova in the refrigerator and consume it within the next 24 hours.

    Love meringue desserts? Try these next!

    • Meringue Cake Merveilleux
    • Meringue Roulade
    • Giant Meringue
    • Plum Pavlova
    • Or browse all the cake recipes

    Want more delicious and beautiful recipes? Subscribe to my newsletter and follow me on Facebook, Pinterest, and Instagram for my latest updates. If you make this recipe, please leave a star rating on the recipe card and comment below!

    Print

    Recipe card

    Christmas Pavlova Wreath

    Christmas Pavlova wreath on a serving plate.
    Print Recipe
    Save Recipe Recipe Saved

    5 Stars 4 Stars 3 Stars 2 Stars 1 Star

    No reviews

    Christmas Pavlova wreath is a festive meringue with a marshmallow-like center and crispy exterior, perfect for the festive time of the year. Topped with fresh red fruit and sweetened whipped cream, it is the most delicious way to celebrate Christmas. 

    • Author: Irina Totterman
    • Total Time: 1 hour, 30 minutes (plus resting time)
    • Yield: 8 1x
    • Category: Cakes
    • Method: Baking
    • Cuisine: Australian
    • Diet: Gluten Free

    Ingredients

    Scale

    For the meringue:

    • 4 egg whites, room temperature
    • ¾ cup + 2 tablespoons (200 g) caster sugar 
    • 1 teaspoon white vinegar
    • 1 tablespoon cornstarch

    For the sweetened whipped cream:

    • 1 ¼ cups + 1 tablespoon (300 ml) cold heavy cream, 30% fat
    • 1 tablespoon powdered (icing) sugar
    • ½ teaspoon vanilla extract

    For decoration:

    • (200 g) fresh strawberries
    • 200 g fresh raspberries
    • ¼ pomegranate
    • few raw pistachios
    • 1 tablespoon powdered (icing) sugar

    *Don't you have the correct baking pan on hand right now? Try this simple Cake Pan Converter!

    ** If needed, please refer to Baking Conversion Charts.

    Instructions

    1. Preheat the oven to 230°F (110°C). Prepare a baking sheet covered with parchment paper. Mark an 8-inch (20 cm) circle on parchment paper and flip the parchment to ensure no marks transfer to the meringue. 

    2. To make the meringue, place egg whites in a large bowl and beat with an electric mixer at high speed.

    3. Gradually add caster sugar, one spoon at a time, beating until the sugar dissolves and the meringue is stiff, thick, and glossy.

    4. Add cornflour and white wine vinegar, and whisk for 20 to 30 seconds until just combined.

    5. Using a large metal spoon, spoon 8 to 10 dollops of meringue close together to form a wreath shape. 

    6. Bake at 230°F (110°C) for 20 minutes, then reduce heat to 210°F (100°C). Bake for a further 1 hour 15 minutes. Turn off the oven and allow Pavlova to cool, with the door closed, for about 3 to 4 hours.

    7. To make sweetened whipped cream, beat heavy cream, powdered sugar, and vanilla until soft peaks form.

    8. To assemble Pavlova, place the meringue wreath on a serving platter and top with the whipped cream. Decorate Pavlova with fresh fruit, pomegranate seeds, chopped pistachios, and sprinkle with powdered sugar.

    Notes

    1. Ensure you use a clean bowl and avoid even a tiny drop of egg yolk while separating the eggs. 
    2. If fresh fruits are out of season, sprinkle the top of Pavlova with fruit preserves, freeze-dried berries, and chopped nuts. 
    3. Assemble Pavlova at the last minute, right before serving. 
    4. Make ahead option: Prepare the meringue base a day ahead and keep it in the oven. Alternatively, bake the Pavlova shell two days in advance and store it in a sealed container in a cool, dry area. Chill the bowl and whip the cream, then cover it with plastic film and refrigerate for up to one day. Finally, assemble the dessert before serving.

    Nutrition

    • Serving Size: 1 slice
    • Calories: 269
    • Sugar: 30.1 g
    • Sodium: 32 mg
    • Fat: 14.3 g
    • Saturated Fat: 8.8 g
    • Carbohydrates: 37.9 g
    • Fiber: 2.2 g
    • Protein: 3.1 g
    • Cholesterol: 52 mg

    Thank you for following me on Pinterest, Facebook, and Instagram. Hashtag #bakinglikeachef so I can see your creations.

    The nutritional information has been calculated using an online recipe nutrition calculator such as Verywellfit.com and is intended for informational purposes only. These figures should be used as a general guideline and not be construed as a guarantee.

    The recipe was originally published on December 24, 2018. It has been updated and may differ from what was originally published.

    Concorde Cake (Gateau Concorde)

    Oct 28, 2020 · 26 Comments

    Concord cake (gâteau Concorde) on a marble board with dessert plates in the background.

    If you look for a chocolate meringue cake, this Concorde cake (gâteau Concorde in French) will surely please your guests. It is a chocoholic's dream made with crisp meringue layers sandwiched with luscious chocolate mousse and topped with chocolate shavings.

    Sliced chocolate meringue cake Concorde on a cake board

    Cake Concorde has an interesting history. It was created in honor of the mythical French aircraft Concorde in the early 1970s, while Gaston Lenôtre was a chef of the catering on the lines Air France.

    According to Madam Mercotte, the French Chef Mr. Lenôtre

    "[has] raised the pastry to the rank of art and paved the way for many world-famous pastry chefs known today."

    Concorde cake also has different spelling as Concord cake. It is translated as gâteau Concorde in French.

    BAKING ESSENTIALS CHECKLIST

    Sign up and get a list of the necessary baking tools and ingredients

    FREE DOWNLOAD

    Decorated Concorde cake with plates and a wine bottle in the background
    [feast_advanced_jump_to]

    Concorde cake

    Gaston Lenôtre was a French chef who invented the Concorde cake. Later, it was recreated by many chefs around the world.

    Israeli Chef Gadi Peleg, an owner of Breads Bakery in Manhattan, was inspired by his favorite cake sold in now-closed Soutine Bakery and created his own Concord cake version.

    He simplified the decoration of the cake, covering it entirely with meringue sticks. 

    So, if you feel uncomfortable with tempering chocolate, this type of Concord cake assembling is for you.

    Madam Mercotte slightly modified the Concorde cake recipe and offered it as a technical test for five amateur pastry chefs during Le Meilleur Pâtissier Saison 6 émission 7, Douce France.

    I adapted her recipe and left the cake's decoration with chocolate shavings/chips on top.

    It is probably the most challenging part of making the cake.

    Chocolate meringue cake on a marble board: Overhead view

    How to decorate Concorde cake

    French gâteau Concorde, meaning Concord(e) cake in English, is decorated with the tempered chocolate shavings on top of the cake, arranged in a swirl's shape.

    If you have a cooking thermometer, trust me that you can master this technique, even at the first attempt.

    Follow the water bath method to temper chocolate, and you will succeed!

    In the worst scenario, make chocolate shavings out of a chocolate bar, using a knife or a vegetable peeler, and decorate the top of the cake.

    It is the same technique used to make Meringue Cake Merveilleux.

    Another way to decorate Concorde cake is to make meringue sticks using Ateco plain pastry tip 806 instead of Ateco plain pastry tip 809 used in the recipe below.

    You will end up with smaller and neat meringue sticks to cover the cake entirely. Arrange them so that they are poking up in different directions.

    Why you should try this recipe

    1. This deliciously decadent cake is perfect for any special event: serve it for Christmas, birthday party, Easter, or a family barbeque party.
    2. It is a chocolate meringue cake to satisfy your sweet tooth.
    3. Concord cake recipe has a make-ahead option: make meringue disks and sticks and prepare chocolate shavings in advance and save time on the day of assembling the dessert.
    4. The cake is gluten-free; so, no worries about serving the cake for a crowd.
    5. Decorating the cake is very forgiving: cover the cake with meringue sticks completely instead of using tempered chocolate shaving.
    A slice of Concord cake (Gâteau Concorde) with the rest of the cake

    Ingredients

    For ingredients and detailed instructions, refer to the recipe card below.

    Egg whites: the recipe calls for large egg whites. Separate egg whites from the yolks while eggs are chilled. Use an egg separator to facilitate this step.

    Sugar: for the best results, use caster sugar or superfine baker's sugar. You can make superfine sugar yourself by processing granulated sugar in a food processor bowl for a few seconds.

    Icing sugar: make it yourself by using a coffee grinder or use a store-bought powdered sugar.

    Cocoa powder: use unsweetened cocoa powder to make the cake.

    Whipping cream: use whipping cream with at least 35% or more milk fat.

    Dark chocolate: to make this chocolate cake, use high-quality dark chocolate such as Scharffen Berger dark chocolate or Valrhona dark chocolate.

    The authentic recipe for Concorde cake calls for Valrhona dark chocolate Caraibe.

    How to make Concorde cake

    To make the chocolate meringue, preheat the oven to 240 F/115 C.

    Using a flour sifter, sift icing (powdered) sugar and cocoa powder, and set aside.

    Place egg whites in a stand mixer recipient and beat until stiff. Gradually add granulated (caster) sugar and whisk until glossy (photo 1).

    Add the dry mixture of icing sugar with cocoa powder and gently mix with a rubber spatula (photo 2).

    Photo 1: Beaten egg whites in a bowl Photo 2: Chocolate meringue in a bowl
    PHOTO 1 PHOTO 2

    Prepare two parchment paper sheets and draw three discs with a diameter of 6 ½-inch/17 cm. Flip paper sheets so that the drawn circles will be facing down.

    Transfer the chocolate meringue to a pastry bag with Ateco plain pastry tip 809 and pipe three meringue disks in a spiral within the pencil marks (photo 3).

    Also, push a few rows of long meringue sticks around disks, using the same pastry tip.

    Dip a knife in melted butter and cut meringue "sausages" into segments of 25/32-inch (almost 1 inch)/2 cm (photo 4).

    Photo 3: Two meringue disks on parchment Photo 4: Meringue disk and  meringue sticks on parchment
    PHOTO 3 PHOTO 4

    Bake for 1 hour. Remove from the oven and let the meringue cool down. Break the meringue sticks (photo 5).

    To make the chocolate mousse, melt dark chocolate using a bain-marie/water bath or a microwave (mix chocolate every 30 seconds).

    Bring ⅔ cup + 1 tablespoons (170 g) whipping cream to a boil and pour cream in 3 times over chocolate, mixing well with the spatula (photo 6). Keep the mixture at 113 F/45 C (maximum).

    Photo 5: Baked meringue on the parchment
Photo 6: A chocolate mixture in a metal bowl
    PHOTO 5 PHOTO 6

    In a separate bowl, whisk 1 ½ cups (340 g) whipping cream to get a softly whipped cream.

    Add whipped cream to the chocolate preparation (photo 7), mix, and use immediately. Do not refrigerate!

    To make dark chocolate shavings, temper chocolate. Pour the tempered chocolate on a worktop surface (better marble or granite) and spread it up to 1/10-inch/2 mm thick.

    When the chocolate is just starting to crystallize, push it quickly with a triangle, a chocolate spatula, or a large knife.

    Repeat the operation several times to obtain chocolate shavings, ideally with a length of about 1 ½-inch/4 cm. Let completely crystallize before you use it (photo 8).

    Photo 7: Chocolate mousse in a metal bowl Photo 8: Chocolate shavings on parchment
    PHOTO 7 PHOTO 8

    To assemble the Concorde cake, place the first meringue disk on a serving plate or a cake board, with the flat surface facing down.

    Cover it regularly with 6.4 oz. (180 g) chocolate mousse (photo 9). Place the second meringue disc smooth side up this time.

    Spread 6.4 oz. (180 g) mousse again. Cover with the last disc with the flat side on the top (photo 10).

    Photo 9: Meringue topped with mousse on parchment Photo 10: Meringue on top of the mousse
    PHOTO 9 PHOTO 10

    Cover the top and sides with the remaining chocolate mousse and smooth them with a spatula.

    Decorate the cake's sides horizontally, placing the meringue sticks on two levels (photo 11).

    Decorate the top of the cake with chocolate shavings (photo 12). Sprinkle with the icing (powdered) sugar. Refrigerate the cake for at least 6 hours, better overnight.

    Photo 11: Cake decorated with meringue sticks Photo 12: Cake topped with chocolate shavings
    PHOTO 11 PHOTO 12

    Expert tips

    1. Read on the main tips for the perfect meringue.
    2. Read on how to temper dark chocolate.
    3. Make-ahead tip: make meringue disks in advance and store them for up to 15 days in a dry place, being well packed. You can also make chocolate shavings ahead of time and keep them in a cold, dry place.
    4. Keep the finished Concorde cake for up to 48 hours in the fridge.

    Frequently asked questions

    Can you make this cake ahead of time?

    Yes, you can make meringue and chocolate shavings up to 15 days in advance. Keep them in a dry place.

    How to store Concorde cake

    Store the assembled cake Concorde for up to 2 days.

    Can you freeze this chocolate meringue cake

    For the best cake taste and meringue texture, I do not recommend freezing this cake.

    Print

    Recipe card

    Chocolate Concorde (Gateau Concorde)

    Concord cake (gâteau Concorde) on a marble board with dessert plates in the background.
    Print Recipe
    Save Recipe Recipe Saved

    5 Stars 4 Stars 3 Stars 2 Stars 1 Star

    5 from 11 reviews

    If you look for a chocolate meringue cake, this Concorde cake (gâteau Concorde in French) will surely please your guests. It is a chocoholic's dream made with crisp meringue layers sandwiched with luscious chocolate mousse and topped with chocolate shavings. 

    • Author: Irina Totterman
    • Total Time: 2 hours, 15 minutes
    • Yield: 10 1x
    • Category: Cakes
    • Method: Baking
    • Cuisine: French
    • Diet: Gluten Free

    Ingredients

    Scale

    For the chocolate meringue:

    • ⅔ cup + 1 ½ tablespoons (190 g) egg whites (see note #1)
    • ⅔ cup + 8 ½ teaspoons (190 g) granulated sugar 
    • 1 ½ cups + 1 teaspoon (190 g icing) (powdered) sugar
    • ⅓ cup (40 g) cocoa powder

    For the chocolate mousse:

    • ⅔ cup + 1 tablespoons (170 g) whipping cream
    • 1 ½ cups (345 g) whipping cream
    • 9.9 oz. (280 g) dark chocolate 

    For dark chocolate shavings:

    • 7 oz. (200 g) dark chocolate

    *Don't you have the correct baking pan on hand right now? Try this simple Cake Pan Converter!

    ** If needed, please refer to Baking Conversion Charts.

    Instructions

    1. To make the chocolate meringue, preheat the oven to 240 F/115 C.
    2. Using a flour sifter, sift icing (powdered) sugar and cocoa powder, and set aside. Place egg whites in a stand mixer recipient and beat until stiff. Gradually add granulated (caster) sugar and whisk until glossy. Add the dry mixture of icing sugar with cocoa powder and gently mix with a rubber spatula.
    3. Prepare two parchment paper sheets and draw three discs with a diameter of 6 ½-inch/17 cm. Flip paper sheets so that the drawn circles will be facing down. Transfer the chocolate meringue in a pastry bag with Ateco plain pastry tip 809 and pipe three meringue disks in a spiral within the pencil marks.
    4. Also, push a few rows of long meringue sticks around disks, using the same pastry tip. Dip a knife in melted butter and cut meringue "sausages" into segments of  25/32-inch (almost 1 inch)/2 cm. Bake for 1 hour. Remove from the oven and let the meringue cool down. Break the meringue sticks.
    5. To make the chocolate mousse, melt dark chocolate using a bain-marie/water bath or a microwave (mix chocolate every 30 seconds). Bring ⅔ cup + 1 tablespoons (170 g) whipping cream to a boil and pour cream in 3 times over chocolate, mixing well with the spatula. Keep the mixture at 113 F/45 C (maximum).
    6. In a separate bowl, whisk 1 ½ cups (340 g) whipping cream to get a softly whipped cream. Add whipped cream to the chocolate preparation, mix and use immediately. Do not refrigerate!
    7. To make dark chocolate shavings, temper chocolate. Pour the tempered chocolate on a worktop surface (better marble or granite) and spread it up to 1/10-inch/2 mm thick. When the chocolate is just starting to crystallize, push it quickly with a triangle, a chocolate spatula, or a large knife. Repeat the operation several times to obtain chocolate shavings, ideally with a length of about 1 ½-inch/4 cm. Let it completely crystallize before you use it.
    8. To assemble the Concorde cake, place the first meringue disk on a serving plate or a cake board, with the flat surface facing down. Cover it regularly with 6.4 oz. (180 g) chocolate mousse. Place the second meringue disc smooth side up this time. Spread 6.4 oz. (180 g) mousse again. Cover with the last disc with the flat side on the top. Cover the top and sides with the remaining chocolate mousse and smooth them with a spatula.
    9. Decorate the sides of the cake horizontally, placing the meringue sticks on two levels. Decorate the top of the cake with chocolate shavings. Sprinkle with the icing (powdered) sugar. Refrigerate the cake for at least 6 hours, better overnight.

    Notes

    1. 190 g egg whites approximately equal to 5 raw fresh egg whites from extra large size chicken eggs.
    2. Read on the main tips for the perfect meringue.
    3. Read on how to temper dark chocolate.
    4. Make-ahead tip: make meringue disks in advance and store them for 15 days in a dry place, being well packed. You can also make chocolate shavings ahead of time and keep them in a cold, dry place.
    5. Keep the finished Concorde cake for up to 48 hours in the fridge.

    Nutrition

    • Serving Size: 1 slice
    • Calories: 570
    • Sugar: 62.6 mg
    • Sodium: 75 mg
    • Fat: 30.6 mg
    • Saturated Fat: 20.1 mg
    • Carbohydrates: 70.3 mg
    • Fiber: 2.8 mg
    • Protein: 7.6 mg
    • Cholesterol: 68 mg

    Thank you for following me on Pinterest, Facebook, and Instagram. Hashtag #bakinglikeachef so I can see your creations.

    The nutritional information has been calculated using an online recipe nutrition calculator such as Verywellfit.com and is intended for informational purposes only. These figures should be used as a general guideline and not be construed as a guarantee.

    The recipe was adapted from https://www.mercotte.fr/. It was originally published on October 08, 2018. The recipe has been revised to include improved content and photos.All posted pictures are mine.

    Flan de Coco (Coconut Flan) Recipe

    Oct 4, 2020 · 12 Comments

    Coconut flan decorated with coconut chips and served on a white plate.

    Enjoy this easy coconut flan or flan de coco recipe to make one of the most impressive desserts. Made with condensed milk and topped with caramel, this delicate custard is worth making at least once in a lifetime. But once you try it, you will indeed repeat that experience!

    A slice of coconut flan with a plate in the background: Close up

    Coconut flan, flan coco, flan de coco, coconut flan cake, or coconut flan pie is another impressive and delicious dessert.

    It belongs to the desserts called custards, a cooked mixture of milk or/and cream and egg yolks. 

    [feast_advanced_jump_to]

    This coconut flan recipe is quite different from the traditional flan recipe. It has a French touch, and it hails from the cuisine of the French Antilles Islands. So here is another name - Flan au coco antillais, meaning West Indian coconut flan or Caribbean flan.

    BAKING ESSENTIALS CHECKLIST

    Sign up and get a list of the necessary baking tools and ingredients

    FREE DOWNLOAD

    Added shredded coconut to the custard mixture divides the baked coconut flan into two different layers.

    Once flipped, the flan showcases a biscuit-like coconut crust with a luscious creamy custard and caramel on top.

    What is flan

    Flan is a baked custard dessert with a silky texture and a beautiful layer of simple caramel sauce on top. It is also known under other names such as "crème caramel" in French, caramel custard, or caramel pudding. 

    Coconut flan is a luscious dessert of Latin American origin with a prominent coconut flavor and taste due to coconut milk, cream of coconut, or shredded coconut.

    Flan topped with caramel and tea box, tea bags and a cup in the background

    Why you should try this recipe

    • This easy coconut flan recipe (flan de coco receta in Spanish) is quick to make: it takes about an hour from start to finish.
    • This flan dessert calls for a handful of simple ingredients.
    • It is an impressive custard dessert for a special occasion, whether a birthday or a BBQ party.
    • Flan de coco is gluten-free, so there are no worries about serving anyone.

    Ingredients

    Flan de coco ingredients in pictures

    For ingredients and detailed instructions, refer to the recipe card below.

    • Evaporated milk is used to make the recipe. You will need a bit less than one can of evaporated milk.
    • Sweetened condensed milk: you will need about one can of store-bought sweetened condensed milk: I used the Carnation one by Nestlé. You can also opt for homemade condensed milk.
    • Brown sugar: Use golden brown sugar or replace it with dark brown sugar.
    • Eggs: the recipe calls for large eggs. Bring them to room temperature 30-60 minutes before you start.
    • Water: Use cold water to make the flan.
    • Coconut: the recipe calls for shredded coconut.
    • Sugar: use regular granulated sugar or caster sugar to make the caramel.

    Recipe variations

    Known since the middle ages, nowadays, flan is a popular dessert in Latin America, and its recipe is the most customizable to create different types of flan.

    This coconut flan recipe calls for sweetened condensed milk. Other recipes use heavy cream, whole, or coconut milk.

    • Flan de coco with condensed milk has a slightly denser texture than the ones made with cream or milk.
    • Flan de coco with coconut milk or Spanish coconut flan will be lighter than a cream-based custard.
    • Puerto Rican flan de coco is made with evaporated and whole milk, eggs, and sugar.
    • Mexican coconut flan has delicious variations, such as coffee, chocolate, pumpkin, pineapple, and orange.

    You can make flan in different pans: choose between a glass or non-stick pie pan, a savarin mold, and a bundt pan.

    But don't confuse a flan pan created for making German fruit flan with a mold you choose for your flan.

    If you strive for authenticity while making the flan, look for a special flan mold called a flora.

    To make individually served flan desserts, use ramekins. Ensure that they are nestled close in a water bath to prevent them from sliding around.

    How to make coconut flan

    Heat oven to 390°F (200°C). Prepare a 9-inch/23 cm pie pan or pie plate to pour caramel right away.

    Make wet caramel

    To make the caramel, in a heavy-bottomed small saucepan, pour water, add white sugar, and bring over medium-high heat to boil (photo 1). Heat sugar until the caramel turns a golden color (photo 2).

    Expert tip: Watch for your caramel to avoid overcooking. Once it turns golden brown, remove it from the heat!

    Photo 1: Boiling sugar syrup in a saucepan Photo 2: Boiling caramel in a saucepan
    PHOTO 1 PHOTO 2

    Pour the caramel into the bottom of the prepared pan (photo 3) and let it cool down.

    Make custard

    To make the custard, in a separate bowl, add whole eggs and brown sugar and whisk with a hand whisk. Add evaporated milk and combine (photo 4).

    Photo 3: Hot caramel in a pie pan Photo 4: Egg mixture in a metal bowl
    PHOTO 3 PHOTO 4

    Add sweetened condensed milk and cold water, and whisk again. Finally, add coconut and mix (photo 5). Pour the preparation into the pie tin over the caramel (photo 6).

    Photo 5: Ready custard mixture in a bowl Photo 6: A poured mixture in a tin
    PHOTO 5 PHOTO 6

    Make a hot water bath

    A water bath (bain marie) is crucial while baking flan: slow baking prevents getting a scrambled egg-textured custard. It is the same technique used to make cheesecakes.

    To prepare a flan water bath, place a flan pan in the center of the large roasting pan, baking dish, or frying pan. Pull the oven rack out (no baking sheet on) and place pan with flan inside the empty frying pan.

    Carefully pour the warm water around the flan dish until the water level reaches halfway up the edges of the dish.

    Push the oven rack back in the preheated oven and bake the flan for 50-60 minutes (photos 7-8).

    Photo 7: Mold with flan into the water bath Photo 8: Flan into the water bath
    PHOTO 7 PHOTO 8

    When the flan is baked, carefully remove the frying pan from the oven, not spilling the hot water. Use oven mitts!

    Allow the flan to cool to room temperature while in the water bath. Then remove the flan pan from the large container.

    Get flan out of the pan

    Once the flan is cooled down, slide a sharp knife between the custard and the sides of the pan. Next, invert serving plate on top of the flan tin and flip the pan and the plate using a quick movement.

    If it doesn't immediately away, let it sit inverted for a minute or two: it will finally slide out.

    Lift the flan pan. The flan will be covered with caramel topping, while the coconut forms a biscuit-like base.

    Using a rubber spatula, scrape the remaining caramel from the bottom of the dish on top of the flan. The hardened part of the caramel will remain in the pan, which is fine.

    Decorate the top of the flan with roasted coconut flakes or coconut chips. Allow 2 hours for the flan to set.

    Sliced flan topped with caramel and decorated with coconut chips

    Expert Tips

    1. Make sure a heavy-duty pan is ready to pour the caramel in. Once the caramel turns golden, pour it right away until it hardens.
    2. While cooking the caramel, either stir it constantly or rotate the pan on top of the stove without any spoon. It is essential to catch the right color of ready caramel!
    3. Tilt the pan in every direction to get a nice coating of caramel in the pan. Then let it harden.
    4. Keep the flan (still in the pan) in the fridge until ready to serve. Before serving, bring it to the oven at 355°F (180°)C for a few minutes to liquefy the caramel. Then flip it over and serve.

    Storage instructions

    Store the coconut flan in an airtight container in the fridge for up to 3 days.

    Can you freeze flan? It isn't recommended to freeze the coconut flan. Since the flan is custard, its texture will be destroyed when thawed.

    Recipe FAQ

    What is the difference between flan and creme brulee?

    Flan and creme brulee are silky smooth custards with a beautiful texture and lavish flavor. The main difference is that flan has a denser texture and is topped with a soft and gooey caramel sauce. Creme brulee is lighter in texture and topped with a layer of hardened caramelized sugar. Also, flan hails from Latin American cuisine, while creme originates from French.

    What is flan usually made of?

    Traditional flan is made of eggs, sweetened condensed milk, cream, whole or evaporated milk, and sugar. It may be flavored with vanilla, coconut extract, coffee, or orange.

    Does flan have gelatin?

    Flan, or crème caramel, doesn't have gelatin; it is an egg-based custard made of eggs, sweetened condensed milk, cream, whole or evaporated milk, and sugar.

    Do you need to cover flan with foil while baking?

    You do not need to cover the flan with aluminum foil while it is in the oven.

    Can you make the flan ahead of time?

    Make this flan at least 2 hours before serving so that it has time to set.

    How to serve coconut flan?

    Once you flip the flan onto a serving platter, the dessert will be covered with a golden caramel sauce. Slice the flan and spoon the caramel over each serving. Garnish with fresh berries if you desire.

    Want more delicious and beautiful recipes? Subscribe to my newsletter and follow me on Facebook, Pinterest, and Instagram for my latest updates. If you make this recipe, please leave a star rating on the recipe card and comment below!

    Print

    Recipe card

    Flan de Coco (Coconut Flan)

    Coconut flan decorated with coconut chips and served on a white plate.
    Print Recipe
    Save Recipe Recipe Saved

    5 Stars 4 Stars 3 Stars 2 Stars 1 Star

    5 from 5 reviews

    Enjoy this easy gluten-free coconut flan (flan de coco) recipe to make one of the most impressive desserts. Made with condensed milk and topped with caramel, this delicate custard is worth making at least once in a lifetime. But once you try it, you will indeed repeat that experience!

    • Author: Irina Totterman
    • Total Time: 1 hour, 15 minutes (plus resting time)
    • Yield: 8 1x
    • Category: Custards
    • Method: Baking
    • Cuisine: Spanish
    • Diet: Gluten Free

    Ingredients

    Scale

    For custard:

    • 1 cup (255 g) evaporated milk
    • ⅔ cup + 2 tablespoons (245 g) sweetened condensed milk
    • 1 tablespoon (12 g) brown sugar
    • 4 large eggs
    • ½ cup + 1 ½ teaspoons (125 ml) cold water
    • ⅔ cup + 3 tablespoons (80 g) shredded coconut

    For caramel:

    • ⅔ cup + 3 ½ tablespoons (200 g) granulated sugar
    • 10 teaspoons (50 ml) water

    For decoration: 

    • 0.3 oz (10 g) roasted coconut chips

    *Don't you have the correct baking pan on hand right now? Try this simple Cake Pan Converter!

    ** If needed, please refer to Baking Conversion Charts.

    Instructions

    1. Preheat oven to 390°F (200°C). Prepare a 9-inch/23 cm pie pan or pie plate to pour caramel right away. 
    2. To make the caramel, in a heavy-bottomed saucepan, pour water, add white sugar, and bring to a boil. Once the caramel turns golden, pour it into the bottom of the prepared apn and let it cool down.
    3. To make the custard, in a separate bowl, add whole eggs and brown sugar and whisk with a hand whisk. Add evaporated milk and combine. Add sweetened condensed milk and cold water, and whisk again. Finally, add coconut and mix.
    4. Pour the preparation into the pie tin over the caramel. Place the tin inside a large frying pan, bring it to the oven rack, and carefully add warm water. The water level should reach about halfway up the flan tin. Bake the flan for 50-60 minutes.
    5. Using oven mitts, remove the pan from the oven and set it aside to cool at room temperature in the water bath. Then remove the flan pan.
    6. Once the flan is cool, slide a sharp knife between the custard and the mold. Then place a serving plate on top of the mold and flip the flan quickly using a sharp move. The flan will be covered with caramel on top, while the coconut forms a biscuit-like base.
    7. Decorate the flan with coconut flakes or coconut chips. Allow 2 hours for the flan to set.

    Notes

    1. Make sure your pie pan is ready to pour the caramel in. Once the caramel gets golden, pour it right away until it hardens.
    2. While cooking the caramel, stir it constantly or rotate the pan on top of the stove without using any spoon. It is essential to catch the right color of ready caramel!
    3. Tilt the pan in every direction to get a nice coating of caramel in the pan. Then let it harden.
    4. Keep the flan (still in the pan) in the fridge until ready to serve. Before serving, bring it to the oven at 355°F (180°)C for a few minutes to liquefy the caramel. Then flip it over and serve.

    Nutrition

    • Serving Size: 1 slice
    • Calories: 340
    • Sugar: 47.2 g
    • Sodium: 107 mg
    • Fat: 13.7 g
    • Saturated Fat: 9.5 g
    • Carbohydrates: 49 g
    • Fiber: 1.8 g
    • Protein: 8.1 g
    • Cholesterol: 102 mg

    Thank you for following me on Pinterest, Facebook, and Instagram. Hashtag #bakinglikeachef so I can see your creations.

    The nutritional information has been calculated using an online recipe nutrition calculator such as Verywellfit.com and is intended for informational purposes only. These figures should be used as a general guideline and not be construed as a guarantee.

    The recipe was adapted from https://www.meilleurduchef.com. It was originally published on February 23, 2018. The recipe has been revised to include improved content and photos. All posted pictures are mine.

    Pavlova Roll (Meringue Roulade)

    Jul 22, 2020 · 23 Comments

    Meringue roulade topped with raspberries and pistachios on a black serving board.

    Here is the ultimate Pavlova roll recipe for all occasions. This easy meringue roulade is a delightful twist on the traditional Pavlova, featuring a mouthwatering combination of sweet meringue, tangy raspberries, luscious whipped cream, and crunchy toasted pistachios. Light, impressive, and full of flavors.

    Meringue roulade topped with raspberries and pistachios on a black serving board

    Whether it is a beautiful summer day or a birthday party, a Christmas holiday, or Valentine's Day, this gorgeous dessert will be a winner of the table.

    [feast_advanced_jump_to]

    This meringue roulade recipe offers the delightful taste of Pavlova but requires a much shorter cooking time. While classic Pavlova typically takes about 2 hours to bake, this meringue only needs 30 minutes in the oven.

    BAKING ESSENTIALS CHECKLIST

    Sign up and get a list of the necessary baking tools and ingredients

    FREE DOWNLOAD

    If you love light and airy meringue, enjoy other meringue-based desserts on the website, such as easy and quick Large Meringue, crowd-pleasing French Meringue Cake Merveilleux, summertime Plum Pavlova, or no-bake Eton Mess.

    What is a Pavlova roll?

    Pavlova roll, or Pavlova roulade, is a rolled meringue with a crispy top and soft, marshmallow-like interior. It is filled and decorated with whipped cream and seasonal fruits.

    As a variation of the famous Australian or NZ Pavlova, this stunning and yummy meringue dessert has many names, such as meringue roulade, meringue roll, Swiss meringue roll, Pavlova roll, Pavlova cake roll, Pavlova log, and rolled Pavlova.

    Not all the names correctly describe the roulade, but one thing they all have in common: delicious.

    Pavlova roll decorated with fresh raspberries and pistachios on a serving board

    Pavlova roll recipe

    • This quick and easy rolled Pavlova recipe results in a very impressive-looking dessert.
    • Ideal for any party, this naturally gluten-free dessert serves 8-10 people.
    • This meringue roulade is fully customizable: replace fresh raspberries with cherries or other fruits of your choice.
    • It is perfect for a birthday, anniversary, Christmas, Easter, and Australia Day.

    Ingredients

    For ingredients and detailed instructions, refer to the recipe card below.

    • Egg whites: Use large egg whites from fresh eggs. Easily separate the whites from the yolks while they are cold. Use an egg separator or the old-school eggshell method when you break the egg and pour the egg yolk from half of the shell to another half, allowing the white to drip into a bowl. Let the egg whites get to room temperature before you start.

    Use leftover egg yolks to make Italian pastry cream, Bavarian cream, crème Anglaise, or savory hollandaise sauce.

    • Sugar: Use superfine caster sugar, also known as baker's sugar or castor sugar. To make granulated sugar superfine, process it in a food processor for a few seconds.
    • Vanilla extract: Madagascar Bourbon pure vanilla extract is the most full-flavored among other vanilla extracts. Use alcohol-free vanilla flavor if you desire. 
    • White wine vinegar helps stabilize the beaten egg whites so that the meringue retains its volume and keeps the air whisked into it. To replace it, use the same amount of lemon juice or cream of tartar.
    • Corn starch is an essential ingredient to make a meringue roulade. With its long molecules, cornstarch prevents egg white proteins from clotting too much while the meringue is baking. It facilities the meringue rolling while assembling the dessert.
    • Heavy cream: Use your favorite heavy or heavy whipping cream brand with at least 30% fat content.
    • Sour cream helps stabilize whipped cream. Replace it with mascarpone, but do not over-mix the cream.
    • Icing sugar: Make it yourself with a coffee grinder or use store-bought powdered sugar.
    • Rosewater (optional) brings floral flavor to the dessert. Combined with vanilla, rosewater makes an enticing match in this Pavlova roulade.
    • Raspberries: The recipe calls for fresh seasonal raspberries. Frozen raspberries will not work in this recipe, but you can use fresh or frozen cherries. In this case, use drained, pitted, and wiped dry cherries.
    • Pistachios: Choose toasted or raw pistachios to decorate the dessert.
    Decorated rolled Pavlova on a black serving board with plates in the background

    Recipe variations

    • Flavoring: Flavor the meringue roll and the filling cream with vanilla, coconut, almond extract, orange blossom water, or rose water.
    • Filling: Swap raspberries for fresh peaches, nectarines, cherries, kiwis, or a mix of red fruit (fresh strawberries, blueberries, blackberries, and raspberries). Replace pistachios with toasted almonds.
    • Decoration: Decorate the meringue roulade with fresh rose petals or chocolate shavings instead of fresh berries.

    How to make meringue roulade

    Step 1. To make the Pavlova meringue, preheat the oven to 320°F (160°C).

    Step 2. Place egg whites in a clean bowl of an electric mixer or the bowl of a stand mixer fitted with the whisk attachment and whisk until soft peaks.

    Step 3. Gradually add sugar in a few additions and continue to whisk egg whites on medium-high speed until the meringue becomes glossy and stiff peaks form.

    Step 4. Add vanilla extract, white wine vinegar, and cornstarch and gently mix with a large metal spoon or a large rubber spatula (photo 1).

    Step 5. Line a 13 x 9.5 inches rimmed baking sheet (33 x 24 cm) with non-stick baking paper extending 1 inch (2.5 cm) over each side of the pan. Secure parchment paper to the pan with meringue drops at the corners (photo 2).

    Photo 1: Meringue in a bowl Photo 2: Parchment fixed with the meringue into a pan
    PHOTO 1 PHOTO 2

    Step 6. Spread the meringue mixture into the prepared pan and level it with an offset spatula or a dough scraper (photo 3).

    Step 7. Bake in the preheated oven for 30 minutes. The meringue is ready when it forms a crust on top. Remove the pan from the oven, slide the meringue on a work surface, and let it cool (photo 4). 

    Step 8. Flip the meringue onto a clean sheet of parchment larger than the longest side of the pan and gently peel off the lining paper from the base.

    Photo 3: Meringue into a baking pan Photo 4: Baked meringue in a pan
    PHOTO 3 PHOTO 4

    Step 9. To make the stabilized whipped cream, place cold heavy cream, cold sour cream, icing (powdered) sugar, rose water, and vanilla extract in a clean oil-free bowl.

    Step 10. Whisk with a hand whisk for about 5-6 minutes until soft peaks: the cream will start holding its shape (photo 5). 

    Step 11. To assemble the meringue roll, spread the cream in an even layer over the top of the meringue, and set aside a few spoons of cream for decoration.

    Step 12. Arrange raspberries (reserve a few for the decor) on top of the cream, and sprinkle with chopped pistachios (photo 6).

    Photo 5: Whipped cream in a bowl Photo 6: Meringue covered with cream, raspberries, and pistachios
    PHOTO 5 PHOTO 6

    Step 13. Roll the meringue into a log, starting from the long end. Use parchment paper as a guide to help you roll it (photo 7).

    Step 14. Transfer the roulade onto a serving plate with the seam side down. Decorate the top of the cake with the cream, making waves with a spatula. Refrigerate for at least 30 minutes.

    Step 15. Once ready to serve, decorate the roulade with the remaining cream, fresh raspberries, and chopped toasted pistachios (photo 8). Sprinkle with icing (powdered) sugar.

    Photo 7: Meringue roll on parchment Photo 8: Assembled Pavlova roulade
    PHOTO 7 PHOTO 8

    Expert Tips

    1. Ensure to use a clean and dry bowl. Any remaining moisture or grease will interfere with whisking.
    2. Add sugar in a slow stream or one spoonful at a time. Whisk for 10 seconds before adding the next spoonful.
    3. Check the meringue's texture by rubbing it between your fingers to confirm sugar is incorporated and dissolved.
    4. Avoid opening the oven door while baking.
    5. Don't trim the edge of the meringue roulade: it isn't a sponge cake roll.
    6. Use an electric mixer to whip the cream, but keep your eye on it, don't over-whisk. 
    7. Make sure to spread the cream filling onto the cooled meringue.
    8. To recalculate the amount of ingredients for a classic Swiss roll tin, use this simple cake pan calculator.

    Storing and freezing

    Pavlova roll is best eaten on the day of making, but you can store any leftovers in the refrigerator for up to two days.

    Can you freeze a meringue roulade? It is not recommended to freeze it due to the cream filling: it doesn't stand freezing.

    Recipe FAQ

    What's the difference between a Pavlova and a roulade?

    Classic Pavlova is a shaped meringue dessert topped with whipped cream and fresh fruit. On the other hand, Pavlova roulade is made by spreading meringue on a baking tray, baking, filling it with cream and berries, and rolling it into a log.

    Why is my meringue roulade sticky?

    The meringue roulade becomes sticky with the extra moisture from the air. To prevent it, store it in a dry place.

    Can you make meringue roulade ahead of time?

    The answer is yes and no. You can make this roulade one day beforehand, but it might lose some crispiness due to the cream's use. With that said, it is better to make the dessert on the day of serving to keep the meringue crispiness on the outside and marshmallowy on the inside.

    Love cake rolls? Try these next!

    After discovering the best Pavlova roll recipe, explore the perfection of other rolled cakes on the website:

    • Vanilla Swiss roll
    • Nutella Swiss roll
    • Coffee Swiss roll
    • Pavlova roll cake
    • Pistachio roulade
    • Or browse all the cake recipes

    Want more delicious and beautiful recipes? Subscribe to my newsletter and follow me on Facebook, Pinterest, and Instagram for my latest updates. If you make this recipe, please leave a star rating on the recipe card and comment below!

    Print

    Recipe card

    Pavlova Roll (Meringue Roulade)

    Meringue roulade topped with raspberries and pistachios on a black serving board.
    Print Recipe
    Save Recipe Recipe Saved

    5 Stars 4 Stars 3 Stars 2 Stars 1 Star

    5 from 10 reviews

    Pavlova roll, or meringue roulade, is an interesting and pretty take on the traditional Pavlova with sweet meringue, tart raspberries, luscious whipped cream, and toasted pistachios. Light, impressive, and full of flavors.

    • Author: Irina
    • Total Time: 1 hour, 20 minutes (plus resting time)
    • Yield: 8 1x
    • Category: Cakes
    • Method: Baking
    • Cuisine: Australian, NZ
    • Diet: Gluten Free

    Ingredients

    Scale

    For the Pavlova meringue:

    • 4 large egg whites, room temperature
    • 1 cup + 5 ½ teaspoons (250 g) caster sugar
    • 1 teaspoon vanilla extract
    • 1 teaspoon white wine vinegar
    • 1 teaspoon cornstarch

    For the cream filling:

    • 1 ⅔ cups + 4 teaspoons (400 ml) cold heavy cream. 30 % fat
    • ⅓ cup + 1 tablespoon (100 g) cold sour cream
    • 1 tablespoon icing (powdered) sugar
    • 1 tablespoon rosewater (optional)
    • 1 teaspoon vanilla extract

    For assembling:

    • 7 oz (200 g) fresh raspberries
    • 0.7 oz (20 g) toasted pistachios
    • 1 tablespoon icing (powdered) sugar

    *Don't you have the correct baking pan on hand right now? Try this simple Cake Pan Converter!

    ** If needed, please refer to Baking Conversion Charts.

    Instructions

    1. To make the Pavlova meringue, preheat the oven to 320°F (160°C). Place egg whites in a clean bowl of an electric mixer or the bowl of a stand mixer fitted with the whisk attachment and whisk until soft peaks.

    2. Gradually add sugar in a few additions and continue to whisk egg whites on medium-high speed until the meringue becomes glossy and stiff peaks form. Add vanilla extract, white wine vinegar, and cornstarch and gently mix with a large metal spoon or a large rubber spatula.

    3. Line a 13 x 9.5 inches (33 x 24 cm) rimmed baking sheet with non-stick baking paper extending 1 inch (2.5 cm) over each side of the pan. Secure parchment paper to the pan with meringue drops at the corners. 

    4. Spread the meringue mixture into the prepared pan and level it with an offset spatula or a dough scraper. Bake in the preheated oven for 30 minutes. The meringue is ready when it forms a crust on top.

    5. Remove the pan from the oven, slide the meringue on a work surface, and let it cool. Flip the meringue onto a clean sheet of parchment larger than the longest side of the pan and gently peel off the lining paper from the base. 

    6. To make the stabilized whipped cream, place cold heavy cream, cold sour cream, icing (powdered) sugar, rose water, and vanilla extract in a clean oil-free bowl. Whisk with a hand whisk for about 5-6 minutes until soft peaks: the cream will start holding its shape.

    7. To assemble the meringue roll, spread the cream in an even layer over the top of the meringue, and set aside a few spoons of cream for decoration. Arrange raspberries (reserve a few for the decor) on top of the cream, and sprinkle with chopped pistachios.

    8. Roll the meringue into a log, starting from the long end. Use parchment paper as a guide to help you roll it. Transfer the roulade onto a serving plate with the seam side down. Decorate the top of the cake with the cream, making waves with a spatula. Refrigerate for at least 30 minutes.

    9. Once ready to serve, decorate the roulade with the remaining cream, fresh raspberries, and chopped toasted pistachios. Sprinkle with icing (powdered) sugar.

    Notes

    1. Ensure to use a clean and dry bowl. Any remaining moisture or grease will interfere with whisking.
    2. Add sugar in a slow stream or one spoonful at a time. Whisk for 10 seconds before adding the next spoonful.
    3. Check the meringue's texture by rubbing it between your fingers to confirm sugar is incorporated and dissolved.
    4. Avoid opening the oven door while baking.
    5. Don't trim the edge of the meringue roulade: it isn't a sponge cake roll.
    6. Use an electric mixer to whip the cream, but keep your eye on it, don't over-whisk. 
    7. Make sure to spread the cream filling onto the cooled meringue.
    8. To recalculate the amount of ingredients for a classic Swiss roll tin, use this simple cake pan calculator.

    Nutrition

    • Serving Size: 1 slice
    • Calories: 339
    • Sugar: 34.8 g
    • Sodium: 54 mg
    • Fat: 19.7 g
    • Saturated Fat: 11.6 g
    • Carbohydrates: 39.4 g
    • Fiber: 1.9 g
    • Protein: 4.1 g
    • Cholesterol: 62 mg

    Thank you for following me on Pinterest, Facebook, and Instagram. Hashtag #bakinglikeachef so I can see your creations.

    The recipe was adapted from Ottolenghi Raspberry Meringue Roulade at https://thehappyfoodie.co.uk/. It was originally published on November 04, 2018. The recipe has been revised to include improved content and photos.

    The nutritional information has been calculated using an online recipe nutrition calculator such as Verywellfit.com and is intended for informational purposes only. These figures should be used as a general guideline and not be construed as a guarantee.

    Pistachio Dacquoise With Strawberries

    Jun 27, 2020 · 20 Comments

    Pistachio dacquoise decorated with fresh strawberries on a white serving platter with berries and flatware on background.

    This pistachio dacquoise recipe is a keeper! The cake is a feast for the eyes and the mouth.

    It is all about contrasting textures and flavors where the biscuit dacquoise marries with pistachio mousseline cream and fresh strawberries. Unveil this lovely cake for an extra special dessert!

    A slice of pistachio dacquoise topped strawberry halves and the rest of the cake on background

    What a beautiful color combination where the green color of the pistachio cream fits the red color of strawberries! It is an unusual combination in fashion, but what a beauty in a cake.

    What a beautiful combo where the sweet bitterness of the pistachio emphasizes the fruity flavor of red berries! It brings additional pleasure to the taste.

    Pistachio dacquoise belongs to a category of cakes called dacquoise. And if you follow my blog, you may be familiar with other dacquoise recipes such as Coconut Dacquoise Cake and Layer Cashew Cake Sans Rival.

    BAKING ESSENTIALS CHECKLIST

    Sign up and get a list of the necessary baking tools and ingredients

    FREE DOWNLOAD

    [feast_advanced_jump_to]

    Definition of dacquoise

    According to Merriam-Webster, dacquoise is

    a dessert made of layers of baked nut meringue with a filling usually of buttercream.

    Dacquoise varies to the type of chopped nuts folded into the meringue before baking. You can use pistachios and make pistachio dacquoise (see the recipe below), hazelnuts, almonds, or any type of nuts you desire.

    For those with nut allergies, replace nuts with coconut flour and make coconut dacquoise.

    Recipe: Pistachio dacquoise cake topped with cream and strawberries on a white plate

    History of dacquoise

    The origin of dacquoise is French. The cake takes its name from the French feminine dacquois, which means from Dax, where Dax is a town located in southern France.

    The word itself is known from 1954. As a cake, the dacquoise originated in the 17th century when it was created as a luxurious dessert for the people of the French court.

    Later on, the dacquoise recipe became popular in England when lots of French chefs moved there to cook for the top class.

    Why pistachio dacquoise recipe works

    • This pistachio dacquoise recipe (aka pistachio meringue recipe) is classic to welcome it into your life, learn, and make it a go-to cake recipe.
    • Bright colors of the cake and its exquisite look make the dessert a winner of the table from the first minute it is served.
    • The cake serves up to 10 people or maybe 5 with doubled servings. Yes, your guests will be begging for an additional slice!
    • Making the dacquoise one day in advance saves time for the day of serving.
    • The taste of the cake is beautiful: yes, it is a delicious French cake!
    • What's more? The cake is gluten-free!
    Pistachio dacquoise cake decorated with fresh strawberries: Overhead view

    Ingredients

    For ingredients and detailed instructions, refer to the recipe card below.

    Pistachios: process raw or toasted unsalted pistachios in a food processor to make ground pistachios.

    Icing sugar: make it yourself with a coffee grinder or use a store-bought powdered sugar.

    Almond flour: it is a usual ingredient to make the dacquoise.

    Eggs: the recipe calls for egg whites and yolks from large eggs at room temperature.

    Sugar: use regular granulated white sugar.

    Milk: whole milk is perfect to use in the recipe.

    Corn starch: a small amount of corn starch is added to the pastry cream.

    Butter: use a top-quality unsalted butter.

    Pistachio paste: use a store-bought pistachio paste or make it yourself.

    Strawberries: fresh strawberries (not the frozen ones) are the key to decorate the cake. Replace them with fresh raspberries if you prefer.

    How to make pistachio dacquoise step by step

    Preheat oven to 335 F/170 C.

    To make pistachio dacquoise, chop pistachios into small pieces or process nuts in a food processor to get the ground pistachios. Mix powdered (icing) sugar, almond flour, and chopped (ground) pistachios.

    Beat egg whites with an electric mixer and gradually add granulated sugar. The meringue has to be flexible: just reach medium-firm picks (photo 1).

    Pour the dry ingredients into the whites and gently mix with a rubber spatula going in a circular motion from outside to inside. Stop mixing as soon as the mixture is homogeneous (photo 2).

    Photo 1: Meringue in a metal bowl Photo 2: Ready dacquoise mixture in a metal bowl
    PHOTO 1 PHOTO 2

    Butter a tart ring or another cake ring of 9 inches/23-24 cm in diameter (the height does not matter) and place it on a baking sheet covered with the parchment paper.

    Place the dacquoise preparation in a pastry bag with Ateco plain pastry tip 806. Make a spiral into the tart/cake ring, starting from the center and going to the edge of the ring.

    Then make small balls in the direction towards the center, side by side along the edge of the ring (see note #1). Sprinkle small balls with powdered (icing) sugar (photo 3). Bake for 30 minutes (photo 4).

    Photo 3: Piped dacquoise preparation into a cake ring Photo 4: Baked dacquoise in a cake ring
    PHOTO 3 PHOTO 4

    To make the pastry cream, bring milk in a saucepan to boil. In a separate small bowl, whip egg yolk, sugar, and corn starch together. Pour the hot milk into the yolk/sugar/starch mixture, stirring constantly.

    Pour the mixture back in the saucepan and bring it over low heat. Continue whisking until the mixture starts thickening (photo 5). Pour the pastry cream on a shallow plate, cover with a plastic film in contact and let it cool at room temperature.

    To make the Italian meringue, bring water and sugar to a boil. Meanwhile, whip egg white with an electric mixer. Once the sugar syrup reaches 250 F/121 C  (use a cooking thermometer), pour it over the beaten egg white while keeping whisking. Beat until the meringue becomes firm (photo 6). 

    Photo 5: Pastry cream of yellow color in a saucepan Photo 6: Italian meringue in a metal bowl
    PHOTO 5 PHOTO 6

    To make creme Anglaise, bring milk to a boil. In a separate bowl, mix sugar and egg yolks. Pour the hot milk into the yolk/sugar mixture, stirring constantly.

    Bring the preparation back in the saucepan, heat over low to reach 181 F/83 C, continually whisking with a hand whisk (photo 7). Pour the thick cream on a small plate, cover with a plastic film in contact and let it cool at room temperature.

    Mix the pastry cream with the pistachio paste and set aside (photo 8).

    Photo 7: Crème anglaise in a saucepan Photo 8: Greenish pastry cream/pistachio paste mixture in a glass bowl
    PHOTO 7 PHOTO 8

    Whisk the softened butter with a stand or electric mixer. Add the cooled creme Anglaise and whisk. Then add the Italian meringue, whip again: the buttercream is ready (photo 9).

    Add the pastry cream/pistachio paste mixture to the buttercream and whip again. The pistachio mousseline cream is ready (photo 10).

    Photo 9: Buttercream in a metal bowl
Photo 10: Pistachio mousseline cream in a metal bowl
    PHOTO 9 PHOTO 10

    To assemble the cake, place the dacquoise on a serving plate. Transfer the pistachio mousseline cream in a pastry bag with a plain tip and spread the cream over the dacquoise biscuit, leaving the edges of dacquoise not covered (photo 11). 

    Cut strawberries into halves and place them over the mousseline cream. Sprinkle chopped pistachios over berries and dust the edges of dacquoise with powdered (icing) sugar (photo 12).  

    Photo 11: Cake piped with mousseline cream Photo 12: Strawberry halves on top of the cream; fully decorated cake
    PHOTO 11 PHOTO 12

    Expert tips

    1. While making the dacquoise, pipe small round balls around the edges of the ring instead of making balls in the direction towards the center: this method makes sure that you will have enough of the dacquoise preparation to finish piping.
    2. If you make dacquoise in advance, assemble the cake four hours as a maximum before serving, or it will become soggy.
    3. Replace fresh strawberries with fresh raspberries if you desire.
    4. Take the cake out of the fridge 30 minutes before serving so that the mousseline cream will have time to soften.

    Frequently Asked Question

    Can you make a dacquoise in advance?

    Yes, you can make a dacquoise up to one week in advance. Wrap it tightly in plastic film and store in an airtight container.

    What is mousseline cream?

    Mousseline cream (pronounced "moos-eh-leen") is a pastry cream combined with softened butter. The typical ratio of the pastry cream and butter is 2:1. 

    What is the difference between pastry cream and creme Anglaise?

    Both, pastry cream and creme Anglaise are made with milk, egg yolks, and sugar. The main difference between pastry cream and creme Anglaise is that the pastry cream is corn starch added.

    More delicious cake recipes you will love

    • French Meringue Cake Merveilleux
    • Caramel Carrot Cake With Pecans
    • No-Bake Raspberry Oreo Cheesecake
    • Browse all the Cake Recipes

    Want more delicious and beautiful recipes? Subscribe to my newsletter and follow me on Facebook, Pinterest, and Instagram for my latest updates. If you make this recipe, please leave a star rating on the recipe card and comment below!

    Print

    Recipe card

    Pistachio Dacquoise With Strawberries

    Pistachio dacquoise decorated with fresh strawberries on a white serving platter with berries and flatware on background.
    Print Recipe
    Save Recipe Recipe Saved

    5 Stars 4 Stars 3 Stars 2 Stars 1 Star

    5 from 9 reviews

    This pistachio dacquoise recipe is a keeper! The cake is a feast for the eyes and the mouth: it is all about contrasting textures and flavors where the biscuit dacquoise marries with pistachio mousseline cream and fresh strawberries. Unveil this lovely cake for an extra special dessert!

    • Author: Irina Totterman
    • Total Time: 2 hours, 30 minutes
    • Yield: 9-10 1x
    • Category: Cakes
    • Method: Baking
    • Cuisine: French
    • Diet: Gluten Free

    Ingredients

    Scale

    For pistachio dacquoise:

    • 1.4 oz (40 g) unsalted pistachios
    • 1 cup + 4 teaspoons (135 g) icing sugar
    • 1 cup + 3 tablespoons (115 g) almond flour
    • ½ cup + 5 ½ teaspoons (150 g) egg whites (see note #1)
    • 3 ½ tablespoons (50 g) granulated sugar

    For pistachio mousseline cream:

    For the pastry cream:

    • ¼ cup (60 g) milk
    • 1 egg yolk
    • ½ tablespoon (5 g) corn starch
    • 1 tablespoon (15 g) granulated sugar

    For the Italian meringue:

    • 2 tablespoons (30 g) egg whites (see note #2)
    • ¼ cup + 1 teaspoon (60 g) granulated sugar
    • 1 tablespoon (15 g) water

    For creme Anglaise:

    • 7 teaspoons (35 g) milk
    • 2 tablespoons (30 g) egg yolks (see note #3)
    • 1 tablespoon (15 g) granulated sugar

    Plus:

    • 5.3 oz (150 g) butter, softened
    • 1.4 oz (40 g) pistachio paste

    For decoration:

    • 17.6 oz (500 g) fresh strawberries
    • ½ oz (15 g) pistachios
    • 1 teaspoon powdered (icing) sugar

    *Don't you have the correct baking pan on hand right now? Try this simple Cake Pan Converter!

    ** If needed, please refer to Baking Conversion Charts.

    Instructions

    1. Preheat oven to 335 F/170 C.
    2. To make pistachio dacquoise, chop pistachios into small pieces or process nuts in a food processor to get the ground pistachios. Mix powdered (icing) sugar, almond flour, and chopped (ground) pistachios. Beat egg whites with an electric mixer and gradually add granulated sugar. The meringue has to be flexible: reach medium-firm picks. Pour the dry ingredients into the whites and gently mix with a rubber spatula going in a circular motion from outside to inside. Stop mixing as soon as the mixture is homogeneous.
    3. Butter a tart ring or another cake ring of 9 inches/23-24 cm in diameter (the height does not matter) and place it on a baking sheet covered with the parchment paper. Place the dacquoise preparation in a pastry bag with Ateco plain pastry tip 806. Make a spiral into the tart/cake ring, starting from the center and going to the edge of the ring. Then make small balls in the direction towards the center, side by side along the edge of the ring (see note #4). Sprinkle small balls with powdered (icing) sugar. Bake for 30 minutes.
    4. To make the pastry cream, bring milk in a saucepan to boil. In a separate small bowl, whip egg yolk, sugar, and corn starch together. Pour the hot milk into the yolk/sugar/starch mixture, stirring constantly. Pour the mixture back in the saucepan and bring it over low heat. Continue whisking until the mixture starts thickening. Pour the pastry cream on a shallow plate, cover with a plastic film in contact and let it cool at room temperature.
    5. To make the Italian meringue, bring water and sugar to a boil. Meanwhile, whip egg white with an electric mixer. Once the sugar syrup reaches 250 F/121 C  (use a cooking thermometer), pour it over the beaten egg white while keeping whisking. Beat until the meringue becomes firm. 
    6. To make creme Anglaise, bring milk to a boil. In a separate bowl, mix sugar and egg yolks. Pour the hot milk into the yolk/sugar mixture, stirring constantly. Bring the preparation back in the saucepan, heat over low to reach 181 F/83 C, continually whisking with a hand whisk. Pour the cream on a small plate, cover with a plastic film in contact and let it cool at room temperature.
    7. Whisk the softened butter with a stand or electric mixer. Add the cooled creme Anglaise and whisk. Then add the Italian meringue, whip again: the buttercream is ready.
    8. Mix the pastry cream with the pistachio paste and add it to the buttercream. Whip again. The pistachio mousseline cream is ready!
    9. To assemble the cake, place the dacquoise on a serving plate. Transfer the pistachio mousseline cream in a pastry bag with a plain tip and spread the cream over the dacquoise biscuit, leaving the edges of dacquoise not covered. 
    10. Cut strawberries into halves and place them over the mousseline cream. Sprinkle chopped pistachios over berries and sprinkle the edges of dacquoise with powdered (icing) sugar.  

    Notes

    1. 150 g egg whites approximately equal 4 ½ raw fresh egg whites from large size chicken eggs.
    2. 30 g egg whites approximately equal 1 raw fresh egg white from medium size chicken egg.
    3. 30 g egg yolks approximately equal 1 ½ raw fresh egg yolks from extra large size chicken eggs.
    4. While making the dacquoise, pipe small round balls around the edges of the ring instead of making balls in the direction towards the center: this method makes sure that you will have enough of the dacquoise preparation to finish piping. 
    5. If you make dacquoise in advance, assemble the cake four hours as a maximum before serving, or it will become soggy.
    6. Replace fresh strawberries with fresh raspberries if you desire.
    7. Take the cake out of the fridge 30 minutes before serving so that the mousseline cream will have time to soften.

    Nutrition

    • Serving Size: 1 slice
    • Calories: 362
    • Sugar: 30.8 g
    • Sodium: 123 mg
    • Fat: 22.7 g
    • Saturated Fat: 9.1 g
    • Carbohydrates: 36.6 g
    • Fiber: 2.9 g
    • Protein: 7 g
    • Cholesterol: 96 mg

    Thank you for following me on Pinterest, Facebook, and Instagram. Hashtag #bakinglikeachef so I can see your creations.

    The nutritional information has been calculated using an online recipe nutrition calculator such as Verywellfit.com and is intended for informational purposes only. These figures should be used as a general guideline and not be construed as a guarantee.

    The recipe was adapted from http://empreintesucree.fr. It was originally published on May 09, 2018. The recipe has been revised to include improved content and photos. All posted pictures are mine.

    Large Meringue (Giant Meringue)

    Jun 10, 2020 · 10 Comments

    Giant meringue with redcurrant on top.

    Enjoy this easy meringue recipe for the mouthwatering dessert - large meringue (aka giant meringue) - decorated with mascarpone whipped cream and fresh berries. With its active, hands-on time of 20 minutes and up to ten servings, the recipe is a keeper.

    Giant meringue topped with cream and redcurrant on a white plate

    Are you looking for a simple, amazingly yummy, and delicious dessert? Add this egg white dessert recipe to your collection now.

    [feast_advanced_jump_to]

    The giant meringue (meringue géante in French) is made with a classic French meringue (meringue française) placed on a baking sheet without special shaping.

    BAKING ESSENTIALS CHECKLIST

    Sign up and get a list of the necessary baking tools and ingredients

    FREE DOWNLOAD

    It is fun to make and eat: slice it or dig into the dessert.

    A single slice of large meringue on a white dessert plate

    Why you should try this recipe

    • The giant meringue recipe is so simple that even a beginner baker will succeed.
    • It is an easy meringue recipe that takes 20 minutes of hands-on time.
    • This egg white dessert resembles a giant Pavlova but does not require shaping.
    • Naturally, the meringue dessert is gluten-free.
    • It is the perfect dessert for an entertaining party serving up to ten people.

    Ingredients

    For ingredients and detailed instructions, refer to the recipe card below.

    • Egg whites: Take chilled eggs out of the fridge and separate egg yolks from egg whites. Make sure egg whites are free of any traces of egg yolk. Let egg whites come up to room temperature. If you are short on time, place chilled eggs in a bowl of warm tap water for a few minutes to warm them up.

    Use old eggs that produce fluffier and higher meringues. Read about how to decode an egg carton.

    • Sugar: Use caster or baker's sugar or process granulated sugar in a food processor for a few seconds to get superfine. It will help to whisk the meringue.
    • Flaked almonds: Use store-bought toasted flaked nuts or toast almonds in the oven at 300°F (150°C) for 10 minutes.
    • Heavy cream: Whisk cold heavy or heavy whipping cream with at least 30% fat content in a chilled metal bowl.
    • Mascarpone cheese - no need to bring it to room temperature; use it from the fridge.
    Sliced giant meringue with a single slice on a plate

    Recipe variations

    Experiment with the meringue dessert recipe and bring your creativity up to decorate the meringue.

    • Make sugar-free whipped cream or Chantilly cream. Keep the cream plain, or flavor it with a few drops of rose water, orange flower water, or almond extract. Instead, add 1 /2 teaspoon of vanilla extract.
    • Use one type of fruit or a combination. The big meringue cracks during baking; it is typical for such a size meringue dessert. Arrange fresh fruit along cracks and around the dessert. Download this complimentary fruit flavor pairing chart to assist you with creating delicious fruit combinations.
    • Finally, make giant meringue cookies instead of making a single dessert.

    How to make a giant meringue

    Preheat oven to 245°F (120°C). To make the meringue, beat egg whites with an electric or stand mixer on medium speed until soft peaks form. Gradually add sugar and whisk until glossy peaks (photo 1).

    Add powdered (icing) sugar and gently mix with a rubber spatula. Add half of the flaked almonds and combine (photo 2). 

    Photo 1: Whisked meringue in a bowl Photo 2: Meringue with almonds in a bowl
    PHOTO 1 PHOTO 2

    Place the meringue on a baking sheet covered with parchment paper. Form a large meringue, sprinkle it with the rest of the flaked almonds (photo 3), and bake for 2 hours. Let it cool (photo 4).

    Photo 3: Large meringue topped with almonds on parchment Photo 4: Baked meringue on parchment paper
    PHOTO 3 PHOTO 4

    To make the cream, place cold heavy cream and mascarpone into a chilled bowl and whisk until medium-stiff peaks.

    Pro tip: Consult the mascarpone frosting recipe for step-by-step photographed explanations, helpful tips, and tricks.

    To decorate the large meringue, place the meringue on a serving plate. Pipe the cream with your favorite tip or spoon it into the dessert. Decorate with the fresh fruit of your choice.

    Decorated giant meringue on a cake stand with red currant on a plate

    Expert Tips

    1. To get the highest volume of the meringue, use clean equipment: a metal or glass bowl and beaters.
    2. Make the meringue on a dry day. Avoid humid or rainy days since the meringue tends to absorb moisture.
    3. If you have time before serving, leave the meringue in the closed oven for 1 to 2 hours to let it cool, even overnight, if you desire.
    4. The meringue will be cracked after baking, which is normal. Arrange fresh berries along the cracks.
    5. Add one tablespoon of powdered (icing) sugar to the cream if desired.
    6. Serve it with berry coulis aside.

    Storing and freezing

    Store giant meringue under a cake dome in the refrigerator and consume it within 24 hours.

    Can you freeze the meringue dessert? While it is possible to freeze the meringue, it is not what I would recommend. It is quite fragile and can attract moisture in the freezer. I highly recommend baking the meringue one day ahead instead of freezing.

    Recipe FAQ

    How long to cook a meringue

    The cooking time for meringue is approximately 1 ½-2 hours at a low temperature.

    Can you make a giant meringue in advance?

    You can bake the meringue one day in advance and leave it in the closed oven overnight. Decorate the dessert before serving.

    Can you decorate a large meringue with frozen berries?

    Frozen and fresh red fruits are mostly interchangeable in baking, but decorating the meringue dessert with frozen berries is not recommended. They tend to get a bit squished and juice running while thawing. In this case, frozen fruits are not an aesthetically pleasing option for this type of cake decoration.

    Love meringue desserts? Try these next!

    • Vanilla Meringue Cake
    • Meringue Cake Merveilleux
    • Meringue Spheres
    • Meringue Mushrooms

    Want more delicious and beautiful recipes? Subscribe to my newsletter and follow me on Facebook, Pinterest, and Instagram for my latest updates. If you make this recipe, please leave a star rating on the recipe card and comment below!

    Print

    Recipe card

    Large Meringue (Giant Meringue)

    Giant meringue with redcurrant on top.
    Print Recipe
    Save Recipe Recipe Saved

    5 Stars 4 Stars 3 Stars 2 Stars 1 Star

    5 from 5 reviews

    This large meringue (aka giant meringue) is the easiest mouthwatering egg white dessert (à la unshaped Pavlova) decorated with mascarpone whipped cream and fresh berries. With its active, hands-on time of 20 minutes and up to ten servings, the recipe is a keeper. 

    • Author: Irina Totterman
    • Total Time: 2 hours, 20 minutes
    • Yield: 8-10 1x
    • Category: Cakes
    • Method: Baking
    • Cuisine: French

    Ingredients

    Scale

    For the meringue:

    • 7 ½ large egg whites (250 g) egg whites, room temperature
    • 1 cup + 2 tablespoons (250 g) granulated sugar
    • 2 cups (250 g) powdered (icing) sugar
    • 1.8 oz (50 g) toasted flaked almonds

    For the decoration:

    • ⅓ cup + 1 ½ tablespoons (100 g) heavy cream, 30% fat
    • 3.5 oz (100 g) mascarpone cheese
    • 7 oz (200 g) fresh berries

    * If needed, please refer to Baking Conversion Charts.

    Instructions

    1. Preheat oven to 245°F (120°C). To make the meringue, beat egg whites with an electric or stand mixer on medium speed until soft peaks form. Gradually add sugar and whisk until glossy peaks. Add powdered (icing) sugar and gently mix with a rubber spatula. Add half of the flaked almonds and combine.

    2. Place the meringue on a baking sheet covered with parchment paper. Form a large meringue, sprinkle it with the rest of the flaked almonds, and bake for 2 hours. Let it cool.

    3. To make the cream, place cold heavy cream and mascarpone into a chilled bowl and whisk until medium-stiff peaks. 

    4. To decorate the large meringue, place the meringue on a serving plate. Pipe the cream with your favorite tip or spoon it into the dessert. Decorate with the fresh fruit of your choice.

    Notes

    1. 250 g egg whites approximately equal to 7 ½ raw fresh egg whites from large size chicken eggs (or 1 cup egg whites)
    2. To get the highest volume of the meringue, use clean equipment: a metal or glass bowl and beaters.
    3. Make the meringue on a dry day. Avoid humid or rainy days since the meringue tends to absorb moisture.
    4. If you have time before serving, leave the meringue in the closed oven for 1 to 2 hours to let it cool, even overnight, if you desire.
    5. The meringue will be cracked after baking, which is normal. Arrange fresh berries along the cracks.
    6. Add one tablespoon of powdered (icing) sugar to the cream if desired.
    7. Serve it with berry coulis aside. 

    Nutrition

    • Serving Size: 1 slice
    • Calories: 341
    • Sugar: 57.5 g
    • Sodium: 54 mg
    • Fat: 8.8. g
    • Saturated Fat: 3.2 g
    • Carbohydrates: 62.4 g
    • Fiber: 3.5 g
    • Protein: 6.3 g
    • Cholesterol: 17 mg

    Thank you for following me on Pinterest, Facebook, and Instagram. Hashtag #bakinglikeachef so I can see your creations.

    The nutritional information has been calculated using an online recipe nutrition calculator such as Verywellfit.com and is intended for informational purposes only. These figures should be used as a general guideline and not be construed as a guarantee.

    The recipe was adapted from http://madame.lefigaro.fr. It was originally published on July 29, 2018. The recipe has been revised to include improved content and photos.

    French Meringue Cake Merveilleux

    May 7, 2020 · 22 Comments

    French Meringue Cake Merveilleux on a cake round with chocolate shavings and a cup on background.

    Enjoy this delicious, crowd-pleasing French meringue cake Merveilleux by sandwiching two meringue layers with a luscious mascarpone whipped cream. The dessert covered with rich dark chocolate shavings is absolutely decadent and worth every bite.

    Sliced French Meringue Cake Merveilleux with a cup and spoons on background

    If you are looking for a perfect meringue cake, don't look any further than a dessert family Merveilleux. Start from little bundles of joy, individual meringue dessert Merveilleux that is simply delightful.

    [feast_advanced_jump_to]

    And while exploring the meringue world, don't hesitate to make the ultimate version - the French meringue gateau Merveilleux.

    BAKING ESSENTIALS CHECKLIST

    Sign up and get a list of the necessary baking tools and ingredients

    FREE DOWNLOAD

    Meringue cake Merveilleux

    Both strawberry meringue cake and Vanilla Meringue Cake seem to be the most common meringue cakes. But a French meringue layer cake Merveilleux with mascarpone frosting and covered with chocolate shavings takes the experience to a whole new level.

    The cake's stature is astonishing, the texture is airy, and the taste is irresistible. It is extraordinary in every bite.

    French Meringue Cake Merveilleux covered with chocolate shavings: Close up

    Why you should try this recipe

    • The cake is gluten-free, meaning it will please everyone without restrictions.
    • The meringue cake recipe is easy to make with a perfect baking shortcut: make the meringue layers one day in advance.
    • Coffee-flavored mascarpone whipped cream will please coffee lovers.
    • Decorating this cake is a breeze - no special skills are required. The meringue spirals can be imperfect, and the cream balls are dusted with powdered sugar and cocoa powder. Any imperfections will be hidden.
    • Finally, the cake is perfect for birthday parties and other special occasions.

    Ingredients

    For ingredients and detailed instructions, refer to the recipe card below.

    • Egg whites: Use large whole eggs to make the cake. Take chilled eggs out of the fridge, separate egg yolks from egg whites, and let egg whites come to room temperature for about 30-54 minutes.
    • Sugar: Use a caster or baker's sugar to make the meringue. Or use a food processor to pulse granulated sugar for a few seconds to get superfine sugar. And if you need icing sugar, use a coffee grinder at home.
    • Dark chocolate: Use a top-quality 70% dark chocolate like Valrhona dark chocolate.
    • Heavy cream: Opt for heavy or heavy whipping cream with at least 30% fat content.
    • Mascarpone cheese brings a beautiful tang flavor and stabilizes the whipped cream.
    • Instant coffee: Use powdered instant coffee, which is much more effective in making coffee-flavored whipped cream.
    • Cocoa powder: Opt for unsweetened cocoa powder to dust the cake.

    Recipe variations

    • Layers of meringue: Add unsweetened cocoa powder to the meringue mixture to create a chocolate meringue cake.
    • Flavorings: Replace instant coffee with cocoa powder. Or add Biscoff cookie spread to make Biscoff whipped cream.
    • Add-ins: Elevate the meringue cake further by adding juicy slices of fresh strawberries or other fresh fruit between cake layers. For a simple yet satisfying filling, go with plain mascarpone frosting.
    • Decoration: Swap dark chocolate for milk or white chocolate. Or cover the entire cake with Lotus Biscoff crumble to create the iconic Biscoff cake.
    A slice of the cake Merveilleux with a fork up and a cup on background

    How to make meringue cake

    Making the meringue cake consists of a few steps, including preparing meringue layers, making mascarpone whipped cream and chocolate shavings, and assembling the cake.

    Make the meringue

    Preheat the oven to 210°F (100°C). Use a stainless steel circle or a plate 7 inches (18 cm) in diameter as a template, and draw two discs on two sheets of parchment paper. Turn them over and place them on two baking sheets.

    In a large bowl, place egg whites with a good pinch of salt. Beat with an electric mixer at medium-high speed for 3-4 minutes.

    Switch the mixer speed to high, and gradually add caster sugar, about 2 tablespoons at a time. Whisk until sugar dissolves and stiff peaks form (photo 1). 

    Add the sifted powdered (icing) sugar and gently mix with a rubber spatula (photo 2).

    Photo 1: Beaten egg whites with sugar in a metal bowl Photo 2: Ready meringue in a bowl
    PHOTO 1 PHOTO 2

    Place the meringue in a pastry bag with the cut end or Ateco plain pastry tip 809. Draw two spiral meringue disks on the parchment paper starting from the center of the circles (photo 3).

    Pro tip: Alternatively, divide the meringue evenly between two 7-inch (18 cm) circles drawn on the prepared baking sheets. Use a spatula to spread it out.

    Bake the meringue cake layers for about 2 hours. Let them cool completely (photo 4).

    Photo 3: Piped meringue spiral on the parchment paper Photo 4: Baked meringue disk on parchment
    PHOTO 3 PHOTO 4

    Make mascarpone whipped cream

    Consult the mascarpone frosting recipe for step-by-step photographed explanations, helpful tips, and tricks.

    Place cold heavy cream, cold mascarpone, icing (powdered) sugar, and powdered instant coffee in the chilled bowl of a stand mixer with a whisk attachment. Whisk the cream until stiff peaks (photo 5).

    Transfer the cream to a piping bag with the end cut about ½ inch (1 cm) or fitted with Ateco tip 809.

    Make chocolate shavings

    Use a vegetable peeler, scraping across a chocolate bar, to get medium-sized delicate curls. Make large chocolate shavings by scraping the chocolate with a knife if desired.

    Assemble the meringue cake

    Place the first meringue layer on a cake board or a serving plate and pipe the mascarpone whipped cream in a spiral. Place the second meringue disk top-down, and spread a thin layer of the cream.

    Smooth the surface evenly with a bent spatula, mask, and smooth the sides of the cake. Push the cream, making balls over the entire surface of the cake (photo 6).

    Photo 5: Ready coffee whipped cream in a metal bowl Photo 6: Piped cream balls on top of the assembled dessert
    PHOTO 5 PHOTO 6

    Cover the surface and sides of the cake with chocolate shavings and sprinkle the entire cake with confectioners' sugar and cocoa powder (photos 7-8). Refrigerate it for at least 4 hours before serving.

    Photo 7: Cake generously sprinkled with icing sugar and cocoa powder on parchment Photo 8: Ready cake on the parchment paper
    PHOTO 7 PHOTO 8

    Expert Tips

    1. Create cute meringue kisses by piping the rest of the meringue around circles.
    2. Don't open the oven door during baking.
    3. Make-ahead option: Bake the meringue in advance, and store airtight, but assemble and serve the cake on the same day: mascarpone whipped cream tends to dry out.

    Storing and freezing

    Store the meringue cake under a cake dome in the refrigerator for 24 hours.

    Can you freeze it? You can not freeze the assembled meringue cake, but you can freeze the meringue layers. Freeze each layer for 3 hours or more. Then, place them in a freezer-safe bag with parchment paper between each layer. Seal, label, and freeze for up to 3 months.

    To thaw, bring the meringue to the kitchen counter for 2 to 3 hours. Then make the cream and assemble the cake.

    Recipe FAQ

    How long to bake meringue

    To achieve perfect meringues, bake it at a low oven temperature, around 90 to 110 C, for a long time, up to 2 hours.

    Can you make the meringue in advance?

    You can bake the meringue and store it tightly wrapped in plastic or an airtight container for several days. Avoid humid days for storage.

    How long can you store meringues?

    You can store meringues, also Pavlova meringue shells, at room temperature for up to 3 weeks or freeze for up to 1 month.

    Does meringue need to be refrigerated?

    The meringue doesn't need to be refrigerated. Instead, store it at room temperature or cool place for up to 3 weeks. Keep it in an airtight container, placing a sheet of parchment paper between layers.

    Love classic cakes? Try these next!

    • Cake Sans Rival
    • Ottolenghi Carrot Cake
    • Coconut Dacquoise Cake
    • Strawberry Chantilly Cake
    • Or browse all the cake recipes

    Want more delicious and beautiful recipes? Subscribe to my newsletter and follow me on Facebook, Pinterest, and Instagram for my latest updates. If you make this recipe, please leave a star rating on the recipe card and comment below!

    Print

    Recipe card

    French Meringue Cake Merveilleux

    Sliced French Meringue Cake Merveilleux with a cup and spoons on background.
    Print Recipe
    Save Recipe Recipe Saved

    5 Stars 4 Stars 3 Stars 2 Stars 1 Star

    5 from 8 reviews

    This crowd-pleasing French meringue cake Merveilleux is made by sandwiching two crispy meringues with a luscious coffee-flavored mascarpone whipped cream. The dessert covered with dark chocolate shavings is absolutely decadent and worth every bite.

    • Author: Irina Totterman
    • Total Time: 2 hours, 30 minutes (plus cooling time)
    • Yield: 8 1x
    • Category: Cakes
    • Method: Baking
    • Cuisine: French

    Ingredients

    Scale

    For the meringue:

    • ½ cup + ½ tablespoon (130 g) egg whites (see note #1)
    • ½ cup + 1 ½ tablespoons (130 g) caster sugar
    • 1 cup + 2 teaspoons (130 g) powdered (icing) sugar
    • 1 pinch of salt

    For the mascarpone whipped cream:

    • 2 cups + 2 tablespoons (500 ml) heavy cream, 30% fat
    • 3 ½ oz (100 g) mascarpone cheese
    • 2 tablespoons (30 g) icing (powdered) sugar
    • 5 teaspoons (10 g) powdered instant coffee

    For the decoration:

    • 4 tablespoons (20 g) cocoa powder
    • 2 ½ tablespoons (20 g) confectioners' sugar
    • 3 ½ oz (100 g) dark chocolate

    * If needed, please refer to Baking Conversion Charts.

    ** Don't you have the correct baking pan on hand right now? Try this simple Cake Pan Converter!

    Instructions

    1. To make the meringue, preheat the oven to 210°F (100°C). Use a stainless steel circle or a plate 7 inches (18 cm) in diameter as a template, and draw two discs on two sheets of parchment paper. Turn them over and place them on two baking sheets.

    2. In a large bowl, place egg whites with a good pinch of salt. Beat with an electric mixer at medium-high speed for 3-4 minutes. Switch the mixer speed to high, and gradually add caster sugar, about 2 tablespoons at a time. Whisk until sugar dissolves and stiff peaks form. Add the sifted powdered (icing) sugar and gently mix with a rubber spatula.

    3. Place the meringue in a pastry bag with the cut end or Ateco plain pastry tip 809. Draw two spiral meringue disks on the parchment paper starting from the center of the circles. Alternatively, divide the meringue evenly between two 7-inch (18 cm) circles drawn on the prepared baking sheets. Use a spatula to spread it out. Bake the meringue layers for about 2 hours. Let them cool completely.

    4. To make mascarpone whipped cream, place cold heavy cream, cold mascarpone, icing (powdered) sugar, and powdered instant coffee in the chilled bowl of a stand mixer with a whisk attachment. Whisk the cream until stiff peaks. Transfer the cream to a piping bag with the end cut about ½ inch (1 cm) or fitted with Ateco tip 809.

    5. To make chocolate shavings, use a vegetable peeler, scraping across a chocolate bar, to get medium-sized delicate curls. Make large chocolate shavings by scraping the chocolate with a knife if desired. 

    6. To assemble the cake, place the first meringue layer on a cake board or a serving plate and pipe the mascarpone whipped cream in a spiral. Place the second meringue disk top-down, and spread a thin layer of the cream. Smooth the surface evenly with a bent spatula, mask, and smooth the sides of the cake. Push the cream, making balls over the entire surface of the cake.

    7. Cover the surface and sides of the cake with chocolate shavings and sprinkle the entire cake with confectioners' sugar and cocoa powder. Refrigerate it for at least 4 hours before serving.

    Notes

    1. 130 g egg whites approximately equal to 4 fresh egg whites from large-size chicken eggs.
    2. Create cute meringue kisses by piping the rest of the meringue around circles.
    3. Don't open the oven door during baking.
    4. Make-ahead option: Bake the meringue in advance, and store airtight, but assemble and serve the cake on the same day: mascarpone whipped cream tends to dry out.

    Nutrition

    • Serving Size: 1 slice
    • Calories: 456
    • Sugar: 50 g
    • Sodium: 81 mg
    • Fat: 25.3 g
    • Saturated Fat: 16.1 g
    • Carbohydrates: 54.9 g
    • Fiber: 1.2 g
    • Protein: 6.3 g
    • Cholesterol: 80 mg

    Thank you for following me on Pinterest, Facebook, and Instagram. Hashtag #bakinglikeachef so I can see your creations.

    The nutritional information has been calculated using an online recipe nutrition calculator such as Verywellfit.com and is intended for informational purposes only. These figures should be used as a general guideline and not be construed as a guarantee.

    The recipe was adapted from https://www.femmeactuelle.fr. It was originally published on February 22, 2019. The recipe has been revised to include improved content and photos.

    Dark Chocolate Terrine (Terrine au Chocolat)

    Feb 24, 2020 · 12 Comments

    Sliced chocolate terrine shaped as a half-sphere with a fork on a dessert plate.

    Rich and decadent, dark chocolate terrine dessert is the ultimate sweet treat for chocolate lovers. Shaped like half-spheres and drizzled with caramel sauce, it's a crowd-pleaser at any party. On top of it, it's gluten-free!

    Sliced terrine dessert with the poured caramel on a dessert plate

    Chocolate terrine

    Chocolate terrine (terrine au chocolat or terrine de chocolat) is a French flourless chocolate dessert shaped into a loaf cake. It can be made with different kinds of chocolate: dark, milk, or white.

    [feast_advanced_jump_to]

    Dark chocolate terrine is made with pure chocolate (no cocoa powder added), where good quality chocolate is the key. It tastes like a flourless chocolate cake, lighter than fudge but richer than dark chocolate mousse.

    BAKING ESSENTIALS CHECKLIST

    Sign up and get a list of the necessary baking tools and ingredients

    FREE DOWNLOAD

    The classic chocolate terrine is made as a terrine cake, but I had some fun shaping the dessert like half-spheres. I even tried a bunny silicone mold to make an amazing Easter dessert.

    Ingredients

    Dark chocolate terrine ingredients.

    For ingredients and detailed instructions, refer to the recipe card below.

    • Dark chocolate: Use a high-quality 70% cocoa dark chocolate like Scharffen Berger dark chocolate or Valrhona dark chocolate. Couverture dark chocolate is another great option.
    • Granulated white sugar or caster sugar.
    • Large eggs at room temperature.
    • Heavy cream or heavy whipping cream with at least 30% fat content. Use double cream if you're in the UK.
    • Gelatin sheets with a strength of 200 bloom.
    • Meringues: Use store-bought meringues or make meringue cookies yourself. Follow the recipe for meringue mushrooms to make meringue kisses.
    • Icing sugar: Make it out of granulated sugar using a coffee grinder or powdered sugar.

    How to make chocolate terrine step-by-step

    Step 1. Melt dark chocolate cut into pieces in a bain-marie or water bath, occasionally stirring with a rubber spatula, and let it slightly cool.

    Step 2. Soak gelatin sheets in cold water for 5 to 10 minutes. Break the meringues into small pieces.

    Step 3. Separate egg whites from the yolks. In a large bowl, beat egg yolks with granulated sugar until soft peaks.

    Step 4. Whisk egg whites in a separate bowl of a stand mixer fitted with the whisk attachment or an electric mixer until firm peaks.

    Step 5. Bring heavy cream to a boil. Remove a saucepan from the heat, add the drained gelatin, and mix.

    Step 6. Pour this mixture over the melted chocolate and combine it with a rubber spatula. Add pieces of broken meringues and gently mix.

    Step 7. Fold the egg yolk and sugar mixture into the cooled chocolate mixture with a rubber spatula.

    Step 8. Fold the beaten egg whites carefully into the chocolate mixture (photo 6).

    Step 9. Pour the preparation into a silicone half-sphere mold, smooth, cover the top with cling film, and place it in the freezer overnight.

    Step 10. To make the caramel sauce the next day, heat icing sugar with water in a saucepan over low-medium heat to get the brown caramel.

    Step 11. Remove the saucepan from the heat, add the soft unsalted butter in pieces and hot heavy cream, always mixing (be careful with splashing!) Heat the mixture for a few seconds and take it off the heat.

    To serve, turn the terrine out of the mold and let it thaw for 30 minutes in the fridge. Pour the caramel sauce on top of each dessert and serve immediately.

    Sliced chocolate dessert with a piece on a fork.

    Expert Tips

    1. To eliminate concern about eating raw eggs, use pasteurized eggs. Consuming raw eggs is not advisable for pregnant women and babies.  
    2. To make the chocolate terrine shaped like a cake, double the recipe. Pour the chocolate mixture into a terrine mold (or a nonstick loaf pan) lined with a plastic film. Refrigerate the dessert overnight (do not freeze it.) On the day of serving, remove the dessert from the mold/pan, cut it into thick slices, and serve it with caramel sauce.
    3. Use a hot knife to get clean, thin slices.

    Recipe variations

    While dark chocolate terrine is a traditional dessert, you can give your classic a creative spin.

    • Milk or white chocolate terrine: Replace dark chocolate with milk or white chocolate.
    • Chocolate terrine with speculoos: Add broken speculoos cookies to the terrine mixture and fill the mold.
    • Chocolate and prune terrine: Add chopped prunes, soaked in water or alcohol of your choice, for a few hours.
    • Use a classic French terrine mold - a special loaf-shaped container with a weighted press (cover) that shapes the dessert from all sides. Or replace the terrine pan with a simple loaf tin covered with aluminum foil.

    Storing

    Store chocolate terrine refrigerated for up to 3-4 days. Don't freeze it again.

    But you can keep the frozen dessert in the freezer for up to two months. Bring it to the refrigerator for 30 minutes before serving.

    Recipe FAQ

    What is terrine?

    Terrine is a traditional French loaf, primarily savory, sometimes a dessert, cooked in a special terrine mold in a bain-marie.

    How to serve chocolate terrine

    Serve chocolate terrine with caramel, chocolate glaze, or raspberry coulis with fresh berries to add tangy notes to the dessert. Thomas Keller, an American chef, recommends serving the dessert with créme Anglaise.

    Love chocolate desserts? Try these next!

    • Chocolate ganache cake
    • Chocolate sponge cake
    • Royal chocolate cake Trianon
    • Nutella Swiss roll
    • Fondant au Chocolat

    Want more delicious and beautiful recipes? Subscribe to my newsletter and follow me on Facebook, Pinterest, and Instagram for my latest updates. If you make this recipe, please leave a star rating on the recipe card and comment below!

    Print

    Recipe card

    Dark Chocolate Terrine Dessert

    Sliced chocolate terrine shaped as a half-sphere with a fork on a dessert plate.
    Print Recipe
    Save Recipe Recipe Saved

    5 Stars 4 Stars 3 Stars 2 Stars 1 Star

    5 from 5 reviews

    Rich and decadent dark chocolate terrine dessert is the best sweet treat for chocolate lovers. Shaped like half-spheres and poured with caramel sauce, it is a great party dessert that makes the guests drool. What's more? It is gluten-free!

    • Author: Irina Totterman
    • Total Time: 1 hour (plus freezing time)
    • Yield: 8 1x
    • Category: Gluten-Free Desserts
    • Method: No Bake
    • Cuisine: French

    Ingredients

    Scale

    For the chocolate terrine:

    • 8.8 oz. (250 g) dark chocolate
    • ¼ cup (50 g) granulated sugar
    • 3 large eggs, room temperature
    • ⅓ cup + 1 tablespoon (100 ml) heavy cream, 30% fat
    • 3 gelatin sheets, 200 bloom
    • 1 oz. (30 g) store-bought meringues

    For the caramel sauce (optional):

    • ⅔ cup + 2 tablespoons (100 g) powdered (icing) sugar
    • 1.5 tablespoons water
    • 3 ½ tablespoons (50 ml) heavy cream
    • 1 ½ tablespoons (25 g) unsalted butter

    * If needed, please refer to Baking Conversion Charts.

    Instructions

    1. To make the chocolate terrine, melt dark chocolate cut into pieces in a bain-marie/water bath,  occasionally stirring with a rubber spatula, and let it slightly cool. Soak gelatin sheets in cold water for 5 to 10 minutes. Break the meringues into small pieces.

    2. Separate egg whites from the yolks. Beat egg yolks with granulated sugar until the mixture whitens. Whisk egg whites in the bowl of a stand mixer fitted with the whisk attachment or with the use of an electric mixer until firm.
    3. Bring heavy cream to a boil. Remove a saucepan from the heat, add the drained gelatin, and mix. Pour this mixture over the melted chocolate and combine with a rubber spatula. Add pieces of broken meringues and gently mix.

    4. Fold the egg yolk and sugar mixture into the cooled chocolate mixture with a rubber spatula. Fold the beaten egg whites carefully into the chocolate mixture.

    5. Pour the preparation into a silicone half-sphere mold, smooth, fold a plastic film over the top, and place in the freezer overnight.

    6. To make the caramel sauce the next day, heat powdered (icing) sugar with water in a saucepan over low-medium heat to get the brown caramel. Remove the saucepan from the heat, add the soft butter in pieces, and hot heavy cream, always mixing (be careful with splashing!) Heat the mixture for a few seconds and take it off the heat.

    7. Serving terrine, turn it out of the mold and let thaw for 30 minutes in the fridge. Pour the caramel sauce on top of each dessert and serve immediately.

    Notes

    1. Use a top-quality 70% cocoa dark chocolate: Scharffen Berger dark chocolate or Valrhona dark chocolate.
    2. To eliminate concern about eating raw eggs, use pasteurized eggs. However, consuming raw eggs is not advisable for pregnant women and babies.
    3. To make the chocolate terrine shaped like a cake, double the recipe. Pour the chocolate mixture into a terrine mold (or a nonstick loaf pan) lined with a food film. Refrigerate the dessert overnight (do not freeze it.) On the day of serving, remove the dessert from the mold/pan, cut it into thick slices, and serve it with caramel sauce. 
    4. Use a hot knife to get clean slices.

    Nutrition

    • Serving Size: 1 half-sphere
    • Calories: 311
    • Sugar: 31.2 g
    • Sodium: 90 mg
    • Fat: 16.8 g
    • Saturated Fat: 10.7 g
    • Carbohydrates: 34.3 g
    • Fiber: 1.1 g
    • Protein: 6.8 g
    • Cholesterol: 90 mg

    Thank you for following me on Pinterest, Facebook, and Instagram. Hashtag #bakinglikeachef so I can see your creations.

    The nutritional information has been calculated using an online recipe nutrition calculator such as Verywellfit.com and is intended for informational purposes only. These figures should be used as a general guideline and not be construed as a guarantee.

    The recipe was adapted from the Gourmand magazine. It was originally published on April 02, 2019. The recipe has been revised to include improved content and photos.

    French Meringue Dessert Merveilleux

    Jan 28, 2020 · 63 Comments

    French meringue dessert Merveilleux with a fork on a dessert plate.

    If you run to the kitchen right now, I will not blame you: this meringue dessert Le Merveilleux is to die for! It is a crunchy meringue sandwich filled with a layer of whipped cream and covered with chocolate chips. Simply, it is a white sugar cloud of deliciousness.

    French meringue dessert Merveilleux with a fork on a dessert plate.

    Have you ever seen a line to get into a pastry shop in the 21st century? Does this really ever happen? Yes, there is a unique place with heavenly meringues in Paris. It is called "Aux Merveilleux de Fred".

    [feast_advanced_jump_to]

    This is the place where you can try the original Le Merveilleux (pronounced "mair-vè-y-eu" in French), meaning 'wonderful' or 'marvelous' in English.

    BAKING ESSENTIALS CHECKLIST

    Sign up and get a list of the necessary baking tools and ingredients

    FREE DOWNLOAD

    Aux Merveilleux de Fred

    The first impression of Aux Merveilleux de Fred visitors tasting Merveilleux, a "delicious fusion of meringue and cream," is that it was to die for. As per the customers,  it is a "totally addictive meringue cake. You start, and the only way to stop is when it is all gone."

    This meringue dessert typically doesn't survive beyond 10 minutes from the time it was purchased; it is usually eaten inside the pastry shop or a few steps outside of the bakery.

    Merveilleux originated in Belgium. In 1985 the French confectioner and chocolatier Frederic Vaucamp brought an old classical dessert back but added a large variety of flavors.

    Since 1997 the chef has opened seven sweet boutiques in Paris, also all over France, in London, Brussels, Berlin, Geneva, and New York. Some of his locations have an open floor plan where customers can see each step of making these meringues.

    Is there a Merveilleux recipe?

    There is no doubt that I made a few attempts to find Frederic Vaucamp's original recipe, but it is a well-kept secret to this day.

    I was lucky enough to find another version of the recipe created by the Belgian chocolatier, the World champion Pâtissier (1995), Pierre Marcolini. He describes his Merveilleux as "a very modern cake, the marriage of crispness and mellowness..."

    I made some changes to the recipe to make it work in a home kitchen. I increased the amount of ingredients for the whipped cream while omitting 25 ml of cold coffee Ristretto as per Mr. Marcolini.

    Actually, I found that adding liquid coffee to the cream makes it harder to assemble the meringues since the cream becomes more liquid. 

    Moreover, I replaced the chef's recommended Pacari Ecuadorian chocolate Los Rios with Trader Joe's dark chocolate. And you will need many more chocolate chips to wrap the meringues than the original recipe recommends!

    Merveilleux cut into bite pieces with a fork and a dried rose on a grey plate

    Would you like a new birthday party idea? Just make a batch of meringues Merveilleux and serve them on a large serving platter!

    This is the second year when my son asked me to make these cute cakes for his birthday. I ended up with eighteen meringues Merveilleux, each with a candle on top. As you can imagine, every year brings an additional cake with a candle :).

    Why this meringue dessert recipe works

    • Easy meringue-based recipe results in a heavenly delicious dessert.
    • Making numerous cakes serves as a great birthday party idea.
    • Rolling meringues in white chocolate chips, pink chocolate curls, or chopped Pink Praline makes beautiful and tasteful ideas for Valentine's Day, Mother's Day, a baby shower party, or a wedding.
    Merveilleux - French Sandwich Meringue

    How to make Merveilleux

    Preheat oven to 195°F (90°C). Draw circles 2.5 inches (6 cm) on parchment paper. Turn the paper over so that the circles are facing down.

    To make the meringue, open a capsule of Ristretto and place ground coffee aside. Using an electric or stand mixer, beat egg whites (at room temperature), gradually add granulated sugar, and whisk till the meringue becomes glossy (photo 1).

    Once egg whites are set, add powdered (icing) sugar and ground coffee and mix with a rubber spatula (photo 2).

    Photo 1: Meringue in a bowl Photo 2: Meringue mixed with icing sugar and ground coffee in a bowl
    PHOTO 1 PHOTO 2

    Place the meringue in a pastry bag with Ateco plain pastry tip 806 and pipe small spirals/rosettes onto drawn circles (photo 3). Bake meringues for 2 hours. Turn off the oven and leave the meringues with the door closed for another one hour (photo 4).

    Photo 3: Meringue spirals on parchment paper Photo 4: Baked meringues on parchment
    PHOTO 3 PHOTO 4

    To make the sweetened whipped cream, whisk cold heavy cream, gradually adding granulated sugar. Use an electric mixer to whip the cream until stiff (photo 5).

    Pro tip: Refer to the French Chantilly cream recipe for step-by-step photographed explanations, helpful tips, and tricks.

    To assemble sandwich meringues, pipe the whipped cream on the meringue rosette. Finish with another meringue on top, placing it upside down (photo 6).

    Photo 5: Ready Chantilly cream in a bowl Photo 6: Meringues sandwiched with the cream held in hand
    PHOTO 5 PHOTO 6

    Garnish the edges (photo 7) and cover the top (photo 8) of sandwiched meringues with the cream. Smooth their sides and top using a bent spatula. Place meringues in the freezer for about 10 minutes before rolling them in chocolate chips.

    Photo 7: Meringue with smoothed edges on a marble board Photo 8: Meringues covered with the cream on a wooden board
    PHOTO 7 PHOTO 8

    To make chocolate chips, scrape a chocolate bar with a large knife, or a vegetable peeler or use a mandoline slicer. Place chocolate chips in a large dish. Roll each meringue sandwich in chocolate chips (photo 9), except the bottom (photo 10). Refrigerate.

    Photo 9: Chocolate chips with the meringue in a glass dish Photo 10: Meringues Two Sandwich Meringue Merveilleux on a marble board covered with chocolate chips on a wooden board
    PHOTO 9 PHOTO 10

    Expert Tips

    1. Process granulated sugar in a food processor for a few seconds to make superfine sugar. It dissolves quicker and easier while whisking.
    2. Replace 1 capsule of coffee Ristretto with 1 ½ teaspoon (5 g) of your favorite ground coffee.
    3. Prepare meringue rosettes one day in advance and store them in an airtight container at room temperature.
    4. Make about 12.3 oz. (350 g) of medium-sized chocolate chips to facilitate rolling the meringues.
    5. Roll meringues in white chocolate chips, pink chocolate curls, crumbled speculoos, crispy crepes gavottes, chopped Pink Praline, or nuts to play with tastes and flavors.
    6. If you want to add a tangy note, hide a raspberry inside while assembling the meringues. This version is far from the original recipe, but there is always a place for experimentation.
    7. Whisk 1 cup (230 g) of heavy cream with 1 ½ tablespoon (23 g) of granulated sugar until medium peaks and decorate the top of each meringue cake with a swirl of the whipped cream, using an open star pastry tip.
    8. Serve the dessert right away to keep the crispiness of the meringues since the longer you keep the assembled cakes, the softer the meringues become.

    Watch the video of how the meringues Merveilleux are rolled in chocolate chips at "Aux Merveilleux de Fred" in Paris.

    More delicious cake recipes you will love

    • Cake Sans Rival
    • Raspberry Oreo Cheesecake
    • Maraschino Cherry Cake
    • Or browse all the cake recipes

    Want more delicious and beautiful recipes? Subscribe to my newsletter and follow me on Facebook, Pinterest, and Instagram for my latest updates. If you make this recipe, please leave a star rating on the recipe card and comment below!

    Print

    Recipe card

    French Meringue Dessert Merveilleux

    French meringue dessert Merveilleux with a fork on a dessert plate.
    Print Recipe
    Save Recipe Recipe Saved

    5 Stars 4 Stars 3 Stars 2 Stars 1 Star

    5 from 26 reviews

    Meringue dessert Merveilleux is a crunch meringue sandwich filled with a layer of whipped cream and covered with chocolate chips. Simply, it is a white sugar cloud of deliciousness. It is a dessert to die for!

    • Author: Irina Totterman
    • Total Time: 3 hours, 30 minutes (plus resting time)
    • Yield: 20 1x
    • Category: Cakes
    • Method: Baking
    • Cuisine: French

    Ingredients

    Scale

    For the coffee meringue:

    • ⅔ cup + 2 ½ tablespoon (200 g) egg whites
    • ⅔ cup + 3 ½ tablespoon (200 g) granulated sugar (see note #1)
    • 1 ½ cups + 5 teaspoon (200 g) powdered (icing) sugar
    • 1 capsule of coffee Ristretto (see note #2)

    For the sweetened whipped cream:

    • 3 cups + 4 tablespoon (750 g) heavy cream, 30% fat
    • ⅓ cup (75 g) granulated (caster) sugar

    For the decoration:

    • 5.3 oz (150 g) Trader Joe's dark chocolate (see notes)

    * If needed, please refer to Baking Conversion Charts.

    Instructions

    1. Preheat oven to 195 F/90 C. Draw circles 2.5 inch/6 cm on parchment paper. Turn the paper over so that the drawing is facing down.

    2. To make the meringue, open a capsule of Ristretto and place ground coffee aside. Using an electric or stand mixer, beat egg whites (at room temperature), gradually add granulated sugar and whick till the meringue becomes glossy. Once egg whites are set, add powdered (icing) sugar, ground coffee and mix with a rubber spatula. Place the meringue in a pastry bag with Ateco plain pastry tip 806 and pipe small spirals/rosettes onto drawn circles. Bake meringues for 2 hours. Turn off the oven and leave the meringues with the door closed for another one hour. 

    3. To make the sweetened whipped cream, whisk cold heavy cream, gradually adding granulated sugar. Use an electric mixer to whip the cream until stiff.

    4. To assemble sandwich meringues, pipe the whipped cream on the meringue rosette. Finish with another meringue on top, placing it upside down (flat side up). Garnish the edges and cover the top of sandwiched meringues with the cream. Smooth their sides and top using a bent spatula. Place the meringues on a board and cover the top of each meringue with the cream. Place meringues in the freezer for about 10 minutes before rolling them in chocolate chips.

    5. To make chocolate chips, scrape a chocolate bar with a large knife or a vegetable peeler or use a mandoline slicer. Place chocolate chips in a large dish. Roll each sandwiched meringue in chocolate chips, except the bottom. Refrigerate.

    Notes

    1. Process granulated sugar in a food processor for a few seconds to make superfine sugar. It dissolves quicker and easier while whisking.
    2. Replace 1 capsule of coffee Ristretto with 1 ½ teaspoon (5 g) of your favorite ground coffee.
    3. Prepare meringue rosettes one day ahead and store them in an airtight container at room temperature.
    4. Make about 12.3 oz. (350 g) of middle-sized chocolate chips to facilitate rolling the meringues.
    5. Roll meringues in white chocolate chips, crumbled speculoos, crispy crepes gavottes, pink chocolate curls, chopped Pink Praline, or nuts to experiment with tastes and flavors.
    6. Whisk 1 cup (230 g) of heavy cream with 1 ½ tablespoon (23 g) of granulated sugar till medium peaks and decorate the top of each meringue cake with a swirl of the whipped cream, using an open star pastry tip.
    7. If you want to add a tangy note, hide a raspberry inside while assembling the meringues. This version is far from the original recipe, but there is always a place for experimentation.
    8. Serve the dessert right away to keep the crispiness of the meringues since the longer you keep the assembled cakes, the softer the meringues become.

    Nutrition

    • Calories: 245
    • Sugar: 27.5 g
    • Sodium: 29 mg
    • Fat: 13.8 g
    • Saturated Fat: 8.8.g
    • Carbohydrates: 29.4 g
    • Fiber: 0.3 g
    • Protein: 2.5 g
    • Cholesterol: 43 mg

    Thank you for following me on Pinterest, Facebook, and Instagram. Hashtag #bakinglikeachef so I can see your creations.

    The nutritional information has been calculated using an online recipe nutrition calculator such as Verywellfit.com and is intended for informational purposes only. These figures should be used as a general guideline and not be construed as a guarantee.

    The recipe was adapted from https://www.femmeactuelle.fr. It was originally published in May 2018. The recipe has been revised to include improved content and photos. All posted pictures are mine.

    Ottolenghi's Eton Mess

    Jan 18, 2019 · 17 Comments

    Eton mess: crushed meringues topped with strawberries, and cream served on the white plates.

    Enjoy this fruity summer twist on Ottolenghi's Eton Mess with crème fraîche, crunchy meringue, and strawberries. It takes 20 minutes from start to finish to make this gorgeous gluten-free treat! It's the easiest dessert ever!

    Crushed meringue topped with strawberries, creme fraiche, and sorbet served on three white plates

    Summertime calls for fresh and bright summery desserts! Interestingly, they can be messy and tasty such as a crushed meringue with cream and strawberries called Eton Mess.

    This dessert is made with fresh strawberries, meringue, and rose-flavored cream. It is one of the best treats to finish off summer nights with friends. The scoop of strawberry sorbet on top is the key!

    Once you make an Eton mess, you might be eating this dessert all summer long. Use frozen berries and enjoy it all year round!

    BAKING ESSENTIALS CHECKLIST

    Sign up and get a list of the necessary baking tools and ingredients

    FREE DOWNLOAD

    Strawberry Eton mess dessert served on two white plates and strawberries in the background: Overhead view
    [feast_advanced_jump_to]

    What is the Eton Mess?

    Eton mess is a traditional British dessert consisting of three main ingredients: strawberries, meringues, and whipped cream.

    Its history goes back to the 19th century when it was first served in Eton College in Windsor, UK.

    Legend states that Eton mess was invented when a frisky Labrador accidentally crushed a meringue dessert prepared for a picnic in Eton College.

    Why you should try this recipe

    1. Strawberry sorbet on top of Eton mess brings freshness, which is a lovely way to celebrate summertime.
    2. Store-bought crispy meringues are all right to use! Crush them, scatter fresh strawberries, whip the cream up and get Eton mess ready in minutes.
    3. Pomegranate molasses splashed over the dessert is an excellent accompaniment to strawberries.
    4. Sumac sprinkled on top of Eton mess adds a beautiful pop of color and a subtle note to the dessert, delicate and yummy.
    5. Using different kinds of fresh or frozen fruit and their combinations makes Eton mess a perfect dessert all year round.

    Eton mess variations

    Traditional Eton mess is made from fresh strawberries, meringue(s) and classic whipped cream.

    However, why not to build your own Eton mess, using different variations?

    Replace strawberries with other summer fruit such as raspberries, blackberries, blueberries, and switch the strawberry sorbet with the other fruity one accordingly.

    If you want another alternative to strawberries, use the roasted rhubarb. Just cut the rhubarb into pieces, sprinkle with a bit of brown sugar and orange juice, cover the dish with tin foil, and roast for 20 minutes at 350 F/175 C.

    Replace strawberries with stone fruit such as peaches, sprinkle with pistachios, and drizzle with honey.

    Use pitted and halved cherries instead of strawberries, break up chocolate meringues and top the dessert with the cherry sorbet and a few toasted flaked almonds.

    Create more delicious whipped cream by adding elderflower cordial, strawberry liqueur, or other fruity brandy to taste.

    To make a scented whipped cream, whip 1 ⅓ cups (300 ml) whipping cream with 5 tablespoons (40 g) icing sugar until it begins to thicken, just before soft peaks (don't over-whip the cream!), and add 1 to 2 tablespoons of alcohol.

    Another cute idea is to use the half cream/half plain Greek yogurt mix. If you look for the lighter Eton mess, replace the fresh whipped cream with plain low-fat yogurt.

    Crushed meringues, strawberries, and cream served on a white plate: Close up

    How to make strawberry Eton mess

    To make the rosewater cream, whisk the mascarpone and crème fraîche until homogeneous.

    Add icing sugar, rose water, and whisk until soft peaks. Cover a bowl with the cream and refrigerate till serving.

    To serve the dessert, break meringues into bite-sized pieces and arrange between four serving plates.

    Top meringues with fresh strawberries cut into 2 cm pieces and rosewater cream.

    Decorate with pomegranate seeds and arrange one to two tablespoons of strawberry sorbet.

    Pour pomegranate molasses on top of the dessert, sprinkle with sumac and edible rose petals. Serve immediately.

    Expert tips

    1. Use store-bought meringues and strawberry sorbet.
    2. Prepare the dessert components in advance: the rosewater cream, strawberries cut into pieces, broken meringues. Keep the cream and berries in the fridge till you are ready to serve.
    3. Replace crème fraîche with sour cream or full fat plain Greek yogurt. You can also make crème fraîche at home, using buttermilk and heavy cream.
    4. Use rose petals from edible rose buds if you prefer.

    Frequently asked questions

    What is Sumac?

    Sumac is a dried red spice that is native to the Middle East. It is made by crushing the dried berries of a wild bush into the powder. The spice is wildly used in Middle Eastern and Mediterranean cooking. Sprinkle your vegetables, grilled or roasted meat, chicken, or fish to add a bright piney-citrusy note. The most available sumac substitute is lemon zest.

    What is crème fraîche?

    Crème fraîche is a thick and rich cream that looks similar to sour cream, but less tangy. The fat content of crème fraîche is about 30%, while sour cream has a fat content of about 20%. Still, plain sour cream is the best substitute for crème fraîche. If you are up to make your own crème fraîche, just follow the recipe. 

    Can you make Eton mess in advance?

    Eton mess has to be assembled close to serving time to keep the crispiness of the meringues. Prepare whipped cream, cut strawberries into pieces in advance, and keep them in the fridge. Then dress up the dessert within a few minutes.

    Can you freeze Eton mess?

    No, it is not recommended to freeze Eton mess. The dessert is served fresh, right after making it.

    Love easy desserts? Try these next!

    • Banoffee Pie Cups
    • Four-Ingredient Coconut Macaroons
    • Italian Shortbread Cookies
    • Browse all the No-Bake Desserts

    Want more delicious and beautiful recipes? Subscribe to my newsletter and follow me on Facebook, Pinterest, and Instagram for my latest updates. If you make this recipe, please leave a star rating on the recipe card and comment below!

    Print

    Recipe card

    Ottolenghi's Eton Mess

    Eton mess: crushed meringues topped with strawberries, and cream served on the white plates.
    Print Recipe
    Save Recipe Recipe Saved

    5 Stars 4 Stars 3 Stars 2 Stars 1 Star

    5 from 11 reviews

    Enjoy this fruity summer twist on Ottolenghi's Eton Mess with crème fraîche, crushed meringues, and strawberries. It takes 20 minutes from start to finish to make this gorgeous gluten-free treat! It's the easiest dessert ever!

    • Author: Irina Totterman
    • Total Time: 20 min
    • Yield: 4 1x
    • Category: Gluten free dessert
    • Method: No-bake
    • Cuisine: British

    Ingredients

    Scale

    For the rosewater cream:

    • 5.6 oz (160 g) mascarpone
    • 9.5 oz (270 g) crème fraîche
    • 2 tablespoons (15 g) icing sugar
    • 1 tablespoon rose water 

    For serving:

    • 7 oz (200 g) fresh strawberries
    • 2.1 oz (60 g) meringues
    • 10.5 oz (300 g) strawberry sorbet
    • 3.5 oz (100 g) pomegranate seeds
    • 2 tablespoons of pomegranate molasses
    • 1 teaspoon of sumac 
    • 2 tablespoons of edible dried rose petals (optional)

    ** If needed, please refer to Baking Conversion Charts.

    Instructions

    1. To make the rosewater cream, whisk the mascarpone and crème fraîche until homogeneous. Add icing sugar and rose water, and whisk until soft peaks. Cover a bowl with the cream and refrigerate till serving.
    2. To serve, break meringues into bite-sized pieces and arrange between four serving plates. Top meringues with fresh strawberries cut into 2 cm pieces and rosewater cream.
    3. Decorate with pomegranate seeds and arrange one to two tablespoons of strawberry sorbet. Pour pomegranate molasses on top of the dessert and sprinkle with sumac and edible rose petals. Serve immediately.

    Notes

    1. Use store-bought meringues and strawberry sorbet.
    2. Prepare the dessert components in advance: the rosewater cream, strawberries cut into pieces, and broken meringues. Keep the cream and berries in the fridge till you are ready to serve.
    3. Replace crème fraîche with sour cream or full-fat plain Greek yogurt. You can also make crème fraîche at home, using buttermilk and heavy cream.
    4. Use rose petals from edible rose buds if you prefer.

    Nutrition

    • Calories: 532
    • Sugar: 43.4 g
    • Sodium: 101 mg
    • Fat: 31.9 g
    • Saturated Fat: 20.2 g
    • Carbohydrates: 52.4 g
    • Fiber: 1.8 g
    • Protein: 7.9 g
    • Cholesterol: 81 mg

    Thank you for following me on Pinterest, Facebook, and Instagram. Hashtag #bakinglikeachef so I can see your creations.

    The recipe was adapted from https://ottolenghi.co.uk/. It was originally published on January 18, 2019. The recipe has been re-tested and revised to include improved content and photos. All posted pictures are mine.

    The nutritional information has been calculated using an online recipe nutrition calculator such as Verywellfit.com and is intended for informational purposes only. These figures should be used as a general guideline and not be construed as a guarantee.

    Primary Sidebar

    Personal photo of the website's author

    Hi, I am Irina!

    A home baker with over 30 years of experience, sharing baking recipes with step-by-step instructions, helpful tips, and tricks. Get baking, and let the fun begin!

    About • Start Here • Contact

    Summer Desserts

    • Fig tiramisu cups in a serving board.
      Easy Fig Tiramisu (15-Minute Recipe)
    • Louise cake on a cake stand.
      Ottolenghi's Louise Cake With Plum And Coconut
    • Apple and blueberry crumble in a white ceramic dish with ice cream and two spoons.
      Apple And Blueberry Crumble (Super Easy)
    • Sliced Jordgubbstårta on a cake board.
      Jordgubbstårta (Swedish Strawberry Cake)

    More Summer Desserts →

    Readers’ Favorites

    • Sliced Sans Rival cake on a cake board.
      Sans Rival Cake (Filipino Cashew Meringue Cake)
    • A batch of baked madeleines in a baking mold.
      Classic French Madeleines (Madeleine Cookies)
    • Italian sponge cake on a marble board.
      Italian Sponge Cake (Pan di Spagna)
    • Halved muffin loaded with blueberries with the rest of the cakes in the background.
      To Die For Blueberry Muffins Recipe
    • French financiers with almonds on a wooden board lined with parchment.
      Classic French Financiers (Authentic Recipe)
    • Stack of banana bread slices on a serving board.
      Easy Banana Bread Without Baking Soda

    More Cake Recipes →

    Footer

    Featured in banner with logos.

    BAKING LIKE A CHEF

    • Home
    • About
    • Recipe Index
    • Baking 101
    • Cake Pan Converter
    • Contact
    • Log In

    SOCIAL

    • Facebook
    • Pinterest
    • Instagram
    • Twitter

    LEGAL

    • Privacy Policy
    • Disclaimer
    • Terms & Conditions
    • Accessibility Statement

    Copyright © 2025 Baking Like a Chef • Baking Like a Chef is a participant in the Amazon Services LLC Associates Program, an affiliate advertising program designed to provide a means for sites to earn advertising fees by advertising and linking to Amazon.com. As an Amazon Associate, I earn a commission – at no cost to you –  from qualifying purchases.