• Skip to primary navigation
  • Skip to main content
  • Skip to primary sidebar

Baking Like a Chef logo

  • ABOUT
  • RECIPES
  • CLUB
  • SHOP
menu icon
go to homepage
  • Recipes
  • Basics
  • Printables
  • Subscribe
  • About
search icon
Homepage link
  • Recipes
  • Basics
  • Printables
  • Subscribe
  • About
×

Want to learn sourdough?

START

Home » Recipe Index

5-Ingredient Oil Sponge Cake (With Olive Oil)

Apr 5, 2022 · 7 Comments

Sliced oil sponge cake with a slice on a cake server.

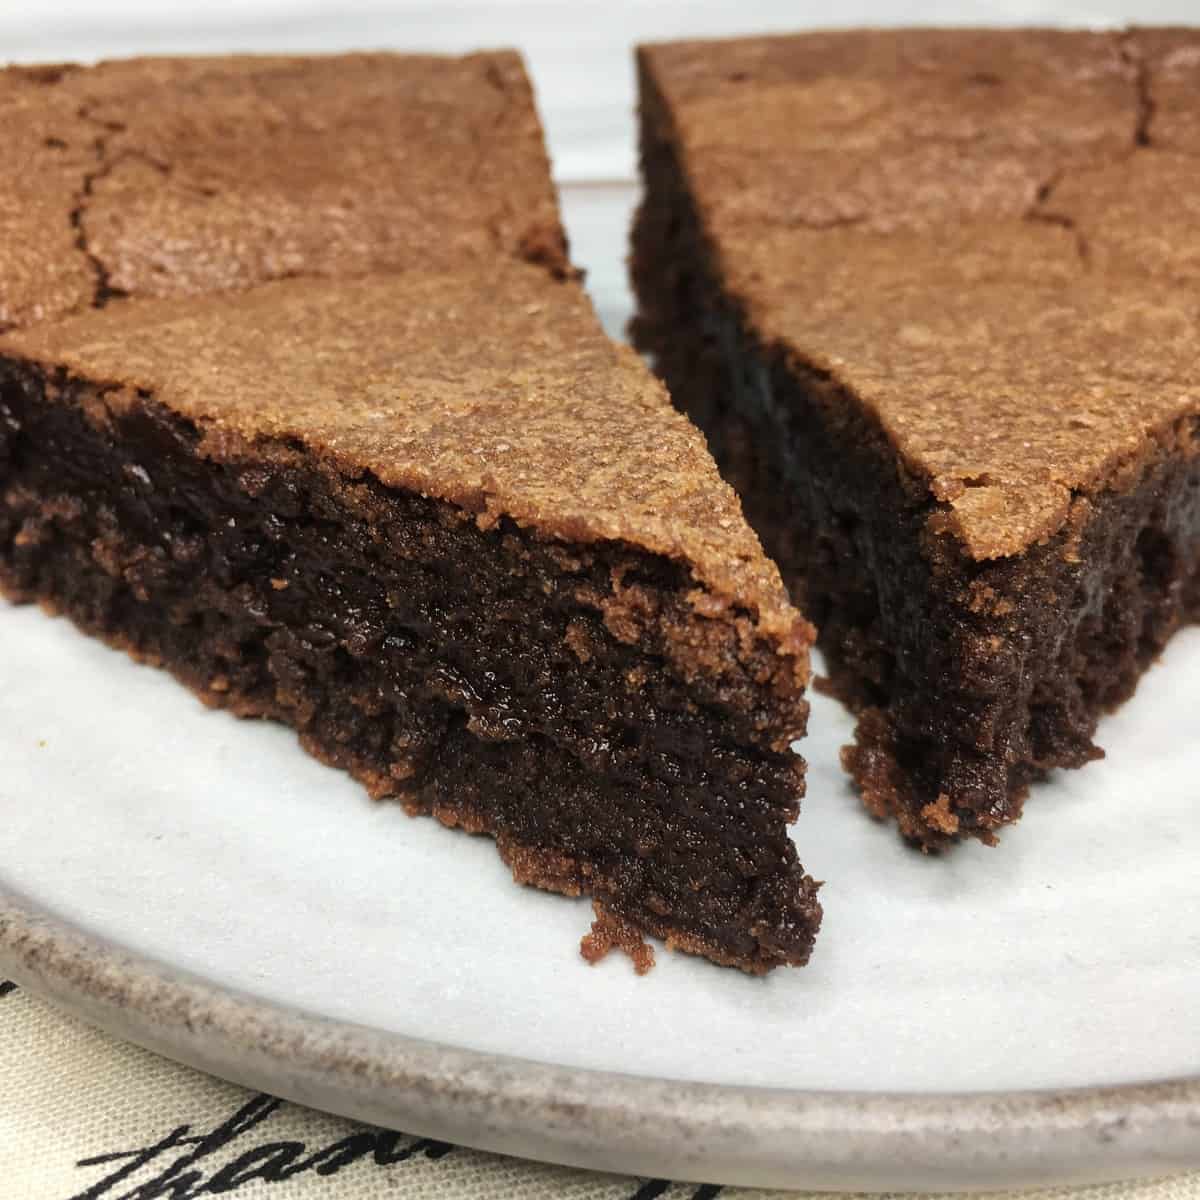
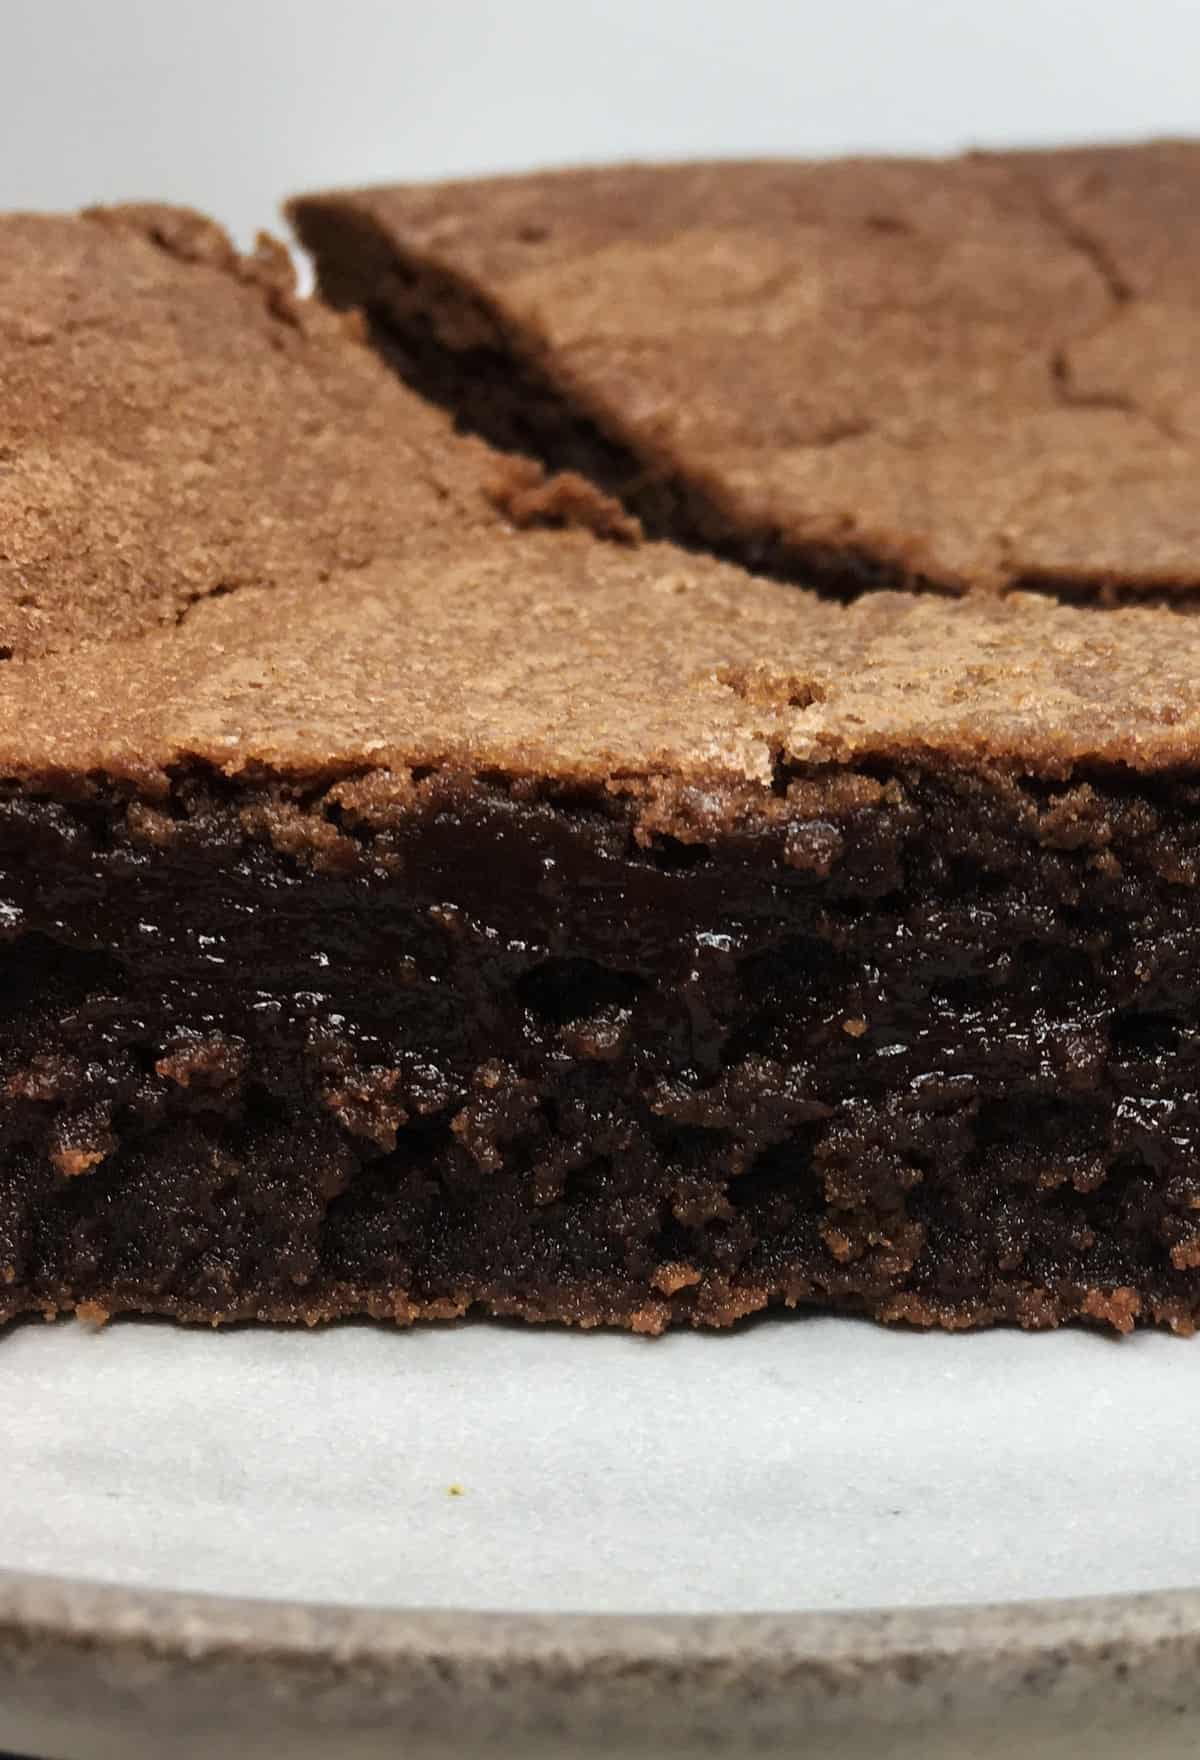
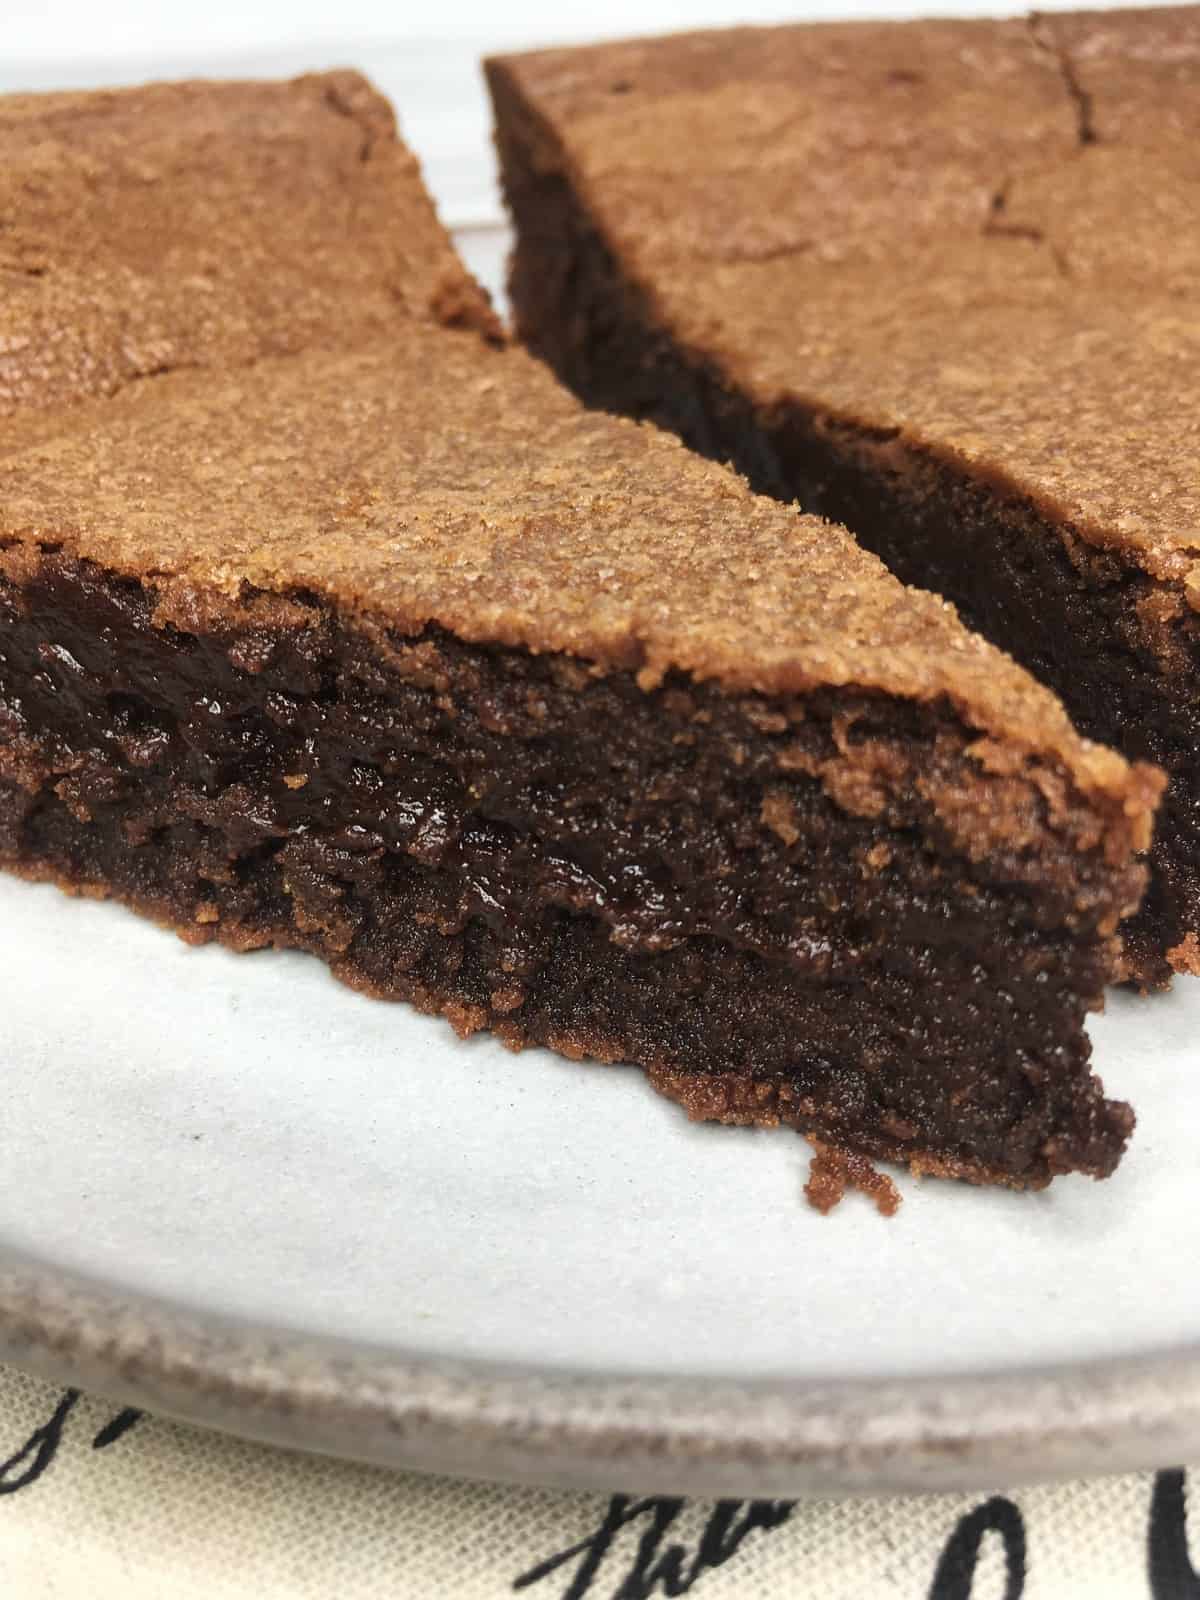
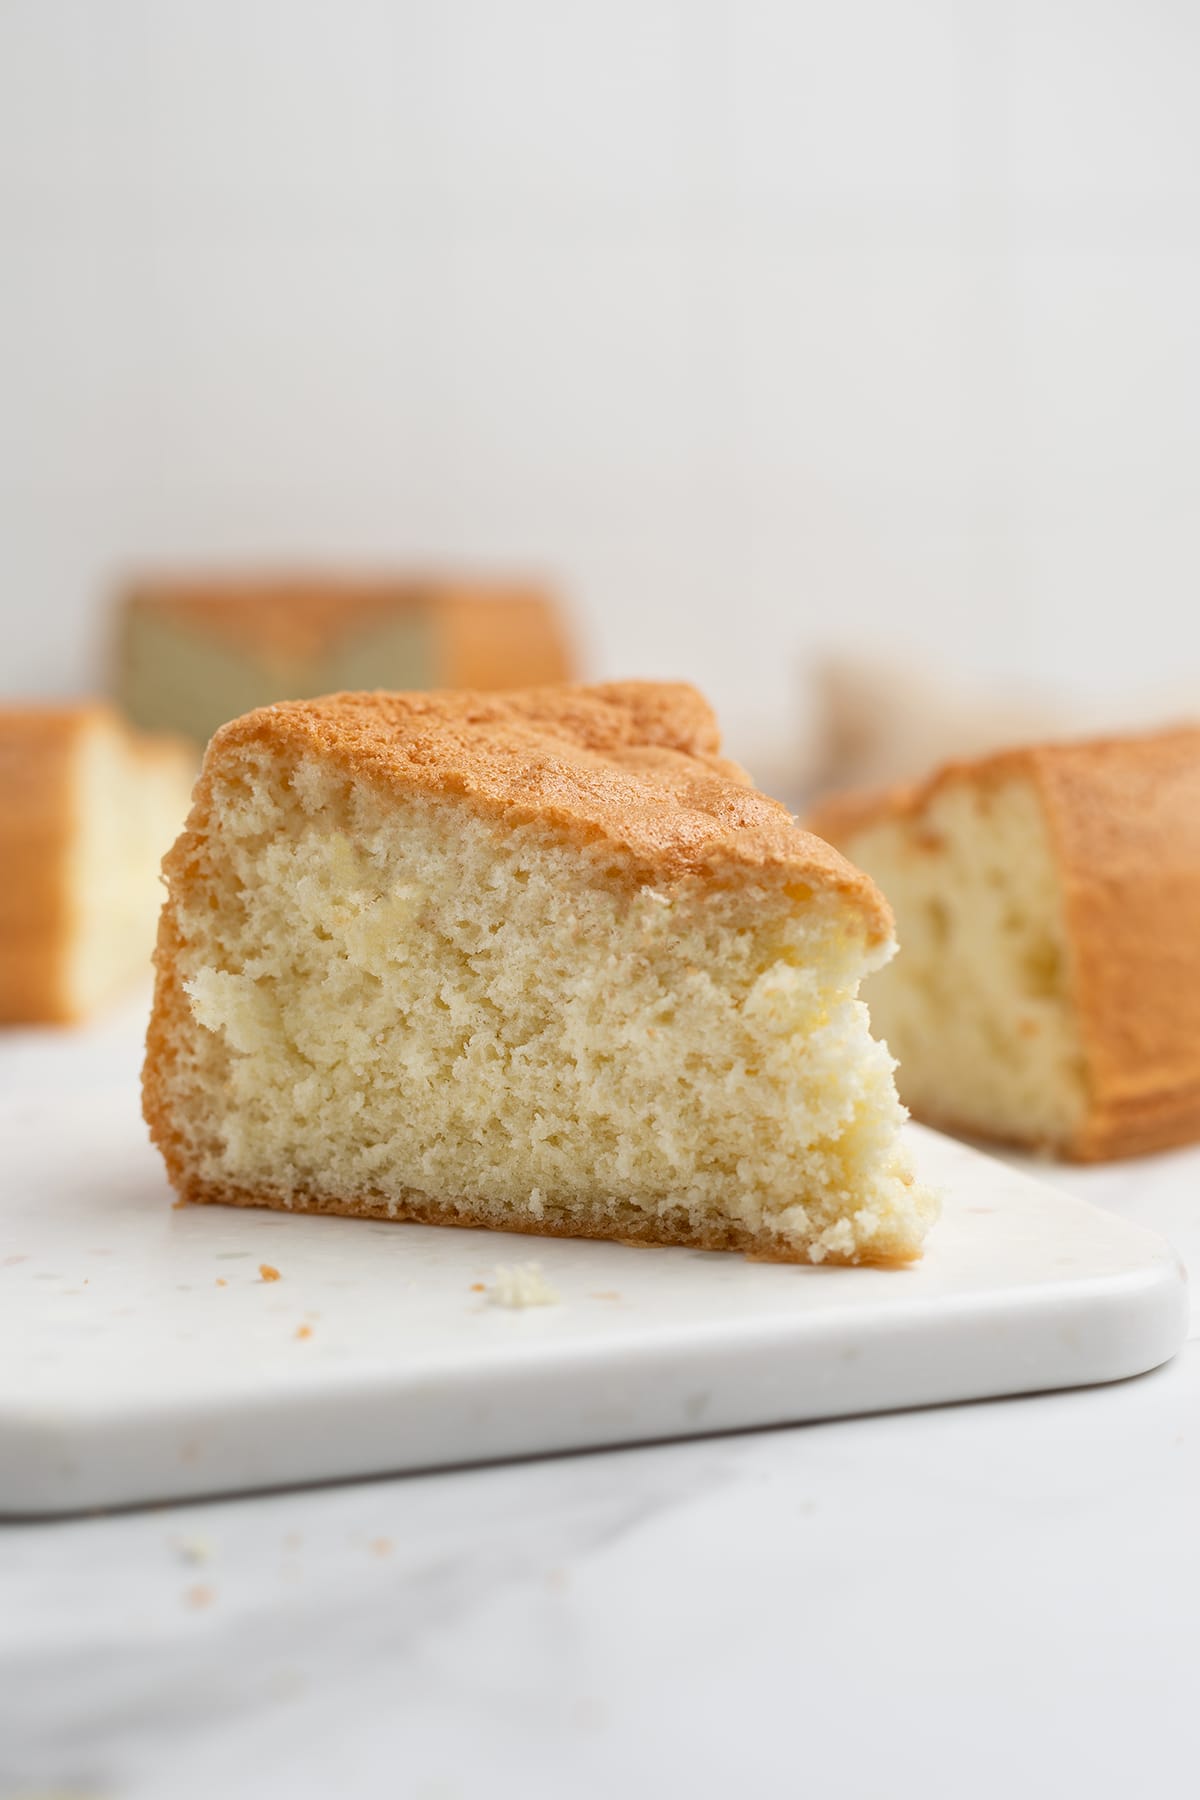
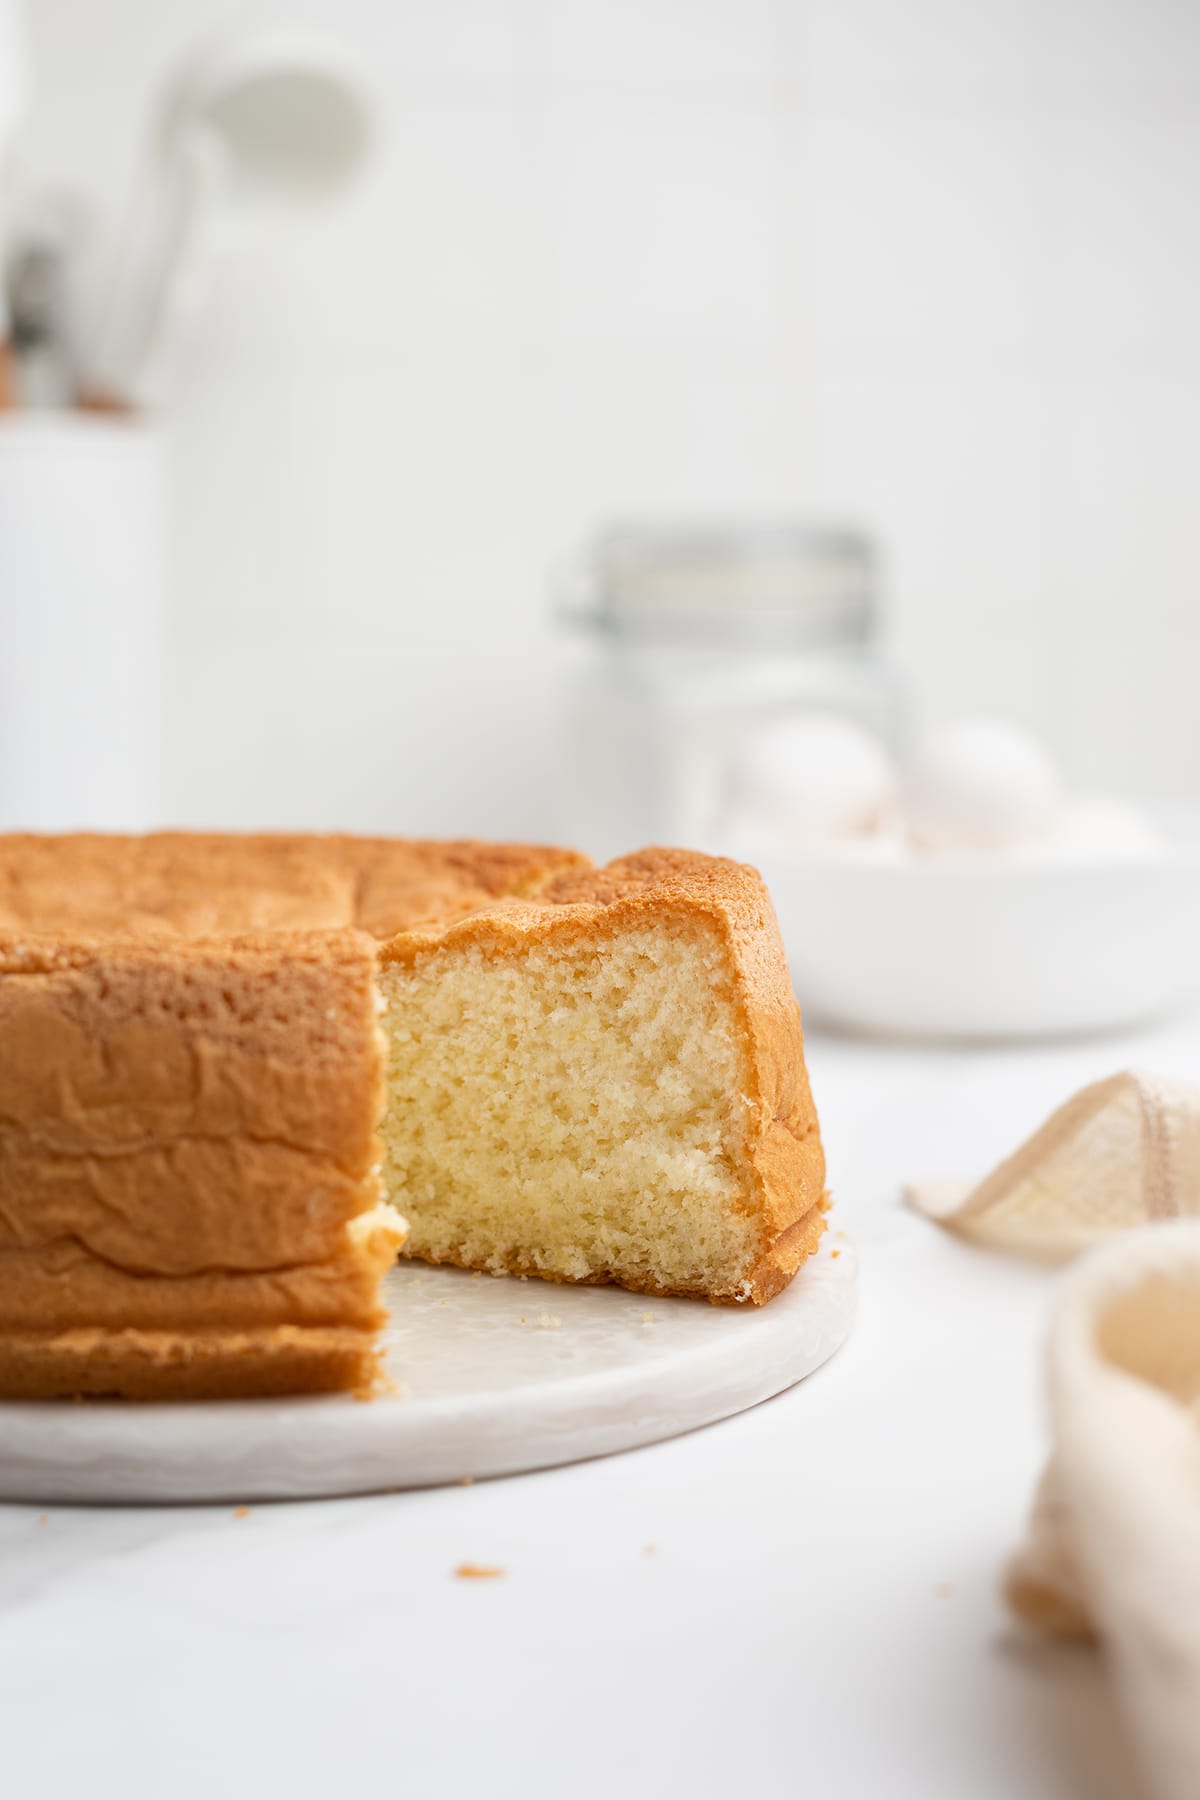
Oil sponge cake is a butter-free, light, and moist sponge, perfect for those with food allergies and sensitivities. With the flavorful olive oil, it is full of delicious flavor, texture, and taste. What's more? It is easy to make with only 5 ingredients!

Sliced oil sponge cake with a slice on a cake server.

This oil sponge cake or no butter sponge cake is a new and exciting way to serve your guests. It is spongy, light, and airy inside, with a beautiful flavor of olive oil. It doesn't overwhelm the taste buds but still leaves them willing more.

[feast_advanced_jump_to]

Olive oil isn't restricted only to salads. With its distinct flavor and amazing taste, it is used to make cakes, muffins, and other baked goodies.

BAKING ESSENTIALS CHECKLIST

Sign up and get a list of the necessary baking tools and ingredients

FREE DOWNLOAD

And if you prefer not to have any butter, cream, or yogurt in your diet, discover the secret to baking a deliciously moist cake using oil instead of butter.

But if you are looking for simple oil- and butter-free sponge cake, try my favorite - Italian sponge cake.

Oil sponge cake recipe

  • This light, fluffy cake is one of those oil cakes with no baking powder, so it relies on the eggs for rising.
  • Olive oil creates a truly sensational cake with a soft and moist texture and unforgettable flavor.
  • This easy oil sponge cake recipe is a basic recipe; for example, it is ideal if you want to make a layered cake.

Ingredients

Oil sponge cake ingredients.

For ingredients and detailed instructions, refer to the recipe card below.

  • Eggs: The recipe calls for large eggs. Ensure they are at room temperature before you start: bring them to the countertop an hour before. You will need to whip the eggs with sugar over a bain-marie/water bath to prepare the mixture to incorporate the air bubbles during whisking.

Pro tip: Alternatively, you can use a trick I always use: place whole eggs in a bowl of warm water for a few minutes. 

  • Sugar: Use granulated sugar or caster sugar to make the recipe.
  • Olive oil fixes the aromas, brings moisture and softness to the cake, and prolongs its shelf life. You can replace extra virgin olive oil with sunflower oil, vegetable oil, rapeseed oil, etc.

Pro tip: If you want to learn more about how to make a cake moist, please, read my guide.

  • Milk: The recipe calls for whole milk at room temperature.
  • Flour: Use all-purpose flour (aka plain flour).
A single slice of the oil sponge cake on a dessert plate.

How to make olive oil sponge cake

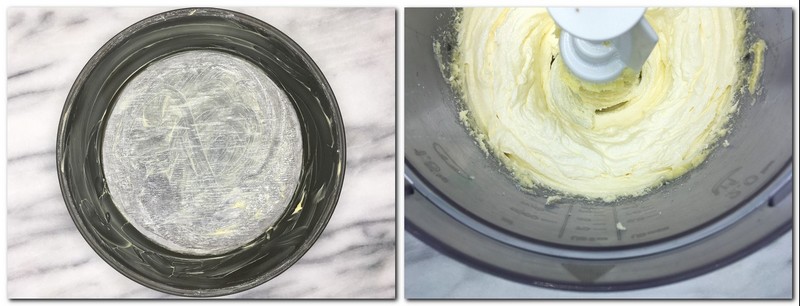
Step 1. With cooking spray, grease an 8-inch (20 cm) round cake pan, then place a parchment paper circle at the bottom of the pan.

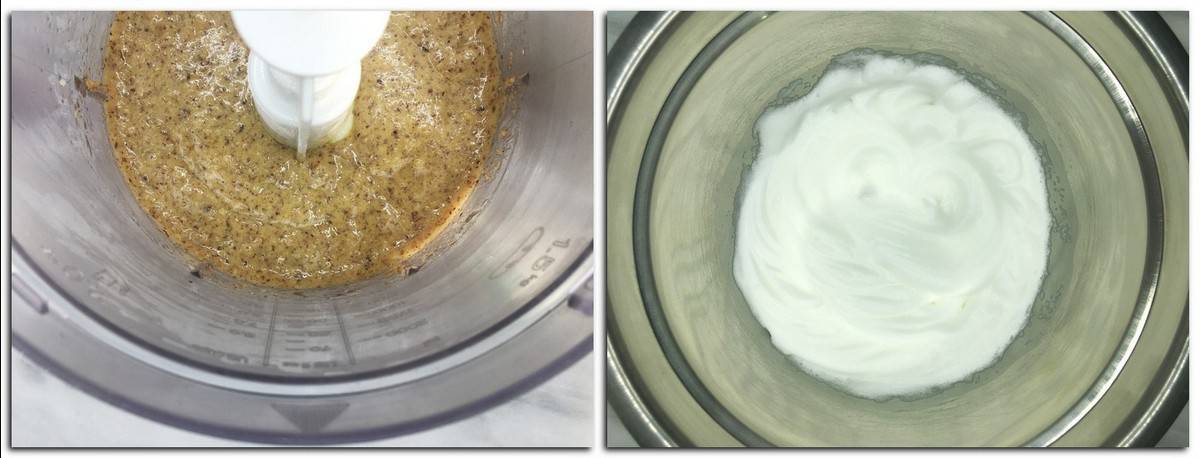
Step 2. Using a flour sifter, sift all-purpose flour in a large mixing bowl and set aside.

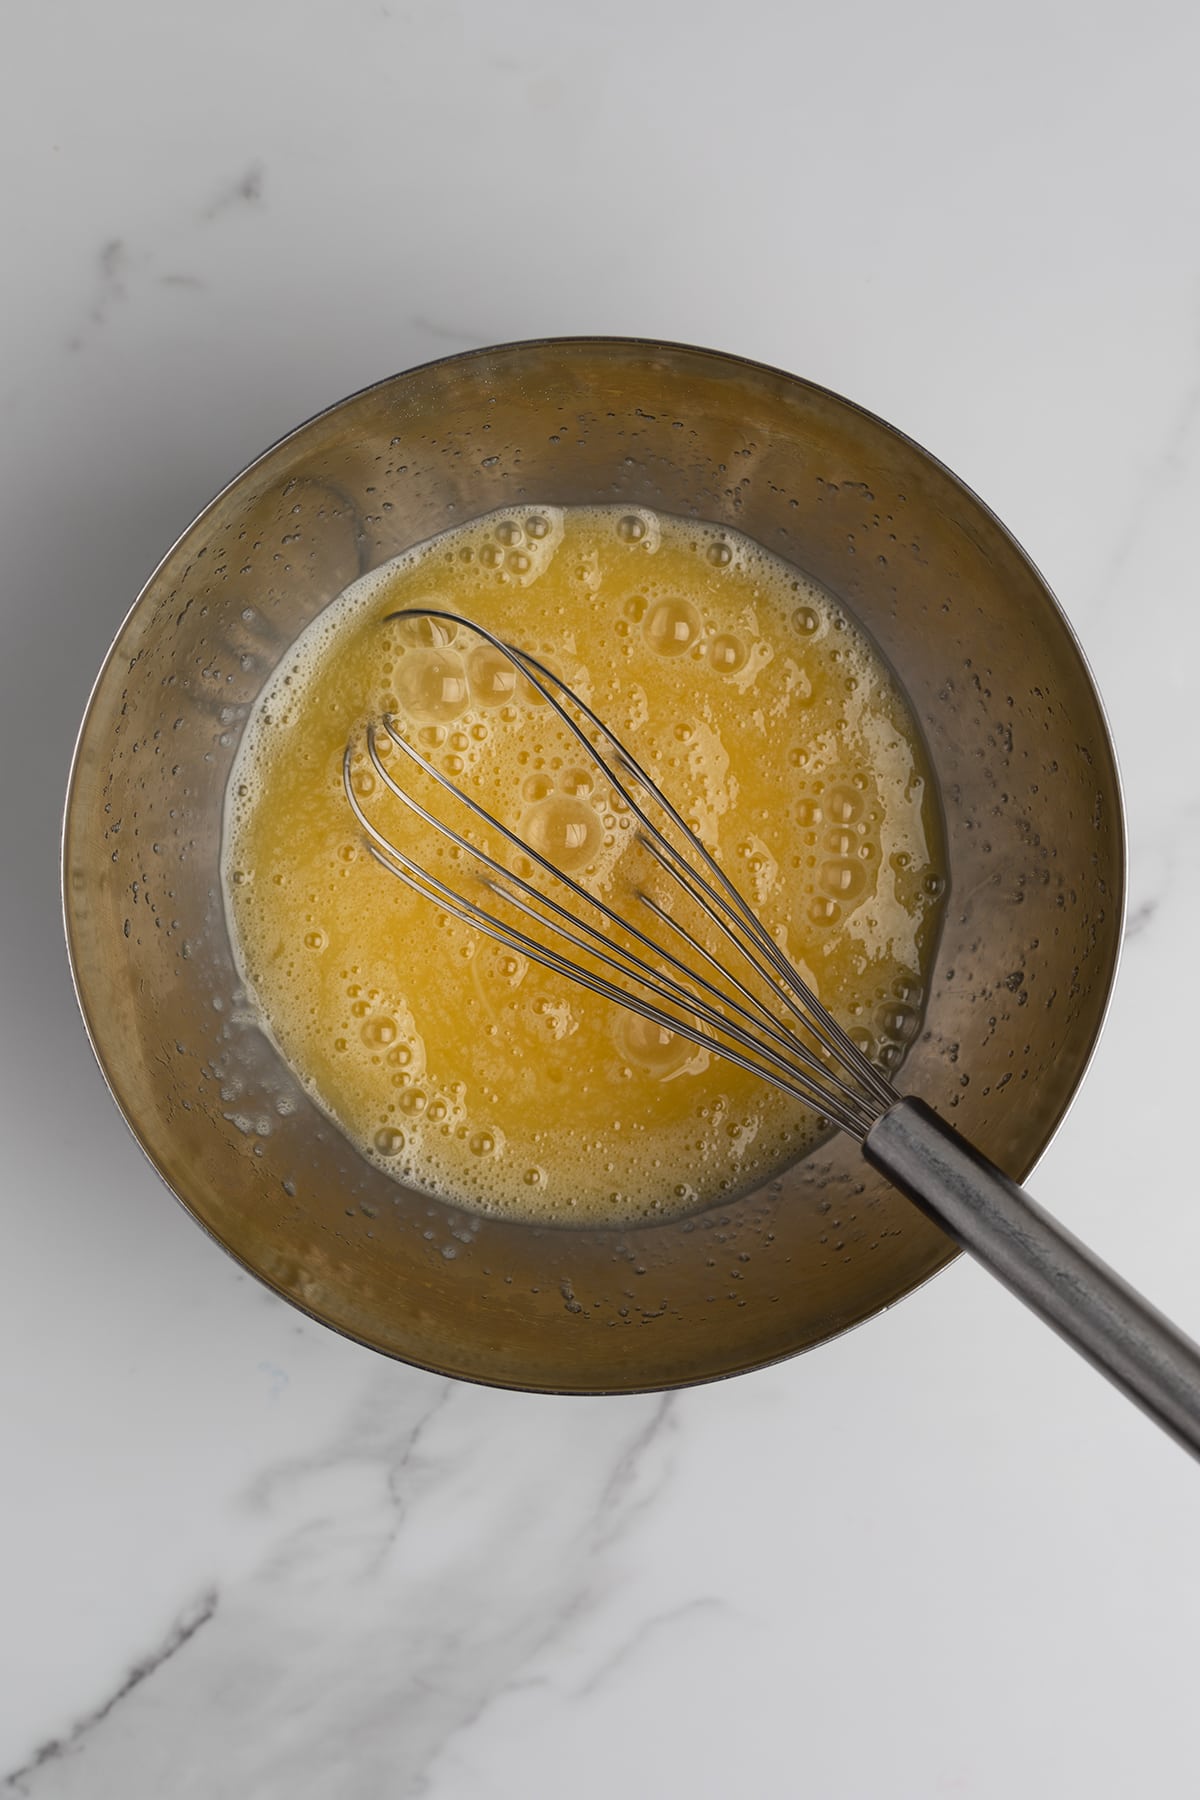
Step 3. Preheat the oven to 350°F (175°C). Place eggs and sugar in the bowl of a stand mixer and lightly beat with a hand whisk.

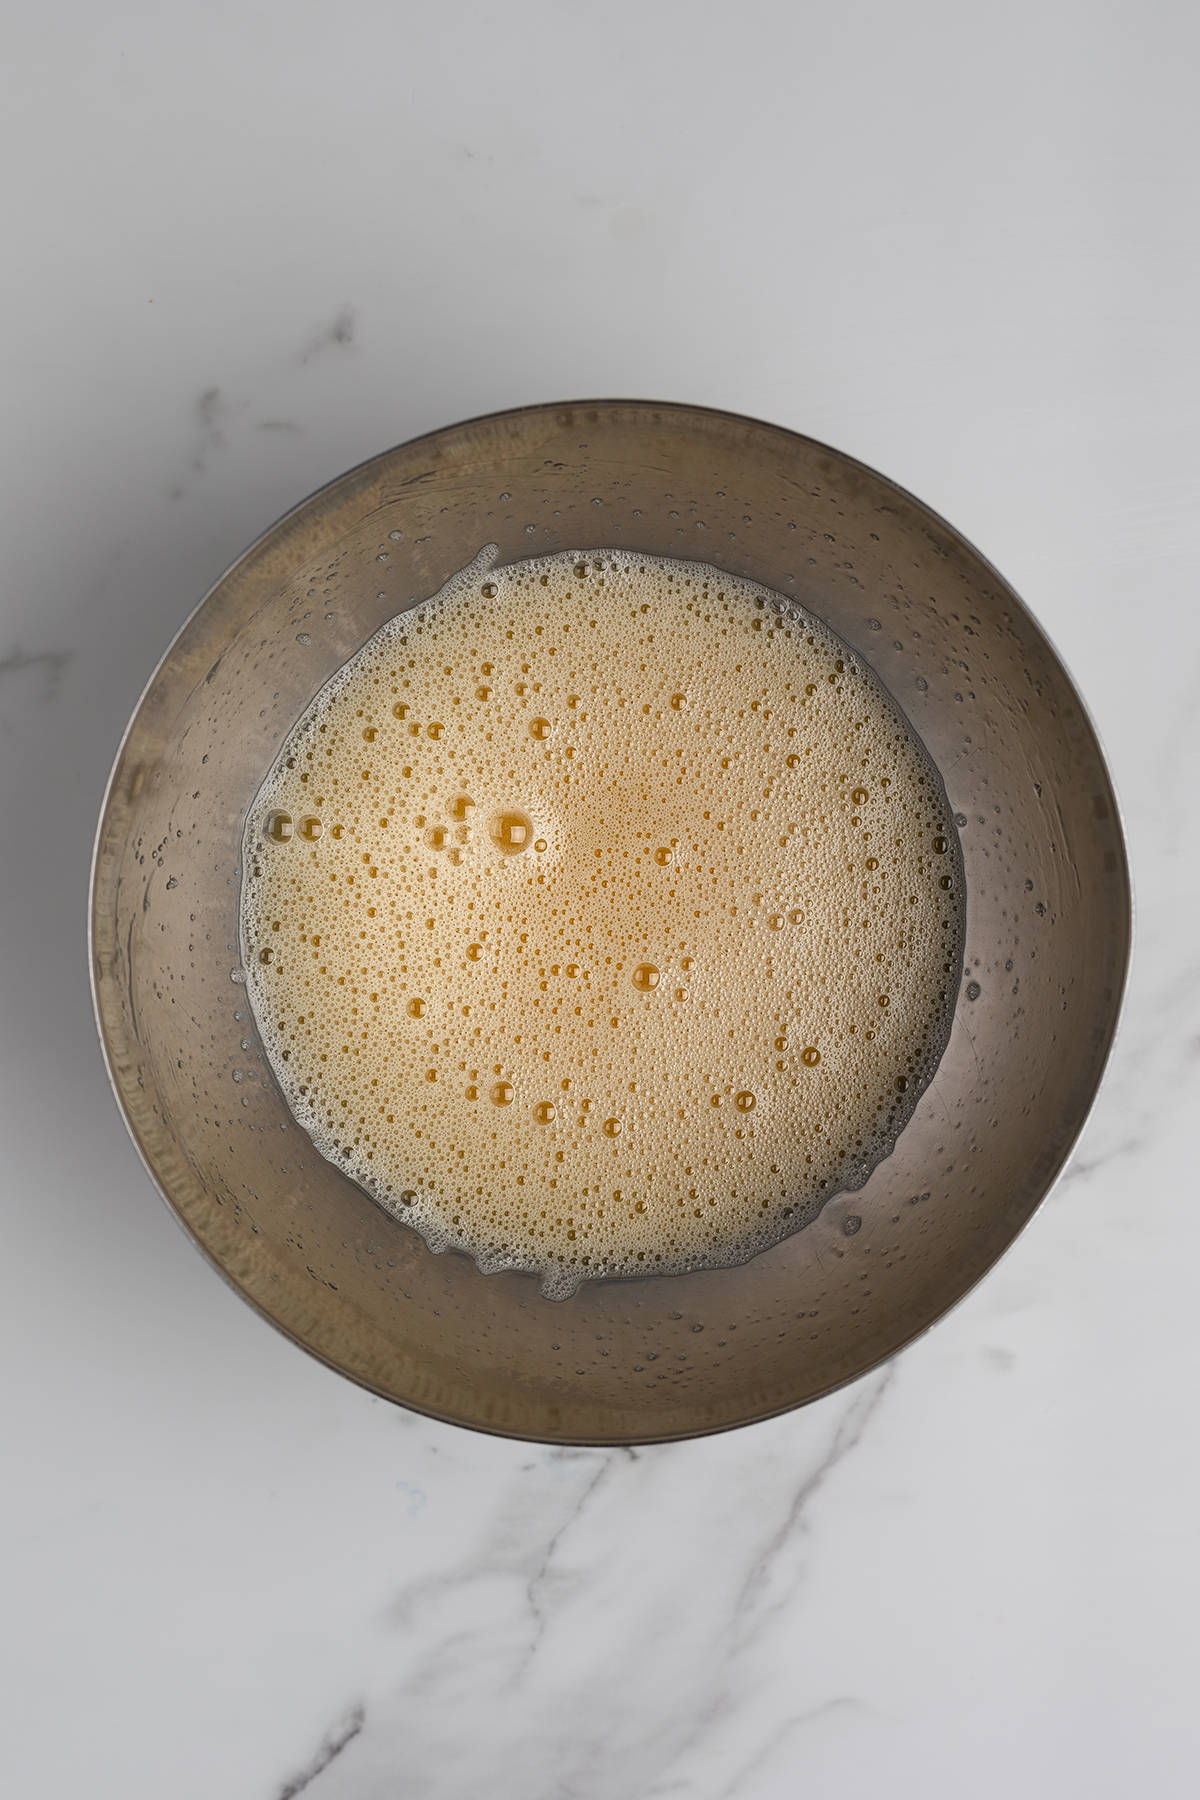
Step 4. Place the bowl over the bain-marie/water bath and heat the mixture to 104°F (40°C) or warm to the touch, constantly whisking.

Step 5. Remove the bowl from the water bath. Fit your stand mixer with a whisk attachment.

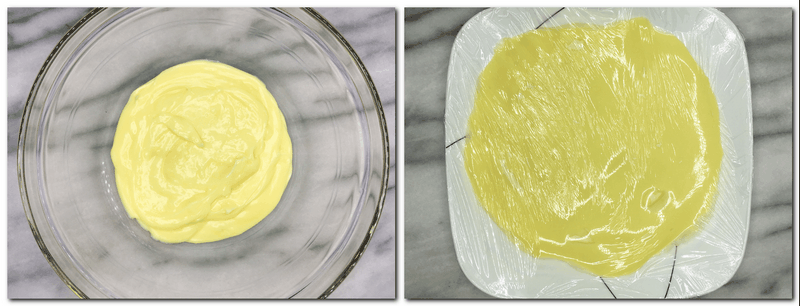
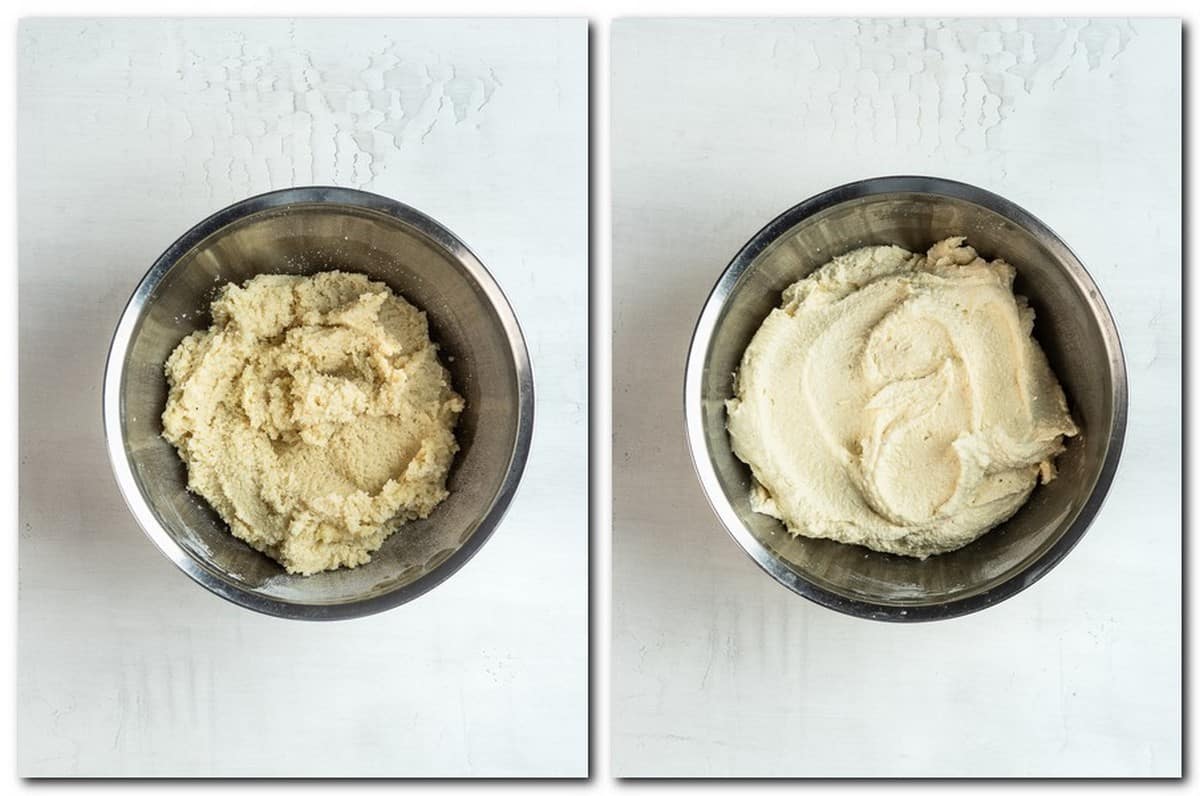
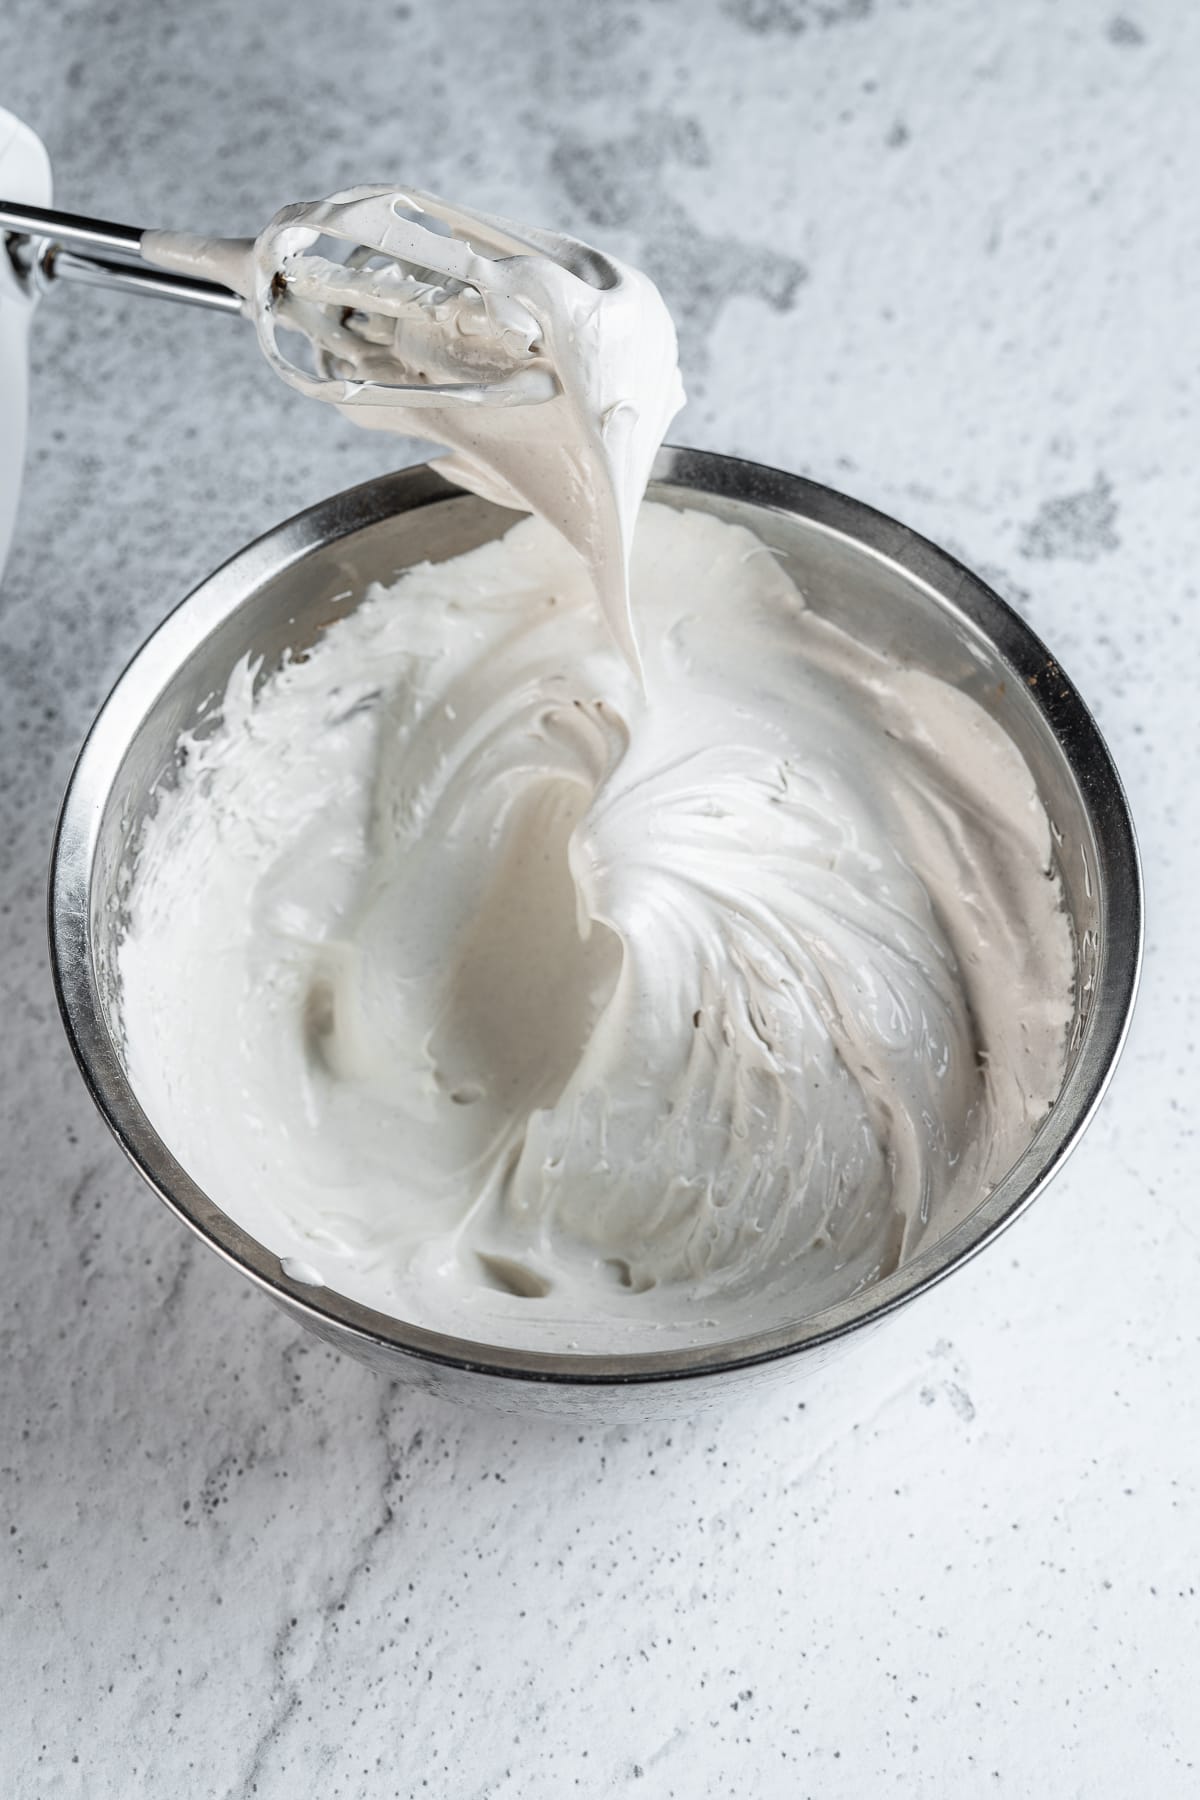
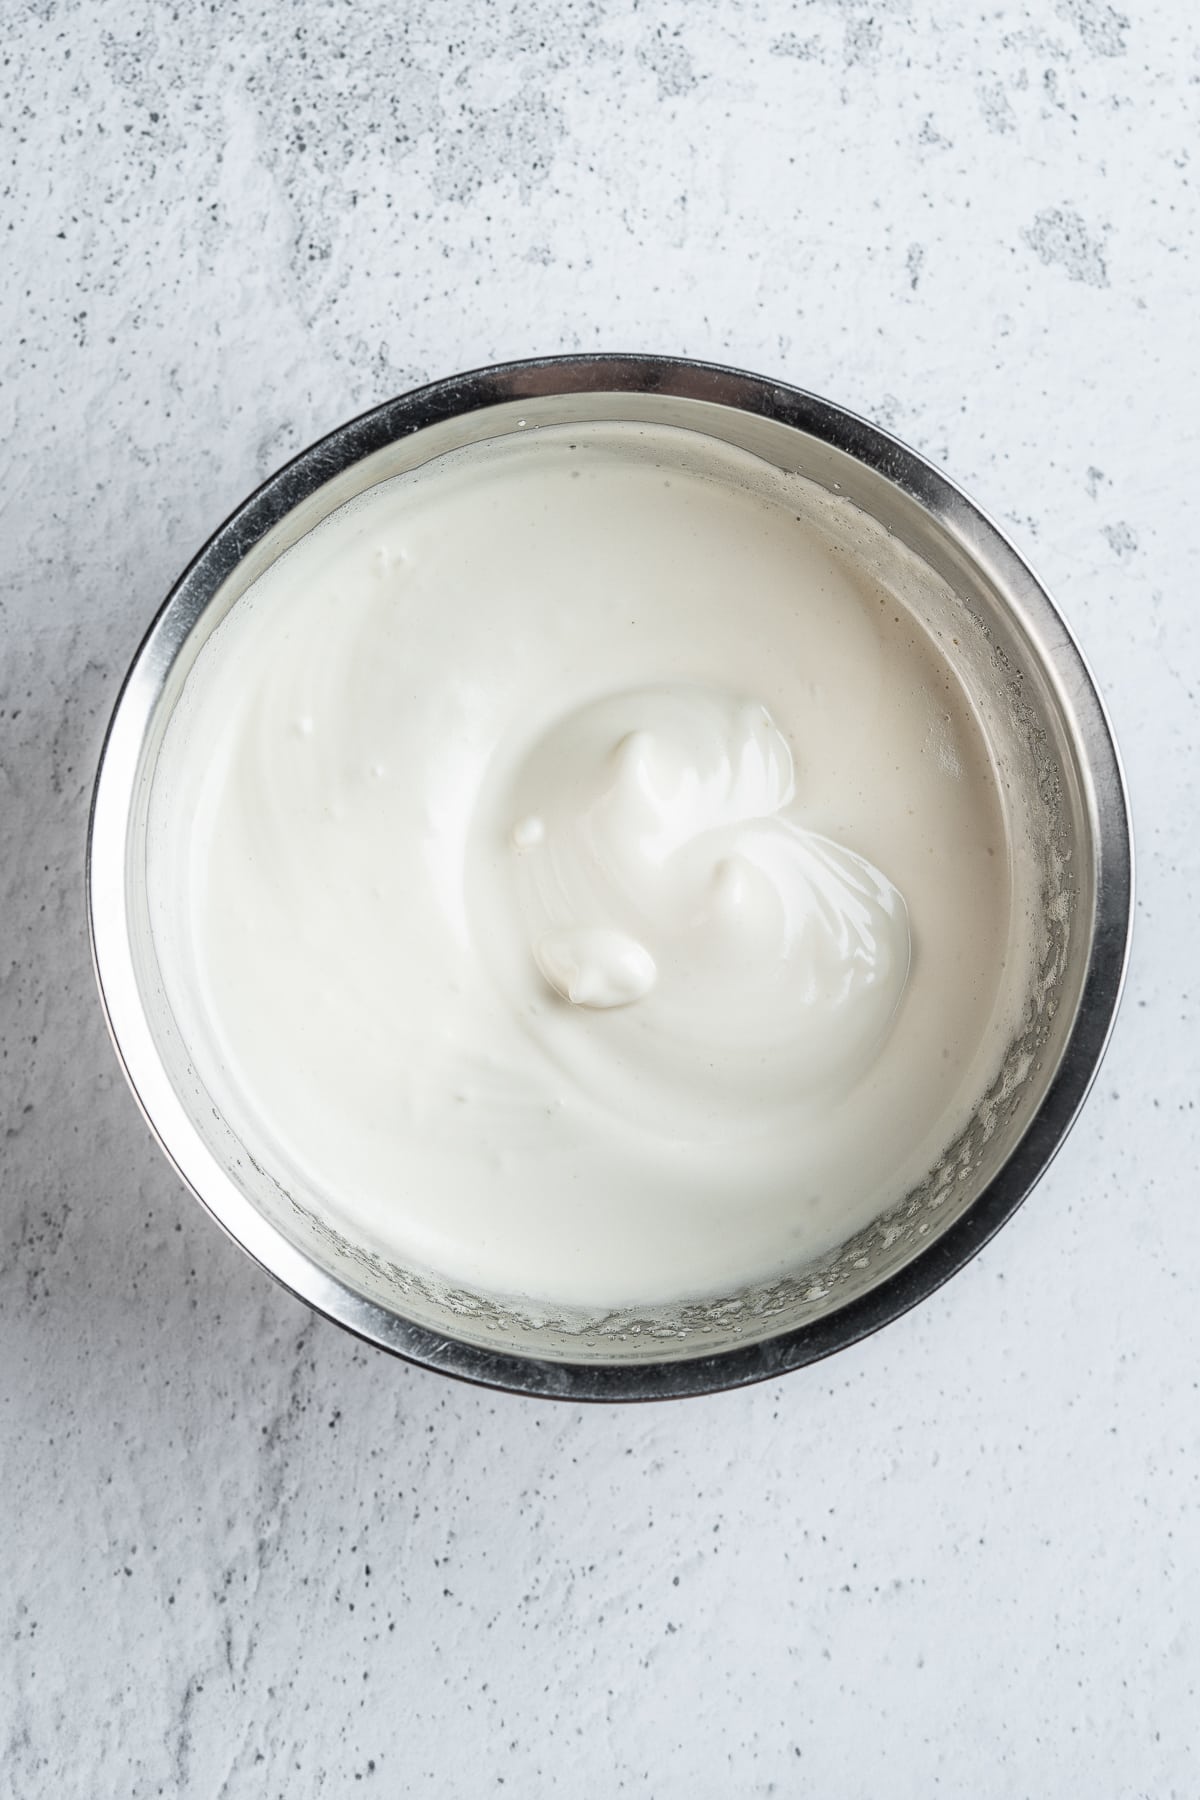
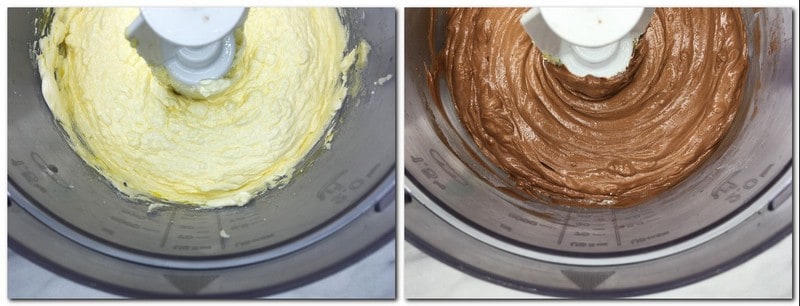
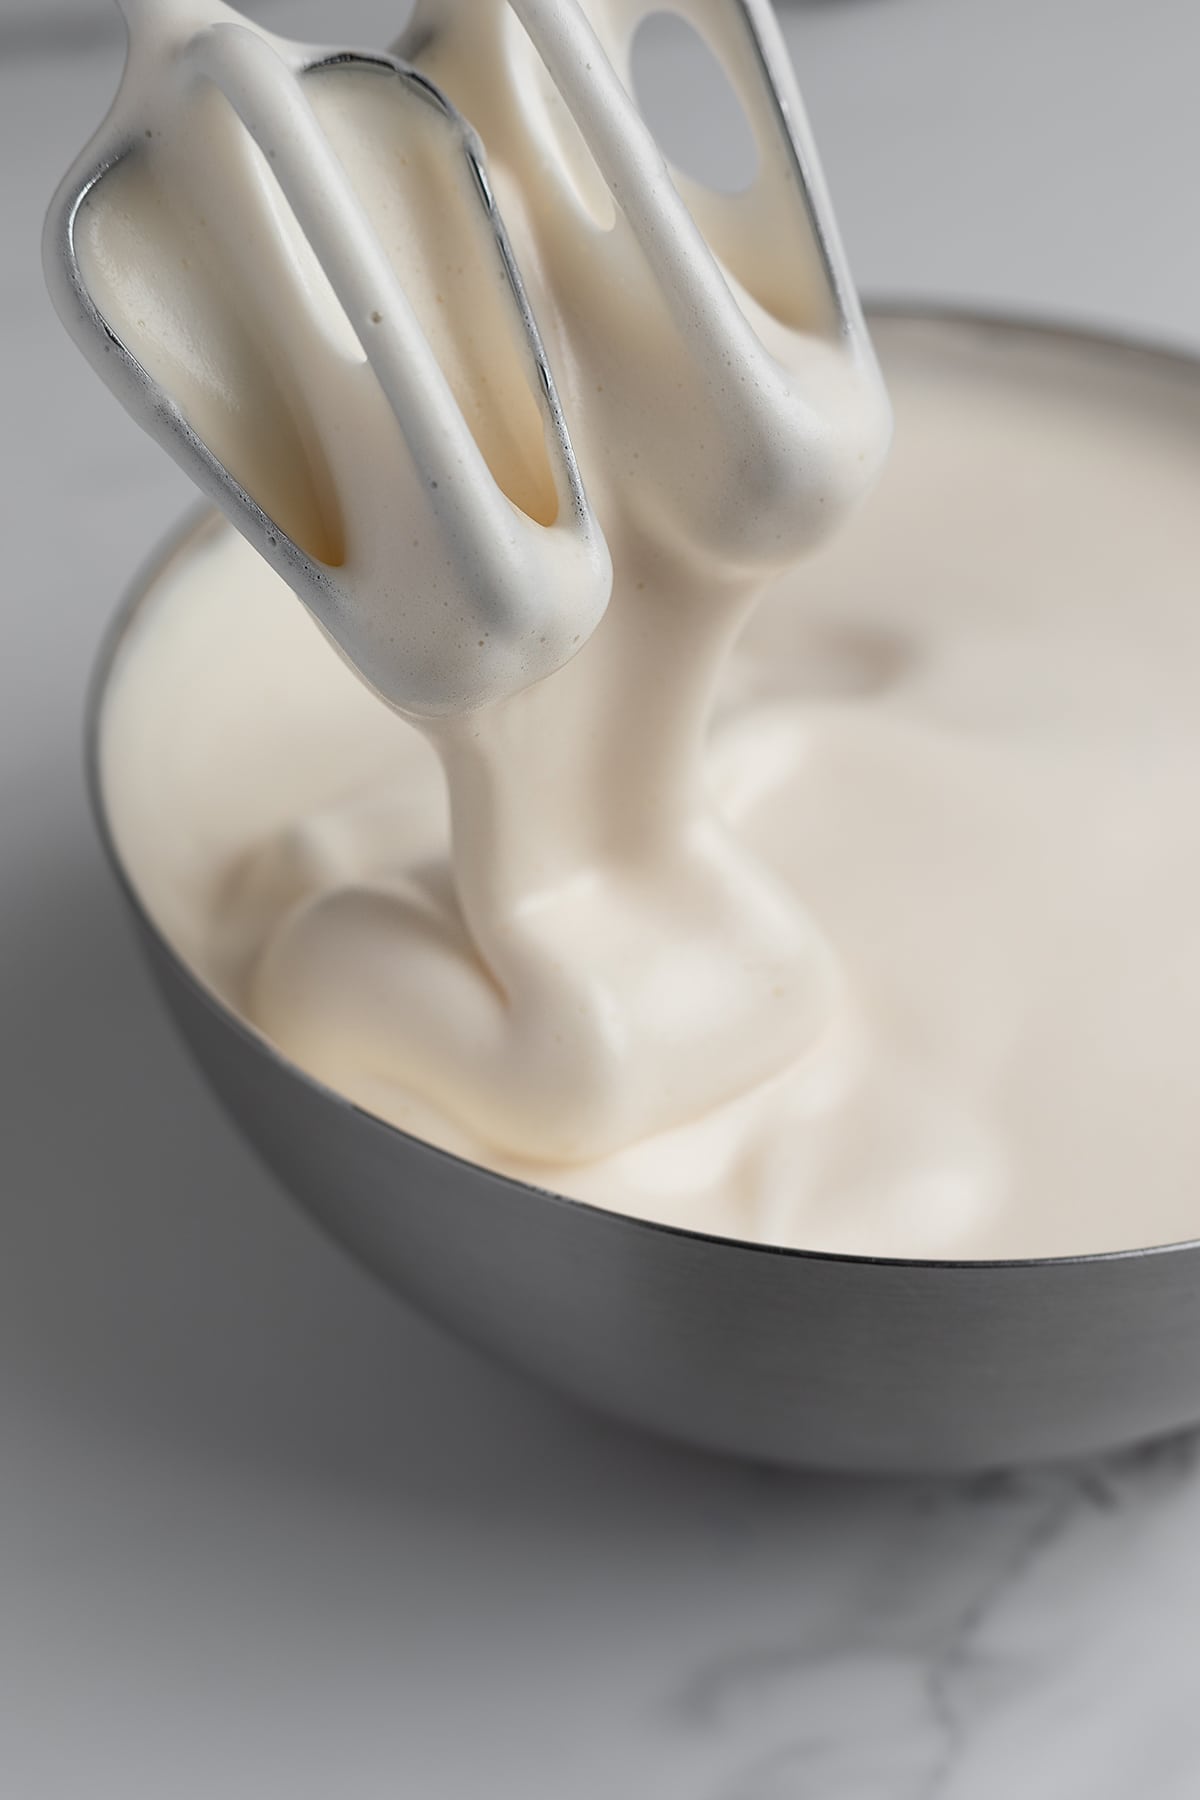
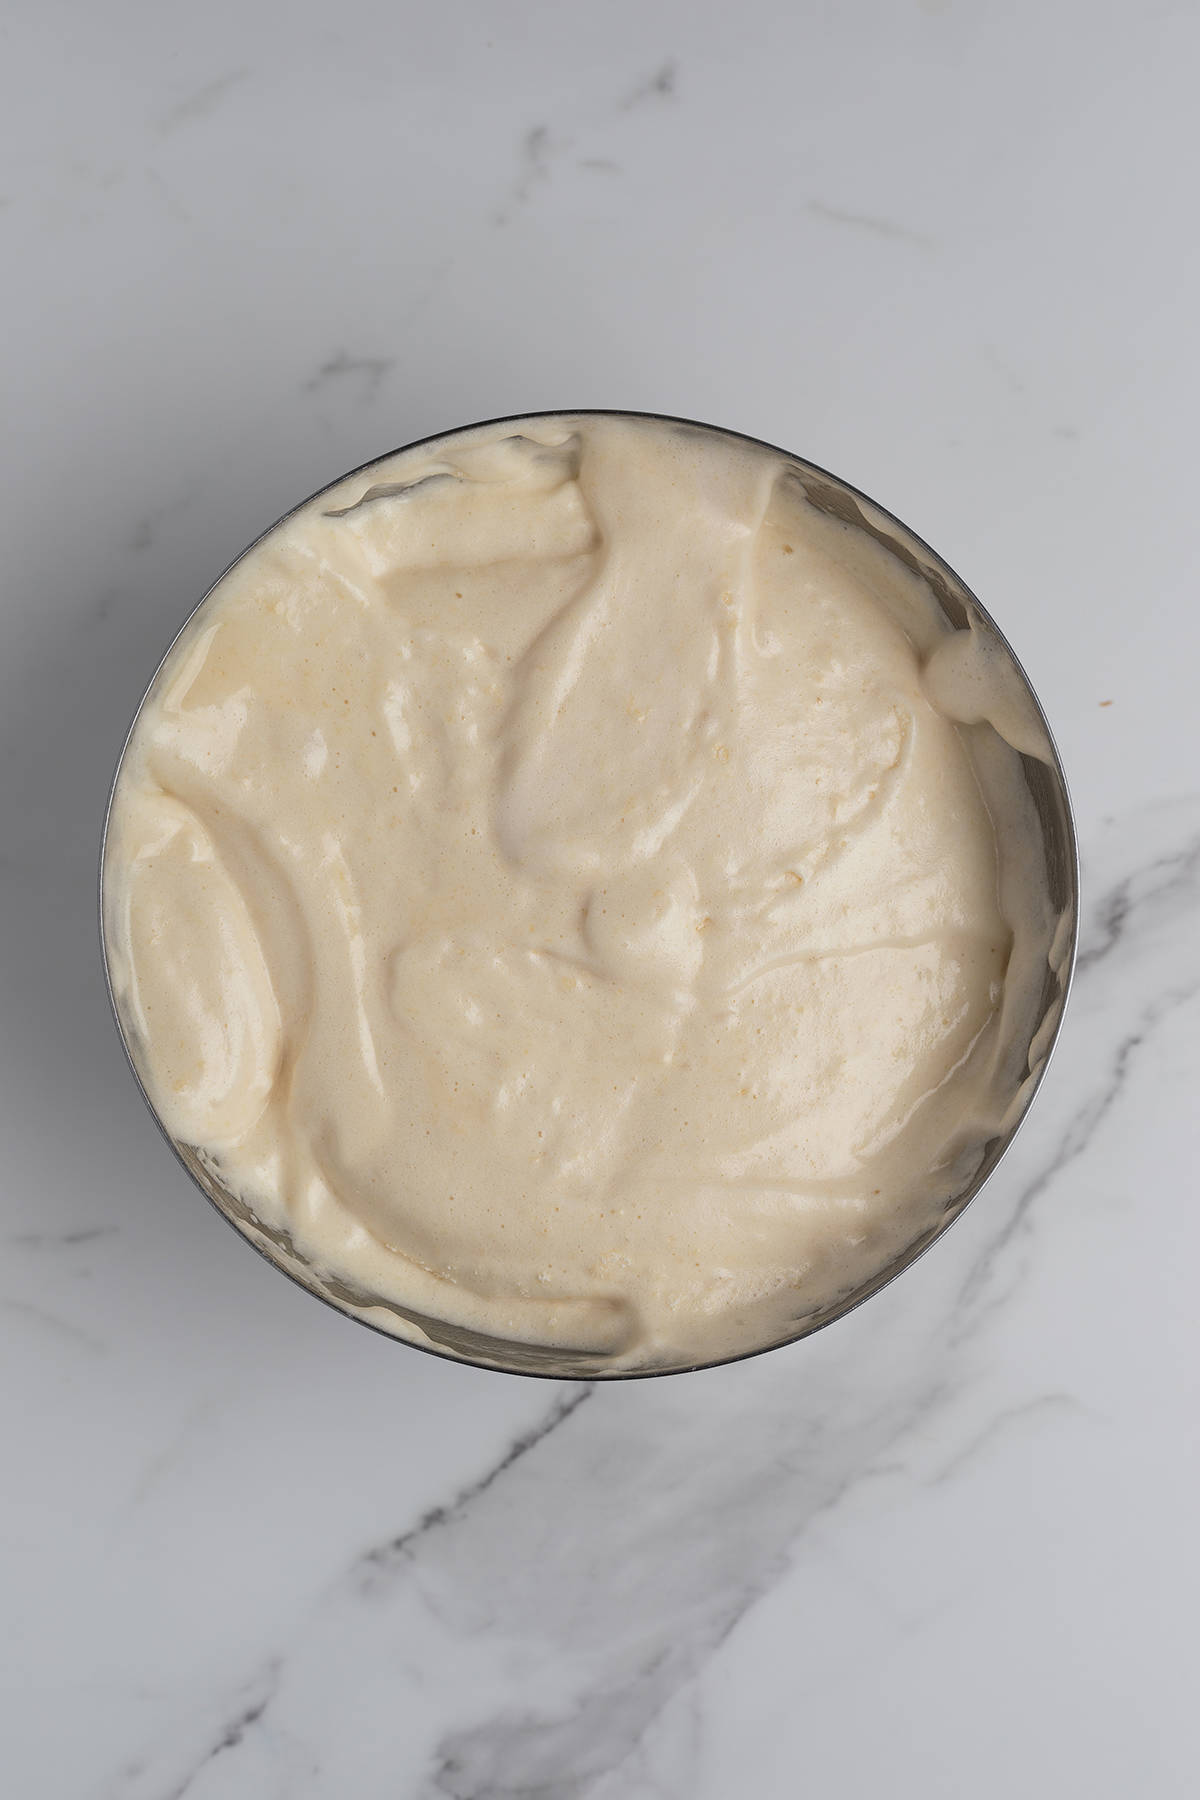
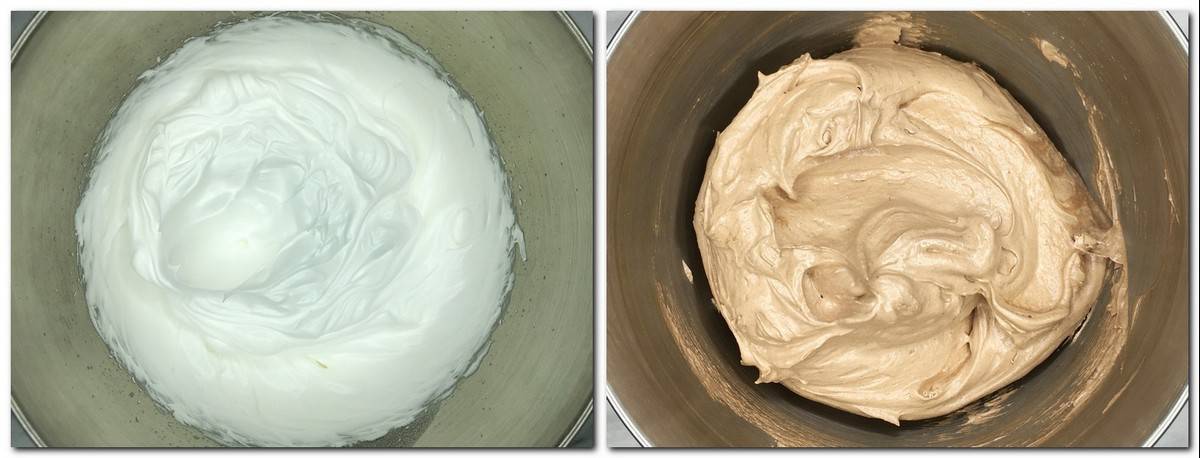
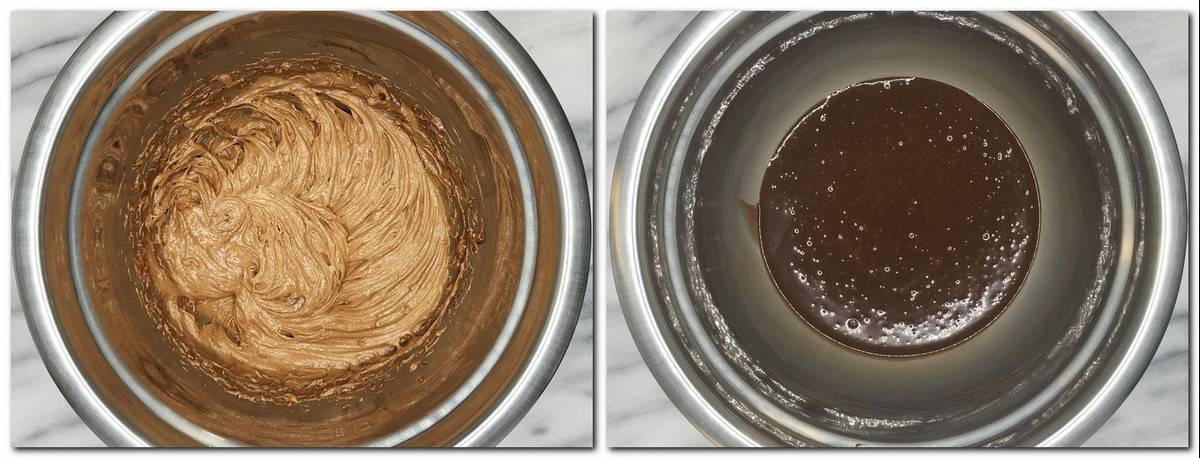
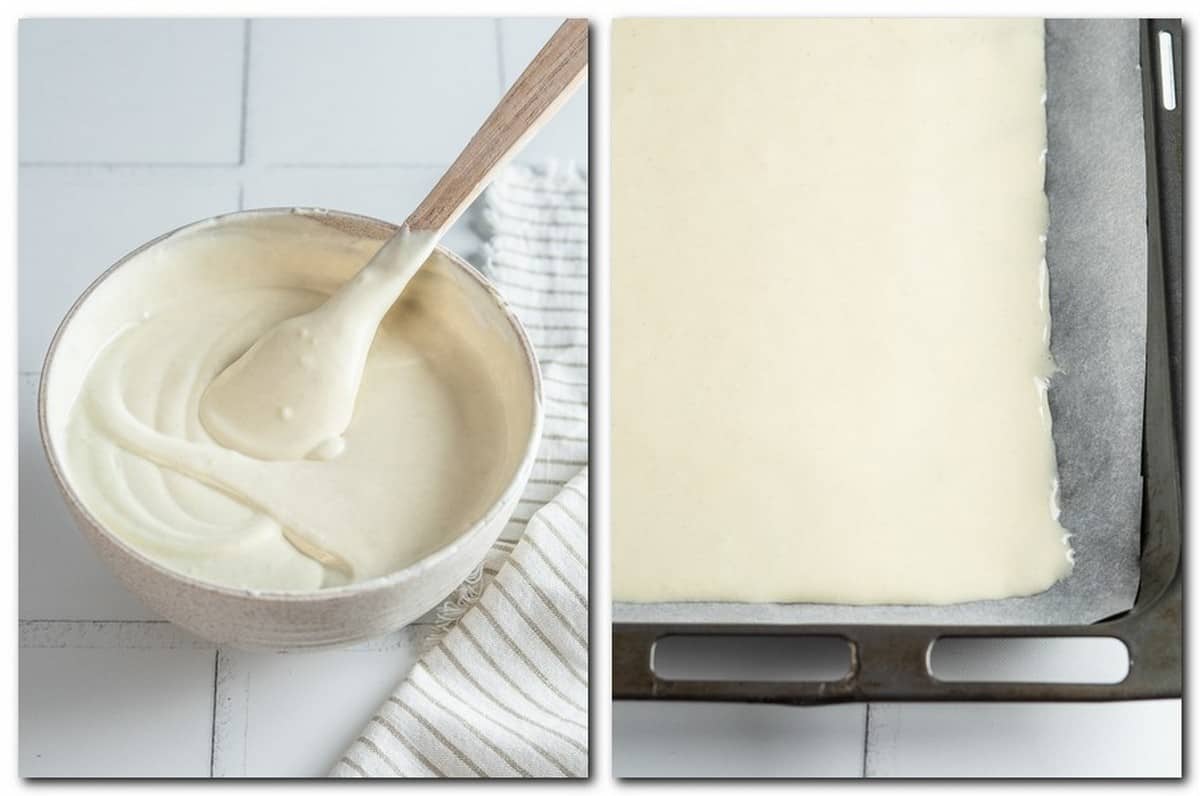
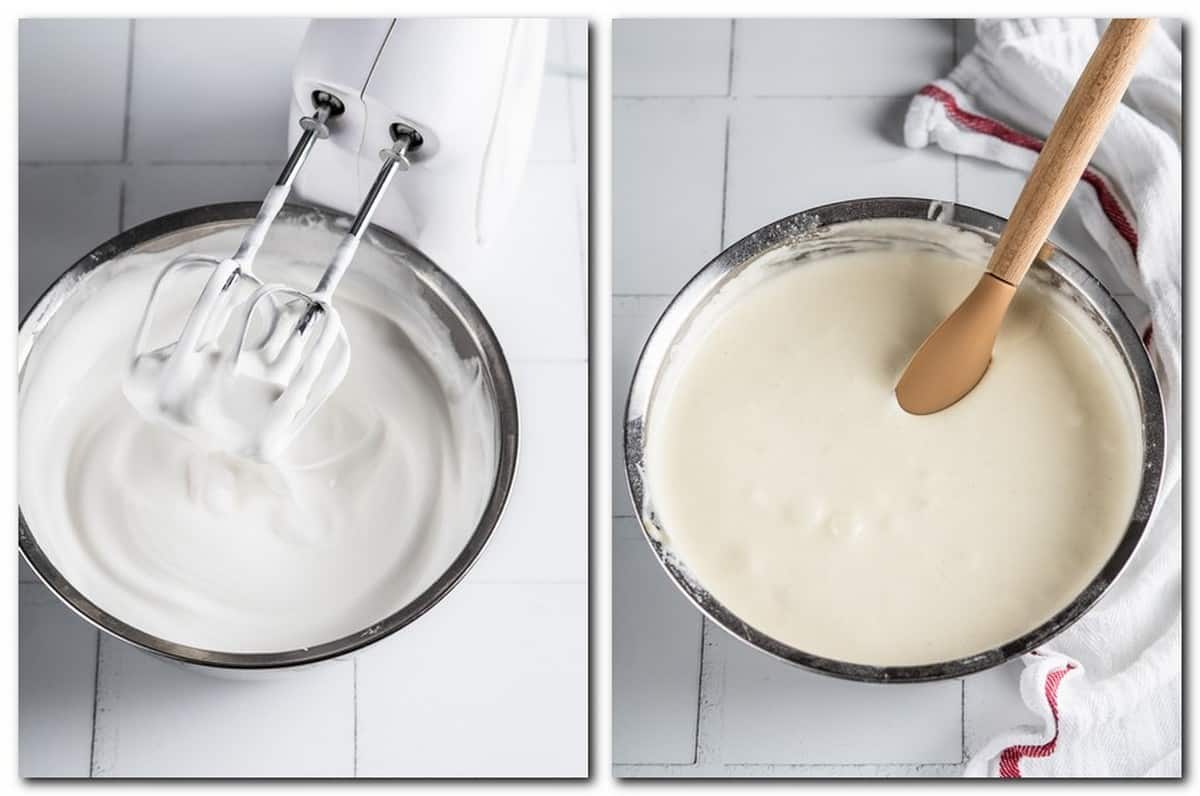
Step 6. Beat the egg mixture for 5 minutes at high speed and 10 to 15 minutes at medium speed until the ribbon stage (photo 1).

Step 7. Sift one-third of the flour over the surface of the mixture. Mix with a rubber spatula, going from the center to the edge, with gentle folding motions.

Pro tip: Fold in the flour slowly and carefully. Also, rotate the bowl with the other hand while mixing the batter.

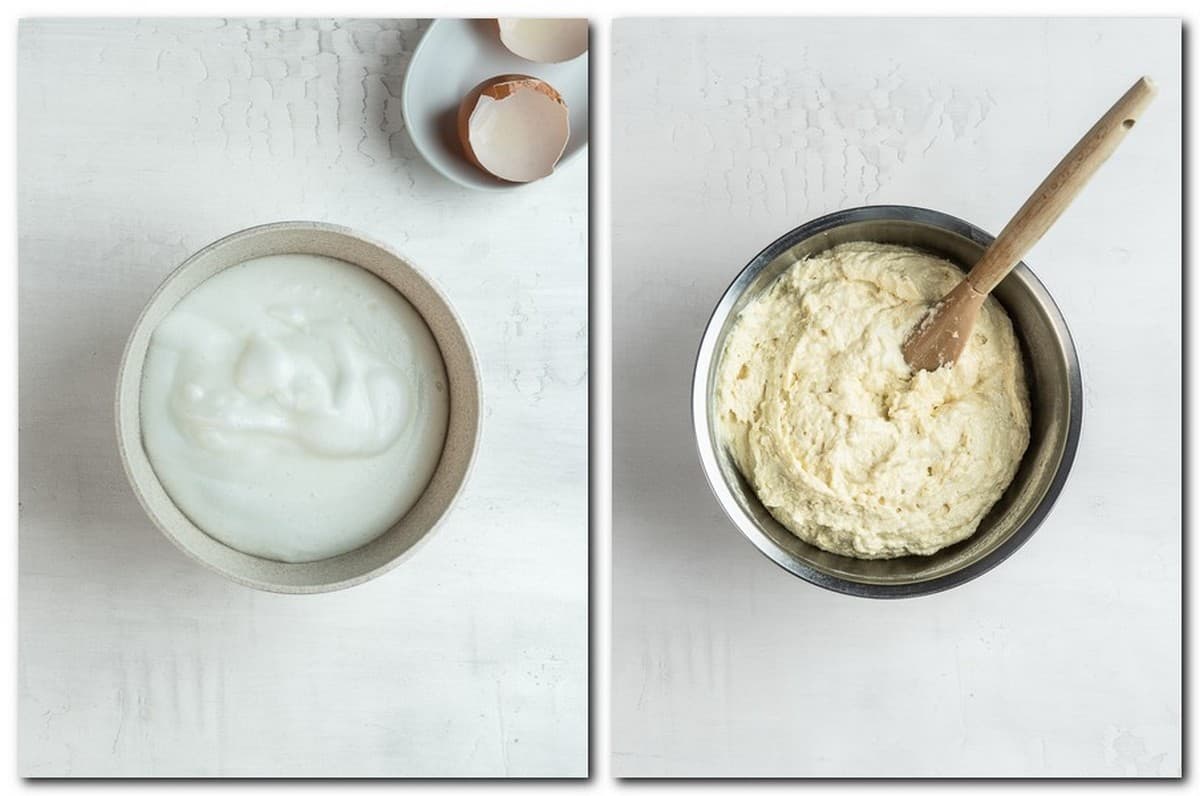
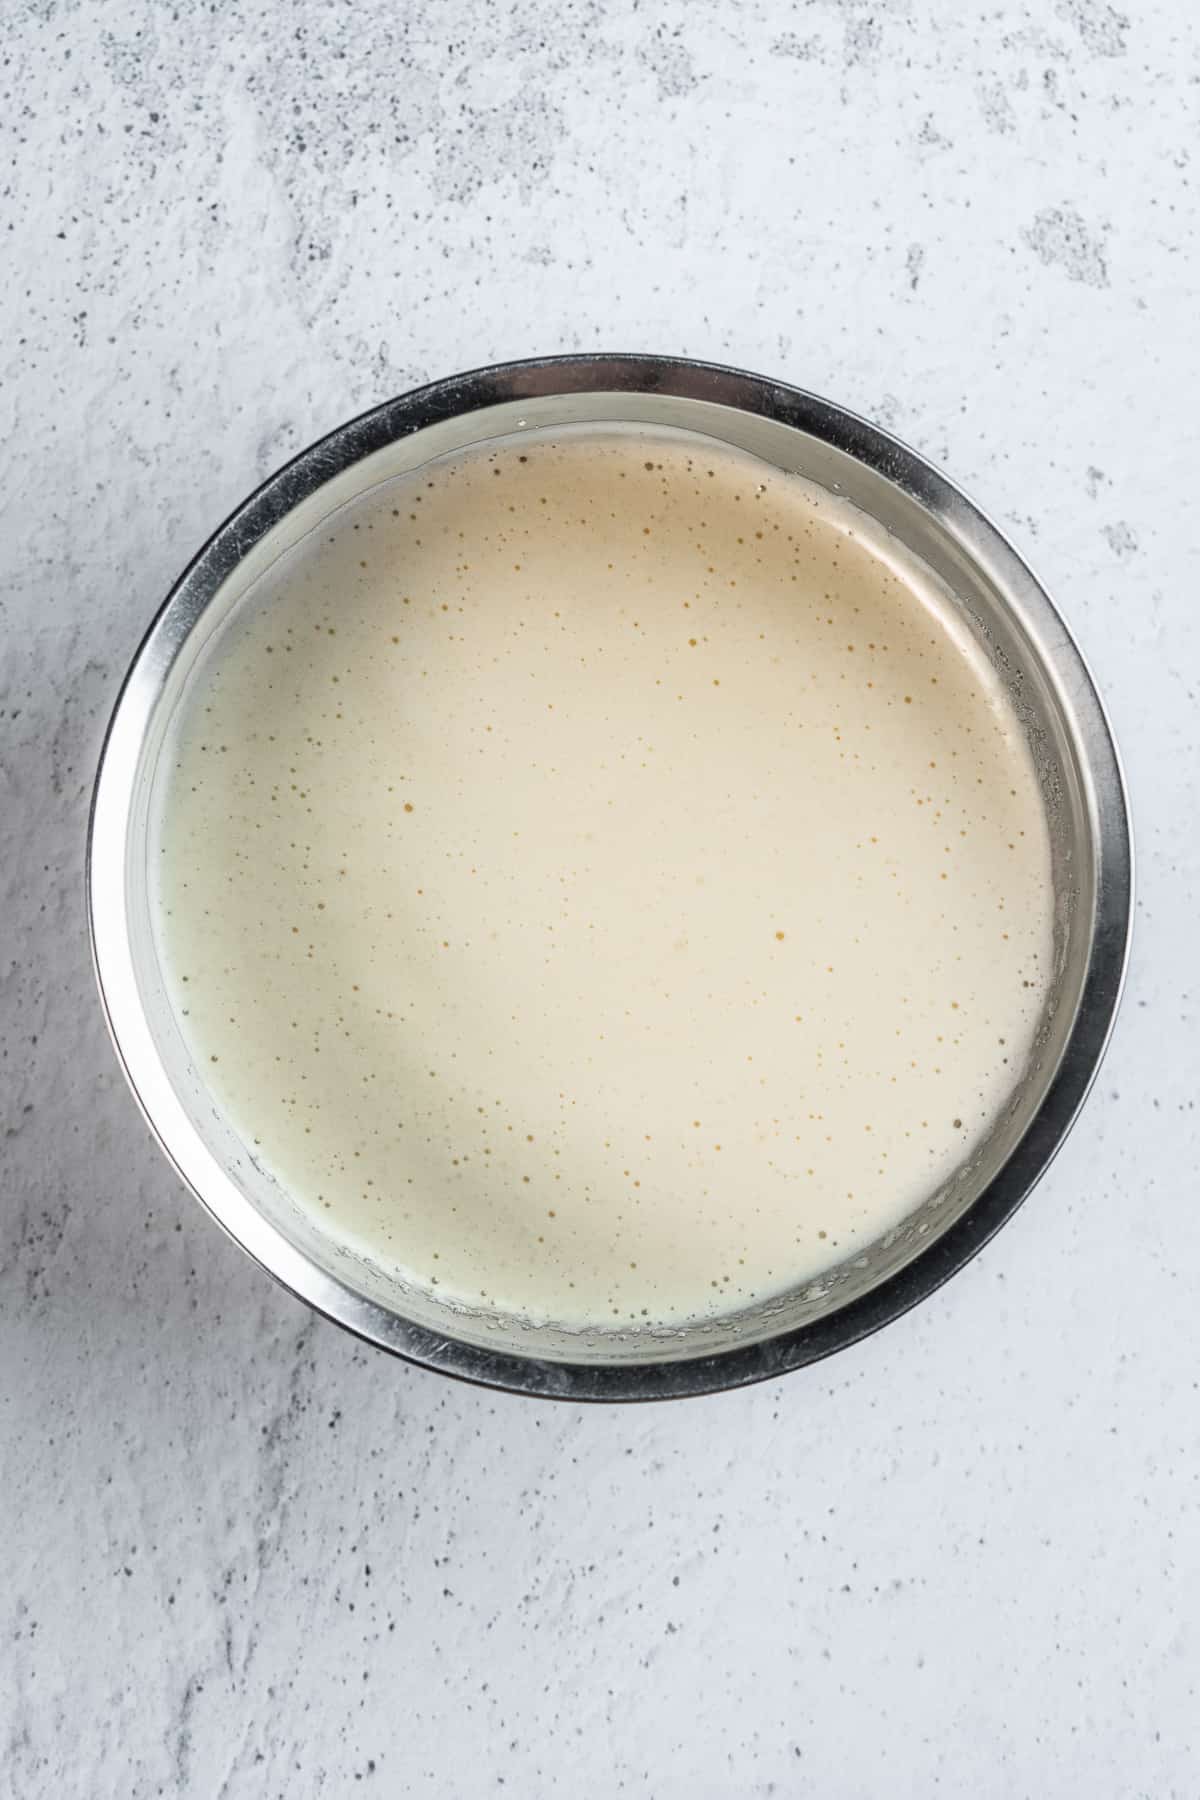
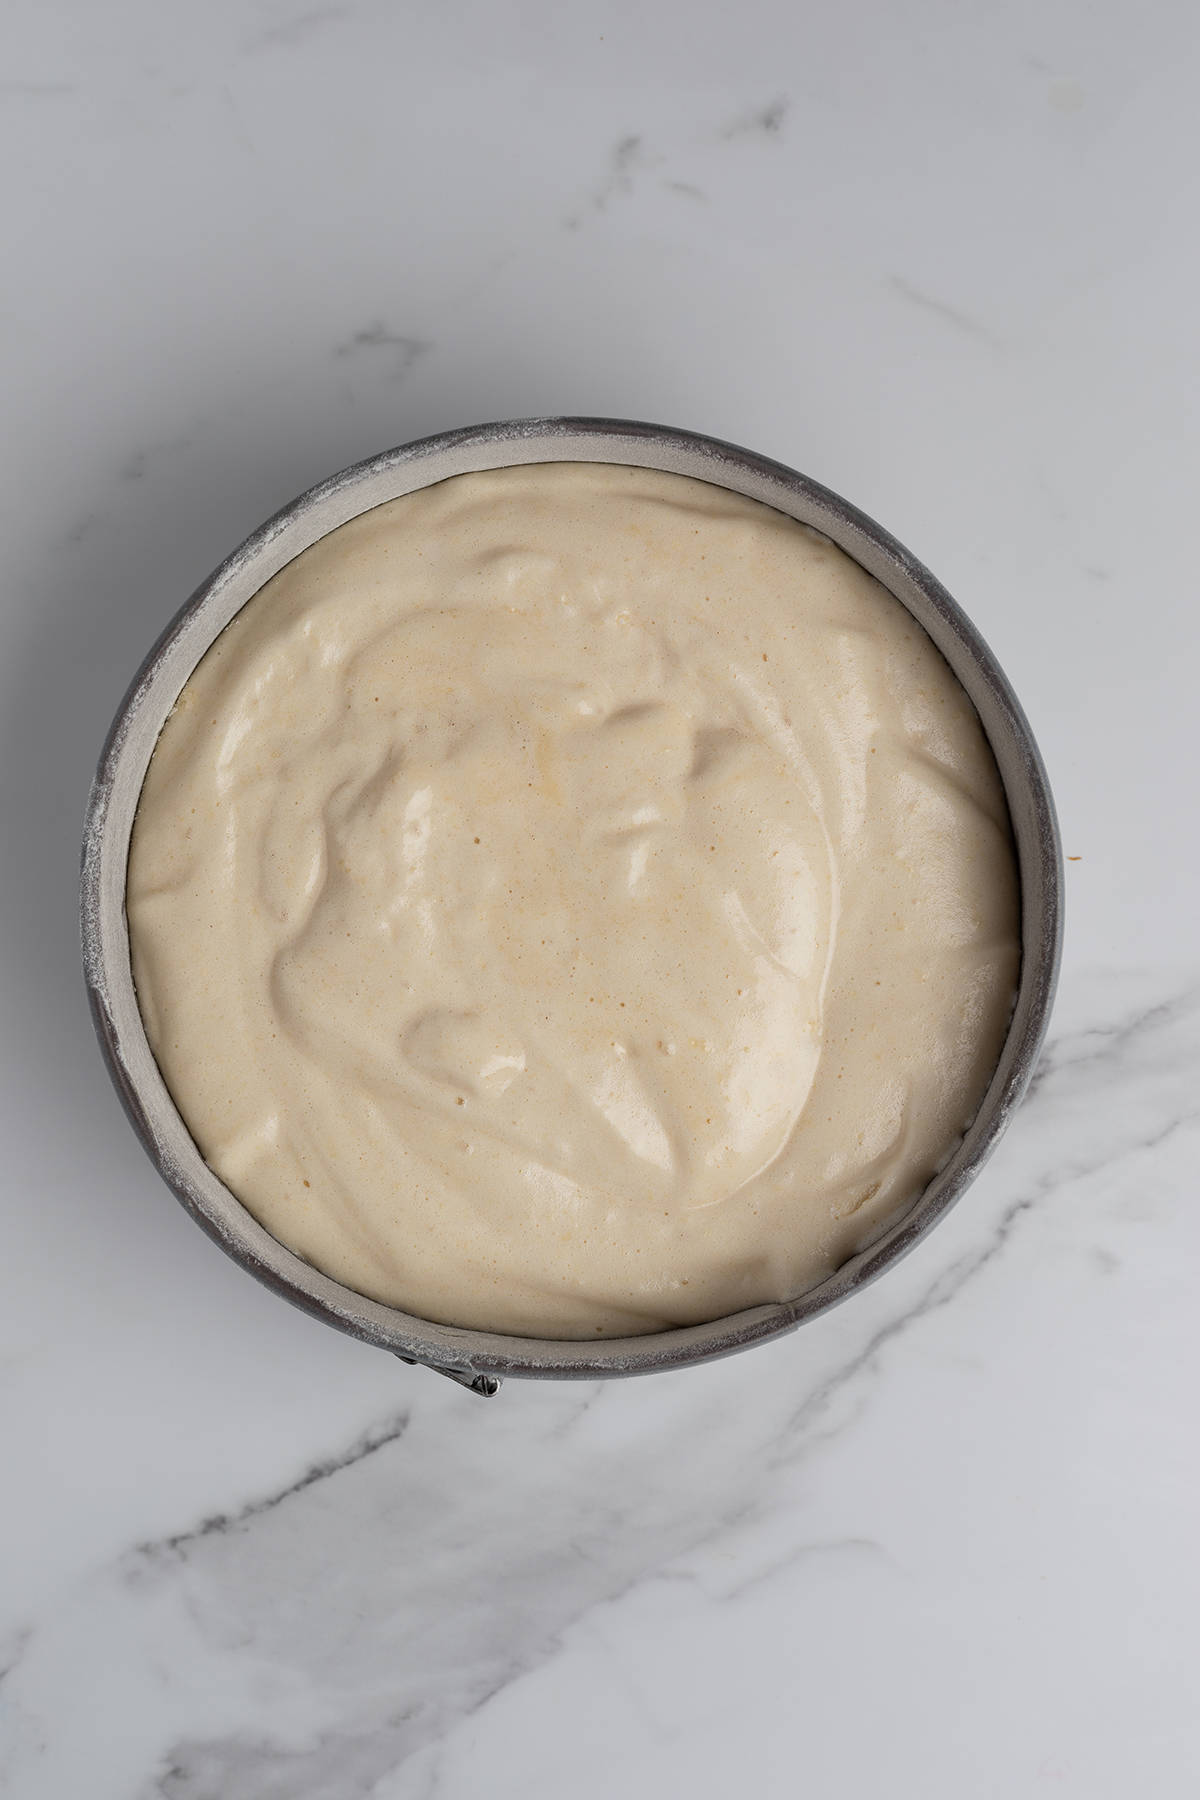
Step 8. Whisk the oil and milk with a fork. Pour ⅓ of the mixture into the batter and gently mix (photo 2). Alternate dry and liquid ingredients until the batter is creamy and homogeneous.

Beaten egg mixture in a bowl with a ribbon stage on mixer beaters.

PHOTO 1

Cake batter in a bowl.

PHOTO 2

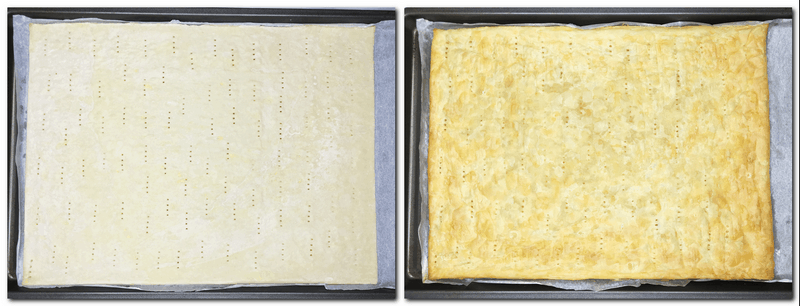
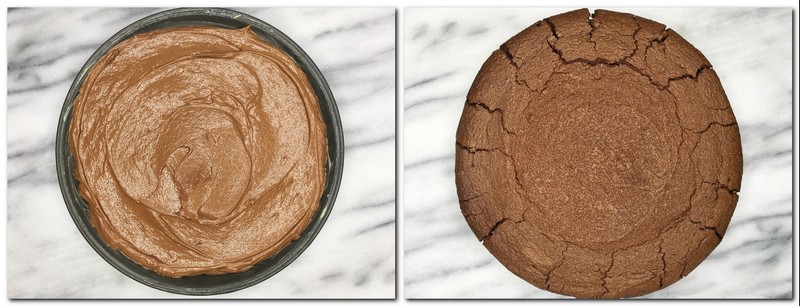
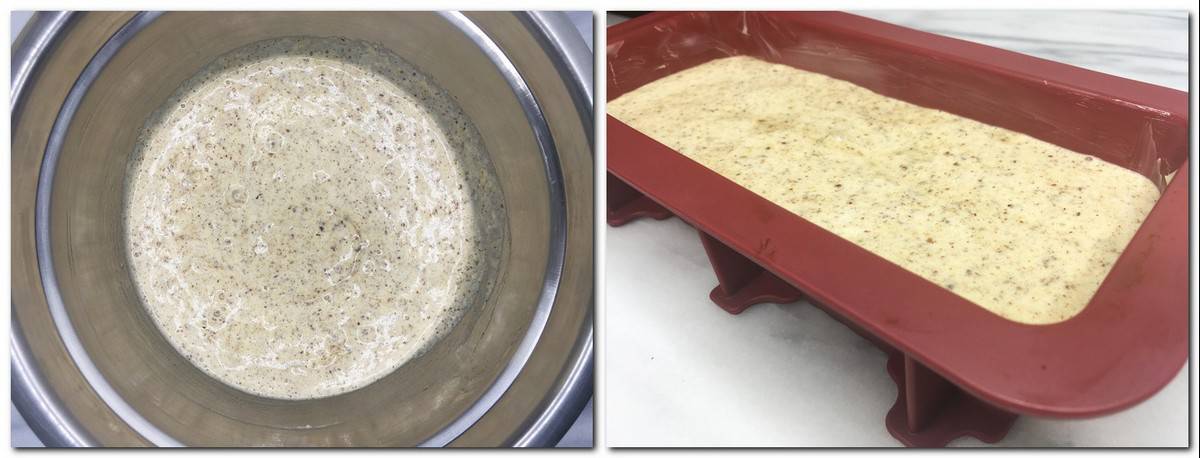
Step 9. Pour the batter into the prepared tin (photo 3).

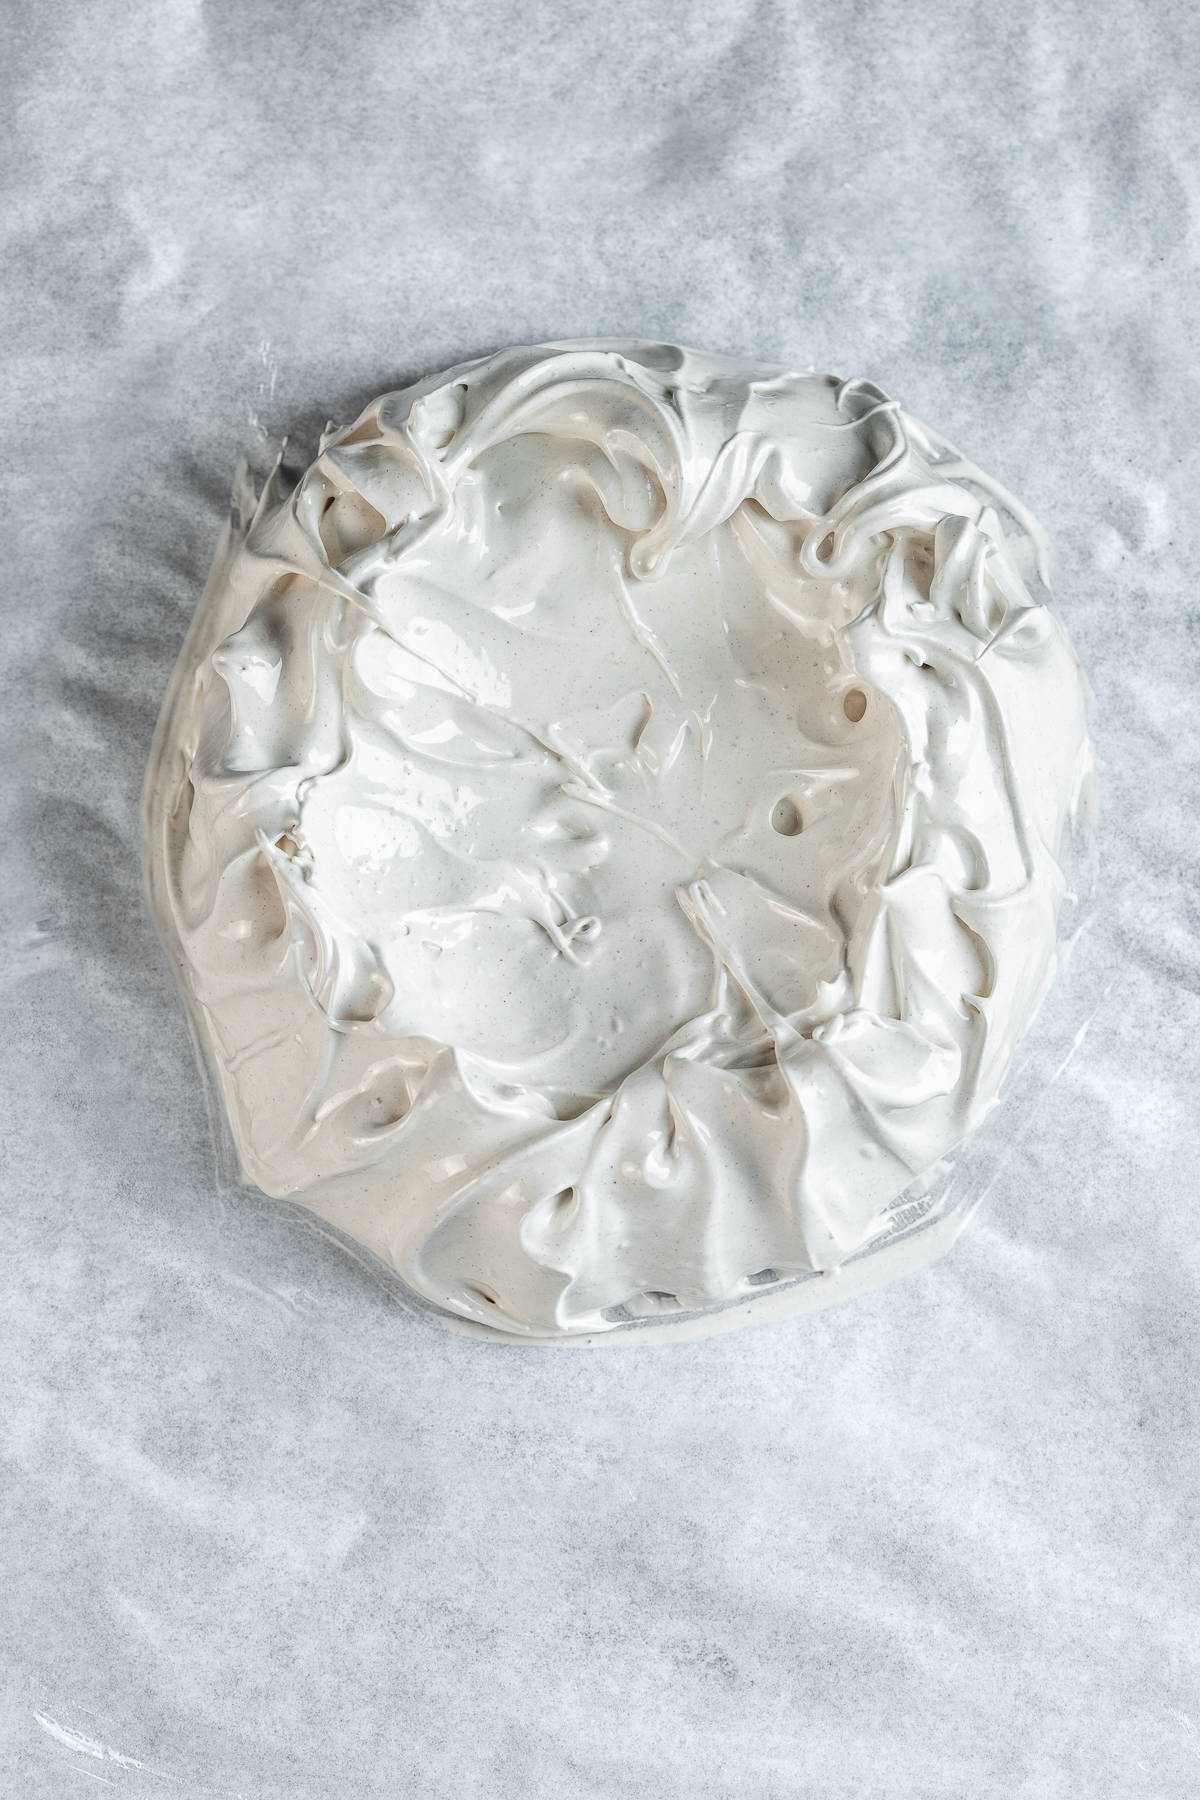
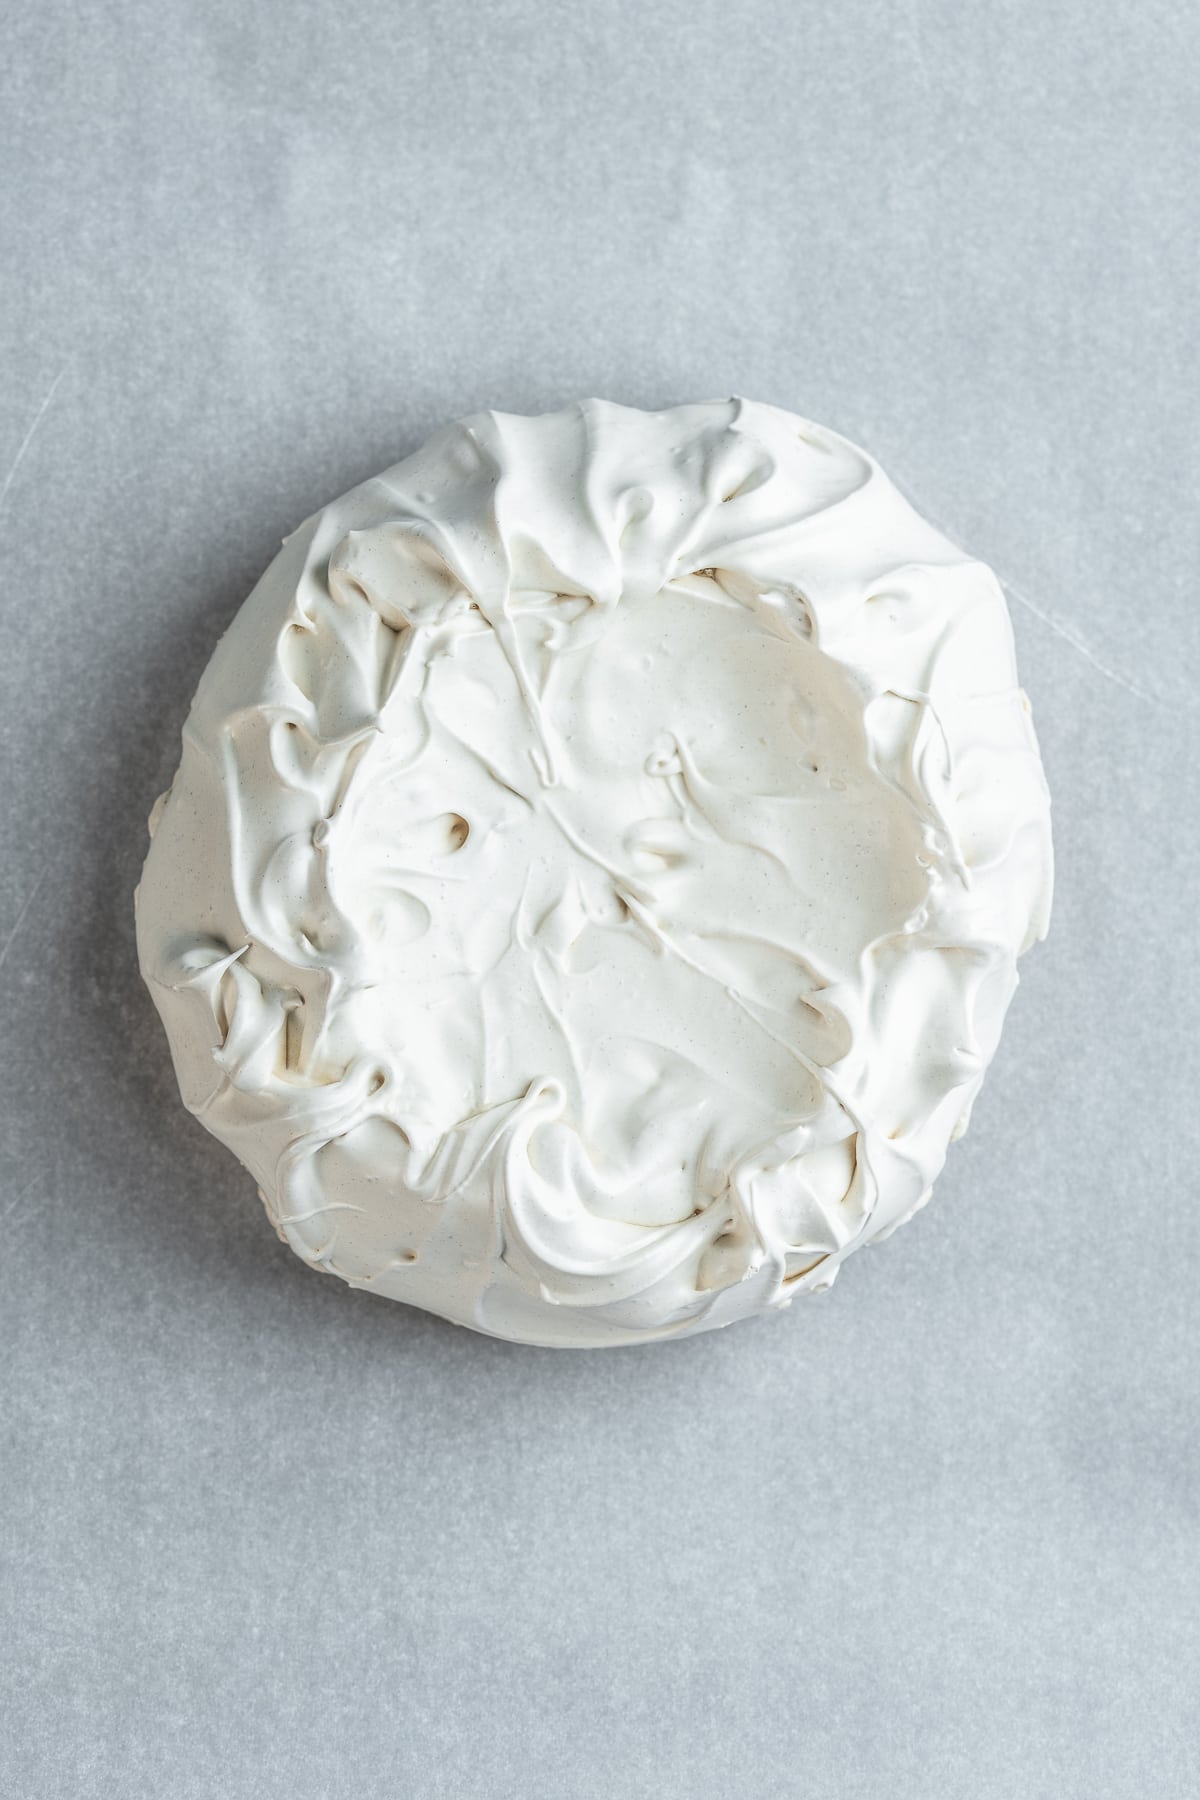
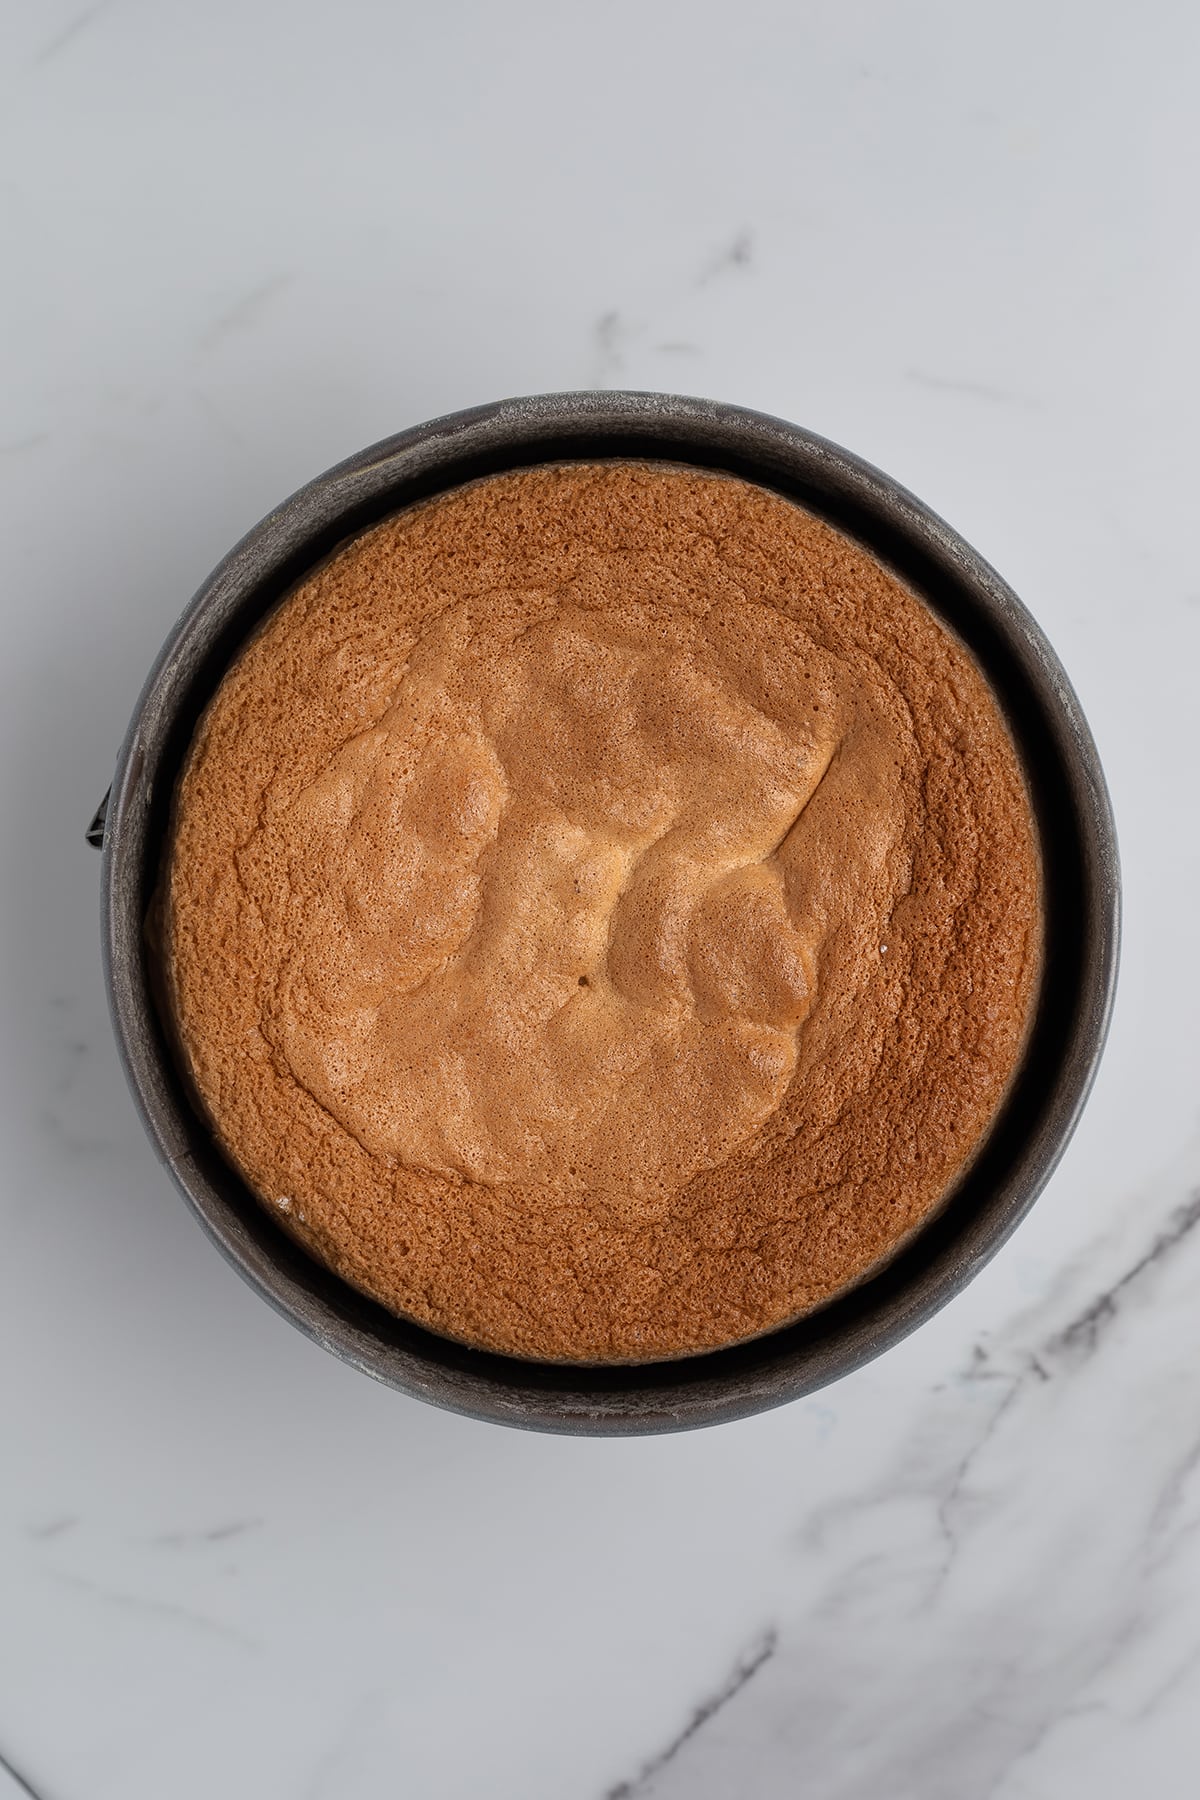
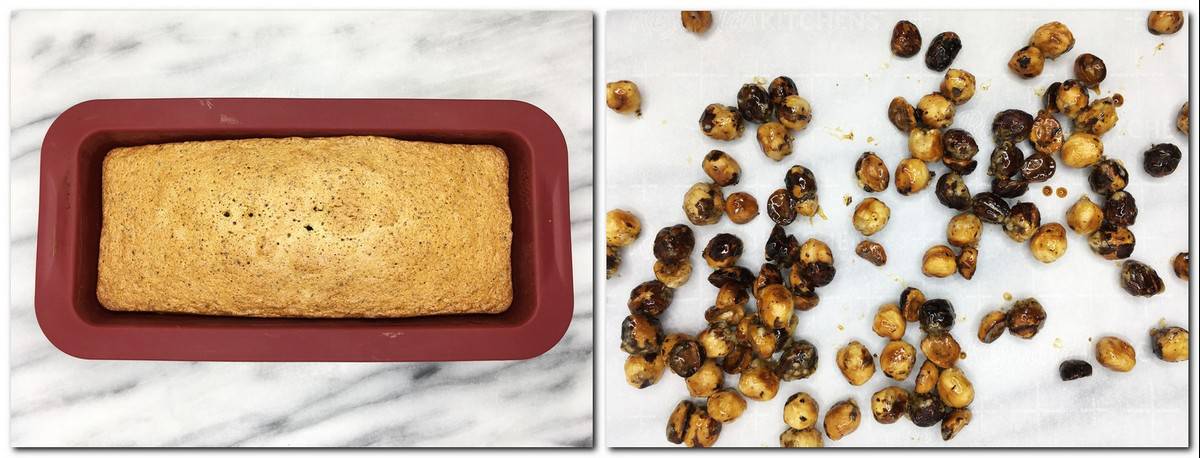
Step 10. Bake for 30 to 35 minutes (photo 4).

Pro tip: Check the doneness of the cake with a cake tester or a toothpick. If it is inserted in the center of the cake and comes out clean or with a few crumbs, the cake is ready.

Cake batter in a springform pan.

PHOTO 3

Baked cake with olive oil in a pan.

PHOTO 4

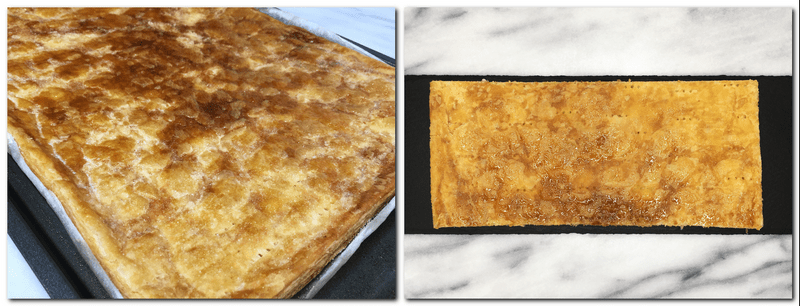
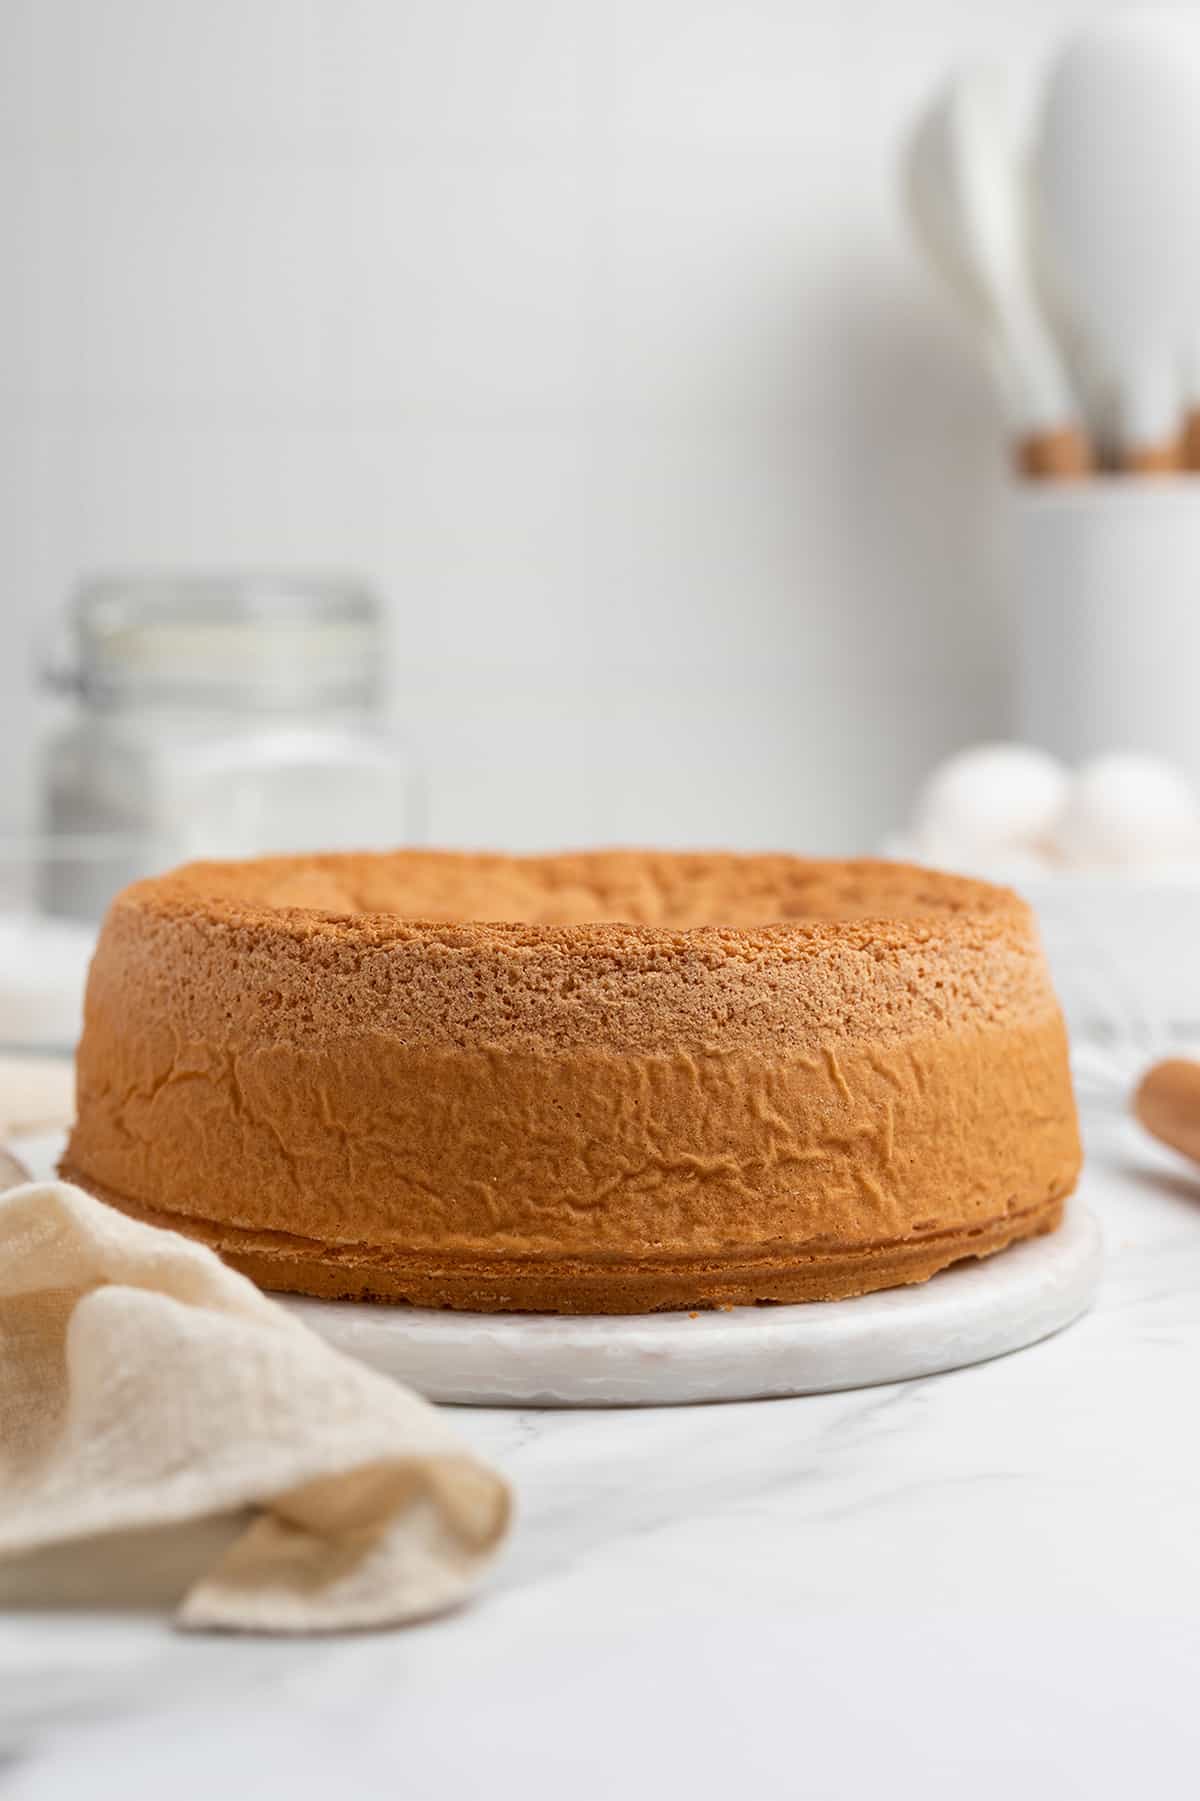
Step 11. Remove the cake from the oven and let it cool in the mold for 5 to 10 minutes. It should shrink slightly around the edges of the mold.

Step 12. Unmold the cake by turning the baking pan upside down. Next, remove the parchment paper and invert it again, placing it on a serving platter.

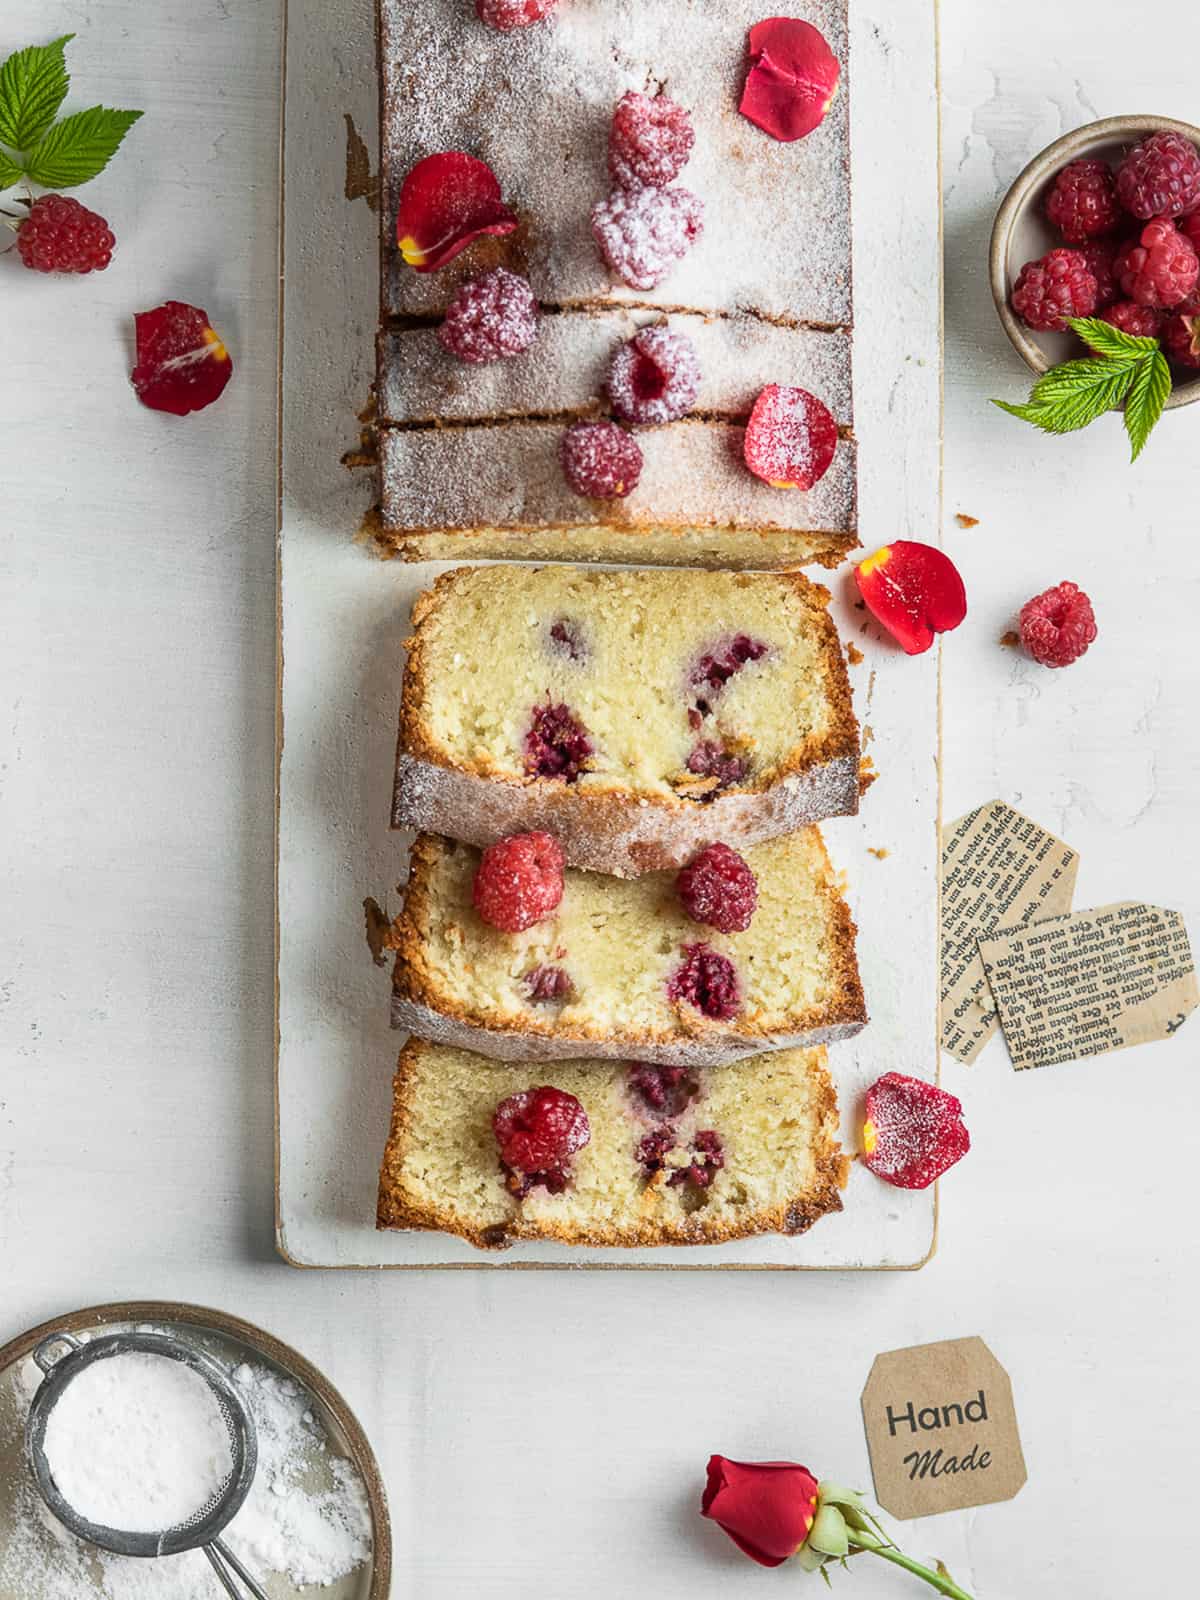
To serve, dust the cake with icing sugar.

Sliced olive oil sponge cake on a serving plate.

Expert Tips

  1. Don't skip or decrease the time necessary to whip the egg and sugar mixture. To maintain the fluffy texture of the cake, it is essential to beat plenty of air into the mix.
  2. Add dry and wet ingredients to the preparation slowly and gently.
  3. Bring the cake batter to the preheated oven once poured into the cake pan.
  4. Don't open the oven door during the first 30 minutes of baking.
  5. Unmold the cake from the pan for 5 to 10 minutes after taking it out of the oven to prevent it from falling apart.
  6. Let it cool completely on a wire rack so the cake cools more evenly, keeping its texture light and airy.

Recipe variations

It is a basic cake recipe with oil that is classic and traditional. Does it need any variations?

  • Use a traditional whipped cream and lemon curd or something more exotic like strawberries dipped in chocolate sauce.
  • Give your cake an extra special touch by adding some flavor with this simple recipe. Mix 1 teaspoon of vanilla extract to make an oil-based vanilla cake.
  • Flavor the cake batter with orange or lemon zest to make the dessert more interesting. If you are looking for a boozy cake, add in some alcohol, for example, dark rum.
  • Replace 1 oz. (30 g) of flour with cocoa powder to get the best possible results when making a chocolate version of the oil cake.

A simple little change like this can really make all kinds of differences in taste and texture.

Storing and freezing

Store the cake well-wrapped at room temperature for about a week. If you need to keep the cake longer, you should freeze it.

Can you freeze oil sponge cake? Yes, you can. To freeze your cake, make sure that the cake is cooled completely. Then, cover it with double plastic wrap and aluminum foil.

Place it in the freezer at -13 degrees F/-25 degrees C and store it under this condition for up to 3 months. 

To thaw the sponge cake, bring it to room temperature for a couple of hours or in the fridge overnight.

If you are short on time, you can place the cake in the oven at a low temperature for at least 15 minutes.

Also, read more

  • if you can refrigerate the cake batter and
  • if you can freeze the cake batter.
Olive oil sponge cake with a slice on a cake server.

Troubleshooting

Why my cake is too dense

Reason: A dense cake is often caused by excessive liquid, excessive sugar, or insufficient leavening agent.

How to prevent it: You should correctly measure the ingredients using a kitchen scale or other measuring tools. Also, make sure to use fresh leavening agents (if required) and check the oven temperature.

Why my cake has holes

Reason: The holes in a cake are often caused by over-beating the cake batter.

How to prevent it: Use whichever mixing method is called for in the recipe. If it requires using a hand whisk, avoid electric or stand mixers because they can result in over-beating the batter. Ensure all ingredients are at room temperature so you get maximum results when combining them together.

Why my cake is dry

Reason: The cake is usually dry due to the wrong measurement of ingredients or overbaking the cake. So, it can be caused by too much moisture being absorbed by the flour, cocoa powder, etc.

How to prevent it: Ensure to measure flour, cocoa powder, and other dry ingredients correctly. To avoid overbaking the cake, check it for doneness with a cake tester, a toothpick, or the tip of a knife. Also, the cake is ready when it pulls away from the sides of the pan and snaps back with light finger pressure.

Why my cake is hard

Reason: The hard cake results from over-beating the batter or using the wrong type of flour.

How to prevent it: Using suitable flour is the key to making the desired texture of the cake. It is also essential to follow the order of the ingredients and mix the batter using the proper method and the time required.

Why my cake is falling apart

Reason: The most common cause of a cake falling apart when removing it from the pan is not allowing for enough time to cool after baking.

How to prevent it: To ensure a successful and easy cake removal, line the bottom of your pan with parchment paper. Always let it rest for at least 10-15 minutes before unmolding. Then, run a knife between the pan wall and carefully remove the cake.

Why my cake is sinking in the middle

Reason: Cake sinking in the middle is usually due to underbaking it, using too much leavening agent, or if you open up your oven while baking.

How to prevent it: The first thing you want is the correct oven temperature and baking time. Check the cake's doneness by using a toothpick or a cake tester.

Measurements of the leavening agents should also be accurate; don't replace the baking powder with baking soda and vice versa. And one more baking rule is never to open the oven door during baking time.

Recipe FAQ

Is sponge cake better with oil or butter?

While both oil and butter increase the cake's moisture, oil gives it a coarse texture, while butter gives it a finer texture. Additionally, oil remains liquid at room temperature and when chilled, while butter solidifies in the fridge. This has an impact on how the cake can be stored.

Can you use olive oil instead of vegetable oil in sponge cake?

Swap vegetable oil for olive oil in any dessert recipe. It's a simple one-to-one ratio substitution.

Love sponge cakes? Try these next!

Looking for the best sponge cake recipe? Check out the website for more delicious options.

  • Genoise Sponge Cake
  • Sponge Apple Cake
  • Japanese Sponge Cake
  • Chocolate Sponge Cake
  • Or browse all the basic recipes

Want more delicious and beautiful recipes? Subscribe to my newsletter and follow me on Facebook, Pinterest, and Instagram for my latest updates. If you make this recipe, please leave a star rating on the recipe card and comment below!

Print

Recipe card

Oil Sponge Cake (With Olive Oil)

Sliced oil sponge cake with a slice on a cake server.
Print Recipe
Save Recipe Recipe Saved

5 Stars 4 Stars 3 Stars 2 Stars 1 Star

5 from 1 review

Oil sponge cake is the perfect solution for those with food allergies and sensitivities. This easy-to-make, light, and moist olive oil-based sponge is full of delicious flavor, texture, and taste. 

  • Author: Irina Totterman
  • Total Time: 60 minutes
  • Yield: 8 1x
  • Category: Cakes
  • Method: Baking
  • Cuisine: French

Ingredients

Scale
  • 4 large eggs (190 g), room temperature
  • ¾ cup (150 g) granulated sugar
  • ½ cup + 1 tablespoon (135 ml) virgin olive oil
  • ⅓ cup + 1 ½ tablespoon (100 ml) whole milk, room temperature
  • ¾ cup + 2 ½ tablespoons (115 g) all-purpose flour

*Don't you have the correct baking pan on hand right now? Try this simple Cake Pan Converter!

** If needed, please refer to Baking Conversion Charts.

Instructions

  1. Use a cooking spray to grease an 8-inch (20 cm) round cake pan, then place a parchment paper circle at the bottom of the pan. Using a flour sifter, sift all-purpose flour in a medium bowl and set aside. Preheat the oven to 350°F (175°C).

  2. To make the batter, place eggs and sugar in the bowl of a stand mixer and lightly beat with a hand whisk. Place the bowl over the bain-marie/water bath and heat the mixture to 104°F (40°C) or warm to the touch, constantly whisking.

  3. Remove the bowl from the water bath. Then, using a stand mixer fitted with a whisk attachment beat the preparation for 5 minutes at high speed and 10 to 15 minutes at medium speed. 

  4. Sift one-third of the flour over the surface of the mixture. Mix with a rubber spatula, going from the center to the edge, with gentle folding motions. Fold in the flour slowly and carefully. Also, rotate the bowl with the other hand while mixing the batter. 

  5. Whisk the oil and milk with a fork. Pour ⅓ of the mixture into the batter and gently mix. Alternate dry and liquid ingredients until the batter is creamy and homogeneous. 

  6. Pour the batter into the prepared mold and bake for 30 to 35 minutes. Check the doneness of the cake with a cake tester or a toothpick. If it is inserted in the center of the cake and comes out clean or with a few crumbs, the cake is ready. 

  7. Remove the cake from the oven and let it cool in the mold for 5 to 10 minutes. It should shrink slightly around the edges of the mold.

  8. Unmold the cake by turning the baking pan upside down. Next, remove the parchment paper and invert it again, placing it on a serving platter. Once the cake is cooled, dust it with icing sugar if desired.

Notes

  1. Don't skip or decrease the time necessary to whip the egg and sugar mixture. To maintain the fluffy texture of the cake, it is essential to beat plenty of air into the mix.
  2. Add dry and wet ingredients to the preparation slowly and gently.
  3. Bring the cake batter to the preheated oven once poured into the cake pan.
  4. Don't open the oven door during the first 30 minutes of baking.
  5. Unmold the cake from the pan 5 to 10 minutes after taking it out of the oven to prevent it from falling apart.
  6. Let it cool completely on a wire rack so that the cake cools more evenly, keeping its texture light and airy.

Nutrition

  • Serving Size: 1 slice
  • Calories: 303
  • Sugar: 19.7 g
  • Sodium: 60 mg
  • Fat: 19 g
  • Saturated Fat: 3.3 g
  • Carbohydrates: 30.5 g
  • Fiber: 0.4 g
  • Protein: 5.1 g
  • Cholesterol: 94 mg

Thank you for following me on Pinterest, Facebook, and Instagram. Hashtag #bakinglikeachef so I can see your creations.

The nutritional information has been calculated using an online recipe nutrition calculator such as Verywellfit.com and is intended for informational purposes only. These figures should be used as a general guideline and not be construed as a guarantee.

The recipe was originally published on April 5, 20. It has been updated and may differ from what was originally published.

Sponge Apple Cake (Easy and Quick Recipe)

Apr 3, 2022 · 1 Comment

Sliced apple sponge cake on a dessert plate.

This easy and quick apple sponge cake has just the right amount of sweetness, soft and fluffy cake texture, and unbelievable flavors. There is nothing more satisfying than a cheap, tasty, and easy apple cake.

Sliced apple sponge cake on a dessert plate.

So, if you try it, I guarantee you will fall in love with this simple recipe. The cake will become your go-to dessert to enjoy at any time.

With the hectic schedules and busy times with children, cooking, especially baking, is not really an option for many people nowadays. But baking this cake, even on weekdays, is a real thing!

[feast_advanced_jump_to]

The batter requires very little work - it takes only a few minutes for me from start to finish.

BAKING ESSENTIALS CHECKLIST

Sign up and get a list of the necessary baking tools and ingredients

FREE DOWNLOAD

All this means that this quick treat always finds its place on the top list of my favorite desserts.

What is apple sponge cake?

Apple sponge cake is a soft and fluffy sponge cake topped with juicy apples or thin slices evenly distributed in the cake. It is usually made with simple ingredients like sugar, eggs, and flour with added oil or sour cream.

This sponge apple cake slightly resembles the Russian apple cake Sharlotka (Polish Szarlotka is another apple dessert), but there is some uniqueness about this particular recipe.

The cake has an entirely different ratio between its sponge and apples. It is more like a sponge cake with apples than an apple cake.

A single slice of apple sponge cake on a dessert plate.

Apple sponge cake recipe

  • This easy apple cake recipe is very quick to make. It only has a few basic ingredients and requires 10 minutes of hands-on time.
  • The cake has an exciting and creative design unlike any other. The apple slices are strategically placed on top of the sponge to be beautifully hidden beneath the sponge after baking. As a result, the cake is easy to slice when you get around apples.
  • The sponge apple cake is a perfect pairing for any occasion and can be enjoyed year-round.
  • There is nothing to be more satisfying than an apple dessert for kids. This cake will please any child.

Ingredients

Apple sponge cake ingredients.

For ingredients and detailed instructions, refer to the recipe card below.

  • Eggs: Use large eggs to make the recipe. Separate the egg whites from egg yolks using an egg separator. Then, bring the whites and yolks to room temperature.
  • Sugar: The recipe calls for granulated or caster sugar.
  • Oil: Use any oil you desire, from vegetable to olive oil. I usually choose grapeseed oil since it is flavorless.
  • Flour: Use all-purpose flour to make the cake.
  • Baking powder: Use fresh aluminum-free baking powder.
  • Salt: A pinch of salt is necessary to enhance the flavors of the cake.
  • Apples: One large or two medium apples are enough for this cake. Choose tart apples to balance out the sweetness of your cake. This variety of apples best works for the recipe:
    • Granny Smith apples,
    • Bramley apples,
    • Gala,
    • Pink Lady,
    • Cortland,
    • Honeycrisp,
    • Fuji.
  • Powdered sugar is used for dusting the top of the cake. Feel free to omit this ingredient.
Apple sponge cake with a slice on a cake server.

How to make apple sponge cake

Step 1. Preheat the oven to 355°F (180°C). Using an egg separator, separate the egg whites from the yolks. Sift the flour with baking powder and set aside.

Step 2. Butter an 8-inch (20 cm) round cake pan and line it with parchment paper (you can also use a Le Creuset springform pan of the same diameter).

Step 3. To make the sponge batter, place egg whites with a pinch of salt in a large mixing bowl and beat with an electric mixer until foamy. Add sugar in three batches and beat until stiff and glossy (photo 1). 

Step 4. Reduce the speed of the hand mixer and mix egg yolks, oil, and sifted dry ingredients into the mixture (photo 2). Mix to combine the ingredients; avoid overmixing the sponge mixture.

Meringue in a bowl and mixer beaters.

PHOTO 1

Cake batter in a bowl.

PHOTO 2

Step 5. Pour the batter into the prepared pan. Use a vegetable peeler and an apple corer to peel, core, and slice the apple into ½-inch (1 ½ cm) slices.

Step 6. Put apple slices on top of the batter, slightly pressing them (photo 3).

Step 7. Bake the cake for 40-45 minutes until a toothpick inserted in the center of the cake comes out clean (photo 4).

Cake batter with apple slices in a baking pan.

PHOTO 3

Baked apple sponge cake in a baking mold.

PHOTO 4

Step 8. Take the cake out of the oven and rest it in the pan for 10 minutes.

Step 9. Remove the cake from the baking dish, unpeel the parchment paper from the sides, and let it cool on a wire rack.

To serve, transfer the cake to a serving plate and sprinkle it with powdered sugar.

Sliced sponge apple cake on a serving platter.

Expert Tips

  1. It is a personal preference to peel apples or to leave them unpeeled.
  2. Use chopped apples to arrange them as a top layer of the cake if desired.

Recipe variations

It is a classic apple sponge cake based on a sponge cake recipe with added apples. If you aren't a fan of the classic, there are new things to try and see how they turn out.

  • Apples: Experiment with a different variety of apples and a sliced or grated apple. Using stewed apples opens up another cake variation.
  • Other fruits: Try this sponge with other fresh fruit, for example, strawberries, plums, etc. Just remember that some fruit may sink more than others.
  • Flavorings: Add some vanilla extract, lemon juice or zest, or a pinch of cinnamon to your cake batter for an additional flavor.
  • Sheet apple sponge cake: Make the cake in a rectangular shape or even a sheet sponge cake (the baking time might vary). To re-calculate ingredients, use this simple cake pan converter.

How to serve it

Dust your apple sponge cake with powdered or cinnamon sugar. Just mix ground cinnamon with confectioners' sugar (aka icing sugar) and sprinkle some on top for an extra special treat.

Serve the cake alone or with vanilla custard, sugar-free whipped cream, creme fraiche, lemon curd, or vanilla ice cream.

Storing and freezing

Store sponge cake with apples in an airtight container in the fridge for 3 to 4 days.

Can you freeze apple sponge cake? You can freeze the cake tightly wrapped in plastic film and aluminum foil for up to 3 months. Thaw overnight in the fridge or the countertop for a couple of hours.

Recipe FAQ

What are the best apples for apple cake?

For the best results, use apples that hold their shape with baking. Opt for Granny Smith, Bramley apples, Gala, Pink Lady, Cortland, Honeycrisp, and Fuji.

Do you need to peel apples for apple cake?

You need to peel apples to make this apple sponge cake. However, if you are short on time, you can leave the skins on, and the cake will still taste delicious.

Should you cook apples for apple sponge cake?

There is no need to cook apples in advance. Instead, cut up fresh apples, and you are good to go.

Can you cut the apples in advance?

Since apples can quickly turn brown once cut and exposed to the air, it is not recommended to prepare apples in advance. Instead, for optimal results, peel your apples and cut them at the very last minute.

Love apple recipes? Try these next!

  • Apple crumble bread
  • Apple juice reduction
  • Apple mousse cake
  • Caramelized apples

Want more delicious and beautiful recipes? Subscribe to my newsletter and follow me on Facebook, Pinterest, and Instagram for my latest updates. If you make this recipe, please leave a star rating on the recipe card and comment below!

Print

Recipe card

Easy Sponge Apple Cake

Sliced apple sponge cake on a dessert plate.
Print Recipe
Save Recipe Recipe Saved

5 Stars 4 Stars 3 Stars 2 Stars 1 Star

5 from 1 review

This easy and quick apple sponge cake has just the right amount of sweetness, soft and fluffy texture, and unbelievable flavors. Nothing is more satisfying than a cheap, easy, and tasty apple cake.

  • Author: Irina Totterman
  • Total Time: 55 minutes
  • Yield: 8 1x
  • Category: Cakes
  • Method: Baking
  • Cuisine: Italian

Ingredients

Scale

For the cake batter:

  • 4 large eggs, room temperature
  • ½ cup + 2 tablespoons (125 g) granulated sugar
  • 2 ½ tablespoons vegetable oil
  • ¾ cup + 1 ½ tablespoon (105 g) all-purpose flour
  • ½ teaspoon baking powder
  • 1 pinch of salt
  • 1 large apple

For greasing pan:

  • 1 tablespoon softened unsalted butter 

For decoration:

  • 1-2 tablespoons powdered sugar

*Don't you have the correct baking pan on hand right now? Try this simple Cake Pan Converter!

** If needed, please refer to Baking Conversion Charts.

Instructions

  1. Preheat the oven to 355°F (180°C). Using an egg separator, separate the egg whites from the yolks. Sift the flour with baking powder and set aside.

  2. Butter an 8-inch (20 cm) round cake pan and line it with parchment paper (you can also use a Le Creuset springform pan of the same diameter).

  3. To make the cake batter, place egg whites with a pinch of salt in a large mixing bowl and beat with an electric mixer until foamy. Add sugar in three batches and beat until stiff and glossy.

  4. Reduce the speed of the hand mixer and mix the yolks, oil, and sifted dry ingredients into the mixture. Mix to combine the ingredients; avoid overmixing the cake mixture. Pour the batter into the prepared pan.

  5. With a vegetable peeler and an apple corer, peel, core, and slice the apple into ½ inch/1 ½ cm slices. Put apple slices on top of the batter, slightly pressing them.

  6. Bake the cake for 40-45 minutes until a toothpick inserted in the center of the cake comes out clean.

  7. Take the cake out of the oven and rest it in the pan for 10 minutes. Remove the cake from the mold, unpeel the parchment paper from the sides, and let it cool on a wire rack.

  8.  Once cooled, transfer it to a serving plate and sprinkle with powdered sugar. 

Notes

  1. It is a personal preference to peel apples or to leave them unpeeled.
  2. Use chopped apples to arrange them as a top layer of the cake if desired.

Nutrition

  • Serving Size: 1 slice
  • Calories: 198
  • Sugar: 19.7 g
  • Sodium: 55 mg
  • Fat: 6.9 g
  • Saturated Fat: 1.4 g
  • Carbohydrates: 30.8 g
  • Fiber: 1 g
  • Protein: 4.6 g
  • Cholesterol: 93 mg

Thank you for following me on Pinterest, Facebook, and Instagram. Hashtag #bakinglikeachef so I can see your creations.

The nutritional information has been calculated using an online recipe nutrition calculator such as Verywellfit.com and is intended for informational purposes only. These figures should be used as a general guideline and not be construed as a guarantee.

Kinder Paradiso Cake (Torta Kinder Paradiso)

Apr 1, 2022 · 2 Comments

Sliced Torta Kinder Paradiso on a black serving plate.

Kinder Paradiso cake or torta Kinder Paradiso is a must-have for any dessert lover. It has an unbeatable combination of flavors that will leave you willing more.

The soft and fluffy sponge cake base makes it easy on your taste buds, while the milk cream takes care of sweet cravings in all parts.

Sliced Torta Kinder Paradiso on a black serving plate

This cake is a delicious version of the popular Kinder Paradiso snack by the Ferrero brand.

Interestingly, another Ferrero snack - Kinder Pingui® - was also upgraded with a delicious twist on the original - Kinder Pingui Cake.

Torta Kinder Paradiso (also known as Kinder Paradise cake) is a result of a marriage between two recipes. One is to create Torta Paradiso and another for milk cream (crema al latte in Italian).

Italian milk cake has an extremely delicate texture that resembles the softness of Kinder Paradiso.

It just melts in your mouth with honey vanilla flavor while being another piece of heaven.

The cake is shaped round, but feel free to give a try to a rectangular-shaped cake.

BAKING ESSENTIALS CHECKLIST

Sign up and get a list of the necessary baking tools and ingredients

FREE DOWNLOAD

Kinder Paradise cake sliced into multiple slices
[feast_advanced_jump_to]

Why you should try this recipe

Kinder Paradiso cake is an elegant choice for your next event. It can be used for a lavish birthday party or buffet.

Made with simple ingredients, it will be sure to impress anyone who tastes this delicious treat.

Also, the cake is perfect on its own for breakfast or as an afternoon snack with a glass of milk.

Ingredients

Kinder Paradise cake ingredients in pictures

For ingredients and detailed instructions, refer to the recipe card below.

All the cake ingredients must be at room temperature.

Butter: unsalted butter brings the butter taste and flavor to the sponge. Use high-top quality European-style butter if available.

Sugar: use granulated sugar or caster sugar. It adds sweetness and provides structure to the cake.

Vanilla bean: is the perfect ingredient for adding an elegant, rich flavor to your cake.

Eggs: use large eggs to make the recipe. They are a key binding ingredient and help hold the cake. There is no need to separate the egg whites from the egg yolks.

Flour: the original recipe calls for Italian 00 flour, but you can replace it with all-purpose flour. Flour provides the structure to the cake.

Potato starch: the recipe calls for potato starch, not corn starch. The former makes the cake tender and more delicate.

Baking powder: use fresh aluminum-free baking powder.

Salt: a pinch of salt modifies the flavor of the cake and increases the color of the crust.

Whipping cream: choose the whipping cream with at least 30% fat content. To make the milk cream even richer, go for heavy whipping cream with 36% fat content.

Sweetened condensed milk: brings sweetness and delicate flavor to the cream.

If you don't have it at home, you can make it yourself or replace it with mascarpone cheese to make the cream less sweet.

Honey: the recipe calls for wildflower honey or acacia honey. Try to avoid the buckwheat honey. Unfortunately, it is too intense for this delicate cake.

Icing sugar: make it yourself with granulated sugar and a coffee grinder, or use store-bought powdered sugar.

How to make Kinder Paradiso cake

Make the soft sponge base following the step-by-step recipe to prepare a perfect Paradise cake.

Use the freshly-made lemon zest to add an extra layer of lemon flavor to the cake batter, or omit this ingredient.

Once the sponge is taken out of the oven, let it cool for a few minutes in a baking pan.

Baked Paradiso sponge cake in a pan

Then turn it out of the mold and place it on a cutting board lined with parchment paper.

Let the cake rest for 10-15 minutes, and turn the cake back on a flat surface with parchment.

This step will ensure the perfect flat cake on top. Finally, let the cake cool down completely (it takes about 2 hours).

Using a cake leveler, a cold knife with a long blade (keep it in the freezer for a few minutes), or a simple serrated knife, cut the sponge cake horizontally into two layers.

To make the cream, place the cold whipping cream, sweetened condensed milk (from the fridge), and honey (at room temperature) in a stand mixer bowl. Whip the cream until firm (it usually takes about 2 minutes).

Milk cream in a bowl

Place the first cake layer on a serving plate, and spread the cream with a rubber spatula.

Gently place another layer disc of Paradise cake over the cream. Sprinkle the surface of the cake with plenty of powdered sugar.

Assembled Kinder Paradiso cake on parchment paper

Refrigerate the cake for 10 minutes at a minimum, better for 2 hours.

Take it out of the fridge about 10 to 20 minutes before serving. The cake at room temperature tastes the best.

Sponge cake dusted with icing sugar and sliced

Recipe variations

This "classic" Kinder Paradiso cake is a simple yet sophisticated dessert.

You can use Margherita or Italian Paradise cake as the base, then add some flavorful fillings to make it your own.

If you feel like your cake needs a little extra something, consider converting it into an unforgettable chocolate experience.

Just replace three tablespoons of potato starch with cocoa powder and add some chocolate chips for that perfect flavor.

With the Kinder Paradiso cake recipe, you can even make a three-layer cake unparalleled in its taste.

All you need is to increase the amount of all the ingredients by 1.5 or use a recipe for Italian sponge cake - pan di Spana.

To give your cake an extra burst of lemon flavor, add lemon (or orange) zest to the batter.

So, what else? Do you know that the cake can be filled with your favorite custard instead of the rich milk cream?

Jam and fruit are great, but you can do so much more with your dessert.

Why not try to top it with chocolate whipped cream or Nutella? Or take it one step further by using chocolate ganache on top of the cake for an extra tasty treat.

But sometimes the best thing you can do is keep things simple, and this Italian cake is not an exception.

Give your cake a generous dusting of confectioners' sugar, and maybe even use some stencils to make it really stand out.

Storing and freezing

Kinder Paradise sponge cake should be stored in an airtight container in the fridge for up to 2 days.

Freezing the assembled cake (with cream) is not recommended, but you can freeze the sponge base for up to 1 month.

Expert tips

  1. Make ahead option: bake the butter sponge cake one day in advance and keep it at room temperature under a glass dome cake stand. Then, the next day, whip up the cream and assemble the dessert.
  2. Place a mixer's bowl in the freezer for about an hour. It helps to whip the cream.
  3. To make the cake's edges neat, assemble the cake in an adjustable cake ring lined with an acetate cake collar.
  4. Make the cake in a round or rectangular mold or even make it as a giant snack to be cut into slices. To re-calculate ingredients, use this simple cake pan converter.
  5. Clean the knife's blade between each cut to avoid "dirtying" the sponge layers and get a more thorough job.

Frequently asked question

Can you make a sponge cake without butter?

To make the cake butter-free, replace butter with oil: for 100 g of butter, use 80 g of oil.

Love easy cakes? Try these next!

  • Sliced Madeleine cake on parchment paper and mesh ribbon.
    Madeleine Cake
  • Sliced gateau au yaourt on a serving plate.
    Gâteau au Yaourt (French Yogurt Cake)
  • Sliced Italian carrot cake on parchment.
    Italian Carrot Cake (Torta di Carote)
  • Sliced Torta Paradiso on a black plate.
    Torta Paradiso (Traditional Italian Paradise Cake)

Want more delicious and beautiful recipes? Subscribe to my newsletter and follow me on Facebook, Pinterest, and Instagram for my latest updates. If you make this recipe, please leave a star rating on the recipe card and comment below!

Print

Recipe card

Kinder Paradiso Cake (Torta Kinder Paradiso)

Sliced Torta Kinder Paradiso on a black serving plate.
Print Recipe
Save Recipe Recipe Saved

5 Stars 4 Stars 3 Stars 2 Stars 1 Star

5 from 2 reviews

Kinder Paradiso cake or Torta Kinder Paradiso is a must-have for any foodie. It has an unbeatable combination of flavors that will leave you willing more. The soft and fluffy sponge cake base makes it easy on your taste buds, while the milk cream takes care of sweet cravings in all parts.

  • Author: Irina Totterman
  • Total Time: 60 minutes (plus cooling time)
  • Yield: 8 1x
  • Category: Cakes
  • Method: Baking
  • Cuisine: Italian

Ingredients

Scale

For the cake batter:

  • 5.3 oz. (150 g) unsalted butter softened
  • ¾ cup (150 g) granulated sugar
  • 1 vanilla bean
  • 3 large eggs (150 g), room temperature
  • ½ cup + 1 ½ tablespoon (75 g) all-purpose flour
  • ⅓ cup + 2 tablespoons (75 g) potato starch
  • ½ teaspoon baking powder
  • 1 pinch of salt

For the milk cream:

  • 250 g whipping cream
  • 65 g sweetened condensed milk
  • 30 g wildflower honey

For the decoration:

  • 1-2 tablespoons powdered sugar

*Don't you have the correct baking pan on hand right now? Try this simple Cake Pan Converter!

** If needed, please refer to Baking Conversion Charts.

Instructions

  1. Make the soft sponge base following the step-by-step recipe to prepare a perfect Paradise cake. Use the freshly-made lemon zest to add an extra layer of lemon flavor to the cake batter, or omit this ingredient. Once the sponge is taken out of the oven, let it cool for a few minutes in a baking pan. 

  2. Then turn it out of the mold and place it on a cutting board lined with parchment paper. Let the cake rest for 10-15 minutes, and turn the cake back on a flat surface with parchment. This step will ensure the perfect flat cake on top. Finally, let the cake cool down completely (it takes about 2 hours). Then, using a cake leveler, a cold knife with a long blade (keep it in the freezer for a few minutes), or a simple serrated knife, cut the sponge cake horizontally into two layers.

  3. To make the cream, place the cold whipping cream, sweetened condensed milk (from the fridge), and honey (at room temperature) in a stand mixer bowl. Whip the cream until firm (it usually takes about 2 minutes). 

  4. Place the first cake layer on a serving plate, and spread the cream with a rubber spatula. Gently place another layer disc of Paradise cake over the cream. Sprinkle the surface of the cake with plenty of powdered sugar.

  5. Refrigerate the cake for 10 minutes at a minimum, better for 2 hours. Take it out of the fridge about 10 to 20 minutes before serving. The cake at room temperature tastes the best.  

Notes

  1. Make ahead option: bake the butter sponge cake one day in advance and keep it at room temperature under a glass dome cake stand. Then, the next day, whip up the cream and assemble the dessert.
  2. Place a mixer's bowl in the freezer for about an hour. It helps to whip the cream.
  3. To make the cake's edges neat, assemble the cake in an adjustable cake ring lined with an acetate cake collar.
  4. Make the cake in a round or rectangular mold or even make it as a giant snack to be cut into slices. To re-calculate ingredients, use this simple cake pan converter.
  5. Clean the knife's blade between each cut to avoid "dirtying" the sponge layers and get a more thorough job.

Nutrition

  • Serving Size: 1 slice
  • Calories: 441
  • Sugar: 30.5 g
  • Sodium: 70 mg
  • Fat: 27.3 g
  • Saturated Fat: 16.9 g
  • Carbohydrates: 46.3 g
  • Fiber: 0.4 g
  • Protein: 4.1 g
  • Cholesterol: 154 mg

Thank you for following me on Pinterest, Facebook, and Instagram. Hashtag #bakinglikeachef so I can see your creations.

The nutritional information has been calculated using an online recipe nutrition calculator such as Verywellfit.com and is intended for informational purposes only. These figures should be used as a general guideline and not be construed as a guarantee.

Italian Carrot Cake (Torta di Carote)

Mar 23, 2022 · 1 Comment

Sliced Italian carrot cake on parchment.

What could be better than a slice of Italian carrot cake or Torta di Carote for breakfast? You will love this sweet, moist treat with an unforgettable flavor and taste. It's a perfect way to end your day with dinner or just dessert.

A single slice of Italian carrot cake

The Italian version of the carrot cake is not complicated; indeed, it is perfect for beginners.

The cake's texture is soft and moist. The combination of carrot and orange creates a delightful aroma.

[feast_advanced_jump_to]

Also known as torta carote, the cake has a tiny twist on Brazilian carrot cake (Bolo de Cenoura in Portuguese), which blends carrots with oil. This gives the cake that gorgeous yellow-orange coloring.

BAKING ESSENTIALS CHECKLIST

Sign up and get a list of the necessary baking tools and ingredients

FREE DOWNLOAD

Experience the unique flavors that set this cake apart from its American counterpart.

Italian carrot cake with candied carrots and icing sugar

What is Italian carrot cake?

Italian carrot cake is a moist carrot cake of Italian origin made with grated carrots, oil, and a hint of orange (here is another name - carrot and orange cake). It offers a unique twist compared to the American version with its abundance of dried fruit, spices, and cream cheese frosting.

Why you should try this recipe

  • Torta di Carote is a lighter alternative to a traditional Carrot Cake recipe without adding spices, butter, and milk. Carrots help make up for the lack of sugar by giving the cake an extra kick of flavor and natural sweetness.
  • Like a moist carrot cake loaf, it is a delicious and nutritious morning snack you can take easily on the go.
  • You can bring it to the office as a part of your lunch box or make it for your kids' break at school.
  • This deliciously soft, moist cake is a must for any occasion; the whole family will love it.

Ingredients

Italian carrot cake ingredients in pictures

For ingredients and detailed instructions, refer to the recipe card below.

  • Carrots are the main ingredient of the cake. Choose fresh, firm, and bright-colored vegetables; it is always better to buy them with their green tops attached.
  • Flour: Use all-purpose flour or replace ⅓ of the flour with almond flour.
  • Oil: The recipe calls for sunflower oil, but you can replace it with peanut oil, olive oil, or flavorless grapeseed oil. To make the cake lighter, replace the oil with the same amount of plain yogurt.
  • Sugar: Use granulated sugar or caster sugar if desired. You can experiment with adding brown sugar too.
  • Eggs: The recipe calls for large eggs at room temperature.
  • Orange zest: Make it fresh from untreated medium orange using a zester grater or replace it with lemon zest.
  • Baking powder: Fresh aluminum-free baking powder is the best for baking.
  • Powdered sugar is used to dust the top of the cake.

Recipe variations

This Italian carrot cake is the ultimate versatile treat, and you can indeed twist it into countless shapes and flavors.

  • Frosting: Top the cake with a simple cream cheese frosting. Or garnish it with chocolate ganache and serve it as dessert at the end of your meal or for a birthday party.
  • Almonds: Replace ⅓ of all-purpose flour with almond flour or almond meal to give a particular rusticity to the batter. Or add 1.4 oz. (40 g) of chopped almonds to the batter to give your dessert an extra boost with their crunchiness.
  • Flavorings: Add one tablespoon of Arancello orange liqueur to give it a fresh new take on an old classic. Or use vanilla extract or orange juice to add additional flavor.
  • Add-ins: Enrich it with the addition of 1 oz. (30 g) unsweetened cocoa powder and some chocolate chips or chopped dark chocolate.
  • Make muffins: Divide the batter between muffin cups to bake single-portioned easy carrot cake muffins called Le Camille in Italian.
  • Create a dome-shaped cake: Use a hemisphere pan to create an elegant dome-shaped cake with carrot flavors, resembling a classic Camilla cake (Torta Camilla in Italian).

How to make Italian carrot cake

Wash and peel medium carrots with a vegetable peeler. Cut them into slices. Transfer carrots to a food processor and chop them finely.

Add the sunflower oil and continue to blend until the mixture becomes carrot cream (photo 1).

Using a flour sifter, sift all-purpose flour with baking powder a few times in a separate bowl; set aside.

Preheat the oven to 350°F (175°C). Brush an 8-inch/20 cm round cake pan with softened butter and flour it.

Place sugar and eggs in the bowl of a stand mixer and beat for 1 to 2 minutes (photo 2).

Photo 1: Carrot mixture in a bowl Photo 2: Egg and sugar mixture in a metal bowl
PHOTO 1 PHOTO 2

Add orange zest (photo 3) and creamy pureed carrot mixture and beat again.

Add the dry ingredients a little at a time and mix gently with a rubber spatula, moving from top to bottom (photo 4).

Photo 3: Citrus-scented mixture in a mixing bowl Photo 4: Cake batter in a bowl
PHOTO 3 PHOTO 4

Pour the cake batter into the prepared pan and smooth the surface of the batter (photo 5).

Bake the cake in the preheated oven for 35 to 45 minutes, until golden brown (photo 6).

Photo 5: Cake batter in a baking pan Photo 6: Baked carrot cake in a mold
PHOTO 5 PHOTO 6

Check the cake with a toothpick test: the cake is ready if it comes out with a few moist crumbs.

Let it cool for a couple of minutes before unmolding it to prevent the cake from breaking.

Pro tip: If you bake the cake in a Le Creuset springform pan, you can remove the cake immediately.

Once cooled down completely, dust the cake with plenty of powdered sugar and decorate it with candied carrots.

Sliced Torta di Carote on parchment paper

Expert Tips

  1. Blend the carrots with oil longer (up to 5-6 minutes) if desired. In this case, they will be blended perfectly with the batter.
  2. Use a hand mixer to make the cake batter if preferred.
  3. You can also grate carrots very finely if you don't have a food processor.
  4. Using a silicone mold doesn't need to be buttered and floured before adding the batter. Read more about how to bake with silicone molds.

Storing and freezing

Italian carrot cake tastes even better the next day when the flavors settle.

The cake should be stored at room temperature under a glass dome cake stand, in an airtight container, or covered with plastic film for 3 to 4 days. It will remain soft and moist.

Can you freeze it? Freezing carrot torte is not recommended.

Recipe FAQ

What is the trick to a moist cake?

Using heavy cream or buttermilk instead of milk, brown sugar instead of white sugar, adding oil, applesauce, or high-fat dairy products, using room temperature ingredients, and following the recipe is the key to making a moist cake.

How to make a carrot cake moist

The blend of carrots with oil provides enough moister to the cake. Also, read on how to make a cake moist.

Can you use olive oil instead of vegetable oil in carrot cake?

You can replace vegetable oil with light or mild extra-virgin olive oil resulting in an extremely moist cake.

How to serve Italian carrot cake?

Serve your cake with the mascarpone cream or accompany your morning coffee or black tea.

Love Italian desserts? Try these next!

  • Sliced almond cake covered with flaked almonds on a white platter.
    Best Italian Almond Cake Recipe (Gluten-Free)
  • Sliced Torta Paradiso on a black plate.
    Torta Paradiso (Traditional Italian Paradise Cake)
  • Stacked Italian shortbread cookies on a grey plate with other cookies and almonds on background.
    Authentic Italian Shortbread Cookies
  • Italian sponge cake on a marble board.
    Italian Sponge Cake (Pan di Spagna)

Want more delicious and beautiful recipes? Subscribe to my newsletter and follow me on Facebook, Pinterest, and Instagram for my latest updates. If you make this recipe, please leave a star rating on the recipe card and comment below!

Print

Recipe card

Torta di Carote (Italian Carrot Cake)

Sliced Italian carrot cake on parchment.
Print Recipe
Save Recipe Recipe Saved

5 Stars 4 Stars 3 Stars 2 Stars 1 Star

5 from 1 review

This Italian carrot cake or Torta di Carote is a sweet and moist treat with an unforgettable flavor. It's perfect for breakfast or as part of your dinner table arrangement.

  • Author: Irina Totterman
  • Total Time: 45 minutes
  • Yield: 8 1x
  • Category: Cakes
  • Method: Baking
  • Cuisine: Italian

Ingredients

Scale

For the batter:

  • 6.5 oz. (185 g) carrots
  • 1 ⅓ cup (165 g) all-purpose flour
  • 2 teaspoons baking powder
  • ½ cup (110 g) sunflower oil
  • ¾ cup (150 g) granulated sugar
  • 2 large eggs, room temperature
  • ½ orange, zest
  • 1 tablespoon unsalted butter for greasing 

For decoration:

  • 2 tablespoons powdered sugar
  • candied carrots

*Don't you have the correct baking pan on hand right now? Try this simple Cake Pan Converter!

** If needed, please refer to Baking Conversion Charts.

Instructions

  1. Wash and peel carrots with a vegetable peeler. Cut them into slices. Transfer carrots to a food processor and chop finely. Add the sunflower oil and continue to blend until the mixture turns into carrot cream. Using a flour sifter, sift all-purpose flour with baking powder a few times in a separate bowl; set aside.

  2. Preheat the oven to 350°F (175°C). Brush an 8-inch/20 cm round cake pan with softened butter and flour it. Place sugar and eggs in the bowl of a stand mixer and beat for 1 to 2 minutes. Add orange zest and creamy pureed carrot mixture and beat again.

  3. Add the flour mixture a little at a time and mix gently with a rubber spatula, making movements from top to bottom. Pour the cake batter into the prepared tin and smooth the surface of the batter.

  4. Bake the cake in the preheated oven for 35 to 45 minutes, until golden brown. Check the cake with a toothpick test: the cake is ready if it comes out with a few moist crumbs. Let it cool for a couple of minutes before unmolding it to prevent the cake from breaking. If you bake the cake in a Le Creuset springform pan, you can remove the cake immediately.

  5. Once cooled down completely, dust the cake with plenty of powdered sugar and decorate it with candied carrots.

Notes

  1. Blend the carrots with oil longer (up to 5-6 minutes) if desired. In this case, they will be blended perfectly with the batter.
  2. Use a hand mixer to make the cake batter if preferred.
  3. You can also grate carrots very finely if you don't have a food processor.
  4. Using a silicone mold doesn't need to be buttered and floured before adding the batter.

Nutrition

  • Serving Size: 1 slice
  • Calories: 301
  • Sugar: 21.1 g
  • Sodium: 35 mg
  • Fat: 15.2 g
  • Saturated Fat: 1.8 g
  • Carbohydrates: 38.8 g
  • Fiber: 1.4 g
  • Protein: 4 g
  • Cholesterol: 47 mg

Thank you for following me on Pinterest, Facebook, and Instagram. Hashtag #bakinglikeachef so I can see your creations.

The nutritional information has been calculated using an online recipe nutrition calculator such as Verywellfit.com and is intended for informational purposes only. These figures should be used as a general guideline and not be construed as a guarantee.

The recipe was adapted from www.chiarapassion.com.

Torta Paradiso (Traditional Italian Paradise Cake)

Mar 17, 2022 · 8 Comments

Sliced Torta Paradiso on a black plate.

If you look for an easy and delicious recipe to make at home, look no further than this traditional Italian Paradise Cake or Torta Paradiso. It is made with simple ingredients and has the perfect pillowy-soft texture - so fluffy that it is also called Heaven Cake.

Sliced Torta Paradiso on a black plate

Isn't it that the simplest things are often the best? So if you haven't tried a piece of heaven - Italian Paradise cake - yet, you should.

The cake of Lombard origin was probably invented by an herbalist monk of the monastery and sanctuary of Certosa di Pavia in Italia.

Later, in 1878, the Pavia pastry chef Enrico Vigoni recreated the cake recipe at the invitation of the Marquis Cusani Visconti.

The name was attributed to it by a noblewoman who, after tasting it, defined it as the "cake of paradise."

It became an iconic symbol for the city of Pavia that is now enjoyed all over Italy and beyond.

Torta Paradiso (other names Torta Del Paraiso and Torta Paraiso) even won a prize in Rome in 1888 and had great success at the 1906 Milan International Exhibition.

But the original recipe, nevertheless, is jealously protected by the Pasticceria Vigoni of Pavia: make sure you stop by if nearby.

Interestingly, in the past and even now, the traditional cake is often made without the help of an electric mixer, only with a wooden spoon or spatula.

But it seems like quite some work to incorporate air into the batter and give the cake lightness.

So if you want something easy-to-go, use an electric or stand mixer over the manual method.

BAKING ESSENTIALS CHECKLIST

Sign up and get a list of the necessary baking tools and ingredients

FREE DOWNLOAD

Baked Paradise cake in a baking pan
[feast_advanced_jump_to]

Why you should try this recipe

Torta Paradiso and Torta Margherita are Italian classics, so if you want to try a traditional Italian torta (aka Italian cake), here it goes.

The cake resembles quatre quarts or"four quarters," a classic French cake made with the proportions between the ingredients.

Again, if you love a sponge cake, you will fall in love with this traditional recipe, which is rich, tasty, and delicious.

The cake's fluffy and melt-in-your-mouth texture and divine taste are unique. You hardly need any decoration apart from the powdered sugar on top.

This cake is perfect for a sweet breakfast or a simple snack served with milk or juice.

Nothing will ever beat a slice of paradise enjoyed with a cup of tea or coffee in the afternoon or evening.

What's more? If you want to replace the classic light sponge cake in your birthday celebration, this Torta Paradiso recipe works as a beautiful basis for other cakes.

Sliced and filled with cream, the cake makes a beautiful cake perfect for buffets and parties. 

Ingredients

Paradise cake ingredients in pictures

For ingredients and detailed instructions, refer to the recipe card below.

Make sure all the ingredients are at the same temperature.

Butter: use high-quality butter to make the cake. It is one of the essential ingredients in this recipe, so choose the European-style butter with high-fat content.

Also, bring it to the counter for 1 to 2 hours to soften it. It should be soft but not melted.

The authentic Paradise cake recipe calls for butter, but there is a place for an exception. You can substitute butter for oil: for 100 g butter, use 80 g of oil.

Sugar: use granulated sugar as the original recipe calls for. You can replace it with store-bought powdered sugar that contains some percentage of starch or homemade icing sugar.

Eggs: the recipe calls for large eggs that should be at room temperature. Beat them lightly with a fork before adding to the batter.

The recipe below uses whole eggs to make the cake; it is the same as the original recipe.

Many recipes call for egg yolks (from 2 to 12) and some egg whites; others use a combination of the yolks and whole eggs.

Flour: the authentic Italian recipe is made with Italian 00 flour, but replace it with all-purpose flour if you cannot find it.

Starch: Torta Paradiso calls for potato starch, which is different from Maizena (corn starch). It gives this cake a tender and delicate touch. 

Lemon: make fresh lemon zest from untreated lemon for the best lemon scent and taste. Use a zester grater to facilitate this step.

Vanilla bean: vanilla flavor is essential in the recipe, so use the most fragrant Madagascar vanilla beans.

Baking powder: this leavening agent is optional, but if you want to give your cake more rise, add ½ teaspoon of baking powder.

The original cake recipe doesn't use baking powder, but, according to Mrs. Pinella from the Vigoni pastry shop, they put "a leavening agent," which is not yeast.

Salt: a pinch of salt enhances the flavor of the cake.

Sliced Paradise cake on a black serving board

How to make Torta Paradiso

Preheat the oven to 355 degrees F/180 degrees F. Butter and flour an 8-inch/20 cm cake pan and line the bottom with a parchment paper round.

Beat eggs (at room temperature) with a fork lightly and set aside.

Using a flour sifter, sift flour, salt, and baking powder (if used) two times in a medium bowl.

To make the cake batter, place the softened butter, sugar, lemon zest, and scraped seeds of the vanilla pod in a large bowl or the bowl of a stand mixer.

Using an electric or stand mixer fitted with a whisk attachment, whip it for about 15 minutes until the mixture obtains a white and velvety consistency.

Sugar and Butter mixture in a bowl

Reduce the speed to low and continue whisking. Add the eggs mixture one tablespoon at a time when the last spoonful has been incorporated perfectly. Continue in the same way until the eggs are used up.

Remove the mixer's bowl from the mixer and start adding the sifted flour mixture a little at a time (1 tablespoon), incorporating it with large movements using a rubber spatula.

Wait for the flour to be absorbed entirely; then add the next spoon. Continue until the dry ingredients are mixed into a creamy mixture.

Cake batter in a bowl

Pour the batter into the prepared cake pan and smooth it with a rubber spatula.

Cake batter in a cake tin

Bake it in the preheated oven for 30 to 40 minutes. Check the cake's doneness with a toothpick: it must come out dry.

Baked cake in a mold

Remove the cake from the oven and, while it is hot, invert it on a flat serving platter lined with parchment.

Let it rest for about 15 minutes, no longer to prevent the formation of condensation on the paper. 

Then using a plate or a cutting board, turn it over again. This little trick helps obtain a perfectly flat top.

Let the cake cool down completely on a wire rack (it takes up to an hour). Sprinkle generously with powdered sugar.

Recipe variations

The Torta Paradiso is a light and airy cake that has been known for its versatility.

It is usually made with 4 main ingredients: flour, sugar, eggs, and butter and scented with lemon zest.

But there are other variations in flavor combinations that people also enjoy.

If you want to celebrate, add one tablespoon of lemon juice, Grand Marnier, Limoncello, or other citrus liqueur into the batter.

The cake is perfect with simple powdered sugar on top. But there are countless possibilities when you want a little something extra: from creams and custards to fruit fillings and fresh berries.

Sliced in half and filled with whipped cream, chocolate cream, jam, Italian custard, or Nutella, the cake becomes a perfect treat to celebrate any occasion.

A perfect birthday cake won't be complete without simple yet elegant arrangements of fresh fruit and mint leaves on top.

Filling it with a rich milk cream (crema al latte in Italian) upgrades the Paradise cake to Kinder Paradiso cake, which replicates a bestseller, and a delicious Kinder snack.

Finally, to make a chocolate version of the cake, replace ⅓ cup or 40 g of flour with cocoa powder.

Storing and freezing

The Paradise sponge cake is best served on the day of baking, but it remains soft, fragrant, and tasty for a couple of days.

Store it under a bell jar, or glass dome cake stand at room temperature. If the cake is made with cream, refrigerate it for two days maximum.

It can be frozen plain, without icing sugar, cream, or another frosting. Cover your cake with plastic wrap and freeze for 1 month.

To thaw, bring it to the fridge overnight or the counter for a few hours.

Expert tips

  1. It is essential to use ingredients at room temperature.
  2. Don't decrease the time necessary to whip the batter at each step.
  3. Add eggs and flour mixtures one spoon at a time.
  4. Bake the cake in a static oven and don't open the oven door during the first 30 minutes.
  5. The baking time can vary, so test the cake with a toothpick or a cake tester.
  6. Keep the flat bottom of the cake as a top if desired.

Frequently asked questions

What is torta?

Torta is translated as "cake" from Italian and Spanish. It is a word that means different things in various languages. For example, it can refer to the typical flatbread in Spain, eggplant omelet in the Philippines, and a specific type of sandwich in Mexico.

What is paradise in Italian?

Paradise is paradiso in Italian, which is one word, while in English, there are two words paradise and heaven.

How to make Paradise cake gluten-free

To make this cake gluten-free, substitute the amount 00 flour for the same amount of rice flour.

Are the Paradiso cake and the Margherita cake the same?

The difference between the Paradiso and Margherita cakes is quite simple. The former is made by beating butter and sugar first, while eggs are added later. On the other hand, the Margherita cake is made by beating eggs and sugar first.

Love Italian desserts? Try these next!

  • Sliced almond cake covered with flaked almonds on a white platter.
    Best Italian Almond Cake Recipe (Gluten-Free)
  • Stacked Italian shortbread cookies on a grey plate with other cookies and almonds on background.
    Authentic Italian Shortbread Cookies
  • Italian sponge cake on a marble board.
    Italian Sponge Cake (Pan di Spagna)

Want more delicious and beautiful recipes? Subscribe to my newsletter and follow me on Facebook, Pinterest, and Instagram for my latest updates. If you make this recipe, please leave a star rating on the recipe card and comment below!

Print

Recipe card

Torta Paradiso (Traditional Italian Paradise Cake)

Sliced Torta Paradiso on a black plate.
Print Recipe
Save Recipe Recipe Saved

5 Stars 4 Stars 3 Stars 2 Stars 1 Star

4.7 from 3 reviews

If you look for an easy and delicious recipe to make at home, look no further than this traditional Italian Paradise Cake or Torta Paradiso. It is made with simple ingredients and has the perfect pillowy-soft texture - so fluffy that it is also called Heaven Cake. 

  • Author: Irina Totterman
  • Total Time: 45 minutes
  • Yield: 8 1x
  • Category: Cakes
  • Method: Baking
  • Cuisine: Italian

Ingredients

Scale
  • 5.3 oz. (150 g) unsalted butter, softened
  • ¾ cup (150 g) granulated sugar
  • ½ lemon, zest
  • ½ vanilla bean
  • 3 large eggs (150 g), room temperature
  • ½ cup + 1 ½ tablespoon (75 g) 00 flour (or all-purpose flour)
  • ⅓ cup + 2 tablespoons (75 g) potato starch
  • ½ teaspoon baking powder
  • 1 pinch of salt
  • 1 tablespoon powdered sugar (for decoration)

*Don't you have the correct baking pan on hand right now? Try this simple Cake Pan Converter!

** If needed, please refer to Baking Conversion Charts.

Instructions

  1. Preheat the oven to 355 degrees F/180 degrees F. Butter and flour an 8-inch/20 cm cake pan and line the bottom with a parchment paper round. Beat eggs (at room temperature) with a fork lightly and set aside. Using a flour sifter, sift flour, salt, and baking powder (if used) two times in a medium bowl.

  2. To make the cake batter, place the softened butter, sugar, lemon zest, and scraped seeds of the vanilla pod in a large bowl or the bowl of a stand mixer. Using an electric or stand mixer fitted with a whisk attachment, whip it for about 15 minutes until the mixture obtains a white and velvety consistency.

  3. Reduce the speed to low and continue whisking. Add the eggs mixture one tablespoon at a time when the last spoonful has been incorporated perfectly. Continue in the same way until the eggs are used up. Remove the mixer's bowl from the mixer and start adding the sifted flour mixture a little at a time (1 tablespoon), incorporating it with large movements using a rubber spatula. Wait for the flour to be absorbed entirely; then add the next spoon. Continue until the dry ingredients are mixed into a creamy mixture.

  4. Pour the batter into the prepared cake pan and smooth it with a rubber spatula. Bake it in the preheated oven for 30 to 40 minutes. Check the cake's doneness with a toothpick: it must come out dry.

  5. Remove the cake from the oven and, while it is hot, invert it on a flat serving platter lined with parchment. Let it rest for about 15 minutes, no longer to prevent the formation of condensation on the paper.  Then using a plate or a cutting board, turn it over again. This little trick helps obtain a perfectly flat top. Let the cake cool down completely on a wire rack (it takes up to an hour). Sprinkle generously with powdered sugar.

Notes

  1. It is essential to use ingredients at room temperature.
  2. Don't decrease the time necessary to whip the batter at each step.
  3. Add eggs and flour mixtures one spoon at a time.
  4. Bake the cake in a static oven and don't open the oven door during the first 30 minutes.
  5. The baking time can vary, so test the cake with a toothpick or a cake tester.
  6. Keep the flat bottom of the cake as a top if desired.

Nutrition

  • Serving Size: 1 slice
  • Calories: 302
  • Sugar: 18.9 g
  • Sodium: 49 mg
  • Fat: 17.2 g
  • Saturated Fat: 10.2 g
  • Carbohydrates: 34.8 g
  • Fiber: 0.4 g
  • Protein: 3.5 g
  • Cholesterol: 110 mg

Thank you for following me on Pinterest, Facebook, and Instagram. Hashtag #bakinglikeachef so I can see your creations.

The nutritional information has been calculated using an online recipe nutrition calculator such as Verywellfit.com and is intended for informational purposes only. These figures should be used as a general guideline and not be construed as a guarantee.

Gâteau au Yaourt (French Yogurt Cake)

Mar 13, 2022 · 9 Comments

Sliced gateau au yaourt on a serving plate.

This French yogurt cake - gâteau au yaourt - is so fluffy, moist, and full of flavors. Made with pantry staples, it's the easiest, no-measure cake. It's lovely as an afternoon snack and a delicious dessert for any occasion.

French children know this classic yogurt cake recipe by heart. Long before primary school, they learn the cake's "1, 2, 3" counts (1 pot of oil, 2 pots of sugar, 3 pots of flour, etc.). That is why French people often call this simple cake a 1-2-3 cake, where the ingredients determine its name.

Sliced gateau au yaourt on a serving plate.

What is French yogurt cake?

French yogurt cake, or gâteau au yaourt, is a classic French pound cake made with natural yogurt (yaourt nature), where all the ingredients are measured using an empty yogurt container (pot de yaourt) or jar.

The French translation for yogurt cake is gâteau au yaourt, where gâteau means cake, and yaourt means yogurt.

[feast_advanced_jump_to]

It is a no-measure cake made without traditional measuring ingredients with a kitchen scale or measuring cups. All you need is to fill a yogurt container up until it reaches the desired level. The ratio of each ingredient remains constant no matter what size yogurt cup you use.

BAKING ESSENTIALS CHECKLIST

Sign up and get a list of the necessary baking tools and ingredients

FREE DOWNLOAD

You may find recipes for cake au yogurt or cake de yogurt, which means French yogurt cake: they just mix up English words and French "au" or "de."

Interestingly, this cake has different spellings depending on the country. In the United Kingdom, it is spelled as yoghurt cake, while in the United States, the spelling is yogurt cake. When I lived in Canada, I spelled it as yogourt cake.

Ingredients

French yogurt cake ingredients.

For ingredients and detailed instructions, refer to the recipe card below.

Please note that a yogurt container serves as a measure here. Keep your yogurt cup empty to measure your ingredients. Also, read how to make a cake moist.

  • Yogurt - just plain yogurt, but feel free to replace it with Greek yogurt or cottage cheese for a softer cake. You can also add a tablespoon of creme fraiche (crème fraîche) to the batter. You can use sheep's or goat's milk yogurt, too. In fact, even buttermilk or sour cream works for this recipe. 
  • Large eggs at room temperature.
  • Sugar - just granulated sugar, but you can replace two yogurt containers with one container of honey. You can also adapt the recipe by using one pot of sugar. If desired, replace granulated sugar with brown sugar, muscovado, or vergeoise sugar to bring more flavor to the cake. You will also need 1 envelope, or sachet de sucre vanillé to bring the vanilla flavor to the cake.
  • Flour - all-purpose flour or replace half of the AP flour with cornstarch. You can also replace part of the flour with ground almonds or hazelnut flour.
  • Baking powder (levure chimique) is an essential leavening agent. You can replace half of the baking powder with baking soda to make the cake even softer.
  • Oil brings moisture to the cake. Use olive oil, sunflower oil, walnut oil, vegetable oil, or peanut oil interchangeably. The use of mild olive oil is the best choice due to its intense fluffy power. The worst option would be using rapeseed oil since it loses most properties above 300°F (150°C) and tends to give an unpleasant bitter taste. Experiment with melted coconut oil or melted butter.
  • Lemon zest (zeste de citron) gives a little tangy touch to the cake. You can replace it with orange or grapefruit zest.

How to make gâteau au yaourt

Step 1. Preheat the oven to 355°F (180°C). Using a pastry brush and softened butter, grease an 8-inch (20 cm) round cake pan and dust it with flour.

Step 2. Mix flour and baking powder in a medium bowl. Pour the yogurt into a separate large bowl. Clean the jar to use it as a measurer.

Step 3. Add eggs, granulated sugar, and vanilla sugar to the yogurt and beat with a hand whisk for a few seconds (photo 1).

Step 4. Add the oil and quickly mix. At this stage, add citrus zest or fruits, apples, pears, lemon zest, etc.

Step 5. Fold the dry ingredients and vanilla sugar into the yogurt mixture and gently mix just to combine (photo 2). Please, don't overwork the batter!

Egg sugar mixture in a glass bowl with a hand whisk.

PHOTO 1

Yogurt cake batter in a glass mixing bowl.

PHOTO 2

Step 6. Pour the batter into the prepared pan (photo 3).

Step 7. Bake on the middle rack of the oven until golden brown for 30 to 40 minutes (photo 4).

Pro tip: A cake tester or the tip of a knife inserted in the center of the cake should come clean or with a few moist crumbs.

Cake batter in a baking pan.

PHOTO 3

Baked yogurt cake in a cake mold.

PHOTO 4

Step 8. Let the cake cool for 5 to 10 minutes before unmolding, then transfer it to a wire rack to cool completely. Dust with icing sugar if desired. Bon appétit!

Two slices of French yogurt cake on dessert plates.

Expert Tips

  1. Don't use an electric mixer or stand mixer: only mix the ingredients with a hand whisk.
  2. Don't overmix the cake batter: whisk for 5-10 seconds at every step until just combined. Never stir the batter more than necessary.
  3. Cover it with aluminum foil halfway through baking to prevent your cake from burning.
  4. To prevent the cake from drying out, slice it once serving it, not in advance. The cake retains moisture when it remains whole. 
  5. If you double the recipe and use 2 pots of yogurt, bake the cake at the lower temperature - 320°F (160°C) - for about 1 hour to 1 hour and 20 minutes. Check for doneness with a sharp knife or a toothpick.
  6. Serve the cake with mint or Earl Grey tea or with a glass of champagne or sparkling Vouvray wine.

Recipe variations

It is the original recipe for French yogurt cake, but you can customize your plain cake according to what you want or have in stock.

  • Add-ins: Add semi-sweet chocolate chips, candied orange, lemon, or orange zest, diced apples or pears, raspberries, speculoos crumble, or a tablespoon of orange blossom water. Mix your favorite add-in into the batter once the oil has been incorporated and gently combine.
  • Flavors: Add a teaspoon vanilla extract or 1 to 2 tablespoons of dark rum.
  • Fruits: Add canned or fresh fruit, for example, arrange six pineapple slices in syrup at the bottom of the mold. Then, place one candied cherry in the center of each piece. Pour batter and bake as directed in the recipe. Then, unmold the cake upside down to reveal the pineapples. Or cut fresh strawberries in two lengthwise and place them at the bottom of a pan, flat side outwards. Pour the cake batter and bake.
  • Chocolate: Divide the cake batter into two parts and replace 1 oz. (30 g) of flour with cocoa powder in one part. Then, arrange light and dark batter in a checkerboard pattern into a cake pan, swirl, and bake.
  • Spices: Add a tablespoon of ground cinnamon and about 3.5 oz. (100 g) candied fruit cut into pieces to the cake batter.
  • Decoration: Top your cake with confectioner's sugar, royal icing, caramel sauce, red fruit coulis, flaked or slivered almonds, apricot jam, or candied lemon slices, or soak with rum-flavored sugar syrup.
  • Layer yogurt cake: Slice it into two layers horizontally and garnish it with your favorite cream or jam.
  • Rainbow yogurt cake: Divide your batter into five equal portions. Then, add several drops of food coloring to obtain vivid colors. Gently pour the first dough into the center of the pan, then the second still in the center, and continue. 
  • Mini yogurt cakes: Instead of using a round cake pan or loaf pan, experiment by making muffin-style yogurt cakes. Just pour the batter halfway up into buttered muffin cavities, add one tablespoon of Nutella and chopped unsalted peanuts into each, then cover with the rest of the batter. Bake for 25 minutes.

Storing and freezing

The yogurt cake tastes better the next day. A little waiting lets the cake be enriched with all the aromas of the ingredients.

To store the cake, wrap it in aluminum foil or plastic wrap or place it in an airtight container. Keep it for 1 to 2 days at room temperature and up to a week in a cool, dry place.

Refrigerate yogurt cake immediately if it is made with frosting, cream, dairy, or egg-based toppings, and store it for a couple of days only.

To freeze, wrap the plain yogurt cake with plastic film or aluminum foil, or place it in a freezer-safe bag and freeze for up to 4 to 6 months.

To defrost, bring the cake to the fridge overnight or the counter for a few hours.

Baking pan for making gâteau au yaourt

This French yogurt cake uses a yogurt container to measure ingredients. Since yogurt containers have different capacities, it makes sense to use different sizes of baking pans:

  • 8-inch (20 cm) Le Creuset springform pan, or
  • 9-inch (23 cm) springform pan, or
  • 10-inch (25 cm) Wilton springform pan, or
  • 11-inch (27 cm) Ballarini springform pan, or
  • 12-inch (30 cm) extra large springform pan.

For the yogurt cake in the picture, I used an 8-inch (20 cm) Fat Daddio's round cake pan and a 4 oz. (113 g) plain yogurt container.

Here is a simple table that converts a yogurt container into a cake pan to make the yogurt cake. It considers the capacity of a yogurt container as a measuring cup. If your baking pan is a different size or shape, use this cake pan calculator.

Measurements in ounces and inches

Yogurt capacityCake pan size
4 oz.8 inches
4.4 oz.9 inches
5 oz. 10 inches
5.3 oz.11 inch
6 oz.12 inch
Please, adjust the baking time accordingly if you use a different size pan.

Measurements in grams and centimeters

Yogurt capacityCake pan size
113 g20 cm
125 g23 cm
141 g 25 cm
150 g27 cm
170 g30 cm
Please adjust the baking time accordingly if you use a different size pan.

Recipe FAQ

How to make lactose-free yogurt cake?

To make a yogurt cake lactose-free, opt for soy milk yogurt without changing the quantities of the basic recipe.

How to make vegan yogurt cake?

You should omit the eggs from the lactose-free yogurt recipe and replace them with flaxseed eggs.

How to make a yogurt cake without eggs?

Remove the eggs from the basic recipe and add one more yogurt container.

How to make gluten-free yogurt cake?

Replace all-purpose flour with cornstarch or potato starch (2 yogurt cups of starch for 1 cup of yogurt) or a gluten-free flour mixture with cornstarch.

Love easy cakes? Try these next!

  • Sliced Madeleine cake on parchment paper and mesh ribbon.
    Madeleine Cake
  • Sliced German fruit flan topped with strawberries and peaches on a serving plate.
    Fruit Flan (Obsttorte)
  • Italian sponge cake on a marble board.
    Italian Sponge Cake (Pan di Spagna)
  • Fig and almond cake on a serving platter.
    Fresh Fig And Almond Cake Recipe

Want more delicious and beautiful recipes? Subscribe to my newsletter and follow me on Facebook, Pinterest, and Instagram for my latest updates. If you make this recipe, please leave a star rating on the recipe card and comment below!

Print

Recipe card

Gâteau au Yaourt (French Yogurt Cake)

Sliced gateau au yaourt on a serving plate.
Print Recipe
Save Recipe Recipe Saved

5 Stars 4 Stars 3 Stars 2 Stars 1 Star

5 from 5 reviews

This French yogurt cake - gâteau au yaourt - is fluffy, moist, and full of flavors. Loved by kids and adults, it is an easy no-measure cake perfect for any occasion.

  • Author: Irina Totterman
  • Total Time: 50 minutes
  • Yield: 6 1x
  • Category: Cakes
  • Method: Baking
  • Cuisine: French

Ingredients

Scale

1 measure = 1 pot = 1 yogurt container (4 oz. or 113 g)

  • 1 plain yogurt (keep the container)
  • 3 large eggs
  • 2 containers granulated sugar
  • 1 sachet (15 g) vanilla sugar
  • 1 container olive oil
  • 3 containers all-purpose flour
  • 1 teaspoon baking powder
  • ½ lemon, zest
  • 1 teaspoon butter for greasing

*Don't you have the correct baking pan on hand right now? Try this simple Cake Pan Converter!

** If needed, please refer to Baking Conversion Charts.

Instructions

  1. Preheat the oven to 355°F (180°C). Using a pastry brush and softened butter, butter, and flour, an 8-inch (20 cm) round cake pan.

  2. To make the cake batter, mix flour and baking powder in a medium bowl. Pour the yogurt into a separate large bowl. Clean the jar to use it as a measurer. Add eggs, granulated sugar, and vanilla sugar to the yogurt and beat with a hand whisk for a few seconds. Add the oil and quickly mix.

  3. Fold the dry ingredients and vanilla sugar into the yogurt mixture and gently mix, just to combine. Please, don't overwork the batter! At this stage, add citrus zest or fruits, apples, pears, lemon zest, etc.

  4. Pour the batter into the prepared pan and bake on the middle rack of the oven for 30 to 40 minutes. A cake tester or the tip of a knife inserted in the center of the cake should come clean or with a few moist crumbs.

  5. Let the cake cool for 5 to 10 minutes before unmolding, then transfer to a wire rack to cool completely. Dust with icing (powdered) sugar if desired. 

Notes

  1. Don't use an electric mixer or stand mixer: only mix the ingredients with a hand whisk.
  2. Don't overmix the cake batter: whisk for 5-10 seconds at every step until just combined. Never stir the batter more than necessary.
  3. Cover it with aluminum foil halfway through baking to prevent your cake from burning.
  4. To prevent the cake from drying out, slice it once serving it, not in advance. The cake retains moisture when it remains whole. 
  5. If you double the recipe and use 2 pots of yogurt, bake the cake at the lower temperature - 160 degrees C - for about 1 hour to 1 hour 20 minutes. Check for doneness with a sharp knife or a toothpick.

Nutrition

  • Serving Size: 1 slice
  • Calories: 555
  • Sugar: 42 g
  • Sodium: 52 mg
  • Fat: 20.9 g
  • Saturated Fat: 3.6 g
  • Carbohydrates: 83.3 g
  • Fiber: 1.9 g
  • Protein: 9.8 g
  • Cholesterol: 94 mg

Thank you for following me on Pinterest, Facebook, and Instagram. Hashtag #bakinglikeachef so I can see your creations.

The nutritional information has been calculated using an online recipe nutrition calculator such as Verywellfit.com and is intended for informational purposes only. These figures should be used as a general guideline and not be construed as a guarantee.

Madeleine Cake

Feb 27, 2022 · 3 Comments

Sliced Madeleine cake on parchment paper and mesh ribbon.

Madeleine cake (gâteau Madeleine in French) is a light, fluffy, and sharing version of the traditional madeleines. This delicious dessert is made in just 45 minutes using simple pantry ingredients - no special madeleine pan required.

Sliced Madeleine cake on parchment paper and mesh ribbon

The taste of freshly baked, homemade madeleines is still the perfect way to end any meal or have a snack.

They are so light and fluffy that you will never want another kind again once madeleines hit your taste buds.

You will be hooked after one bite and maybe even start making your own, too - just like me many years ago.

And I hope you will discover my guide on making your own French pastries at home.

Often, the process of making the best madeleines can be a little daunting.

They require special equipment - a madeleine pan - to get their traditional shell shape, and you have to chill the batter to obtain the cakes' signature hump.

Even though they are super delicious, most people only make madeleine cakes (sometimes called madeleine cookies) on special occasions because of these extra steps.

But baking madeleines doesn't have to be hard. What if I offer you to make an XL Madeleine cake?

This cake called gâteau Madeleine in French tastes just like a madeleine but is much easier to make and doesn't require any special equipment. You can even skip the chilling step.

You need to mix the ingredients in a bowl and pour them into a cake pan and bake. It is ready in just 45 minutes.

Do you remember how a French writer Marcel Proust described his experience with madeleines in his book "A Remembrance Of Things Past"? He would probably be delighted with a slice of the Madeleine cake too...

This cake is perfect for anyone who loves madeleines and wants an easy way to enjoy them more often. The best part is you can make this little gem yourself!

Grab All My Tips On How To Get That Famous Madeleine Hump, Everybody's Taking About

Close the CTA

Stay updated with weekly new recipes. You may opt out anytime. View our Privacy Policy.

This troubleshooting guide is all yours -  FOR FREE!

[feast_advanced_jump_to]
Sliced French cake Madeleine: Close up

Why you should try this recipe

With this easy-to-follow recipe, you can enjoy your favorite cake any time you want without all the hassle.

The cake will make the perfect accompaniment to your cup of tea and is great for last-minute guests.

Plus, this great recipe is versatile, so you can change it up however you like and create your own XL Madeleine cake.

For more ideas on how to vary the cake's taste and flavor, read on madeleine flavors.

Ingredients

Madeleine cake ingredients in pictures

For ingredients and detailed instructions, refer to the recipe card below.

Also, read Madeleine Ingredients.

Eggs: the recipe calls for large eggs at room temperature. Make sure to bring them to the counter 1 hour before you start.

Sugar: use golden brown sugar or replace it with light brown muscovado sugar if desired.

Butter: use unsalted butter with a pinch of salt or semi-salted butter if available.

Oil: the best and the most neutral oil in baking is grapeseed oil. If you don't mind the oil scent and taste, use olive oil or other oil of your choice.

Lemon juice: freshly squeezed lemon juice (use a citrus squeezer) enhances the citrus flavor of the cake.

Replace it with orange juice, orange blossom water, vanilla extract, or dark rum if desired.

Lemon zest: use only organic lemons to make fresh lemon zest. Substitute it with lime or orange zest if preferred.

Flour: the recipe calls for all-purpose flour or French T55 type flour.

Baking powder: use fresh aluminum-free baking powder (not baking soda).

Two pieces of the Madeleine cake with a fork

How to make Madeleine cake

Preheat the oven to 355 degrees F/180 degrees C. Using a pastry brush and softened butter, brush an 8-inch/20 cm round cake pan or charlotte mold.

Sift flour, baking powder, and salt using a flour sifter in a bowl. In a microwave-safe bowl, melt butter and let it cool.

To make the batter, in a large mixing bowl, whisk eggs and brown sugar at high speed with an electric or stand mixer fitted with the whisk attachment for about 5 minutes.

Egg and sugar mixture in a bowl

Add warm melted butter, oil, lemon zest, and lemon juice to the egg mixture and combine.

Add dry ingredients and gently smooth the mixture with a rubber spatula.

Madeleine batter in a large mixing bowl

Pour the batter into the prepared cake pan and bake in the hot oven for 30 minutes.

Cake batter in a baking mold

Check the cake's doneness with a toothpick or a sharp knife: the cake is ready if they come out clean.

baked cake in a cake tin

Let the cake cool for a few minutes, remove it from the mold, and cool down on a wire rack for 15 minutes. Dust the cake with confectioners' sugar if desired.

Recipe variations

Like classic French madeleines, Madeleine cake has many different variations to offer.

For instance, you can simply dust your cake with confectioners' sugar once baked and cooled down.

Or you can add semi-sweet chocolate chips into your batter if desired to create your own unique flavor combo.

Although cake Madeleine is typically made with a hint of lemon, you can replace it with orange or any other citrus flavor of your choice.

You can also sprinkle toppings such as chopped nuts (pistachios, almonds, pecans, etc.) on the surface of the batter and bake to give the cake some crunchiness during consumption.

Or you make your cake with a beautiful vanilla flavor: add scraped seeds of the vanilla bean, vanilla extract, and replace brown sugar with granulated.

Finally, you can even upgrade this cake into an adult treat by adding dark rum to the madeleine batter.

What else? You can play with cake pans: from 8-inch/20 cm round cake pan and charlotte mold to honeycomb pan and fluted cake mold.

But pay attention to the capacity of your baking dish; some are designed for more than others.

The charlotte mold holds 3 cups of butter while honeycomb pan - 10 cups and fluted cake mold - 6 cups. So, the bake time should be adjusted accordingly.

Check out this simple cake pan converter if you ever need to re-calculate your baking pan size.

Storing and feezing

This Madeleine cake will stay fresh for 2 to 4 days if stored in an airtight container at room temperature.

Can you freeze it? Yes, you can cover it with plastic wrap and freeze it at -13 degrees F/-25 degrees C for up to three months.

Also, read How to Store and Freeze Madeleines.

Expert tips

  1. Whisk the egg and sugar mixture for a long time, not less than 5 minutes, to aerate the preparation.
  2. Make sure to cool down the melted butter.

Frequently asked question

Can you make Madeleine cake with cake flour?

Most French chefs make madeleine batter with French T55 flour type, which is equivalent to American all-purpose flour; others use French T45 flour which is equivalent to American cake flour.

Love madeleine recipes? Try these next!

Have you heard of the deliciously rich, pillowy madeleines that are a favorite among Parisians?

If so, then this best madeleine recipe might be just what your inner cravings need.

Follow all the steps and photographed instructions for authentic French butter cakes to make these delectable treats at home.

Or even change it up and try your hand with a twist on an old classic.

  • Bitten off madeleine with the rest of the cakes in the background.
    Madeleine Recipe Without Mold
  • A batch of baked lemon and poppy seed madeleines on a silicone mold.
    Lemon Poppy Seed Madeleines
  • Halved spiced madeleines with the rest of cakes in the background.
    Christmas Gingerbread Madeleines
  • A batch of raspberry madeleines in a red silicone mold.
    Raspberry Madeleines

Want more delicious and beautiful recipes? Subscribe to my newsletter and follow me on Facebook, Pinterest, and Instagram for my latest updates. If you make this recipe, please leave a star rating on the recipe card and comment below!

Print

Recipe card

Madeleine Cake

Sliced Madeleine cake on parchment paper and mesh ribbon.
Print Recipe
Save Recipe Recipe Saved

5 Stars 4 Stars 3 Stars 2 Stars 1 Star

5 from 1 review

Madeleine cake (gâteau Madeleine in French) is a light, fluffy, and sharing version of the traditional madeleines. This delicious dessert is made in just 45 minutes using simple pantry ingredients  - no special madeleine pan required.

  • Author: Irina Totterman
  • Total Time: 45 minutes
  • Yield: 6 1x
  • Category: Cakes
  • Method: Baking
  • Cuisine: French

Ingredients

Scale
  • 3 large eggs, room temperature
  • ¾ cup (150 g) brown sugar
  • 1 stick + 1 ½ teaspoons (120 g) unsalted butter, melted
  • 2 tablespoons grapeseed oil
  • 1 tablespoon lemon juice
  • 2 lemons, zest
  • 1 cup + 2 teaspoons (130 g) all-purpose flour
  • ½ teaspoon baking powder
  • 1 pinch of salt

*Don't you have the correct baking pan on hand right now? Try this simple Cake Pan Converter!

** If needed, please refer to Baking Conversion Charts.

Instructions

  1. Preheat the oven to 355 degrees F/180 degrees C. Using a pastry brush and softened butter, brush an 8-inch/20 cm round cake pan or charlotte mold. Sift flour, baking powder, and salt using a flour sifter in a bowl. In a microwave-safe bowl, melt butter and let it cool.

  2. To make the batter, in a large mixing bowl, whisk eggs and brown sugar at high speed with an electric or stand mixer fitted with the whisk attachment for about 5 minutes. Add warm melted butter, oil, lemon zest, and lemon juice to the egg mixture and combine. Add dry ingredients and gently smooth the mixture with a rubber spatula.

  3. Pour the batter into the prepared cake pan and bake in the hot oven for 30 minutes. Check the cake's doneness with a toothpick or a sharp knife: the cake is ready if they come out clean. Let the cake cool for a few minutes, remove it from the mold, and cool down on a wire rack for 15 minutes. Dust the cake with confectioners' sugar if desired.

Notes

  1. Whisk the egg and sugar mixture for a long time, not less than 5 minutes, to aerate the preparation.
  2. Make sure to cool down the melted butter.

Nutrition

  • Serving Size: 1 slice
  • Calories: 398
  • Sugar: 24.6 g
  • Sodium: 73 mg
  • Fat: 23.9 g
  • Saturated Fat: 11.6 g
  • Carbohydrates: 41.5 g
  • Fiber: 0.6 g
  • Protein: 5.6 g
  • Cholesterol: 136 mg

Thank you for following me on Pinterest, Facebook, and Instagram. Hashtag #bakinglikeachef so I can see your creations.

The nutritional information has been calculated using an online recipe nutrition calculator such as Verywellfit.com and is intended for informational purposes only. These figures should be used as a general guideline and not be construed as a guarantee.

The recipe was adapted from www.mercotte.fr.

Vanilla Meringue Cake (Cipriani Cake)

Jan 17, 2022 · 2 Comments

Cipriani vanilla meringue cake on a cake stand.

Indulge in this deliciously decadent Cipriani vanilla meringue cake or simply Cipriani cake. Made with a soft Italian sponge, pillowy vanilla cream, and topped with a light sweet meringue, this is guaranteed to impress you and your guests.

Cipriani vanilla meringue cake on a cake stand

What could be more lovely than a cake topped with fluffy meringue? This one is pretty top.

It is an impressive-looking layer cake with a simple name and an inspiration from classic Cipriani meringue cake.

[feast_advanced_jump_to]

The top layer is covered with sweet meringue, while in between each section, you will find soft sponge layers with vanilla whipped cream to match.

When you bite into your first piece of this sweet treat, it feels like biting into the air - literally.

BAKING ESSENTIALS CHECKLIST

Sign up and get a list of the necessary baking tools and ingredients

FREE DOWNLOAD

This vanilla sponge meringue cake is amazingly delicious. All you want is to eat it with a spoon. It is a must-make for anyone who wants to make something special for their family and friends.

Sliced Cipriani meringue cake on a cake stand

Why you should try this recipe

  • This vanilla meringue cake is prepared with simple ingredients carried by grocery stores. It is made with the readers' favorite sponge cake with meringue topping.
  • The Cipriani meringue cake is always a crowd-pleasing treat. It is light and sweet, perfect for any occasion, weather to enjoy on Christmas morning or after dinner during Thanksgiving Eve festivities.
  • The cake has a make-ahead option: a sponge cake can be prepared in advance and assembled on the day of serving.

Ingredients

For ingredients and detailed instructions, refer to the recipe card below.

  • Italian sponge cake: Follow the recipe for Pan di Spagna to make an 8-inch (20 cm) cake.
  • Milk: The recipe calls for whole milk. Replace it with low-fat milk if desired.
  • Vanilla bean: Scraped seeds of a real vanilla bean makes a difference in the flavor of the cake. You can substitute it with one teaspoon of vanilla extract if desired. It is not the same as using a real vanilla bean, but it works.
  • Eggs: Use large eggs at room temperature. Separate the egg whites from the yolks using an egg separator while the eggs are chilled. To make the French meringue frosting, use ONLY pasteurized eggs. Salmonella is generally found in egg yolks, but egg whites are not considered safe. Therefore, eggs must be pasteurized to be safe to eat.

Alternatively, you can make Italian meringue instead of French meringue.

  • Sugar: Use granulated or caster sugar to make the cake.
  • Corn starch is used as a thickener to make the pastry cream.
  • Flour: Use all-purpose flour to make the sponge cake and pastry cream.
  • Butter: The recipe calls for unsalted butter, still chilled in the fridge and cut into cubes.
  • Heavy cream: Use at least 30% fat content of heavy or heavy whipping cream. You can replace it with double cream with 48% fat content.
  • Lemon juice: You will need freshly-squeezed lemon juice to make the meringue.
A slice of vanilla meringue cake on a dessert plate

Recipe variations

This vanilla meringue cake is already so good. But what if you want to make it more flavorful?

  • Add a teaspoon of vanilla extract or ½ teaspoon of fresh lemon zest to the sponge cake batter. It makes it taste just delicious.
  • Increase the amount of the meringue by 0.3 to 0.5 to make the meringue decoration richer and thicker. Well, can you ever have too much meringue icing?!
  • Make the Cipriani signature meringue peaks (watch the video) or form swirly-looking waves in the meringue with the back of a spoon.
  • Finally, transform this cake into a lemon meringue cake. To do so, slice the sponge into two layers of cake. Omit the vanilla cream. Spread the lemon curd over the first cake layer and top with the second one. Then cover the cake with the meringue and brown it with a kitchen torch.
Toasted meringue cake on a cake stand

How to make vanilla meringue cake

Follow the sponge cake recipe to make an 8-inch/20 cm sponge cake.

Remove it from the baking pan and let it cool completely on a wire rack. Then using a cake leveler or a large serrated knife, cut the cake into three layers crossways.

To make the vanilla cream, prepare the pastry cream (crème pâtissière in French) first.

Pro tip: Consult the Italian pastry cream recipe for step-by-step photographed explanations, helpful rips, and tricks.

Use a small sharp knife to split the vanilla bean in half lengthways. Then with the tip of the blade, scrape out the seeds.

Bring milk and vanilla seeds to a boil in a small saucepan. In a separate bowl, whisk egg yolks, sugar, all-purpose flour, and corn starch with a hand whisk.

Pour the hot milk into the egg mixture while continuing whisking. Bring the milk mixture back to the saucepan and cook over medium-low heat for a few minutes (constantly whisking) until the cream thickens.

Add cold butter, cut into cubes, and mix. Transfer the pastry cream to a shallow dish, cover it with plastic film in contact, and let it cool at room temperature (no need to chill it!).

Pour whipped cream into the chilled bowl of a stand mixer or using a hand mixer, and whip cream until soft peaks form.

Pro tip: Consult the sugar-free whipped cream recipe for step-by-step photographed explanations, helpful rips, and tricks.

Slowly, one tablespoon at a time, add the pastry cream to the whipped cream, and beat until firm (photo 1).

To assemble the cake, place the first sponge layer on a serving plate and top with half of the vanilla cream (photo 2).

Photo 1: Vanilla cream in a bowl Photo 2: Cream on top of the cake layer in a mild
PHOTO 1 PHOTO 2

Then add the second cake layer (photo 3), spread the remaining cream, and press down gently. Finally, finish the cake with the third sponge layer.

To make the meringue, place room-temperature egg whites, granulated sugar, and lemon juice in the clean mixer bowl of a stand mixer fitted with a whisk attachment. Or place ingredients in a large bowl and use an electric mixer.

Whisk the meringue at medium-high speed (mixer speed) until sugar dissolves and stiff and glossy peaks form (photo 4).

Photo 3: Vanilla cake layer in a mold Photo 4: Stiff meringue on a whisk
PHOTO 3 PHOTO 4

Cover the entire cake (the top and sides) with the meringue using a dough scraper, an offset spatula, or the back of a spoon. Pick up the meringue on top of the cake to create little peaks (photo 5).

Torch the top and edges of the cake with a blow torch (photo 6). Serve right away.

Photo 5: Sponge cake with meringue topping Photo 6: Toasted meringue cake on a cake board
PHOTO 5 PHOTO 6

Pro tip: If making it ahead of time, chill the cake. Cover it with the meringue and torch it just before serving.

Cipriani cake on cake stand with a fork and a tea towel

Expert Tips

  1. Use ONLY pasteurized eggs to make the French meringue frosting. If you desire, you can make Italian meringue made with heated sugar syrup which is considered safe to eat.
  2. The meringue icing should be spread over the cake no longer than one hour before serving.
  3. If you don't have a kitchen torch, brown the meringue in the oven. Place the oven shelf in the upper position, one below the top, and preheat the broiler. Bring the cake to the oven, broil the meringue until browned, 30 seconds to 1 minute. Attention: watch out closely to avoid burning!
  4. Don't discard the empty vanilla pod: place it in a container with white sugar to flavor it.
  5. Make ahead option: Make sponge cake one day in advance, cover it with plastic wrap, and refrigerate. The next day, slice the sponge into layers and finish the cake.

Storing and freezing

Store the vanilla meringue cake without the meringue layer in the refrigerator for up to 24 hours. Make the meringue, and decorate the cake with the meringue icing when ready to serve.

But you can keep baked and cooled sponge cake well wrapped in the fridge for a couple of days or freeze it for up to one month. 

Can you freeze Cipriani meringue cake? It isn't recommended to freeze the cake. The meringue would lose its shape and texture when thawed.

Recipe FAQ

Is it safe to eat a cake with meringue topping?

If the cake is topped with French meringue (not cooked meringue), there is a risk of salmonella infection. That is why it is recommended to use only pasteurized eggs. However, it is considered safe if the pastry is topped with Italian and Swiss Meringue, where heated sugar syrup is used.

Can you top this cake with an Italian meringue?

Yes, absolutely. Italian meringue is a cooked meringue (safe to eat) and is more stable than French meringue.

What if you don't have a kitchen torch?

There is an easy alternative if you don't have a kitchen torch! Just place your pastry topped with freshly-made meringue under the broiler for a minimal time (about 1 to 2 minutes). Make sure to watch closely, though, because this could burn quickly.

Love meringues? Try these next!

  • Meringue roulade topped with raspberries and pistachios on a black serving board.
    Pavlova Roll (Meringue Roulade)
  • French meringue dessert Merveilleux with a fork on a dessert plate.
    French Meringue Dessert Merveilleux
  • Meringue spheres served on a black slate board with a dessert plate and flowers aside.
    Christmas Meringue Spheres
  • French Meringue Cake Merveilleux on a cake round with chocolate shavings and a cup on background.
    French Meringue Cake Merveilleux

Want more delicious and beautiful recipes? Subscribe to my newsletter and follow me on Facebook, Pinterest, and Instagram for my latest updates. If you make this recipe, please leave a star rating on the recipe card and comment below!

Print

Recipe card

Vanilla Meringue Cake (Cipriani Cake)

Cipriani vanilla meringue cake on a cake stand.
Print Recipe
Save Recipe Recipe Saved

5 Stars 4 Stars 3 Stars 2 Stars 1 Star

5 from 2 reviews

Indulge in this deliciously decadent vanilla meringue cake or Cipriani cake. Made with a soft Italian sponge, pillowy vanilla cream, and topped with a light sweet meringue, this is guaranteed to impress you and your guests.

  • Author: Irina Totterman
  • Total Time: 2 hours
  • Yield: 8 1x
  • Category: Cakes
  • Method: Baking
  • Cuisine: Italian

Ingredients

Scale
  • 8-inch/20 cm sponge cake

For the vanilla cream:

  • ½ cup + 1 teaspoon (125 g) whole milk
  • 1 vanilla bean
  • 1 large egg yolk 
  • 1 ½ tablespoon (20 g) granulated sugar
  • 2 teaspoons (6 g) cornstarch
  • 2 teaspoons (5 g) all-purpose flour
  • 2 teaspoons (10 g) cold unsalted butter 
  • 1 ½ cups (345 g) heavy cream, 30% fat

For the meringue:

  • 4 large egg whites, room temperature
  • 1 cup (225 g) granulated sugar
  • 1 teaspoon lemon juice

*Don't you have the correct baking pan on hand right now? Try this simple Cake Pan Converter!

** If needed, please refer to Baking Conversion Charts.

Instructions

  1. Follow the sponge cake recipe to make an 8-inch (20 cm) sponge cake. Remove it from the baking pan and let it cool completely on a wire rack. Then using a cake leveler, cut the cake into three layers crossways.

  2. To make the vanilla cream, prepare the pastry cream (crème pâtissière in French) first. Use a small sharp knife to split the vanilla bean in half lengthways. Then with the tip of the blade, scrape out the seeds. Bring milk and vanilla seeds to a boil in a small saucepan.

  3. In a separate bowl, whisk egg yolks, sugar, all-purpose flour, and cornstarch with a hand whisk. Pour the hot milk into the egg mixture while continuing whisking. Bring the mixture back to the saucepan and cook over medium-low heat for a few minutes (constantly whisking) until the cream thickens.

  4. Add cold butter, cut into cubes, and mix. Transfer the pastry cream to a shallow dish, cover it with plastic film in contact, and let it cool at room temperature (no need to chill it!).

  5. Pour heavy cream into the chilled bowl of a stand mixer and whip cream until soft peaks. Slowly, one tablespoon at a time, add the pastry cream to the whipped cream, and beat until firm.

  6. To assemble the cake, place the first sponge layer on a serving plate and top with half of the vanilla cream. Then add the second cake layer, spread the remaining cream, and press down gently. Finally, finish the cake with the third sponge layer.

  7. To make the meringue, place egg whites (at room temperature), granulated sugar, and lemon juice in a clean mixer bowl of a stand mixer fitted with a whisk attachment. Or place ingredients in a large bowl and use an electric mixer. Whisk the meringue at medium-high speed (mixer speed) until sugar dissolves and stiff peaks form. Next, cover the entire cake (the top and sides) with the meringue using a dough scraper, an offset spatula, or the back of a spoon. Pick up the meringue on top of the cake to create little peaks.

  8. Torch the top and edges of the cake with a blow torch. Serve right away. If making it ahead of time, chill the cake. Cover it with the meringue and torch it just before serving.

Notes

  1. Use ONLY pasteurized eggs to make the French meringue frosting. If you desire, you can make Italian meringue made with heated sugar syrup which is considered safe to eat.
  2. The meringue icing should be spread over the cake no longer than one hour before serving.
  3. If you don't have a kitchen torch, brown the meringue in the oven. Place the oven shelf in the upper position, one below the top, and preheat the broiler. Bring the cake to the oven, broil the meringue until browned, 30 seconds to 1 minute. Attention: watch out closely to avoid burning!
  4. Don't discard the empty vanilla pod: place it in a container with white sugar to flavor it.
  5. Make ahead option: Make sponge cake one day in advance, cover it with plastic wrap, and refrigerate. The next day, slice the sponge into layers and finish the cake.

Nutrition

  • Serving Size: 1 slice
  • Calories: 427
  • Sugar: 46.9 g
  • Sodium: 74 mg
  • Fat: 18.2 g
  • Saturated Fat: 10.3 g
  • Carbohydrates: 60.6 g
  • Fiber: 0.4 g
  • Protein: 8.4 g
  • Cholesterol: 176 mg

Thank you for following me on Pinterest, Facebook, and Instagram. Hashtag #bakinglikeachef so I can see your creations.

The nutritional information has been calculated using an online recipe nutrition calculator such as Verywellfit.com and is intended for informational purposes only. These figures should be used as a general guideline and not be construed as a guarantee.

Fruit Flan (Obsttorte)

Nov 5, 2021 · 10 Comments

Sliced German fruit flan topped with strawberries and peaches on a serving plate.

Obsttorte or Obstboden is a German fruit flan filled with vanilla pudding and topped with fruits. This sweet treat will surely please a crowd, making 12-14 servings at once. 

Sliced German fruit flan topped with strawberries and peaches on a serving plate

If you are looking for a sweet treat to complete your entertaining menu, there is no better dessert option than this simple fruit flan.

It is a delicious dessert that will be the talk of your next event. You can serve it at an upcoming birthday party or baby shower and impress everyone there with your baking skills.

[feast_advanced_jump_to]

And what's an extra touch that sure makes the dessert a showstopper? The authentic German fruit flan is covered with a fruit cake glaze called Tortenguss to fix the fruits and make them shine.

BAKING ESSENTIALS CHECKLIST

Sign up and get a list of the necessary baking tools and ingredients

FREE DOWNLOAD

Fruit flan closely resembles a popular German strawberry cake or Erdbeerboden, made with a Genoise cake base, vanilla pudding, and seasonal fresh strawberries.

Mixed fruit flan decorated with seasonal summer fruit: Overhead view

What's fruit flan?

Fruit flan is a traditional German dessert made with a fruit base, smooth custard, and fresh fruits covered with a sweet glaze.

In German, it is called Obsttorte (fruit cake in English) or Obstboden, meaning "fruit ground, "froot floor," or "fruit base."

Fruit flan vs. fruit tart

Also known as Obsttorte, fruit flan shares similarities with a fancy fruit tart rather than a fruit pizza, as it features a biscuit-like flan base and glazed fruit toppings.

The boden (base or floor in English) of the fruit flan and the tart shell are often filled with rich pastry cream (crème pâtissière in French) to prevent the dessert from soaking through the fruit's moisture.

However, the dessert bottom of the fruit flan is made of a sponge or shortcrust pastry base. It is baked in a specially-designed flan pan or flan tin to hold fresh, steamed, canned, or frozen fruit.

A fruit tart is usually made with a sweet pastry crust (aka pâte sucrée) baked in a tart pan with fluted sides and a flat bottom.

Both the fruit base and tart shell are decorated with concentric circles of whole or sliced fresh fruit to give the desserts a delicious look.

Fruit flan recipe

  • Fruit flan is an exceptional dessert choice for gathering events. It serves a large audience, yielding approximately 12-14 servings.
  • This fruit flan cake recipe is so easy to make that even a beginner baker can make it.
  • Summer fruit flan is a must-make, but nothing prevents you from making such a dessert with canned or frozen fruit.
  • Using your favorite fruits or sweet berries allows creating your own fruit flan. The possibilities are endless.
  • Finally, if you want to try one of the best German desserts, the Obsttorte recipe is here.

Ingredients

German fruit flan ingredients in pictures

For ingredients and detailed instructions, refer to the recipe card below.

  • Butter: Use top-quality unsalted butter softened at room temperature. You will need a bit more for greasing a flan pan.
  • Sugar: The recipe calls for white sugar (granulated or caster sugar).
  • Vanilla sugar: You will need one sachet of vanilla sugar.
  • Salt enhances the flavors of the fruit base.
  • Eggs: Use large eggs at room temperature.
  • Baking powder, as a leavening agent, helps raise the flan base while baking.
  • Flour: The recipe calls for all-purpose flour.
  • Bread crumbs: Use fine plain bread crumbs to sprinkle the buttered pan. Replace bread crumbs with flour if desired.
  • Vanilla pudding powder: Use a store-bought Dr. Oetker vanilla pudding or make the vanilla pudding yourself.
  • Milk: The recipe calls for whole milk. Substitute it for low-fat milk if preferred.
  • Chocolate: Melted dark chocolate is used to prevent the pastry case (flan base) from soaking. Replace it with milk or white chocolate if desired.
  • Fruits: Use fresh berries and seasonal fruit as the traditional filling for German flan. Also, you can use canned or even frozen fruits to make this simple fruit flan recipe. Please, check the expert tips below.
  • Potato starch is used as a thickener to make a clear glaze. Replace it with corn starch if desired. Or use a store-bought clear glaze Tortenguss.
Assembled German flan with the glazed mixed fruit on top with a cup and a towel

How to make a fruit flan

Step 1. To make the fruit base, using a pastry brush and softened butter, brush an 11-inch (28 cm) fruit flan pan and sprinkle with bread crumbs (photo 1). With a flour sifter, sift flour with baking powder in a mixing bowl and set aside.

Step 2. Preheat oven to 355 degrees/180 degrees C. Place butter, granulated sugar, salt, and vanilla sugar in the bowl of a stand mixer or a large bowl.

Step 3. Beat the butter and sugar mixture until the sugar crystals are almost dissolved using a stand or electric mixer (photo 2).

Photo 1: Flan tin sprinkled with bread crumbs Photo 2: Butter mixture in a bowl
PHOTO 1 PHOTO 2

Step 4. Stir in eggs, one at a time, each for about 30 seconds (photo 3). Add the dry ingredients and mix with a hand mixer just to combine (photo 4).

Photo 3: Butter and eggs mixture in a bowl Photo 4: Ready batter in a bowl
PHOTO 3 PHOTO 4

Step 5. Pour batter into the prepared tin, smooth out (photo 5), and bake in the hot oven for 20 minutes until the golden color (photo 6).

Photo 5: Batter in a flan pan Photo 6: Baked flan base in a tin
PHOTO 5 PHOTO 6

Step 6. Let it cool for about 5 minutes on a wire rack and turn it down. Let it could completely (photo 7).

Step 7. Transfer the baked base in an upside-down position to a serving plate. Cut each strawberry into four, and slice the canned peaches into ½ inch (1.5 cm) wedges.

Step 8. Melt dark chocolate in a double boiler (or water bath) and brush the cooled flan base with chocolate using a silicone or pastry brush (photo 8). Let the chocolate set for about 30 minutes.

Photo 7: Baked flan case on a wire rack Photo 8: Flan base covered with chocolate
PHOTO 7 PHOTO 8

Step 9. To make the vanilla pudding, follow the instructions on the pack of the instant vanilla pudding, but use the amount of ingredients provided in the recipe card below (photo 9).

Step 10. Pour it onto a shallow dish, cover it with plastic wrap, and let it cool. Cover the base with a layer of vanilla pudding.

Step 11. Arrange the prepared fruit in a circular pattern, slightly overlapping fruit slices. Start your design from the outside edge of the flan and work inward towards the center.

Step 12. To make the clear cake glaze, stir potato starch into ¼ cup (60 ml) water until dissolved. Bring ¾ cup (175 ml) water with sugar to a simmer.

Step 13. Stir in the starch mixture and bring it to a boil while stirring. Let the glaze cool a bit, and brush the fruit thinly using a silicone brush (photo 10). Refrigerate for at least 1 hour before serving.

Photo 9: Vanilla pudding in a saucepan Photo 10: Decorated fruit flan on a serving plate
PHOTO 9 PHOTO 10

Expert Tips

  1. While baking the fruit base, add 3 to 5 minutes if you like the fruit crust crisp.
  2. Omit the chocolate layer or pudding layer if desired. Just make one of them to protect the base from soaking (you can use both layers if preferred).
  3. Use the juice from the canned peaches to make your own glaze (omit water and sugar in the glaze recipe) or purchase store-bought clear glaze Tortenguss.
  4. Brush the top of the fruit with the glaze while it is hot enough, or use a spoon to spread it over the fruit on the fruit base from the center (you will use a few spoons of the glaze).
  5. The shiny fruit glaze takes about 1 hour to set.  While chilling, it goes a little faster. So, plan your baking accordingly.
  6. If you decorate your fruit flan with exotic fruits such as pineapple, kiwi, or mango, don't use the glaze. These fruits contain an enzyme that prevents them from setting.
  7. If you use frozen strawberries, arrange them on the base while they are frozen and immediately cover them with the hot glaze. In this way, the juice will stay in the strawberries.
  8. Make-ahead option: Bake the cake base the day before. Then wrap it in plastic film to prevent it from drying out and refrigerate. Assemble the dessert the next day. If you are short on time but need to make a quick dessert, keep the Obsttortenboden sponge cake on your hands. It is a pre-made fruit cake base made by the Schlünder company.

Recipe variations

There are plenty of Obsttorte recipes - from different cake bases to all kinds of fruits and their combinations.

  • The classic Boden or flan base is biscuit. However, the base can be baked from shortcrust pastry or represent a delicious vanilla sponge flan base depending on your taste.  
  • To bring some crunchiness, you can sprinkle the buttered fruit flan tin with bread crumbs, flour, or even flaked almonds.
  • In summer, a simple fruit base with a variety of fruit (fresh strawberries, fresh blueberries, raspberries, pineapple, apricots, or peaches) tastes fantastic.
  • Play with a themed-like flan choosing red fruit or tropical fruits, for example, pineapple, kiwi, or mango.
  • Use the whole red berries or their slices: mound sliced strawberries like in this classic French strawberry tart, go with a flower pattern like in this peach tart, or make a pattern you desire.
  • If the fresh fruits are out of season, use canned or even frozen fruit. Serve a slice of your fruit flan with a dollop of homemade whipped cream, and enjoy.
  • In the end, use your favorite type of fruit to create your own fruit flan dessert. For example, go for only strawberries (the top choice) and make a strawberry flan or combine different fruits in a mixed fruit flan.

Storing and freezing

The assembled fruit flan is best served on the day of making. You can store it covered in the refrigerator for up to 2-3 days.

Can you freeze fruit flan? It is not recommended to freeze the assembled fruit flan. On freezing, the chemical structure of both fruit glaze and berries changes, which will result in a soggy mess when thawed.

But you can freeze the fruit base. Let it cool, cover it with plastic wrap and freeze it for 4 to 6 months. Then, to thaw, bring it to the fridge overnight.

How to prevent the fruit base from soaking

How to keep fruit flan from getting soggy? Here are a few tricks.

  • Chocolate works perfectly to protect the base from soaking. Use melted chocolate to brush the cooled base. Then let the chocolate set for 30 minutes.
  • Alternatively, you can cover the cooled base with 2 to 3 tablespoons of jam (for example, strawberry jam).
  • Also, you can sprinkle it with breadcrumbs, ground almonds, or other nuts. This layer will bind any leaking from the juicy fruit.
  • Finally, make vanilla pudding (use store-bought vanilla pudding powder or make the pudding yourself) and spread a layer onto the cake bottom. It will also protect the fruit case from soaking.

To fix the fruit on top of the cake, use store-bought clear glaze (Tortenguss klar) or red sweet glaze (Tortenguss rot) or make it yourself (follow the clear glaze recipe in the recipe card).

You can always replace water and sugar in the glaze recipe with canned (drained from canned fruit) or fresh juice (white grape or apple juice). Or use red berries or grape juice to make a red glaze.

Another alternative is to use warmed apricot jam, apricot preserves, or other fruit jam/preserves. Just heat seedless jam or preserves in the microwave.

You can add a bit of water if it is too thick. Cool slightly and brush a thin layer of apricot glaze on the fruit. 

Recipe FAQ

Is German fruit flan a fruit tart or fruit cake?

Obsttorte refers to a German fruit cake made with a pre-baked fruit base and topped with fresh or canned fruits. Since the base can be made with a shortcrust pastry and is always decorated with fruit, it is similar to a fruit tart. But it is made in a special flan pan (not a fruit tart pan), so the German flan is a fruit flan cake.

Is German flan the same as Spanish flan?

No, these are different types of flan. The traditional German flan is a fruit cake baked in a special rimmed flan pan and topped with fruit. Spanish (or Mexican) flan is a creamy custard made with eggs, whole milk, sweetened condensed milk, and vanilla extract. 

What is a fruit flan pan?

A flan tin is a baking pan with fluted sides that resembles a tart pan but with a raised center (or base), so the baked cake, being inverted, has a lip to hold fruits. It is a must-have for fruit flans and strawberry shortcakes.

Can you make a fruit flan in a regular fluted tart pan?

Yes, you can bake a fruit base in a 9-inch/23-cm tart tin with a removable bottom. Just recalculate ingredients using our simple baking tool - cake pan converter. After baking, flip it over onto a serving plate and assemble it.

Can you use pastry cream for German fruit flan?

You can make classic pastry cream and use it instead of vanilla pudding in the recipe.

Love fruit desserts? Try these next!

  • Sliced cherry pie topped with crumb topping on a serving board.
    Cherry Crumb Pie Recipe
  • Apple tart decorated with gold pearls and flours in a tart pan with a yellow cup on the background.
    Modern French Caramel Apple Tart
  • A slice of French quince tarte Tatin with the rest of the dessert in the background.
    Quince Tarte Tatin Recipe
  • Plum frangipane tart on a serving board.
    Plum Frangipane Tart (Just 7 Ingredients!)

Want more delicious and beautiful recipes? Subscribe to my newsletter and follow me on Facebook, Pinterest, and Instagram for my latest updates. If you make this recipe, please leave a star rating on the recipe card and comment below!

Print

Recipe card

German Fruit Flan (Obsttorte)

Sliced German fruit flan topped with strawberries and peaches on a serving plate.
Print Recipe
Save Recipe Recipe Saved

5 Stars 4 Stars 3 Stars 2 Stars 1 Star

5 from 5 reviews

German fruit flan, Obsttorte, or Obstboden, is a classic German dessert made with a fruit base, vanilla custard, and glazed fresh fruits. This sweet treat will surely please a crowd, making 12-14 servings at once. 

  • Author: Irina Totterman
  • Total Time: 1 hour, 15 minutes (plus, setting time)
  • Yield: 12 1x
  • Category: Cakes
  • Method: Baking
  • Cuisine: German

Ingredients

Scale

For the fruit base:

  • 4.4 oz. (125 g) unsalted butter, softened + little for greasing
  • ⅔ cup + 2 tablespoons (180 g) granulated sugar
  • 1 sachet (9 g) vanilla sugar
  • 1 pinch of salt
  • 3 large eggs
  • ½ teaspoon baking powder
  • 1 ⅓ cups + 1 ½ tablespoons (180 g) all-purpose flour
  • 1 tablespoon bread crumbs 

For the vanilla pudding:

  • 1 pack of vanilla pudding powder
  • 1 ⅔ cups + 1 tablespoon (400 ml) milk
  • 1 tablespoon granulated sugar

For decoration:

  • 1.8 oz. (50 g) dark chocolate
  • 7 oz. (200 g) fresh strawberries
  • 17.6 oz. (500 g) canned peaches, drained

For the glaze:

  • 2 tablespoons granulated sugar
  • 1 tablespoon potato starch
  • ⅔ cup + 3 tablespoons (200 ml) water

*Don't you have the correct baking pan on hand right now? Try this simple Cake Pan Converter!

** If needed, please refer to Baking Conversion Charts.

Instructions

  1. To make the fruit base, using a pastry brush and softened butter, brush an 11-inch/28 cm fruit flan pan and sprinkle with bread crumbs. Then, using a flour sifter, sift flour with baking powder in a mixing bowl and set aside.
  2. Preheat oven to 355 degrees F/180 degrees C. Place butter, granulated sugar, salt, and vanilla sugar in the bowl of a stand mixer or a large bowl. Beat the butter and sugar mixture until the sugar crystals are almost dissolved using a stand or electric mixer.
  3. Stir in eggs, one at a time, each for about 30 seconds. Add the dry ingredients and mix with a hand mixer just to combine.
  4. Pour batter into the prepared tin, smooth out, and bake in the hot oven for 20 minutes until it the golden in color. Let it cool for about 5 minutes on a wire rack and turn it down. Let it could completely.
  5. To make the vanilla pudding, follow the instructions on the pack of instant vanilla pudding. Then, pour it on a shallow dish, cover it with plastic wrap, and let it cool.
  6. To assemble the fruit flan, transfer the baked base in an upside-down position to a serving plate. Cut each strawberry into four, and slice the canned peaches into ½ inch/1.5 cm wedges.
  7. Melt dark chocolate in a double boiler (or water bath) and brush the cooled flan base with chocolate using a silicone or pastry brush. Let the chocolate set for about 30 minutes.
  8. Cover the base with a layer of vanilla pudding and arrange the prepared fruit in a circular pattern, slightly overlapping fruit slices. Start your design from the outside edge of the flan and work inward towards the center.
  9. To make the cake glaze, stir potato starch into ¼ cup (60 ml) water until dissolved. Bring ¾ cup (175 ml) water with sugar to a simmer. Stir in the starch mixture and bring it to a boil while stirring. Let the glaze cool a bit, and brush the fruit thinly using a silicone brush. Refrigerate for at least 1 hour before serving.

Notes

  1. While baking the fruit base, add 3 to 5 minutes if you like the fruit crust crisp.
  2. Omit the chocolate layer or pudding layer if desired. Just make one of them to protect the base from soaking (I used both layers, it is my personal preference).
  3. Use the juice from the canned peaches to make your own glaze (omit water and sugar in the glaze recipe) or purchase store-bought clear glaze Tortenguss.
  4. Brush the top of the fruit with the glaze while it is hot enough, or use a spoon to spread it over the fruit on the fruit base from the center (you will use a few spoons of the glaze).
  5. The shiny fruit glaze takes about 1 hour to set.  While chilling, it goes a little faster. So, plan your baking accordingly.
  6. If you decorate your fruit flan with exotic fruits such as pineapple, kiwi, or mango, don't use a cake glaze. These fruits contain an enzyme that prevents them from setting.
  7. If you use frozen strawberries, arrange them on the base while they are frozen and immediately cover them with a hot cake glaze. In this way, the juice will stay in the strawberries.
  8. Make-ahead option: Bake the cake base the day before. Then wrap it in plastic film to prevent it from drying out and refrigerate. Assemble the dessert the next day.

Nutrition

  • Serving Size: 1 slice
  • Calories: 304
  • Sugar: 30.4 g
  • Sodium: 56 mg
  • Fat: 12 g
  • Saturated Fat: 7.1 g
  • Carbohydrates: 45.8 g
  • Fiber: 1.9 g
  • Protein: 5.4 g
  • Cholesterol: 73 mg

Thank you for following me on Pinterest, Facebook, and Instagram. Hashtag #bakinglikeachef so I can see your creations.

The nutritional information has been calculated using an online recipe nutrition calculator such as Verywellfit.com and is intended for informational purposes only. These figures should be used as a general guideline and not be construed as a guarantee.

Mille Feuille Cake

Sep 13, 2021 · 20 Comments

French Mille Feuille cake topped with red fruit and flowers.

Enter now for your chance to win big with this summery mille feuille recipe and make the most beautiful French mille-feuille cake ever. It makes your mouth water once you look at the dessert topped with red fruit and edible flowers.

French Mille Feuille cake topped with red fruit and flowers: Close up

I often eat cakes for breakfast. Well, I like this way to start my day. But, moreover, I almost always have some dessert at home. And I bake a lot, as you can imagine.

This mille feuille cake with vanilla cream and fresh fruits on top is one of our home's most often baked goodies.

My favorite version of the French mille feuille consists of a single layer of puff pastry. I find that it simplifies making the dessert and facilities eating.

This popular French pastry looks decadent and impressive. Some people call it even sexy.

Despite the seeming difficulty of making it, this mille-feuille recipe is easy to make at home. The key is to use a store-bought puff pastry dough.

BAKING ESSENTIALS CHECKLIST

Sign up and get a list of the necessary baking tools and ingredients

FREE DOWNLOAD

[feast_advanced_jump_to]
Mille-Feuille topped with red fruit and flowers on a wooden board: Oblique view

Mille feuille meaning

Classic mille-feuille (pronounced meel-foy) is a classic French pastry.

The term mille-feuille is also French and means "one thousand petals" or "one thousand sheets," referring to pastry layering in the dessert.

It is made with three layers of buttery puff pastry filled with rich custard pastry cream. The top is usually sprinkled with icing sugar.

The first recipe for a Millefeuille was published in François Pierre La Varenne's cookbook in 1651.

The cake was decorated with fondant and decorated with a chocolate spider web design on top.

Cake decorated with fresh red fruit and edible flowers: Close up

Why you should try this recipe

  1. Making this mille feuille cake recipe is a fun baking project with kids: let them pipe cream balls and decorate the cake with edible flowers.
  2. Using a store-bought puff pastry saves time in making the crust.
  3. Making vanilla cream and crust a day ahead allows you to serve the dessert within a few minutes the next day.
  4. The dessert is easy to eat: it is not excessively tall.
  5. Replacing vanilla cream with mascarpone whipped cream allows you to serve the dessert within an hour!

Ingredients

Mille Feuille Cake ingredients in pictures

For ingredients and detailed instructions, refer to the recipe card below.

Frozen puff pastry: this mille-feuille recipe calls for a store-bought puff pastry. Make sure to purchase square or rectangular puff pastry sheets.

To enjoy its full flavor, buy the puff pastry made from butter and not from the vegetable shortening.

Why? Because you do not want to feel an unpleasant aftertaste from the shortening. 

If you are going to enjoy the homemade puff pastry, make it yourself.

Icing sugar: either make it yourself with a coffee grinder or use store-bought powdered sugar.

Milk: the recipe calls for whole milk.

Whipping cream: use heavy whipping cream of your favorite brand.

Egg yolks: use yolks from large whole eggs.

Gelatin: use gelatin sheets with a strength of 200 bloom. To substitute sheet gelatin, use 8 g of powdered gelatin and ¼ cup (60 ml) of cold water.

Please, take into consideration that there are 3.08 grams of powdered gelatin in 1 teaspoon.

Mascarpone: it is added to stabilize the whipped cream. The only downside of the mascarpone-based whipped cream is that it dries out quickly: you need to serve the dessert after assembling it.

Vanilla pod: to bring the best vanilla flavor to the dessert, use these Madagascar vanilla beans.

Red fruits: use fresh strawberries, raspberries, blueberries, or blackberries. Do not use frozen berries to decorate the cake.

Corn starch, brown sugar.

How to make Mille Feuille

To make the vanilla cream, start one day before. First, soak gelatin in cold water for 10 minutes.

Whisk the remaining ingredients of the cream and seeds of the vanilla bean in a medium pot. Bring the cream to a boil, continually stirring with a hand whisk.

Remove the pan from the heat as soon as the cream thickens. Mix in the drained gelatin (photo 3).

Pour the cream into a shallow dish, cover it with plastic wrap in contact, and chill for 24 hours (photo 2).

Photo 1: Vanilla cream in a bowl Photo 2: Cream with plastic film on a dish
PHOTO 1 PHOTO 2

To make the crust, preheat oven to 355 degrees F/180 degrees C. 

Thaw a sheet of puff pastry. Using a rolling pin, roll it on a lightly floured work surface and prick with a fork. Cut out a large rectangle (photo 3).

Transfer the dough onto a lined baking tray between two sheets of parchment paper.

Then cover it with a baking sheet or baking tray (not too heavy and, if possible, perforated).

Bake for about 30 minutes rotating the pan halfway through. Make sure that the dough gets a beautiful gold color (photo 4).

Photo 3: Pricked puff pastry on parchment paper Photo 4: Baked puff pastry on the parchment
PHOTO 3 PHOTO 4

To caramelize the puff pastry, take it out of the oven. Remove the second baking sheet and the sheet of parchment paper from the top of the pastry. Sprinkle with icing sugar.

Bring the baking tray with the pastry under the oven grill for a few minutes to caramelize the sugar. The pastry will get deep golden brown color.

It takes about two to three minutes: be careful to watch it out to prevent the pastry from burning (photo 5). 

Remove from the oven and cool completely. With a ruler and a sharp serrated knife, cut a rectangular strip 4'' x 10'' / 10 x 27 cm (photo 6).

Let it cool to room temperature and transfer to a serving platter.

Photo 5: Caramelized puff pastry on parchment paper Photo 6: Cut crust on a serving board
PHOTO 5 PHOTO 6

To assemble the cake, whip the cream mixture with an electric mixer to aerate (photo 7).

Transfer the pastry cream to a piping bag fitted with the Ateco plain pastry tube.

Pipe dollops (the size of regular walnuts) onto a caramelized puff rectangle (photo 8).

Photo 7: Cream in a glass bowl Photo 8: Pipped cream balls over the puff pastry
PHOTO 7 PHOTO 8

Decorate the top of the cake with halves of fresh strawberries (photo 9), raspberries, blueberries, or other fresh fruit of your choice.

Arrange edible flowers and mint leaves between fruits and serve immediately (photo 10).

Photo 9: Strawberries on top of cream balls Photo 10: Decorated cake on a wooden board
PHOTO 9 PHOTO 10

Recipe variations

Traditional mille-feuille is made with three flaky layers of puff pastry and two layers of pastry cream.

Then it is topped with chocolate and vanilla glaze. You can also cover the top with royal icing, a chocolate ganache, or simply dust with powdered sugar.

Nowadays, many French chefs make the dessert with a single layer of puff pastry that is dusted with icing sugar and caramelized.

Then it is covered with a single layer of cream and decorated with seasonal fruit.

Interestingly, there is a savory version of mille-feuille made with cheese and spinach.

Storage

The mille-feuille dessert should be served after being assembled because:

  • the mascarpone-based whipped cream tends to dry out quickly;
  • the puff pastry layer absorbs the liquid from the cream and loses crispiness.

I would not recommend storing the cake until the next day, even being refrigerated.

To freeze the mille-feuille, set the freezer to -13 °F/-25 °C 8 hours before freezing the dessert.

Place the cooled cake (no fruit on the top) on a cooling rack and bring it to the freezer.

Once it is frozen to the core, place the dessert in a Ziploc freezer bag and store it in a freezer set at -13 °F/-25 °C for 2 months.

Thaw the mille-feuille in the refrigerator overnight. Decorate with fresh fruit if desired.

Expert tips

  1. Make sure to cover vanilla cream with plastic film in contact to prevent a crust from forming on the surface while refrigerating.
  2. Cover puff pastry with a baking sheet on top of the parchment to prevent extensive puffing of the pastry while baking.
  3. Do not burn the pastry while caramelizing. Two to three minutes are enough to get a beautiful result.
  4. Cut the end of a pastry bag and decorate the cake with cream balls if you do not have a special tip: it works.

Frequently asked questions

Are mille-feuille and Napoleon the same?

While both pastries are made with three layers of puff pastry, the main difference is the cream used to make the pastry. Mille-feuille is filled with vanilla pastry cream, while Napoleon cake is usually made with almond cream. Mille-feuille can have sweet and savory fillings, while Napoleon is always sweet.

How to make Mille Feuille as one big pastry

Double or triple the cream recipe, cut a more significant puff pastry layer, and make one big dessert. Cut it with a serrated knife into pieces and serve.

Can you make Mille-Feuille in advance?

Make vanilla cream one day ahead as directed and prepare the puff pastry crust one day in advance. The next day, whisk the cream and decorate the Mille-Feuille. This cake has to be served right after making it.

How to cut Mille Feuille pastry

It is advised to chill a classic three-layered Mille Feuille cake for a few hours or freeze it for 20 to 30 minutes and then cut it with a sharp knife, better the serrated one. This one-layered dessert is easily cut right after making it with the same type of knife without squashing the dessert.

How to eat Mille Feuille cake

This dessert is best eaten with a fork and knife, but you can bite into it if made with a single layer of puff pastry like this particular cake.

Love cakes? Try these next!

  • Louise cake on a cake stand.
    Ottolenghi's Louise Cake With Plum And Coconut
  • Sliced Sans Rival cake on a cake board.
    Sans Rival Cake (Filipino Cashew Meringue Cake)
  • Coconut dacquoise on a cake board.
    Coconut Dacquoise Cake Recipe
  • Sliced Black Forest cake on a white cake stand.
    Authentic Black Forest Cake (Schwarzwälder Kirschtorte)

Browse all the Cake Recipes

Want more delicious and beautiful recipes? Subscribe to my newsletter and follow me on Facebook, Pinterest, and Instagram for my latest updates. If you make this recipe, please leave a star rating on the recipe card and comment below!

Print

Recipe card

Mille Feuille Cake

French Mille Feuille cake topped with red fruit and flowers.
Print Recipe
Save Recipe Recipe Saved

5 Stars 4 Stars 3 Stars 2 Stars 1 Star

5 from 10 reviews

Enter now for your chance to win big with this summery mille feuille recipe and make the most beautiful French mille-feuille cake ever. It makes your mouth water once you look at the dessert topped with red fruit and edible flowers. 

  • Author: Irina Totterman
  • Total Time: 1 hour, 30 minutes (plus chilling time)
  • Yield: 6 1x
  • Category: Cakes
  • Method: Baking
  • Cuisine: French

Ingredients

Scale

For the crust:

  • 8.8 oz. (250 g) puff pastry 
  • 100 g icing (powdered) sugar

For the vanilla cream:

  • ⅔ cup + 3 tablespoons (200 ml) of milk
  • ½ cup + 1 teaspoon (120 ml) whipping cream 
  • 3 large egg yolks
  • 1 ½ sheet of gelatin
  • 6 oz. (170 g) mascarpone
  • 1 ½ tablespoons (15 g) corn starch
  • 9 ½ teaspoons (40 g) brown sugar
  • 1 vanilla bean

For the decoration:

  • fresh red fruit, edible flowers, fresh mint leaves

*Don't you have the correct baking pan on hand right now? Try this simple Cake Pan Converter!

** If needed, please refer to Baking Conversion Charts.

Instructions

  1. To make the pastry vanilla cream, start one day before. Soak gelatin in cold water for 10 minutes. Whisk the remaining ingredients of the cream in a medium pot. Bring the cream to a boil, continually stirring with a hand whisk. Then remove the pot from heat as soon as the cream thickens. Mix in the drained gelatin. Pour the cream into a shallow dish, wrap it with plastic film in contact, and chill for 24 hours.
  2. To make the crust, preheat the oven to 355 degrees F/180 degrees C. Thaw the puff pastry dough, roll it on a lightly floured work surface, and prick with a fork. Cut out a large rectangle. Put the dough on the baking sheet between two sheets of parchment paper and cover it with a baking sheet or baking tray (not too heavy and, if possible, perforated). Bake for about 30 minutes rotating the pan halfway through. Make sure that the dough gets a beautiful caramel brown color.
  3. To caramelize the puff pastry, take it out of the oven. Remove the second baking sheet and the sheet of parchment paper from the top of the pastry. Sprinkle with icing sugar. Bring the baking sheet with the pastry under the oven grill for a few minutes to caramelize the sugar. It takes about two to three minutes: be careful to watch it out to prevent the pastry from burning. Remove from the oven, cool completely, and cut a rectangular strip 4'' x 10 ''/ 10 x 27 cm with a ruler and a sharp serrated knife. Let it cool to room temperature.
  4. To assemble the cake, whip the cream to aerate. Place the cream in a pastry bag fitted with the Ateco plain pastry tube and pipe dollops (the size of regular walnuts) on a caramelized puff rectangle. Decorate the top of the cake with halves of fresh strawberries, raspberries, blueberries, or other fruits of your choice. Arrange edible flowers and mint leaves between fruits and serve immediately.

Notes

  1. Make sure to cover vanilla cream with plastic film in contact to prevent a crust from forming on the surface while refrigerating.
  2. Cover puff pastry with a baking sheet on top of the parchment to prevent extensive pastry puffing while baking.
  3. Do not burn the pastry while caramelizing. Two to three minutes are enough to get a beautiful result.
  4. Cut the pastry bag's end and decorate the cake with cream balls if you do not have a special tip. It works.

Nutrition

  • Serving Size: 1 slice
  • Calories: 485
  • Sugar: 24.8 g
  • Sodium: 157 mg
  • Fat: 28.8 g
  • Saturated Fat: 11.5 g
  • Carbohydrates: 47.6 g
  • Fiber: 0.6 g
  • Protein: 10.4 g
  • Cholesterol: 145 mg

Thank you for following me on Pinterest, Facebook, and Instagram. Hashtag #bakinglikeachef so I can see your creations.

The nutritional information has been calculated using an online recipe nutrition calculator such as Verywellfit.com and is intended for informational purposes only. These figures should be used as a general guideline and not be construed as a guarantee.

The recipe was adapted from Gourmandises cie. It was originally published on July 07, 2018. The recipe has been revised to include improved content and photos. All posted pictures are mine.

Raspberry Loaf Cake Ispahan

Aug 29, 2021 · 33 Comments

Sliced raspberry loaf cake Ispahan on a white serving board.

Add this truly impressive raspberry loaf cake Ispahan cake to your recipe collection. Made with fresh raspberries and flavored with rose, this moist and delicately scented loaf cake may seem sophisticated, but it is incredibly easy to make.

Sliced raspberry loaf cake Ispahan on a white serving board

Have you ever heard of a French family dessert called Ispahan? It is a family of 42 sweet treats created by the French pastry chef Pierre Hermé: tart, choux, mille-feuille, croissant, Ispahan madeleines, Ispahan macarons, sablé, tea, jam, nougat, caramel, etc.

[feast_advanced_jump_to]

They are all famous for their unique Ispahan flavor, a combination of rose sweetness, the power of raspberry, and the floral note of fresh lychee.

BAKING ESSENTIALS CHECKLIST

Sign up and get a list of the necessary baking tools and ingredients

FREE DOWNLOAD

Once a year, in Pierre Hermé's boutiques, there is a season of Fetish Ispahan, which is a reason to over-eat rose, lychee, and raspberry creations. So, if you plan a trip to Paris, experience all variations of Ispahan desserts in the City of Light.

Ispahan cake topped with fresh raspberries on a white serving platter

What is Ispahan cake?

Ispahan cake is a raspberry loaf cake with a delightful twist, named after the renowned Damask rose. Made with almond flour and fresh raspberries, this dense and moist treat is beautifully crafted with an eye-catching berry arrangement.

Raspberry loaf cake recipe

  • This raspberry loaf cake recipe is simple enough for a beginner baker.
  • The cake is soft, buttery, and moist. Read more about how to make a cake moist.
  • Thanks to juicy raspberries, it makes a great summer fruit dessert. The cake batter holds fresh raspberries, preventing them from sinking to the bottom of the cake.
  • It has a romantic touch of Valentine's Day due to the rosewater flavor.
  • This easy loaf cake is a perfect anytime cake. Serve it at celebrations, dinners, or picnics, or enjoy it with a cup of coffee or tea.

Ingredients

Raspberry loaf cake ingredients in pictures

For ingredients and detailed instructions, refer to the recipe card below.

  • Butter: Use unsalted softened butter. Take it out of the fridge one to two hours before you start.
  • Icing sugar: Make it yourself with a coffee grinder or use store-bought powdered sugar.
  • Almond flour: Use blanched, finely ground almond flour to make the cake. Please do not try to substitute it for a coarse almond meal. Instead, follow one important tip: gently spoon it from a container into a measuring cup while measuring almond flour. 
  • Eggs: Use large eggs for egg whites and egg yolks. Use an egg separator to easily separate egg whites from yolks while the eggs are chilled.
  • Sugar: Use granulated or caster sugar.
  • Milk: The recipe calls for whole milk.
  • Rose water: Use top-quality rosewater to flavor the dessert. If you aren't a fan, omit this ingredient, or replace it with vanilla or almond extract.
  • Flour: Use all-purpose flour to make the recipe.

Recipe variations

How to bring your own touch on the cake, trying to stay in the spirit of Ispanan?

  • Decorate the cake with crystallized rose petals and crushed Pink Praline - red-colored candied almonds - giving an additional crunchiness to the dessert.
  • Finish the cake by pouring the white chocolate and freeze-dried raspberries glaze or lemon icing (adding fresh lemon zest to the batter is also a delightful option).

To flavor the cake even more, use this downloadable 11-page guide - a complete fruit flavor pairing chart.

  • Sprinkle the top of the cake with rose icing sugar and decorate it with fresh raspberries and rose petals. To make rose icing sugar, blend equal parts of edible rose buds or dried rose petals and caster sugar in a blender or food processor.

How to make a raspberry loaf cake

Step 1. Preheat oven to 355°F (180°C). Sift dry ingredients (almond flour and icing sugar) into a large bowl and set aside. Sift all-purpose flour into a separate bowl.

Step 2. To make the cake batter, place the softened butter and almond mixture in a large mixing bowl and beat for 3 minutes using an electric mixer (photo 1). Alternatively, use a stand mixer with a paddle attachment.

Step 3. Add a whole egg with egg yolks to the butter mixture and whisk for 2 minutes. Then add milk mixed with rosewater and beat for 1 minute (photo 2).

Photo 1: Butter almond mixture in a bowl Photo 2: Egg yolk mixture in a bowl
PHOTO 1 PHOTO 2

Step 4. In a separate small bowl, beat egg whites, gradually adding sugar until soft peaks form (photo 3).

Step 5. Gently fold the fluffy egg whites into the cake batter while adding flour.

Step 6. Gently stir the mixture with a rubber spatula, starting from the center and working your way up (photo 4). Be careful not to over-mix! It is best to under-mix than over-mix.

Step 7. Transfer the cake batter to a piping bag.

Photo 3: Beaten egg whites in a bowl Photo 4: Cake batter with a spatula
PHOTO 3 PHOTO 4

Step 8. Butter a 9 x 5-inch loaf pan (opt for a nonstick or a light-colored aluminum pan) and dust it with flour.

Alternatively, use nonstick spray to spray the bottom and sides of the baking pan. Next, line the pan with parchment paper, ensuring that it extends beyond the long sides of the pan.

Pro tip: If using a silicone baking pan, read about baking with silicone molds.

Step 9. Spread ⅓ of the cake batter evenly in the prepared loaf pan. Place a layer of raspberries on top, leaving some space around the edges (photo 5). Top the raspberries with another ⅓ of the batter.

Step 10. Cover the raspberries with another ⅓ of the batter. Add more berries, again avoiding the edges of the tin. Pour the remaining batter over the fresh raspberries.

Step 11. Lower the oven temperature to 300°F (150°C) and bake for 1 hour 30 minutes until golden brown (photo 6). A knife inserted in the center of the cake should be left without streaks of the batter.

Photo 5: Raspberries over the batter in a mold Photo 6: Baked cake in a pan
PHOTO 5 PHOTO 6

Step 12. Remove the cake from the mold immediately after baking. Let it cool on a wire rack to room temperature.

Raspberry loaf cake sliced on a white serving board

Expert Tips

  1. Make sure to use room temperature ingredients.
  2. When breaking eggs, be cautious to avoid egg yolk and eggshells in the egg whites. Gently beat the whites without making them too firm.
  3. Add a few drops of red food color to the batter to get a slightly rose cake color if desired.
  4. Only use fresh berries for the cake, as the frozen ones will make it too watery.
  5. Divide the cake batter into three parts to make equal layers of the batter and raspberries.
  6. Using a pastry bag is optional: you can spoon the batter into a cake tin.
  7. Don't open the oven door during baking.

Storing and freezing

Store the cake in an airtight container in the refrigerator for up to 10 days.

Can you freeze raspberry loaf cake? Cover the whole cooled cake or individual slices with plastic wrap, then aluminum foil. Or use a freezer bag and freeze the cake for up to 2 months. To thaw, place it in the fridge overnight or on the kitchen counter for 3 to 4 hours.

Recipe FAQ

What is Ispahan meaning?

Ispahan, also known as rose d'Ispahan, is a lovely pink Damask rose.

Can you make this cake gluten-free?

Follow the recipe precisely to achieve an authentic outcome, as it has a specific almond and all-purpose flour ratio.

Can you substitute or omit rosewater?

If you don't like rosewater, omit it or use vanilla extract instead.

Can you make the cake with frozen raspberries?

Use only fresh raspberries instead of frozen ones when baking the cake. Frozen berries release excessive juice and will not give the raspberry loaf cake its sought-after inner beauty.

Love loaf cakes? Try these next!

Enjoy a collection of loaf cakes on the website, from quick bread to Pain d'epices and Leopard milk bread.

  • Stack of banana bread slices on a serving board.
    Easy Banana Bread Without Baking Soda
  • Three slices of carrot loaf on a wooden board with a pink towel in the background.
    Carrot Pineapple Bread Recipe
  • Stacked slices of apple crumble bread on parchment.
    Apple Crumble Bread
  • Sliced no sugar added banana bread on a wooden board.
    Sugar Free Banana Bread With Natural Ingredients

Want more delicious and beautiful recipes? Subscribe to my newsletter and follow me on Facebook, Pinterest, and Instagram for my latest updates. If you make this recipe, please leave a star rating on the recipe card and comment below!

Print

Recipe card

Raspberry Loaf Cake Ispahan

Sliced raspberry loaf cake Ispahan on a white serving board.
Print Recipe
Save Recipe Recipe Saved

5 Stars 4 Stars 3 Stars 2 Stars 1 Star

5 from 14 reviews

This truly impressive raspberry loaf cake Ispahan is a moist and fragrant delight made with fresh raspberries and a hint of rose. Despite its sophisticated appearance, this cake is surprisingly simple to create.

  • Author: Irina Totterman
  • Total Time: 2 hours
  • Yield: 12 1x
  • Category: Cakes
  • Method: Baking
  • Cuisine: French

Ingredients

Scale
  • 4.2 oz. (120 g) fresh raspberries

For the cake batter: 

  • 5.6 oz (160 g) unsalted butter, softened
  • ⅔ cup + 3 ½ tablespoons (110 g) icing (powdered) sugar
  • 1 ½ cups + 4 ½ tablespoons (170 g) almond flour
  • 3 large egg yolks, room temperature
  • 1 whole large egg, room temperature
  • ½ cup + 2 ½ tablespoons (80 g) all-purpose flour
  • 3 large egg whites, room temperature
  • 2 ½ tablespoons (35 g) granulated sugar
  • 5 teaspoons (25 g) whole milk
  • 1 tablespoon rosewater

For decoration (optional):

  • icing (powdered) sugar
  • fresh raspberry
  • red rose petals

*Don't you have the correct baking pan on hand right now? Try this simple Cake Pan Converter!

** If needed, please refer to Baking Conversion Charts.

Instructions

  1. Preheat oven to 355°F (180°C). Sift dry ingredients (almond flour and icing sugar) into a large bowl and set aside. Sift all-purpose flour into a separate bowl.

  2. To make the cake batter, place the softened butter and almond mixture in a large mixing bowl and beat for 3 minutes using an electric mixer. Alternatively, use a stand mixer with a paddle attachment.

  3. Add a whole egg with egg yolks to the butter mixture and whisk for 2 minutes. Then add milk mixed with rosewater and beat for 1 minute.

  4. In a separate small bowl, beat egg whites, gradually adding sugar until soft peaks form (photo 3). Gently fold the fluffy egg whites into the cake batter while adding flour.

  5. Gently stir the mixture with a rubber spatula, starting from the center and working your way up. Be careful not to over-mix! It is best to under-mix than over-mix. Transfer the cake batter to a piping bag.

  6. Butter a 9 x 5-inch loaf pan (opt for a nonstick or a light-colored aluminum pan) and dust it with flour. Alternatively, use nonstick spray to spray the bottom and sides of the baking pan. Next, line the pan with parchment paper, ensuring that it extends beyond the long sides of the pan.

  7. Spread ⅓ of the cake batter evenly in the prepared loaf pan. Place a layer of raspberries on top, leaving some space around the edges. Top the raspberries with another ⅓ of the batter. Next, cover the raspberries with another ⅓ of the batter. Add more berries, again avoiding the edges of the tin. Finally, pour the remaining batter over the fresh raspberries.

  8. Lower the oven temperature to 300°F (150°C) and bake for 1 hour 30 minutes until golden brown (photo 6). A knife inserted in the center of the cake should be left without streaks of the batter.

  9. Remove the cake from the mold immediately after baking. Let it cool on a wire rack to room temperature.

Notes

  1. Make sure to use room-temperature ingredients.
  2. If using a silicone baking pan, read about baking with silicone molds.
  3. When breaking eggs, be cautious to avoid egg yolk and eggshells in the egg whites. Gently beat the whites without making them too firm.
  4. Add a few drops of red food color to the batter to get a slightly rose cake color if desired.
  5. Only use fresh berries for the cake, as the frozen ones will make it too watery.
  6. Divide the cake batter into three parts to make equal layers of the batter and raspberries.
  7. Using a pastry bag is optional: you can spoon the batter into a cake tin.
  8. Don't open the oven door during baking.

Nutrition

  • Serving Size: 1 slice
  • Calories: 277
  • Sugar: 13.1 g
  • Sodium: 19 mg
  • Fat: 19.6 g
  • Saturated Fat: 7.9 g
  • Carbohydrates: 21.7 g
  • Fiber: 2.3 g
  • Protein: 6.1 g
  • Cholesterol: 97 mg

Thank you for following me on Pinterest, Facebook, and Instagram. Hashtag #bakinglikeachef so I can see your creations.

The nutritional information has been calculated using an online recipe nutrition calculator such as Verywellfit.com and is intended for informational purposes only. These figures should be used as a general guideline and not be construed as a guarantee.

The recipe was adapted from niksya.ru. It was originally published on February 19, 2018. It has been updated and may differ from what was originally published

Fig And Cinnamon Pavlova

Aug 26, 2021 · 34 Comments

Fig and cinnamon Pavlova on a cake stand lined with parchment paper.

This fig and cinnamon Pavlova is a summer twist on a timeless Australian dessert. It is a stunning meringue combined with praline cream and decorated with fresh figs that are perfect for a special occasion or a dessert for whenever just because.

Fig and cinnamon Pavlova on a cake stand lined with parchment paper.

Have you ever been obsessed with any fruit? You will not believe how much I love figs and how I wait for fig season each year.

[feast_advanced_jump_to]

Once they first appear in a grocery store, I return home with a box of fresh figs each time I go shopping. So, I get the most out of fig season every year.

BAKING ESSENTIALS CHECKLIST

Sign up and get a list of the necessary baking tools and ingredients

FREE DOWNLOAD

After making Fig and almond cake and Fig tart with hazelnut praline, I am up for another sweet summer delight - fig and cinnamon Pavlova.

What is Pavlova?

Pavlova is a white meringue dessert with a gooey, almost toffee-like center topped with traditional whipped cream and fresh fruit. Pavlova dessert is usually served as a whole cake, but mini Pavlovas are another variation.

The origin of Pavlova is considered to be Australia or maybe New Zealand. It depends on who you ask. Australians and New Zealanders are proud of being the first to create the stunning dessert.

However, there is no doubt that the Pavlova cake was named after the Russian ballerina Anna Pavlova.

Fig and cinnamon Pavlova recipe

  • Fig Pavlova with brown sugar and cinnamon is quintessential of the fall season.
  • The recipe is easy and straightforward.
  • It is perfect for birthdays, anniversaries, and other celebrations.

Ingredients

Fig and cinnamon Pavlova ingredients.

For ingredients and detailed instructions, refer to the recipe card below.

  • Egg whites: The recipe calls for large egg whites at room temperature. It is easy to separate egg whites from egg yolks with an egg separator while the eggs are right from the fridge. Then, let egg whites warm up to room temperature for 30 to 60 minutes before you start making the meringue.

Pro tip: If you want to use up your egg yolks, don't miss my Italian pastry cream, Bavarian cream,or crème Anglaise recipes.

  • Sugar: Use regular granulated or caster sugar. Process granulated sugar in a food processor for a few seconds to make it superfine, which helps to whisk the meringue.
  • Brown sugar: Use golden brown sugar or replace it with dark brown muscovado sugar.
  • Ground cinnamon: Use Ceylon ground cinnamon, but if you want to intensify the flavor, you can consider trying Saigon cinnamon.
  • Hazelnut praline: Make hazelnut praline paste yourself or use a store-bought hazelnut praline.
  • Heavy cream: Choose heavy or heavy whipping cream with at least 30% fat content. Whisk the cold cream in a chilled metal bowl for the best results. Keep the empty container in the freezer for about 15 minutes before you start.
  • Pistachios: Use either raw or toasted unsalted pistachios.
  • Figs: Fresh seasonal figs are the stars of this Pavlova.
  • Honey: Use your favorite brand of honey as a topping. Please read my comprehensive guide if you want to learn how to liquify honey.
  • Mascarpone cheese: Use your favorite brand of mascarpone to stabilize whipped cream.
A single slice of fig Pavlova on a dessert plate.

How to make fig and cinnamon Pavlova

Step 1. Heat oven to 250°F (120°C). Get ready a large baking tray covered with parchment paper. Draw a 9-inch circle (23 cm in diameter) with a pencil and turn the baking paper so the drawn circle will face down.

Step 2. To make the meringue, prepare a bain-marie or water bath. In a large bowl, place egg whites, superfine white, and brown sugar, and combine with a hand whisk.

Step 3. Bring the bowl over a water bath and beat egg whites for 4 minutes, using the hand whisk (photo 1). Ensure that the water in the bath is not boiling: it has to simmer.

Step 4. Once the sugar is melted, take the bowl out of the water bath. Transfer the meringue mixture to the bowl of a stand mixer fitted with a whisk attachment.

Step 5. Whisk it at high speed for 5 minutes until the stiff peaks form. Add ground cinnamon and whisk for 20-30 seconds (photo 2).

Sugar and egg white mixture in a metal bowl.

PHOTO 1

Meringue stiff peaks on mixer beaters over the bowl.

PHOTO 2

Step 6. Spoon meringue into the center of the circle on a lined baking sheet. Shape the nest using a palette knife or the back of a spoon. Try to lift the edges of the meringue nest (photo 3).

Step 7. Bake in the preheated oven for 3 hours.

Step 8. Once the meringue is ready, turn the oven off, but do not remove the meringue from the oven. Let it cool with the closed oven door for 2 hours (photo 4). 

Shaped meringue shell on parchment paper.

PHOTO 3

Baked meringue shell on parchment paper.

PHOTO 4

Step 9. To make the praline cream, place cold heavy cream, cold mascarpone cheese, and hazelnut praline in a bowl of the stand mixer and whip cream for 1 minute. Refrigerate it till assembly (photo 5).

Step 10. To assemble Pavlova, cut figs into 1 cm thick rings. Place the cooled Pavlova meringue on a serving dish.

Step 11. Garnish the Pavlova center with the praline cream and arrange fresh figs (photo 6).

Praline mascarpone cream on a bowl.

PHOTO 5

Pavlova topped with cream and fig rounds on a parchment paper.

PHOTO 6

Step 12. Warm up the honey in a water bath, and add raw pistachios. Pour the honey and nuts mixture on top of the Pavlova. Serve immediately.

Fresh fig and Cinnamon Pavlova on a serving plate.

Expert Tips

  1. Ensure a metal bowl is clean and dry before whisking egg whites. Any residual moisture or grease traces prevent egg whites from whisking.
  2. Opt for homemade or store-bought superfine Baker's sugar.
  3. Don't open the oven door during baking.
  4. Avoid over-whisking the praline cream to prevent its splitting. If the cream begins to split, add some cold heavy cream and whisk again.
  5. Refrigerate the praline cream until assembling the dessert. Once you fill the meringue shell with cream and fresh figs, serve immediately.

Recipe variations

The original fig Pavlova recipe, a creation of Yotam Ottolenghi and Helen Goh, is made with dark brown muscovado sugar and flavored with cinnamon, but you can experiment.

  • Pavlova shell: Use different types of sugar, from golden brown sugar to cane sugar or white sugar.
  • Filling cream: Replace hazelnut praline paste with almond praline. Or simply replace praline cream with sugar-free whipped cream or French Chantilly cream.
  • Flavorings: Flavor the whipped cream with rose water, vanilla extract, or orange blossom water.
  • Fruits: Swap seasonal figs with other fresh fruit. If you want to learn about the different fruit flavor combinations and how to use them in baking, please download my fruit flavor pairing chart.

Storing and freezing

Once the Pavlova dessert is assembled, you should serve it right away. Store leftovers in the refrigerator for no longer than 24 hours.

Can you freeze fig and cinnamon Pavlova? Unfortunately, you cannot freeze the assembled Pavlova. But the meringue shell can survive in the freezer for up to three months.

To do so, transfer the cooled Pavlova meringue to a baking sheet lined with parchment and freeze for at least 3 hours.

Then, place it in a freezer bag, remove as much air as possible, seal and label the bag, and freeze for up to 3 months.

To thaw, simply bring the meringue back and let it sit at room temperature for 2 to 3 hours before assembling it.

Recipe FAQ

What is bain-marie?

Bain-marie is a fancy French term for a hot water bath.

How to make bain-marie?

To make a bain-marie, pour 3 inches (7.5-8 cm) of water in a saucepan, then place a heatproof bowl (another pot or a glass Pyrex bowl) on top of the pan. Ensure the top bowl fits snugly over the saucepan so the steam is trapped beneath it. Bring the water to a simmer, place ingredients into the top pan, and follow the recipe's instructions.

Love Pavlova desserts? Try these next!

  • Plum Pavlova
  • Christmas Pavlova wreath
  • Pavlova Roll (Meringue roulade)
  • Mandarin and Gingerbread Pavlova
  • Or browse all the cake recipes.

Want more delicious and beautiful recipes? Subscribe to my newsletter and follow me on Facebook, Pinterest, and Instagram for my latest updates. If you make this recipe, please leave a star rating on the recipe card and comment below!

Print

Recipe card

Fig And Cinnamon Pavlova

Fig and cinnamon Pavlova on a cake stand lined with parchment paper.
Print Recipe
Save Recipe Recipe Saved

5 Stars 4 Stars 3 Stars 2 Stars 1 Star

5 from 14 reviews

This fig and cinnamon Pavlova is a summer twist on a timeless Australian dessert. It is a stunning meringue combined with praline cream and decorated with fresh figs that are perfect for a special occasion or a dessert for whenever just because.

  • Author: Irina Totterman
  • Total Time: 4 hours, 15 minutes (plus resting time)
  • Yield: 12 1x
  • Category: Cakes
  • Method: Baking
  • Cuisine: Australian
  • Diet: Gluten Free

Ingredients

Scale

For the meringue:

  • ½ cup (122 g) egg whites, room temperature
  • ½ cup + 1 tablespoon (125 g) caster sugar 
  • ½ cup (100 g) brown sugar
  • 1 ½ teaspoons ground cinnamon

For the praline cream:

  • 1 tablespoon hazelnut praline
  • ⅔ cup + 3 (200 g) cold heavy cream, 30% fat
  • 1 ½ cups (360 g) cold mascarpone cheese

For assembling:

  • 1 oz. (30 g) raw pistachios 
  • 1 lb. (454 g) fresh figs
  • 3 tablespoons honey

*Don't you have the correct baking pan on hand right now? Try this simple Cake Pan Converter!

** If needed, please refer to Baking Conversion Charts.

Instructions

  1. Preheat oven to 250°F (120°C). Prepare a baking sheet covered with parchment paper.  Draw a circle of 9 inches (23 cm) in diameter with a pencil and turn the paper so that the ring will face down.
  2. To make the meringue, prepare a water bath. In a large heatproof bowl, place egg whites, caster, and brown sugar, and combine with a hand whisk.
  3. Bring the pot over the water bath and beat for 4 minutes, using the hand whisk. Make sure that the water of bain-marie is not boiling: it has to simmer.
  4. Once the sugar is melted, take the bowl out of the water bath and whisk on high speed for 5 minutes until the meringue becomes stiff and glossy. Add ground cinnamon and whisk for 20-30 seconds.
  5. Spoon the meringue into the center of the circle and shape the nest using a bent spatula or a metal spoon. Try to lift the edges of the meringue nest.
  6. Bake for 3 hours. Once the meringue is ready, do not remove it from the oven. Let the meringue cool in the switched-off oven for 2 hours. 
  7. To make the praline cream, place cold heavy cream, cold mascarpone, and hazelnut praline in a bowl of the stand mixer and whisk for 1 minute. Refrigerate it till assembly.
  8. To assemble the Pavlova, garnish the center of the dessert with the praline cream and arrange fresh figs cut into 1 cm thick rings. Warm honey in a water bath and add raw pistachios. Pour the honey and nuts mixture on top of the figs. Serve immediately.

Notes

  1. Make sure that a metal bowl is clean and dry before whisking egg whites. Any residual moisture or grease traces prevent egg whites from whisking.
  2. Opt for homemade or store-bought superfine Baker's sugar.
  3. Don't open the oven door during baking.
  4. Avoid over-whisking the praline cream to prevent its splitting. If the cream begins to split, add some cold heavy cream and whisk again.
  5. Refrigerate the praline cream until assembling the dessert. Once you fill the meringue shell with cream and fresh figs, serve immediately.  

Nutrition

  • Serving Size: 1 slice
  • Calories: 391
  • Sugar: 41.2 g
  • Sodium: 53 mg
  • Fat: 21.6 g
  • Saturated Fat: 11.5 g
  • Carbohydrates: 49.4 g
  • Fiber: 4 g
  • Protein: 5.4 g
  • Cholesterol: 61 mg

Thank you for following me on Pinterest, Facebook, and Instagram. Hashtag #bakinglikeachef so I can see your creations.

The nutritional information has been calculated using an online recipe nutrition calculator such as Verywellfit.com and is intended for informational purposes only. These figures should be used as a general guideline and not be construed as a guarantee.

The recipe was adapted from https://ottolenghi.co.uk/. It was originally published on September 14, 2018. The recipe has been updated and may differ from what was initially published.

Authentic Black Forest Cake (Schwarzwälder Kirschtorte)

Aug 13, 2021 · 21 Comments

Sliced Black Forest cake on a white cake stand.

This Black Forest cake is an authentic German cake - Schwarzwälder Kirschtorte - bursting with rich chocolate flavor, soaked with Kirsch, and decorated with juicy cherries and sweetened whipped cream. It is a stunning cake for any occasion, from a birthday or graduation to a wedding anniversary.

Sliced Black Forest cake on a white cake stand.

You should definitely treat yourself to the ultimate dessert experience with an authentic Black Forest cake. It is the perfect treat for grown-ups, thanks to the delicious addition of Kirsch.

[feast_advanced_jump_to]

But don't worry if you are serving it to the little ones. Let me tell you that you can swap it out with their favorite juice.

BAKING ESSENTIALS CHECKLIST

Sign up and get a list of the necessary baking tools and ingredients

FREE DOWNLOAD

Here is the best Black Forest cake recipe, a classic treat when every bite brings you to the heart of the Black Forest region. And don't forget to try my iconic White Forest cake, inspired by the classic chocolate version.

What is Black Forest cake?

Black Forest cake is a multi-layered chocolate cake where rich chocolate cake layers are soaked with Kirsch-flavored syrup, filled with whipped cream, and topped with tart whole cherries.

The cake has different names, from traditional Schwarzwälder Kirschtorte in German to Black Forest cake or Black Forest gateau in the US and the United Kingdom.

Black Forest cake, also known as Shwarzwald cake, originated in the Black Forest Region called Der Schwarzwald in Southwestern Germany. It was invented in 1934 and became the most famous German cake.

It is still debated who invented the original recipe for Black Forest cake: a confectioner Josef Keller or pastry chef Erwin Hildenbrand.

Interestingly, March 28 is National Black Forest Cake Day in America.

Black Forest cake recipe

  • The Black Forest cake recipe is easy to make: it is made within 2 hours.
  • It is an easy chocolate cake, just for chocolate lovers.
  • This beautiful cake represents one of the most popular and traditional cakes in Germany.
  • It is perfect for any occasion: a birthday party, a wedding celebration, an anniversary, etc.

Ingredients

Black Forest cake ingredients.

For ingredients and detailed instructions, refer to the recipe card below.

  • Eggs: The recipe calls for large eggs at room temperature.
  • Sugar: Use granulated or caster sugar.
  • Flour: The recipe calls for all-purpose flour.
  • Cocoa powder: Use unsweetened cocoa powder to make the cake.
  • Butter: Use unsalted butter to make chocolate Genoise.
  • Heavy cream: Use your favorite brand of heavy or heavy whipping cream with at least 30% fat content.
  • Vanilla sugar: The recipe calls for two sachets of vanilla sugar. You can replace it with regular sugar as well.
  • Cherries: Use maraschino cherries to make this cake all year round, or use Morello cherries when in season. You will need a few cherries with stems to decorate the cake.

Pro tip: Traditional Black Forest cake is made with sour cherries (Morello cherries) or red tart cherries. I replaced them with maraschino cherries to make the cake all year round. You can also use black cherries or sweet cherries in syrup.

  • Dark chocolate: Use top-quality dark chocolate such as Valrhona dark chocolate to make chocolate shavings. Keep them in the fridge until ready to use. Alternatively, you can use store-bought or homemade chocolate curls.
  • Kirsch: Use authentic cherry liqueur Kirsch, make it yourself using a cherry brandy essence, or replace it with fruit-based brandy or rum (about 40% alcohol). If I serve the cake to kids, I replace the alcohol with any fruit juice, for example, cherry juice, or just omit alcohol.
Three slices of Black Forest gateau on white dessert plates.

Recipe variations

  • Black Forest cake with alcohol: The cake is authentically made with alcohol - a cherry brandy Kirsch. It can not legally be sold under the Schwarzwalder Kirschtorte name in Germany if the liquor is not used in making the cake.
  • Black Forest cake without alcohol: This cake's version is widely used in the United States, also for making the cake kid-friendly.
  • Black Forest cake with cherry filling: It is made with homemade cherry filling prepared with pitted, sweet, dark cherries cooked in heavy cherry syrup. Alternatively, you can use cherry pie filling or cherry compote.
  • White Forest cake - a fresh take on the traditional German dessert with the swap from dark chocolate to white chocolate.
A single slice of Black Forest cake on a white dessert place.

How to make Black Forest cake

Making traditional Black Forest cake consists of a few steps, including preparing a chocolate sponge cake, making Kirsch-flavored syrup and whipped cream, and assembling the cake.

Step 1. To make chocolate sponge cake, preheat the oven to 355°F (180°C).

Step 2. Butter a 7-inch (18 cm) cake pan and line its bottom and sides with parchment paper. Using a flour sifter, sift flour with cocoa powder and place aside.

Pro tip: Consult the chocolate sponge cake recipe for step-by-step photographed explanations, helpful tips, and tricks.

Step 3. Place room-temperature eggs and granulated sugar in a large bowl and lightly beat with a hand whisk. 

Step 4. Bring the bowl over a bain-marie or water bath and continue to whisk. Warm the egg mixture up to 104°F (40°C) or warm to touch.

Step 5. Remove the bowl from the water bath and beat with an electric mixer until the volume is doubled, almost tripled, for 8-10 minutes.

Step 6. Decrease the mixer speed and beat for another 2 minutes to adjust the batter's texture. Add the sifted dry ingredients in a few additions and gently mix with a rubber spatula. 

Step 7. Melt butter in the microwave at 20-30 seconds intervals. It should be at 140°F (60°C), measured with a cooking thermometer.

Step 8. Mix two spoonfuls of batter with melted butter using a spatula. Gradually pour the butter mixture into the remaining batter and mix gently.

Step 9. Pour the cake batter into the prepared pan and bake cake in the preheated oven for 30-35 minutes. Check the cake's doneness with a toothpick or a cake tester: it is ready once it comes out clean from the sponge.

Step 10. Remove the sponge cake from the oven, and let it cool in the pan for 5-10 minutes. Then remove it from the pan by flipping it upside down and cool it on a cooling rack for 5- 10 minutes. Turn the cake over and allow it to cool completely.

Step 11. To make the whipped cream frosting, place heavy cream with vanilla sugar in the bowl of a stand mixer fitted with a whisk attachment and beat until stiff peaks form. Refrigerate.

Pro tip: Consult the sweetened whipped cream recipe for step-by-step photographed explanations, helpful tips, and tricks.

Step 12. To make Kirsch syrup, pour water and sugar into a small saucepan and bring to a boil. Remove it from the heat when the sugar is totally dissolved, and add a few drops of Kirsch.

Step 13. To assemble the cake, use a serrated knife and cut the baked cake crosswise into 3 identical layers. If the top of the cake is domed, even the cake's surface.

Step 14. Place the first cake layer on a cake board and, using a silicone or pastry brush, soak it with the kirsch-flavored syrup.

Pro tip: For a neat appearance, assemble the cake using a mousse cake mold with an acetate cake collar.

Step 15. Spread the first layer of the whipped cream. Place the drained cherries on the cream (photo 1) and spread more cream to cover the cherries (set a few cherries for decoration).

Step 16. Cover with the second cake layer (photo 2) and soak with kirsch syrup. Cover with the whipped cream again.

Cherries on top of the cream.

PHOTO 1

Chocolate cake layer over the cream.

PHOTO 2

Step 17. Arrange cherries on top, and spread the whipped cream again. Place the top biscuit layer and soak it with the syrup.

Step 18. Use a vegetable peeler to shave a chocolate bar or make chocolate shards out of the melted chocolate (photo 3).

Step 19. Cover the surface and sides of the cake with the remaining whipped cream and then chocolate shards over the cream.

Step 20. Decorate the top of cake with several swirls of whipped cream using an open star tip (photo 4).

Chocolate shards on parchment paper.

PHOTO 3

Decorated cake on a cake platter.

PHOTO 4

Step 21. Place a cherry on top of each swirl and sprinkle with more chocolate shards. Refrigerate the cake for 2 to 3 hours before serving.

Assembled Black Forest cake on a serving platter.

Expert Tips

  1. To make Kirsch yourself, use a cherry brandy essence (0.65 fl. oz. (20 ml). Pour the whole bottle's content with 1-¼ cups (280 g) granulated sugar into an empty 33 fl. oz. (one-liter) glass bottle. Add 26 fl. oz. (770 ml) neutral vodka, shake very well until the sugar has completely dissolved, and use.
  2. Drain maraschino cherries well using a paper towel.
  3. Make-ahead option: Bake the sponge cake one day ahead, cover it with plastic wrap, and keep it in the fridge overnight. The next day, finish the cake.

Storing and freezing

Store Black Forest cake under a cake dome in the refrigerator for 2 to 3 days.

Can you freeze Black Forest cake? It is not recommended to freeze the assembled Black Forest cake since it is made with whipped cream. However, you can wrap the sponge cake in plastic and freeze it for 3 months.

Recipe FAQ

Why is it called Black Forest cake?

The Black Forest cake may derive its name from the Black Forest (Schwarzwald) mountain range in Germany's southwest or the Schwarzwälder Kirsch(wasser) liquor popular in the region.

Does Black Forest Cake have alcohol?

The authentic German Black Forest cake gets its unique flavor from Kirsch, a cherry-flavored alcohol that legally defines its authenticity. In the United States, alcohol-free versions of the cake are commonly produced.

Can you make Black Forest cake without alcohol?

You can replace Kirsch fruit juice or make a simple sugar syrup to soak the cake.

What can I use instead of Kirsch in Black Forest cake?

If Kirsch is not available, you can substitute Kirsch with fruit-based brandy or rum. To serve the cake to kids, replace it with fruit juice.

Can you make Black Forest cake with a chocolate cake mix?

Authentic Black Forest cake is made from scratch, but you can bake the biscuit using a chocolate cake mix if you are short on time. You will have a simplified and quick version of the Black Forest cake.

Can Black Forest cake be frozen?

Freezing the assembled Black Forest cake is not recommended due to the presence of whipped cream. However, you can preserve the cake sponge by wrapping it in plastic and freezing it for up to 3 months.

Is it safe to eat Black Forest cake during pregnancy?

Black Forest cake is safe to eat during pregnancy. The cake sponge contains eggs, but it poses no risk once baked. When preparing the whipped cream frosting, use pasteurized cream and refrain from alcohol during assembly.

Love cakes? Try these next!

Here are more delicious cake recipes that await you. Give them a try now. Or browse all the cake recipes.

  • Royal chocolate cake Trianon
  • Concorde cake
  • Italian almond cake
  • French meringue cake Merveilleux

Want more delicious and beautiful recipes? Subscribe to my newsletter and follow me on Facebook, Pinterest, and Instagram for my latest updates. If you make this recipe, please leave a star rating on the recipe card and comment below!

Print

Recipe card

Authentic Black Forest Cake (Schwarzwälder Kirschtorte)

Sliced Black Forest cake on a white cake stand.
Print Recipe
Save Recipe Recipe Saved

5 Stars 4 Stars 3 Stars 2 Stars 1 Star

5 from 6 reviews

Authentic Black Forest cake is an iconic German rich chocolate cake soaked with Kirsch and decorated with cherries and sweetened whipped cream. It is a stunning and gorgeous cake for any occasion.

  • Author: Irina Totterman
  • Total Time: 2 hours
  • Yield: 8 1x
  • Category: Cakes
  • Method: Baking
  • Cuisine: German

Ingredients

Scale

For the chocolate sponge cake:

  • 3 large eggs, room temperature
  • ½ cup minus 2 teaspoons (92 g) granulated sugar 
  • ½ cup + 3 ½ teaspoons (72 g) all-purpose flour
  • 2 ½ tablespoons (20 g) unsweetened cocoa powder
  • 1 ½ tablespoons (22 g) unsalted butter

For the whipped cream frosting:

  • 2 ½ cups + 2 tablespoons (600 g) cold heavy cream, 30% fat
  • 4 teaspoons (18 g) vanilla sugar

For the filling:

  • 8 oz. (230 g) maraschino cherries, drained

For assembling:

  • 3.5 oz. (100 g) dark chocolate 

For sugar syrup:

  • 4 tablespoons (60 g) granulated sugar
  • 3 tablespoons (45 ml) water
  • few drops of Kirsch (see note #1)

* If needed, please refer to Baking Conversion Charts.

**Don't you have the correct baking pan on hand right now? Try this simple Cake Pan Converter!


Instructions

  1.  To make the chocolate sponge cake, preheat the oven to 355°F (180°C). Butter a 7-inch (18 cm) cake pan and line its bottom and sides with parchment paper. Using a flour sifter, sift flour with cocoa powder and place aside. 
  2. Place room-temperature eggs and granulated sugar in a large bowl and lightly beat with a hand whisk. Bring the bowl over a bain-marie or water bath and continue to whisk. Warm the egg mixture up to 104°F (40°C) or warm to touch. 
  3. Remove the bowl from the water bath and beat with an electric mixer until the volume is doubled, almost tripled, for 8-10 minutes. Decrease the mixer speed and beat for another 2 minutes to adjust the batter's texture. Add the sifted dry ingredients in a few additions and gently mix with a rubber spatula.  
  4. Melt butter in the microwave at 20-30 seconds intervals. It should be at 140°F (60°C), measured with a cooking thermometer. Mix two spoonfuls of batter with melted butter using a spatula. Gradually pour the butter mixture into the remaining batter and mix gently. 
  5. Pour the batter into the prepared pan and bake cake in the preheated oven for 30-35 minutes. Check the cake's doneness with a toothpick or a cake tester: it is ready once it comes out clean from the sponge.
  6. Remove the sponge cake from the oven, and let it cool in the pan for 5-10 minutes. Then remove it from the pan by flipping it upside down and cool it on a cooling rack for 5- 10 minutes. Turn the cake over and allow it to cool completely.
  7. To make dark chocolate shaving, use a vegetable peeler to shave the chocolate bar. Keep chocolate shavings in the fridge until you assemble the cake. Alternatively, make chocolate shards out of the melted chocolate.
  8. To make the whipped cream, beat cold heavy cream with vanilla sugar until stiff peaks. Refrigerate.
  9. To make Kirsch syrup, bring sugar and water to a boil. Remove it from the heat when the sugar is totally dissolved, and add a few drops of Kirsch.
  10. To assemble the cake, use a serrated knife and cut the baked cake crosswise into 3 identical layers. If the top of the cake is domed, even the surface.
  11. Place the first cake layer on a cake board and, using a silicone brush, soak it with the kirsch-flavored syrup. Next, spread the first layer of whipped cream. Finally, place the drained cherries on the cream and spread more cream to cover the cherries.
  12. Cover with the second cake layer and soak with kirsch syrup. Cover with the whipped cream again, arrange cherries on top, and spread the whipped cream again. Place the top biscuit layer and soak it with the syrup. Cover the surface and the cake's edges with the whipped cream and then chocolate shavings or shards over the cream.
  13. Decorate the top of the cake with several swirls of whipped cream, using an open star tip. Place a cherry on top of each swirl and sprinkle with more chocolate shavings or shards. Refrigerate the cake for 2 to 3 hours before serving.

Notes

  1. To make Kirsch yourself, use a cherry brandy essence (0.65 fl. oz. (20 ml). Pour the whole bottle's content with 1-¼ cups (280 g) granulated sugar into an empty 33 fl. oz. (one-liter) glass bottle. Add 26 fl. oz. (770 ml) neutral vodka, shake very well until the sugar has completely dissolved, and use.
  2. Drain maraschino cherries well using a paper towel.
  3. Keep chocolate shavings or shards in the fridge until ready to assemble the cake.
  4. Make-ahead option: bake the sponge cake one day ahead, cover it with plastic wrap, and keep it in the fridge overnight. The next day, finish the cake.

Nutrition

  • Serving Size: 1 slice
  • Calories: 494
  • Sugar: 30.3 g
  • Sodium: 58 mg
  • Fat: 34.3 g
  • Saturated Fat: 20.8 g
  • Carbohydrates: 44.7 g
  • Fiber: 2 g
  • Protein: 6.2 g
  • Cholesterol: 173 mg

Thank you for following me on Pinterest, Facebook, and Instagram. Hashtag #bakinglikeachef so I can see your creations.

The nutritional information has been calculated using an online recipe nutrition calculator such as Verywellfit.com and is intended for informational purposes only. These figures should be used as a general guideline and not be construed as a guarantee.

The recipe was originally published on April 04, 2019. It has been has been updated and may differ from what was originally published. 

French Chocolate Cake Straight From Paris

Aug 13, 2021 · 85 Comments

Two slices of Suzy French chocolate cake on a grey plate with other plates on background.

Parisian chocolate cake is authentic French chocolate cake, or gâteau au chocolat. Rich and decadent, this super moist 5 ingredient chocolate cake is made in one hour.

Two slices of French chocolate cake on a grey plate

French chocolate cake recipe

This chocolate cake is the famous Suzy cake, created by Pierre Hermé's friend Suzy Palatin. It is known in French as gâteau au chocolat Suzy.

[feast_advanced_jump_to]

BAKING ESSENTIALS CHECKLIST

Sign up and get a list of the necessary baking tools and ingredients

FREE DOWNLOAD

Parisian chef Pierre Hermé describes the cake as "the best chocolate cake in the world" and "extraordinarily good and very simple to make." You can indeed make it, even at 9 pm on a Friday, after a busy working week.

This moist chocolate cake resembles French chocolate fondant cake and Moelleux au Chocolat, and slightly less moist Fondant au Chocolat.

Sliced French chocolate cake revealing moist texture

Ingredients

For ingredients and detailed instructions, refer to the recipe card below.

  • Dark chocolate: Use top-quality dark chocolate with 70% cacao (not chocolate chips). Avoid Dutch dark chocolate and other dark chocolate brands that contain trans fat, milk, artificial flavorings, and high amounts of sugar.
  • Butter: Opt for unsalted butter, softened at room temperature.
  • Sugar: Use granulated white or caster sugar.
  • Eggs: Use large eggs at room temperature.
  • Flour: Stick to all-purpose flour.

How to make French chocolate cake

Step 1. Preheat the oven to 355°F (180°C). Butter a 9-inch (23-cm) pie pan, cover the bottom with parchment paper, butter the paper, and set aside (photo 1).

Step 2. Melt chocolate in a microwave or on top of a double boiler, set aside, and let it cool. The chocolate should be slightly warm to the touch.

Step 3. In a mixing bowl, cream butter with sugar with an electric or stand mixer until the mixture is creamy and the sugar is perfectly amalgamated (photo 2).

Photo 1: A  prepared cake pan Photo 2: Butter and sugar mixture in a bowl
PHOTO 1 PHOTO 2

Step 4. Add eggs (at room temperature) one by one, beating for about a minute each time. The mixture will become granular, which is all right (photo 3).

Step 5. Reduce the speed to a minimum, pour the cooled melted chocolate into the egg mixture, and mix until it is incorporated. 

Step 6. Keep the same low speed, add flour to the chocolate mixture, and mix until it disappears from the dough, but do not overmix. (photo 4)

Photo 3: Butter mixture on a bowl Photo 4: Ready batter in a bowl
PHOTO 3 PHOTO 4

Step 7. Pour batter into the prepared baking pan, smooth the top with a rubber spatula (photo 5), and bake in the preheated oven for about 25 to 30 minutes (photo 6).

Pro tip: It may happen that the top of the cake will become cracked, and the cake will not look cooked entirely in the center, which is all right.

Step 8. Check the readiness of the cake: when you insert a knife in the center of the cake, some stained dough and moist crumbs will appear on the surface of the blade.

Photo 5: Chocolate batter in a pan Photo 6: Baked chocolate cake in a pan
PHOTO 5 PHOTO 6

Step 9. Remove the cake from the oven, place it (still in the cake tin) on a wire rack, and let it cool.

Step 10. Once the cake has cooled at room temperature, refrigerate it for 1 to 2 hours to facilitate the removal of the cake.

Step 11. Turn the cake over, remove the parchment paper, and place the cake on a plate. Let the cake come to room temperature before cutting and serving.

Two slices of French chocolate cake on a grey plate: Close up

Expert Tips

  1. Use high-quality dark chocolate, 70% cacao.
  2. To facilitate removing the cake, bake it in a 9-inch (23-cm) springform pan. The best pans are fluted tart pans or glass-bottom springform pans. You can also use your favorite pan and precut circle cake pan liners.
  3. Cut the cake, wiping the knife off before each cut.

How to serve it

According to your taste, you can serve the cake at room temperature or completely cold. If you plan to serve it cold, leave it in the refrigerator for a few hours. However, remember to bring it to room temperature one hour before serving.

Serve it on its own, drizzle it with chocolate sauce, or accompany it with sugar-free whipped cream or ice cream.

Storing and freezing

Store your chocolate cake at room temperature for two or three days. Keep it away from sunlight and cover it with a clean tea towel like bread.

You can freeze it well-wrapped in plastic film, then aluminum foil, for up to two months.

Recipe FAQ

How to unmold this chocolate cake

Since the moist chocolate cake is made with little flour, it is less compact after baking and, therefore, very fragile. A great way to get a chocolate cake out of the pan is to use buttered parchment paper with lift tabs. Butter the mold, place the precut circle cake pan liners at the bottom (try to avoid wrinkles), and pour the cake batter.

Love French chocolate desserts! Try these next!

  • Sliced decorated chocolate ganache tart on a marble table.
    French Chocolate Ganache Tart Recipe
  • French dark chocolate mousse in glasses with a spoon full of mousse.
    French Chocolate Mousse (Mousse au Chocolat)
  • Sliced chocolate terrine shaped as a half-sphere with a fork on a dessert plate.
    Dark Chocolate Terrine (Terrine au Chocolat)
  • A marble teacup with hot chocolate, Christmas decorations, and tissue in the background.
    Best Chocolat Chaud (French Hot Chocolate)

Want more delicious and beautiful recipes? Subscribe to my newsletter and follow me on Facebook, Pinterest, and Instagram for my latest updates. If you make this recipe, please leave a star rating on the recipe card and comment below!

Print

Recipe card

French Chocolate Cake

Two slices of Suzy French chocolate cake on a grey plate with other plates on background.
Print Recipe
Save Recipe Recipe Saved

5 Stars 4 Stars 3 Stars 2 Stars 1 Star

5 from 30 reviews

French chocolate cake, known as Suzy cake by Pierre Herme, is a rich and decadent, soft and fluffy, and super-moist 5 ingredient chocolate cake made in one hour.

  • Author: Irina Totterman
  • Total Time: 1 hour
  • Yield: 8 1x
  • Category: Cakes
  • Method: Baking
  • Cuisine: French

Ingredients

Scale
  • 8.8 oz. (250 g) dark chocolate 70%
  • 1 cup + 1 ½ tablespoons (250 g) softened unsalted butter
  • 1 cup (200 g) granulated sugar
  • 4 large eggs, room temperature
  • ½ cup + 1 tablespoons (70 g) all-purpose flour

*Don't you have the correct baking pan on hand right now? Try this simple Cake Pan Converter!

** If needed, please refer to Baking Conversion Charts.

Instructions

  1. Heat oven to 355°F (180 degrees C. Butter a 9-inch/23 cm pie pan, cover the bottom with parchment paper, butter the paper, and set aside.
  2. Melt the dark chocolate in a microwave or water bath, set aside, and let it cool. The chocolate should be slightly warm to the touch.
  3. In a bowl, whisk butter and sugar with an electric mixer or a stand mixer until the mixture is creamy and the sugar is perfectly amalgamated. Add eggs (at room temperature) one by one, beating for about a minute each time. The mixture will become granular: it is all right.
  4. Reduce the speed to a minimum, pour the cooled melted chocolate, and mix until incorporated.  Keep the same low speed, add flour to the chocolate mixture, and mix until it disappears from the dough, but do not overmix! 
  5. Pour the batter into the pan, smooth the top with a rubber spatula, and bake in the preheated oven for about 25 to 30 minutes. It may happen that the top will become cracked, and the cake will not look cooked entirely in the center, which is all right. Check the readiness of the cake: when you insert a knife in the center of the cake, some stained dough and moist crumbs will appear on the surface of the blade.
  6. Take the cake out of the oven and place it (still in the cake tin) on a wire rack and let it cool down. Once the cake has cooled at room temperature, refrigerate it for 1-2 hours to facilitate the removal of the cake.
  7. Next, turn the cake over, remove the parchment paper, and place it on a plate. Let the cake come to room temperature before cutting and serving.

Notes

  1. Use high-quality dark chocolate, 70% cacao.
  2. To facilitate removing the cake, bake it in a 9-inch (23 cm) springform pan, a fluted tart pan, or a glass bottom springform pan. Or use your favorite pan and precut circle cake pan liners.
  3. Serve the cake in a pan without chilling if preferred.
  4. Cut the cake, wiping the knife off before each cut.

Nutrition

  • Serving Size: 1 slice
  • Calories: 559
  • Sugar: 27 g
  • Sodium: 215 mg
  • Fat: 41.8 g
  • Saturated Fat: 25.5 g
  • Carbohydrates: 44 g
  • Fiber: 8.9 g
  • Protein: 6.1 g
  • Cholesterol: 160 mg

Thank you for following me on Pinterest, Facebook, and Instagram. Hashtag #bakinglikeachef so I can see your creations.

The nutritional information has been calculated using an online recipe nutrition calculator such as Verywellfit.com and is intended for informational purposes only. These figures should be used as a general guideline and not be construed as a guarantee.

The recipe was adapted from the original recipe for Le gâteau mi-cuit au chocolat de Suzy Palatin from https://perleensucre.com/. It was initially published on February 24, 2019. The recipe has been revised to include improved content and photos.

Fresh Fig And Almond Cake Recipe

Aug 12, 2021 · 50 Comments

Fig and almond cake on a serving platter.

Fresh fig and almond cake is an amazingly easy one-bowl dessert made with seasonal figs and served with a dollop of Greek yogurt and poached figs in red wine. It is a decadent summer cake perfect for afternoon tea and any celebration.

Fig and almond cake on a serving platter.

If you are a huge fig fan who looks forward to getting figs to make incredibly delicious fig desserts, get ready: they have a short season.

[feast_advanced_jump_to]

Start with the spiced fig and cinnamon Pavlova topped with fresh figs and pistachios.

BAKING ESSENTIALS CHECKLIST

Sign up and get a list of the necessary baking tools and ingredients

FREE DOWNLOAD

Then try fig tart with hazelnut praline paste, and finally make the cutest fig tiramisu - another adorable summer treat.

A single slice of fig and almond cake on a dessert plate.

Fig and almond cake recipe

  • This fig and almond cake recipe is a simple and delicious one-bowl recipe.
  • The cake is loaded with seasonal figs flavored with star anise and arranged in a beautiful pattern - just the perfect rustic cake.
  • It is moist due to almond flour and the fig sauce's warm touch that combines a beautiful red wine aroma and caramel taste.
  • The heavenly, delicious fig sauce is a creation of the Israeli-British chef Yotam Ottolenghi.

Ingredients

Fresh fig and almond cake ingredients.

For ingredients and detailed instructions, refer to the recipe card below.

  • Butter: Use softened unsalted butter (not melted butter) to make the dessert. Take it out of the fridge one to two hours before you start.
  • Brown sugar: Use golden brown or dark brown sugar. You can replace it with light brown muscovado or turbinado sugar.
  • Honey: Your favorite brand will work perfectly for the recipe. Read more about how to liquify honey if needed.
  • Almond flour: Use fine ground Anthony's almond flour or coarse powder of the almond meal to make the cake; they all will yield the same tasteful result. Alternatively, make ground almonds yourself: process natural raw almonds, for example, Marcona almonds, in a food processor.
  • Vanilla extract: Use one of the best Madagascar Bourbon vanilla extract as the most full-flavored among other vanilla extracts. Or use alcohol-free vanilla flavor instead.
  • Ground star anise: Use a store-bought ground star anise or make it yourself. Just grind the whole star anise (both seed and pod) in a spice grinder or mortar and pestle. Replace ground star anise with ground cinnamon if you prefer.
  • Baking powder: Use aluminum-free baking powder. The baking powder loses effectiveness after about half of the year, so use it fresh.
  • Fresh figs: The seasonal ripe figs are the best. Use Black Mission figs or combine them with other varieties of figs. 
  • Red wine: Use your favorite brand of red wine.
  • Greek yogurt: Use plain Greek yogurt to accompany the dessert. You can substitute plain Greek yogurt for sour cream or homemade whipped cream while serving the dessert.
  • Eggs: Use large eggs at room temperature to make the recipe.
  • Flour: The recipe calls for all-purpose flour.
Slices of fig and almond cake with plain yogurt and fig sauce on plates.

How to make fig and almond cake

Step 1. Heat oven to 350°F (175°C). Butter and line the bottom and sides of an 8-inch (20 cm) Le Creuset springform pan with parchment paper.

Step 2. To make the cake batter, place butter, honey, and brown sugar in the bowl of a stand mixer and beat on medium speed until smooth (photo 1).

Step 3. Low speed of the mixer and gradually add eggs, mixing the egg mixture until homogeneous.

Step 4. In a separate mixing bowl, weigh and mix almond flour, all-purpose flour, salt, baking powder, and ground anise.

Step 5. With the mixer on low speed, slowly add the almond flour mixture to the batter, mixing until combined. Add vanilla extract and slightly mix (photo 2).

Butter and brown sugar mixture in a bowl.

PHOTO 1

Cake batter in a bowl.

PHOTO 2

Step 6. Pour batter into the prepared lined tin and level the top with a spoon or a rubber spatula (photo 3).

Step 7. Cut each fig vertically into four long wedges. Arrange figs on top of the cake, cut sides up, going in concentric circles (photo 4).

Pro tip: Make sure to slightly immerse figs into the almond batter but not to overlap.

Cake batter in a baking mold.

PHOTO 3

Fig quarters over the cake batter in a mold.

PHOTO 4

Step 8. Bake for about 40 to 50 minutes. Check the cake's readiness by inserting a toothpick into it: it's done if it comes out clean (photo 5).

Step 9. Remove the cake from the oven, and cool down before removing it from the cake tin. Place on a wire rack, then transfer to a cake stand.

Step 10. To make the fig sauce, place white sugar in a saucepan and heat until the sugar starts to caramelize.

Step 11. Remove the pot from heat, and carefully add red wine (be careful since it might splash).

Step 12. Bring the pan to medium heat again and let the caramel dissolve in the wine. Finally, add fig quarters and toss them around just warming up (photo 6).

Baked fig cake in baking mold.

PHOTO 5

Red wine sauce with poached figs.

PHOTO 6

To serve, slice the cake. Spoon a generous dollop of Greek yogurt over or aside from every cake slice and pour the fig sauce on top. Or simply dust the cake with powdered (icing) sugar.

Sliced fresh fig and almond cake on a serving platter.

Expert Tips

  1. Beat the cake batter with an electric mixer or a hand whisk if you do not have a stand mixer.
  2. Use a regular 8-inch (20 cm) round cake pan instead of a springform pan and precut circle cake pan liners to facilitate the removal of the cake.
  3. While making the fig sauce, do not use a wooden spoon or spatula. Instead, swirl the saucepan over the stove.

Recipe variations

  • Fruits: Replace fresh figs with stone fruit such as plums, peaches, and apricots. Even pears or apples work in this recipe.
  • Flavorings: Replace vanilla extract with dark rum, a ¼-1/2 teaspoon of almond extract, lemon, or orange zest.
  • Poached figs in red wine: If you don't have time for a red wine fig sauce, dust the cake with icing sugar or finish with a drizzle of honey or maple syrup.
  • Serving: Substitute plain Greek yogurt for sour cream or homemade whipped cream while serving the dessert.

Storing and freezing

Store fig and almond cake in an airtight container or covered with plastic wrap in the refrigerator for a couple of days.

Can you freeze it? It is not recommended to freeze this cake.

Recipe FAQ

How to use fresh figs in baking

Don't peel or cook fresh figs before baking: they will bake beautifully in the oven. Just wash figs, dry them, cut them into quarters, or slice them lengthwise into thin pieces.

Do you peel figs for baking?

Fresh figs have dark purple skin that hides a delicious pulp. You do not need to peel the fruit since the outer skin is edible. Do not cook them before baking either: they will bake beautifully in

Can you substitute fresh figs for dried ones?

This recipe has not been tested with dried figs, so use fresh figs to make this delicious seasonal dessert layered with fresh fruit.

Love fruit cakes? Try these next!

  • Plum Pavlova
  • Fresh fruit cake
  • German fruit flan
  • Ottolenghi Louise cake
  • Or browse all the fruit recipes.

Want more delicious and beautiful recipes? Subscribe to my newsletter and follow me on Facebook, Pinterest, and Instagram for my latest updates. If you make this recipe, please leave a star rating on the recipe card and comment below!

Print

Recipe card

Fresh Fig And Almond Cake

Fig and almond cake on a serving platter.
Print Recipe
Save Recipe Recipe Saved

5 Stars 4 Stars 3 Stars 2 Stars 1 Star

5 from 23 reviews

Fresh fig and almond cake is an amazingly easy one-bowl dessert made with fresh figs and served with a dollop of Greek yogurt and poached figs in red wine. It is a decadent summer cake perfect for afternoon tea and any celebration.

  • Author: Irina Totterman
  • Total Time: 1 hour, 20 minutes
  • Yield: 8 1x
  • Category: Cakes
  • Method: Baking
  • Cuisine: British

Ingredients

Scale

For the cake:

  • 3.5 oz (100 g) butter
  • ⅔ cup + 5 teaspoons (155 g) brown sugar
  • 1 tablespoon liquid honey
  • ¼ cup (60 g) eggs, room temperature - see note #1
  • 1 cup + 2 teaspoons (100 g) almond flour
  • 1 cup + 2 teaspoons (130 g) all-purpose flour
  • 1 pinch of salt
  • 1 teaspoon vanilla extract  
  • 1 teaspoon ground star anise
  • 1 teaspoon baking powder
  • 10 fresh figs

For the poached figs: 

  • 3 tablespoons granulated sugar
  • 6 tablespoons red wine
  • 6 fresh figs

For serving:

  • 5.3 oz (150 g) Greek yogurt
  • powdered (icing) sugar

* If needed, please refer to Baking Conversion Charts.

**Don't you have the correct baking pan on hand right now? Try this simple Cake Pan Converter!

Instructions

  1. Preheat oven to 350°F (175 °C). Butter and line the bottom and sides of an 8-inch (20 cm) springform pan with parchment paper.
  2. To make the cake batter, place softened butter, honey, and brown sugar in the bowl of a stand mixer and beat until smooth. Low speed of the mixer and gradually add eggs, mixing until homogeneous.
  3. In a separate bowl, weigh and mix almond flour, all-purpose flour, salt, baking powder, and ground anise.
  4. With the mixer on low speed, slowly add the almond flour mixture to the batter, mixing until combined. Add vanilla extract and slightly mix.
  5. Pour batter into the prepared pan and level the top with a spoon or a rubber spatula.
  6. Cut each fig vertically into four long wedges. Arrange figs on top of the cake, cut sides up, going in concentric circles. Make sure to slightly immerse figs into the batter but not to overlap.
  7. Bake for about 40 to 50 minutes. Check the cake's readiness by inserting a toothpick into the cake: it's done if it comes out clean.
  8. Remove the cake from the oven, and cool down before taking it out of the mold. 
  9. To make the poached figs, place sugar in a small saucepan and heat until the sugar starts to caramelize.
  10. Remove the pot from heat, and carefully add red wine (be careful since it might splash).
  11. Bring the pan to medium heat again and let the caramel dissolve in the wine. Add fig quarters and toss them around, just warming up.
  12. To serve, slice the cake. Spoon a generous dollop of Greek yogurt over or aside from every cake slice and pour the sauce with poached figs on top. Or simply dust the cake with powdered (icing) sugar.

Notes

  1. 60 g eggs are approximately equal to 1 whole extra-large chicken egg (eggshell removed).
  2. Beat the cake batter with an electric mixer or a hand whisk if you do not have a stand mixer.
  3. To make ground star anise, grind the whole star anise (both seed and pod) in a spice grinder or mortar and pestle. Rr replace ground star anise with ground cinnamon.
  4. Use a regular can pan and precut circle cake pan liners to facilitate the removal of the cake.
  5. While making the fig sauce, do not use a spoon or spatula. Instead, just swirl the saucepan over the stove. 
  6. The cake is best eaten on the day it is made. Store leftover cake covered in plastic wrap in the refrigerator for two days. 

Nutrition

  • Serving Size: 1 slice
  • Calories: 429
  • Sugar: 42.9 g
  • Sodium: 113 mg
  • Fat: 17.6 g
  • Saturated Fat: 7.2 g
  • Carbohydrates: 64.3 g
  • Fiber: 5.5 g
  • Protein: 6.7 g
  • Cholesterol: 55 mg

Thank you for following me on Pinterest, Facebook, and Instagram. Hashtag #bakinglikeachef so I can see your creations.

The nutritional information has been calculated using an online recipe nutrition calculator such as Verywellfit.com and is intended for informational purposes only. These figures should be used as a general guideline and not be construed as a guarantee.

The figgy sauce recipe was adapted from https://ottolenghi.co.uk/. The cake recipe was originally published on September 01, 2018. It has been updated with new photos, content, and changes to the recipe to make it even better.

Italian Sponge Cake (Pan di Spagna)

Aug 9, 2021 · 98 Comments

Italian sponge cake on a marble board.

Italian sponge cake (Pan di Spagna) is a classic light, airy, and delicious sponge cake made with just 3 ingredients - eggs, sugar, and flour. It is perfect plain for your afternoon tea or to make numerous desserts, from simple layer cake to showstopping wedding cake.

Italian sponge cake on a marble board.

This classic sponge cake is known as airy and light and the best sponge cake in the world, and I agree with that statement after making over 300 sponge cakes. 

I am a huge fan of sponge cakes, from Italian Pan di Spagna to classic Genoise cake and Japanese sponge cake.

[feast_advanced_jump_to]

Italian sponge cake is a perfect base and an essential preparation of Italian pastry, such as cassata, zuccotto, and Zuppa Inglese.

You can sprinkle it with confectioners' sugar for a simple, sweet delight and enjoy it on its own.

BAKING ESSENTIALS CHECKLIST

Sign up and get a list of the necessary baking tools and ingredients

FREE DOWNLOAD

Or you can upgrade this airy sponge cake into a layer cake. Just slice and fill it with your favorite jam, homemade whipped cream, vanilla pudding, Italian pastry cream, creme Chantilly, chocolate ganache, or other cream fillings.

What is Italian sponge cake?

Italian sponge cake (Pan di Spagna) is a simple sponge cake with three basic ingredients: eggs, sugar, and flour. It is made without the use of yeast or any rising agents (baking powder and baking soda), where air and fluffiness are achieved through extended whisking of eggs with sugar.

The key to the perfect sponge cake is to incorporate and develop much air to prevent the cake from deflating during baking. Make sure to read all my tips to succeed in baking your Pan di Spagna.

Slices of Pan di Spagna on a serving board.

Pan di Spagna recipe

  • It is a classic Italian sponge cake recipe for beginners and experienced bakers: it works every time, and everyone will succeed in making the perfect cake.
  • Pan di Spagna is an incredibly light cake with a unique soft and airy texture. It is a homemade sponge cake without baking powder and without butter.
  • The basic sponge cake recipe could be altered and personalized as you desire: color, flavor it, or make it gluten-free.
  • It is perfect for making cream- or jam-filled and layered birthday cakes.

Ingredients of sponge cake

For ingredients and detailed instructions, refer to the recipe card below.

Eggs: Use large eggs at room temperature. Take them out of the fridge 45-60 minutes before you start. If you are short on time, soak whole eggs in a bowl of warm water for a few minutes.

There is no need to separate egg whites from egg yolks: the recipe uses whole eggs.

Sugar: The recipe calls for granulated white sugar. You can replace it with superfine caster sugar if desired.

Flour: Use all-purpose flour, aka plain flour, in the UK. If you have store-bought cake flour, go for it: it contains less gluten, and you will have a very soft, fluffy cake crumb. But try to avoid self-raising flour.

I haven't tested the Pan di Spagna recipe with a 1:1 gluten free flour blend, but you can make gluten-free Pan di Spagna using cornstarch or a mix of heat-treated rice flour and rice starch.

Recipe variations

Although the Pan di Spagna recipe is straightforward, I want to suggest a few interesting variations.

Flavoring: Add ½ teaspoon of almond, coconut, or vanilla extract. Introduce some orange flower water and lemon zest if you want a subtly citrusy taste. Alternatively, give your cake a romantic twist by utilizing rose water to create a delectable treat perfect for Valentine's Day.

Coloring: Add a few drops of gel food coloring to the cake butter (at 5-7 minutes of beating) until the desired color. Easily customize the color of your cake to match any occasion. For a beautiful pink hue, take inspiration from the recipe for Lychee Cake.

Chocolate sponge cake: Replace ⅕ cup (25 g) of plain flour with cocoa powder to make a chocolate variation of Pan di Spagna.

Gluten-free sponge cake: Replace the AP flour with cornstarch or a blend of heat-treated rice flour and rice starch in a 4:1 ratio.

Sliced Italian sponge cake on a serving board.

How to make Italian sponge cake

Step 1. Preheat the oven to 355°F (180°C). Generously butter and flour an 8-inch (20 cm) round cake pan and set aside. Using a flour sifter, sift the flour in a large bowl and put it aside.

Pro tip: Another way to prepare the pan is to brush some softened butter on the bottom and sides of the pan and line them with parchment paper.

Step 2. Place eggs and granulated sugar in a separate large mixing bowl or the bowl of a stand mixer and lightly beat with a hand whisk (photo 1).

Step 3. Continue to whisk and bring the bowl over a bain-marie or water bath to warm the mixture up to 104°F (40°C) or warm to the touch (photo 2).

Pro tip: Whisk the egg and sugar mixture the entire time. Do not overheat the mixture; otherwise, beating air into the mix will make it impossible.

Beaten eggs and sugar in a metal bowl with a hand whisk.

PHOTO 1

Whisked egg mixture in a metal bowl.

PHOTO 2

Step 4. Remove the bowl from the bain-marie or water bath. Beat the eggs and sugar mixture with an electric or stand mixer with a whisk attachment for 12-15 minutes until the volume is doubled and the ribbon stage is reached.

Step 5. Perform the ribbon stage test to determine if the cake batter has reached the right consistency. Simply lift a small amount of batter with your whisk and create a figure-eight pattern using the batter that drips off (photo 3).

If the figure maintains its shape for a duration of at least 3-4 seconds, you have achieved the desired texture. However, additional beating is necessary if the figure-eight pattern sinks into the batter swiftly.

Step 6. Add half of the sifted flour and gently mix with a rubber spatula, making movements from top to bottom. Then add the remaining flour and gently fold it until combined (photo 4).

Pro tip: You can sift the flour over the egg mixture, little by little, and gently fold it with the spatula. Work in a circular pattern, going over and under, slightly rotating the bowl.

Batter falling down from the mixer beaters into a bowl.

PHOTO 3

Cake batter in a bowl.

PHOTO 4

Step 7. Pour the batter into the prepared tin (photo 5) and smooth the top with a silicone or offset spatula. Bake in the preheated oven until golden brown for 25-30 minutes (photo 6).

Pro tip: Check the readiness of the cake with a toothpick, a cake tester, or a wooden skewer: once it comes out clean out of the center of the cake, it is ready.

Cake batter in a baking mold.

PHOTO 5

Baked sponge cake in a baking pan.

PHOTO 6

Step 8. Let it cool for 10 minutes in the switched oven (keep the door slightly open using a wooden spoon) to prevent deflating the sponge cake.

Step 9. Remove the sponge from the oven, and let it cool for the other ten minutes. Then, remove it from the pan by flipping it upside down and cool it on a cooling rack, also known as a wire rack.

Step 10. Turn it over in 10 minutes, and let it cool completely. Dust the top of the cake with icing (powdered) sugar if desired.

Pan di Spagna on a serving plate.

Expert Tips

  1. Weigh the flour with a kitchen scale or use a spoon and level method.
  2. Add a pinch of salt to the flour to enhance the cake flavor and prevent the taste of eggs.
  3. Do not overbeat the egg and sugar mixture: stick for 12-15 minutes. Otherwise, the sponge cake will crumble while cutting.
  4. Opt for an 8-inch (20cm) round pan or springform pan. If you choose a cake ring wrapped in aluminum foil, adjustments to the baking time will be necessary. To recalculate the ingredients for a different size of the baking pan, use this simple cake pan calculator.
  5. Keep the oven door closed until the baking is complete. The rule of thumb is not to open the oven door for at least the first 30 minutes of baking. Otherwise, the cake will deflate.
  6. Adjust the baking time if the cake is too dark outside but still not perfectly cooked inside.
  7. Slice the sponge cake with a long serrated knife, a nylon thread, or a cake leveler.
  8. Make-ahead option: Make the cake one to two days in advance if you plan to cut and decorate it. Wrap it in plastic film (aka cling film) and refrigerate it.

Storing and freezing

Store Italian sponge cake covered in plastic wrap or in an airtight container at room temperature for a couple of days.

Can you freeze Italian sponge cake? You can freeze Pan di Spagna for up to 1 month.

Wrap the cake with plastic film, then a freezer bag, and freeze it for up to a month. Thaw the cake in the refrigerator overnight or at room temperature for a few hours.

What to make with a sponge cake

The airy Italian sponge cake is a light dessert with a unique fluffy texture. That sets it apart from other cakes that use butter, oil, or other ingredients that make a cake moist.

However, this dry-textured feature allows it to absorb any liquid you choose to infuse it with, from a simple sugar syrup to alcohol and coffee. Even the subtle sweetness of orange juice or milk complements the cake beautifully.

Enjoy some delightful cakes inspired by the delectable Pan di Spagna recipe:

  • Italian Mimosa cake
  • Vanilla meringue cake
  • Lychee cake
  • Uruguayan cake Torta Chaja
  • White Forest cake
  • Or browse all the cake recipes

Recipe FAQ

What is an Italian term of sponge cake?

Sponge cake translates as Pan di Spagna in Italian, literally meaning "bread of Spain," or Spanish bread, where "pan" means bread and "Spagna" means Spain.

What is the difference between sponge and Genoise cake?

An authentic sponge cake is made with only three ingredients: eggs, sugar, and flour. Genoise cake is made with the same ingredients but with the addition of melted butter to enrich the cake batter.

What pan is best for a sponge cake?

Sponge cakes are best baked in round, square, or tube pans without a nonstick feature surface, buttered, floured, or lined with parchment paper.

How to make gluten-free sponge cake

To make gluten-free sponge cake, replace all-purpose flour with the same amount of gluten-free flour blend, corn starch, or rice flour. If you want, you can use half of the rice flour and the other half of corn starch or potato starch.

Want more delicious and beautiful recipes? Subscribe to my newsletter and follow me on Facebook, Pinterest, and Instagram for my latest updates. If you make this recipe, please leave a star rating on the recipe card and comment below!

Print

Recipe card

Italian Sponge Cake (Pan di Spagna)

Italian sponge cake on a marble board.
Print Recipe
Save Recipe Recipe Saved

5 Stars 4 Stars 3 Stars 2 Stars 1 Star

5 from 37 reviews

This fat and dairy-free Italian sponge cake or Pan di Spagna is a light, airy, and delicious cake made with just 3 ingredients. It is perfect plain with a cup of tea or coffee, or to make a celebration cake.  

  • Author: Irina Totterman
  • Total Time: 45 minutes
  • Yield: 8 1x
  • Category: Cake
  • Method: Baking
  • Cuisine: Italian

Ingredients

Scale
  • 4 large eggs, room temperature
  • ½ cup + 1 ½ tablespoon (120) g granulated sugar
  • ⅔ cup + 4 ½ tablespoons (120 g) all-purpose flour

* If needed, please refer to Baking Conversion Charts.

**Don't you have the correct baking pan on hand right now? Try this simple Cake Pan Converter!


Instructions

  1. Preheat the oven to 355 degrees F/180 degrees C. Generously butter and flour an 8-inch/20 cm round cake pan and set aside.

  2. Place eggs and granulated sugar in a large bowl and lightly beat with a hand whisk. Continue to whisk and bring the bowl over a bain-marie/water bath to warm the mixture up to 104 degrees F/40 degrees C (warm to the touch).

  3. Remove the bowl from the bain-marie/water bath and beat the eggs/sugar mixture with an electric mixer until the volume is doubled for about 12 to 15 minutes. Add sifted flour and mix with a rubber spatula. 

  4. Pour the batter into the prepared pan and bake in the preheated oven for 25 to 30 minutes. Check the readiness of the cake with a toothpick or a cake tester: once it comes out clean out of the sponge, it is ready.

  5. Let it cool for 10 minutes in the switched oven (keep the door slightly open using a wooden spoon) to prevent deflating the sponge cake.

  6. Remove the sponge from the oven, and let it cool for the other 10 minutes. Then remove it from the pan by flipping it upside down and cool it on a cooling rack for 10 minutes. Turn the cake over, and allow it to cool completely.

Notes

  1. Weigh the flour with a kitchen scale or use a spoon and level method.
  2. Do not overbeat the egg and sugar mixture: stick for 12-15 minutes. Otherwise, the sponge cake will crumble while cutting.
  3. Opt for an 8-inch (20cm) round pan or springform pan. If you choose a cake ring wrapped in aluminum foil, adjustments to the baking time will be necessary. To recalculate the ingredients for a different size of the baking pan, use this simple cake pan calculator.
  4. Keep the oven door closed until the baking is complete. The rule of thumb is not to open the oven door for at least the first 30 minutes of baking. Otherwise, the cake will deflate.
  5. Adjust the baking time if the cake is too dark outside but still not perfectly cooked inside.
  6. Slice the sponge cake with a long serrated knife, a nylon thread, or a cake leveler.
  7. Make-ahead option: Make the cake one to two days in advance if you plan to cut and decorate it. Wrap it in plastic film (aka cling film) and refrigerate it.

Nutrition

  • Serving Size: 1 slice
  • Calories: 142
  • Sugar: 15.2 g
  • Sodium: 31 mg
  • Fat: 2.3 g
  • Saturated Fat: 0.7 g
  • Carbohydrates: 26.6 g
  • Fiber: 0.4 g
  • Protein: 4.3 g
  • Cholesterol: 82 mg

Thank you for following me on Pinterest, Facebook, and Instagram. Hashtag #bakinglikeachef so I can see your creations.

The nutritional information has been calculated using an online recipe nutrition calculator such as Verywellfit.com and is intended for informational purposes only. These figures should be used as a general guideline and not be construed as a guarantee.

The recipe was originally published on February 04, 2019. It has been revised to include improved content and photos. 

Spiced Plum Pavlova With Poached Plums

Aug 7, 2021 · 48 Comments

Plum Pavlova topped with spiced plums chocolate shavings.

Spiced plum Pavlova is the perfect Pavlova dessert topped with sweet-yet-boozy poached plums and sprinkled with chocolate shavings. No wonder it is the ultimate crowd-pleaser. So just give everyone a spoon and let them dig in.

Plum Pavlova topped with spiced plums chocolate shavings.

When you think of Pavlova, there is a beautiful taste that comes to mind. It is light and airy, and it is so much lighter than some other desserts today.

[feast_advanced_jump_to]

If you have ever tried shaping the Pavlova, it is like meditating. It takes all of your own imagination and creativity; this dessert never fails to make.

BAKING ESSENTIALS CHECKLIST

Sign up and get a list of the necessary baking tools and ingredients

FREE DOWNLOAD

The white color makes for such a minimalist look with all these different flavors mixed together on one plate - it tastes as good as it looks too.

Thanks to the world-famous Russian ballerina Anna Pavlova, who inspired a chef from either Australia or New Zealand to create a national dessert in 1926.

A slice of plum pavlova on a white dessert plate.

Delicious plum Pavlova recipe

  • This is a foolproof Pavlova recipe that has been tested and retested many times. It gives a simple egg white meringue, the perfect Pavlova shell, which can be filled with toppings with and without fruit.
  • It is a boozy dessert served with the perfect complement of red wine sauce and spiced plums.
  • It makes a delicious year-round dessert by substituting fresh plums with frozen ones.

Ingredients

Plum Pavlova ingredients.

For ingredients and detailed instructions, refer to the recipe card below.

  • Egg whites: The recipe calls for large eggs. Separate egg whites from egg yolks while the eggs are chilled. Then, let egg whites come to room temperature.
  • Sugar: Use superfine caster or baker's sugar or process granulated sugar in a food processor for a few seconds to make it superfine. It helps to whisk the meringue.
  • White wine vinegar is added to help stabilize the whisked egg whites while making the meringue. You can replace it with the same quantity of lemon juice if desired.
  • Corn starch is a necessary ingredient to create a soft marshmallow center, which is a signature of Pavlova dessert.
  • Red wine: Use your favorite red vine to make a red wine sauce.
  • Spices: Use a cinnamon stick, ground star anise and cinnamon, and a few cardamom pods to poach plums.
  • Plums: The recipe calls for ripe plums. The fresh fruits have to be ripe but not soft. Replace fresh plums with frozen ones or other fruit, for example, cherries.
  • Heavy cream: Opt for heavy or heavy whipping cream with at least 30% fat content. Whisk the cold cream in a chilled metal bowl for the best result. Keep the container in the freezer for 10-15 minutes before you start making the cream.
  • Dark chocolate: Choose a top-quality 70% dark cocoa chocolate such as Valrhona dark chocolate.
Plum Pavlova on a serving platter with a slice on a dessert plate.

How to make plum Pavlova

Step 1. Preheat the oven to 230°F (110°C). Line a baking sheet with parchment paper and draw a circle 8 inches (20 cm) in diameter. Turn the baking paper over so that the pencil line is facing down.

Step 2. To make the meringue, use an electric mixer or a stand mixer fitted with the whisk attachment. Beat egg whites and salt at high speed until soft peaks form.

Step 3. Reduce the speed and add sugar, 1 tablespoon at a time. Beat egg whites until the sugar dissolves and stiff peaks form (photo 1).

Step 4. Add cornflour and white wine vinegar, and whisk until just combined, about 30 seconds.

Pro tip: Rub the ready meringue between your fingers to ensure that sugar has been incorporated and dissolved.

Step 5. Use a large metal spoon to scoop the meringue mixture onto the lined baking tray into the drown circle (photo 2).

Meringue in a bowl with a stiff peak on a whisk.

PHOTO 1

Scooped meringue mixture on parchment paper.

PHOTO 2

Step 6. Spread out the meringue with a rubber or bent spatula to shape a meringue dome (photo 3).

Step 7. Bring the meringue to the center of the oven and bake at 230°F (110°C) for 20 minutes. Then reduce the oven temperature to 210°F (100°C) and bake for a further 1 hour 15 minutes (photo 4).

Step 8. Turn off the oven and leave the meringue in the oven, with the door closed, for 3 to 4 hours until cooled completely.

Shaped meringue on parchment paper.

PHOTO 3

Baked Pavlova shell on parchment paper.

PHOTO 4

Step 9. To make the red wine sauce, place granulated sugar in a small saucepan and heat until sugar starts to caramelize (do not use a spoon; just swirl the pan over the stove).

Step 10. Take the saucepan out of the heat, and carefully add warm red wine (warm it up in the microwave for 10 seconds). Please be careful since the mixture might splash.

Step 11. Bring the pan to medium heat again and let the caramel dissolve in the wine.

Step 12. Add spices with plum quarters and poach plums, cooking for 5 minutes (photo 5). Drain plum slices and spices with a colander or use a slotted spoon, but keep the sauce.

Step 13. Bring the red wine sauce over low heat. Let it simmer and cook for 10 minutes until thickened. Remove from heat, and set aside to cool.

Step 14. To make whipped cream, place cold heavy cream with ground cinnamon (if used) in a chilled bowl of a stand mixer and whip to medium-stiff peaks.

Pro tip: Consult the sugar-free whipped cream recipe for step-by-step photographed explanations, helpful tips, and tricks.

Step 15. To assemble plum Pavlova, peel off the paper and place the meringue base on a serving platter or a cake stand. Top with whipped cream and poached plums. Drizzle with the plum syrup and sprinkle with dark chocolate shavings (photo 6).

PHOTO 5

Plum Pavlova with red whine sauce poured from a glass sauce pourer.

PHOTO 6

Serve the Pavlova immediately.

Poached plum Pavlova on a serving plate.

Expert Tips

  1. Make sure that a large bowl is clean and dry before whisking egg whites. Any residual moisture or traces of grease on a mixing bowl prevents egg whites from whisking.
  2. Process granulated sugar in a food processor for a few seconds to obtain superfine sugar. It helps dissolve the sugar more easily while making the meringue.
  3. Add sugar one spoon at a time. Whisk for about 10 seconds before adding the next spoon.
  4. Do not open the oven door during baking since any moisture in the air can soften the meringue shell. 
  5. Turn off the oven (do not open the door) and let the meringue cool completely for three to four hours; better overnight.
  6. To make large chocolate shavings, scrape chocolate with a knife or simply grate a chocolate bar.

Recipe variations

A Pavlova's strength lies in the fact that it can be made with so many flavors. A quick Google search finds lots of suggestions for things to serve on top.

Fruit flavor combinations are limited by your imagination, but try different pairings before deciding what you like best.

  • Fruits: Pavlova tastes great with lemon curd and boozy cherries or fresh berries, red fruits and raspberry sauce, raspberries, peaches, passion fruit pulp, or a mix of tropical fruits.
  • Flavorings: Try to mix fruit with various spices, for example, banana with pumpkin spice or ground star anise.
  • Fruit alternatives: An alternative to fruit would be crushed chocolate cookies or graham crackers. Also, try to mix all different types of desserts in one dish, like a strawberry mousse, tiny cubes of candied citrus peel, and white chocolate chips. Finally, top your Pavlova dessert with dark chocolate cream and chocolate curls on top.

Storing and freezing

Pavlova is best enjoyed right after it is assembled. Store leftovers of the dessert in the refrigerator and consume within 24 hours.

Can you freeze Pavlova? You can not freeze the assembled Pavlova, but you can freeze the meringue shell.

First, place the cooled Pavlova meringue on a tray lined with parchment and freeze for 3 hours or longer. Then place it in a freezer-safe bag, press out as much air as possible, seal and label the bag, and freeze for up to 3 months.

To thaw, bring the Pavlova shell to a counter 2 to 3 hours before serving. Cover the meringue shell with a paper towel while defrosting. Then top it with whipped cream and fruit.

Recipe FAQ

Can you make the Pavlova shell in advance?

You can make the Pavlova meringue in the evening and leave it in the oven overnight. The next morning, the crisp outer shell with the marshmallow-centered middle of the meringue will be ready to assemble.

Can you replace plums with the fruit of your choice?

This Pavlova recipe is created for autumnal fruits - plums. But it perfectly works for cherries, too.

Can you use double cream instead of whipping cream?

You can replace heavy whipping cream with double cream that has an even higher fat content. It is actually more stable once whipped than using whipping cream.

Love meringue desserts? Try these next!

  • Large meringue dessert
  • Vanilla meringue cake
  • Pavlova roll
  • Gingerbread Pavlova
  • French meringue cake Merveilleux
  • Or browse all the cake recipes

Want more delicious and beautiful recipes? Subscribe to my newsletter and follow me on Facebook, Pinterest, and Instagram for my latest updates. If you make this recipe, please leave a star rating on the recipe card and comment below!

Print

Recipe card

Spiced Plum Pavlova

Print Recipe
Save Recipe Recipe Saved

5 Stars 4 Stars 3 Stars 2 Stars 1 Star

5 from 22 reviews

Spiced plum Pavlova is the perfect Pavlova dessert made with seasonal poached plums, red wine sauce, and rich dark chocolate shavings.  No wonder it is the ultimate crowd-pleaser.

  • Author: Irina Totterman
  • Total Time: 2 hours
  • Yield: 6-8 1x
  • Category: Cakes
  • Method: Baking
  • Cuisine: Australian

Ingredients

Scale

For the meringue:

  • 6 egg whites, room temperature
  • 1 ⅓ cups + 2 tablespoons (330 g) caster sugar
  • 1 tablespoon white wine vinegar
  • 2 tablespoons corn starch
  • 1 pinch of salt

For the red wine sauce:

  • ⅓ cup + 5 ½ teaspoons (100 g) granulated sugar
  • ⅓ cup + 1 ½ tablespoon (100 ml) red wine
  • 1 cinnamon stick
  • 3-4 cardamom pods, lightly crushed
  • 1 pinch of ground star anise
  • 6 plums, stoned and quartered

For whipped cream:

  • 1 cup + 1 ½ tablespoons (250 ml) cold heavy cream, 30% fat
  • 1 pinch of ground cinnamon (optional)

To decorate:

  • 0.4 oz. (10 g) dark chocolate shavings

*Don't you have the correct baking pan on hand right now? Try this simple Cake Pan Converter!

** If needed, please refer to Baking Conversion Charts.

Instructions

  1. Preheat the oven to 230°F (110°C). Line a baking sheet with parchment paper and draw a circle 8 inches (20 cm) in diameter. Turn the baking paper over so that the pencil line is facing down.

  2. To make the meringue, use a stand mixer or an electric mixer fitted with a whisk attachment to beat egg whites and salt at high speed until soft peaks form.

  3. Reduce the speed and add sugar, 1 tablespoon at a time. Beat egg whites until the sugar dissolves and stiff peaks form. Add corn flour and white wine vinegar, and whisk until just combined, about 30 seconds.

  4. Use a large metal spoon to scoop the meringue mixture onto the lined baking sheet into the drown circle. Then, spread out the meringue with a rubber or bent spatula or create a meringue dome. Bring the meringue base to the center of the oven and bake at 230°F (110°C) for 20 minutes. Then reduce the oven temperature to 210°F (100°C) and bake for a further 1 hour 15 minutes.

  5. Turn off the oven and leave the meringue in the oven, with the door closed, for 3 to 4 hours until cooled completely.

  6. To make the red wine sauce, place granulated sugar in a small saucepan and heat until sugar starts to caramelize (do not use a spoon; just swirl the pan over the stove). Take the saucepan out of the heat, and carefully add warm red wine (warm it up in the microwave for 10 seconds). Please be careful since the mixture might splash.

  7. Bring the pan to medium heat again and let the caramel dissolve in the wine. Add spices and plum quarters and cook for 5 minutes. Drain plum slices and spices with a colander or use a slotted spoon, but keep the sauce.

  8. Bring the red wine sauce to a simmer and cook for 10 minutes until thickened. Remove from heat and set aside to cool.

  9. To make whipped cream, place cold heavy cream with ground cinnamon (if used) in a chilled bowl of a stand mixer and whip it until medium-stiff peaks.

  10. To assemble plum Pavlova, place the meringue dome on a serving platter or a cake stand. Top with the whipped cream and poached plums. Drizzle with the sauce and sprinkle with dark chocolate shavings. Serve the Pavlova immediately.

Notes

  1. Make sure that a large bowl is clean and dry before whisking egg whites. Any residual moisture and traces of grease prevent egg whites from whisking.
  2. Process granulated sugar in a food processor for a few seconds to obtain superfine sugar. It helps dissolve easier while making the meringue. 
  3. Add sugar one spoon at a time. Whisk for about 10 seconds before adding the next spoon.
  4. Rub the ready meringue between your fingers to ensure that sugar has been incorporated and dissolved.
  5. Do not open the oven door during baking since any moisture in the air can soften the meringues shell. 
  6. Turn off the oven (do not open the door) and let the meringue cool completely for three to four hours; better overnight.
  7. To make large chocolate shavings, scrape the chocolate with a knife or simply grate the chocolate bar.
  8. Pavlova is best enjoyed right after it is assembled.

Nutrition

  • Serving Size: 1 slice
  • Calories: 451
  • Sugar: 76.4 g
  • Sodium: 77 mg
  • Fat: 13.7 g
  • Saturated Fat: 8.5 g
  • Carbohydrates: 79.6 g
  • Fiber: 0.5 g
  • Protein: 4.9 g
  • Cholesterol: 47 mg

Thank you for following me on Pinterest, Facebook, and Instagram. Hashtag #bakinglikeachef so I can see your creations.

The nutritional information has been calculated using an online recipe nutrition calculator such as Verywellfit.com and is intended for informational purposes only. These figures should be used as a general guideline and not be construed as a guarantee.

The recipe was originally published on September 16, 2019. It has been revised to include improved content and photos and may differ from what was originally published.

Russian Honey Cake Medovik (Tort Medovik)

May 14, 2021 · 30 Comments

Sliced tort Medovik on a serving board.

Here's the famous Russian honey cake Medovik, or simply Medovik tort. It's sweet and rich with a pronounced honey flavor, superb taste, and beautiful stature. Cut yourself a big slice and enjoy it with tea or coffee.

Sliced tort Medovik on a serving board.

Honey cake Medovik

Honey cake Medovik, aka tort Medovik, is a Russian layer cake made with the main ingredient - honey - translated in Russian as мёд [mʲot].

[feast_advanced_jump_to]

For many Russians and people from the former Soviet Union, Medovik tort is a childhood dream cake, perfect for birthday parties, weddings, and other special occasions. The recipe can be made in different variations using a regular oven or an ancient Russian oven/stove.

BAKING ESSENTIALS CHECKLIST

Sign up and get a list of the necessary baking tools and ingredients

FREE DOWNLOAD

The cake traditionally consists of 4 to 8 thin layers, sometimes 10 to 15. But the number of layers depends on your preference: the thinner the layers, the more layers you will get out of the cake batter.

But let me show you how to make the easiest Medovik cake without sweating over cake layers. It uses an easy sponge cake technique (express Medovik cake) with a mouthwatering result!

A single slice of the Russian honey cake Medovik on a serving plate

Ingredients

For ingredients and detailed instructions, refer to the recipe card below.

  • Unsalted butter cut into cubes. You can replace it with good-quality margarine.
  • Honey - Choose buckwheat honey or replace it with the honey you prefer. You can use liquid or crystallized honey; it won't affect the taste of the cake.
  • Baking soda (sodium bicarbonate): Make sure it's fresh.
  • Large eggs at room temperature.
  • All-purpose flour.
  • Sugar - Use granulated white or caster sugar.
  • Heavy cream with at least 30% fat content.
  • Sour cream with at least 20 %, better 25% fat content.
  • Icing sugar - Use a coffee grinder to make it yourself, or use store-bought powdered sugar.

How to make tort Medovik

Preheat the oven to 355°F (180°C). Line a 10 x 15 inches (25 x 38 cm) jelly roll pan with parchment paper.

To make the cake, place butter and honey in a large saucepan and bring over low heat. Cook the mixture for about 2-4 minutes with regular stirring until the butter is melted.

Add baking soda and continue cooking with constant stirring. When the honey reacts with the baking soda and begins to foam, cook the mixture for a few seconds, remove it from the heat, and let it cool.

Meanwhile, beat eggs with sugar in a separate bowl with an electric mixer for 2-3 minutes.

Add sifted flour to the honey mixture and mix with a rubber spatula. Pour the eggs and and mix. The consistency of the dough should be smooth, without lumps, and resemble thick sour cream.

Pour the dough into the prepared baking pan and bake for 18 minutes. The baking time may vary; use your oven as a guide. Check the doneness with a toothpick: the cake is ready if it comes out dry.

Remove the pan from the oven and flip the cake onto a large sheet of parchment paper. Peel the parchment from the bottom of the cake and leave it to cool completely.

Using a plate as a template, cut a circle of 7 inches (18 cm) in diameter and two half-disks. Cut the cake round and half-disks lengthwise with a long serrated knife into two layers.

Crumble the rest of the cake with your hands. This crumb will be used to sprinkle the cake.

To make the sugar syrup, combine water and sugar in a saucepan and stir. Bring to a boil, then cool.

To make the sour cream frosting, whip cold heavy cream with powdered sugar until medium peaks with an electric or stand mixer. Add cold sour cream and mix at low mixer speed. Adjust the cream consistency with your mixer, but don't overwhip the cream.

To assemble the cake, place the first cake layer on a serving board. Soak it with sugar syrup. Spread ¼ of the cream. Place two half-disks, making a round cake layer, soak, and spread another ¼ of the cream.

Continue the same way, finishing with a whole cake layer (circle), and spread the rest of the cream over the entire cake (don't soak the top cake layer).

Sprinkle the top and sides of the cake with the prepared biscuit crumbs. Transfer the cake to a serving plate and refrigerate for at least 5-6 hours; better overnight.

Expert tips

  • To make a larger cake, cut the baked cake into two rectangles instead of the round and half-circles, then each into two cake layers. Use the edges of the baked cake to make crumbles. Multiply the cream ingredients by 1.5.
  • If you ever need to recalculate the cake recipe ingredients for another size, use this simple cake pan calculator.
  • Decorate the cake using a honeycomb stencil and dust icing sugar on top of it, or arrange a few bee icing decorations.
  • Use leftover cake to make cake pops.

Recipe variations

There are plenty of Medovik recipe variations, with alcohol (vodka) and without alcohol, with a double boiler and without, but all of them have two ingredients in common: honey and sour cream.

The original recipe for Medovik frosting is based on sour cream. However, creamy frosting with sweetened condensed milk, dulce de leche, heavy whipping cream, cream cheese, crème fraîche, or even alternated cream layers are famous nowadays.

The delicious sour cream frosting made with adding whipping cream works best. It is stable enough to spread between layers and has a distinctive look once the cake is sliced.

You can experiment with adding chopped roasted walnuts or pieces of dried prunes between the cake layers.

How to store

Store Medovik cake under a glass dome and refrigerate until serving. Leftovers can be kept in the fridge for one to two days.

Can you freeze Medovik? It isn't recommended to freeze the finished cake, but you can freeze the honey cake layers for up to one to two months. Cut cake layers, cover each with plastic wrap (aka cling film), and freeze.

To thaw, bring cake layers to the fridge overnight or on the kitchen counter for a few hours.

Recipe FAQ

Can you make Medovik cake in advance?

It is recommended to make the cake Medovik one day in advance to let the cake layers absorb the tangy sour cream frosting. Then, refrigerate it overnight and serve it the next day.

Love cakes? Try these next!

  • A single slice of apple mousse cake on a red dessert plate with a tea set.
    Apple Mousse Cake Pomme d'Eve
  • Sliced Black Forest cake on a white cake stand.
    Authentic Black Forest Cake (Schwarzwälder Kirschtorte)
  • Sliced Sans Rival cake on a cake board.
    Sans Rival Cake (Filipino Cashew Meringue Cake)
  • A slice of the charlotte with the remaining cake on a white platter.
    Pretty Fresh Fruit Charlotte

Want more delicious and beautiful recipes? Subscribe to my newsletter and follow me on Facebook, Pinterest, and Instagram for my latest updates. If you make this recipe, please leave a star rating on the recipe card and comment below!

Print

Recipe card

Russian Honey Cake Medovik (Tort Medovik)

Sliced tort Medovik on a serving board.
Print Recipe
Save Recipe Recipe Saved

5 Stars 4 Stars 3 Stars 2 Stars 1 Star

5 from 14 reviews

Medovik tort is a traditional Russian honey cake made with multiple layers and sour cream frosting. It's sweet and rich with a pronounced honey flavor, superb taste, and beautiful stature. 

  • Author: Irina Totterman
  • Total Time: 1 hour, 30 minutes (plus chilling time)
  • Yield: 10 slices 1x
  • Category: Cakes
  • Method: Baking
  • Cuisine: Russian

Ingredients

Scale

For the cake:

  • ⅔ cup (150 g) unsalted butter
  • ⅓ cup (135 g) buckwheat honey
  • 1 ½ teaspoons baking soda
  • 3 large eggs, room temperature
  • 150 g granulated sugar 
  • 1 ¾ cups + 2 ½teaspoons (225 g) all-purpose flour

For sugar syrup:

  • ½ cup (115 g) water
  • 4 tablespoons granulated sugar

For the sour cream frosting:

  • 1 cup (238 g) heavy cream (30% fat, cold)
  • 1 ½ cups (350 g) sour cream (20-25% fat, cold)
  • ¾ cup (100 g) icing (powdered) sugar

*Don't you have the correct baking pan on hand right now? Try this simple Cake Pan Converter!

** If needed, please refer to Baking Conversion Charts.

Instructions

  1. Preheat the oven to 355°F (180°C). Line a 10 x 15 inches (25 x 38 cm) jelly roll pan with parchment paper.
  2. Place butter and honey in a large saucepan and bring over low heat. Cook the mixture for about 2-4 minutes with regular stirring until the butter is melted.
  3. Add baking soda and continue cooking with constant stirring. When the honey reacts with the baking soda and begins to foam, cook the mixture for a few seconds, remove it from the heat, and let it cool.
  4. Meanwhile, beat eggs with sugar in a separate bowl with an electric mixer for 2-3 minutes.
  5. Add sifted flour to the honey mixture and mix with a rubber spatula. Pour the eggs and and mix. The consistency of the dough should be smooth, without lumps, and resemble thick sour cream.
  6. Pour the dough into the prepared baking pan and bake for 18 minutes. The baking time may vary; use your oven as a guide. Check the doneness with a toothpick: the cake is ready if it comes out dry.
  7. Remove the pan from the oven and flip the cake onto a large sheet of parchment paper. Peel the parchment from the bottom of the cake and leave it to cool completely.
  8. Using a plate as a template, cut a circle of 7 inches (18 cm) in diameter and two half-disks. Cut the cake round and half-disks lengthwise with a long serrated knife into two layers. Crumble the rest of the cake with your hands. This crumb will be used for sprinkling the cake.
  9. To make the sugar syrup, combine water and sugar in a saucepan and stir. Bring to a boil, then cool.
  10. To make the sour cream frosting, whip cold heavy cream with powdered sugar until medium peaks with an electric or stand mixer. Add cold sour cream and mix at low mixer speed. Adjust the cream consistency with your mixer, but don't overwhip the cream.
  11. To assemble the cake, place the first cake layer on a serving board. Soak it with sugar syrup. Spread ¼ of the cream. Place two half-disks, making a round cake layer, soak, and spread another ¼ of the cream. Continue the same way, finishing with a whole cake layer (circle), and spread the rest of the cream over the entire cake (don't soak the top cake layer).
  12. Sprinkle the top and sides of the cake with the prepared biscuit crumbs.

Notes

  1. To make a larger cake, cut the baked cake into two rectangles instead of the round and half-circles, then each into two cake layers. Use the edges of the baked cake to make crumbles. Multiply the cream ingredients by 1.5.
  2. If you ever need to recalculate the cake recipe ingredients for another size, use this simple cake pan calculator.
  3. Decorate the cake using a honeycomb stencil and dust icing sugar on top of it, or arrange a few bee icing decorations.
  4. Use leftover cake to make cake pops.

Nutrition

  • Serving Size: 1 slice
  • Calories: 483
  • Sugar: 28.2 g
  • Sodium: 289 mg
  • Fat: 24.6 g
  • Saturated Fat: 14.9 g
  • Carbohydrates: 60.7 g
  • Fiber: 1.2 g
  • Protein: 6.8 g
  • Cholesterol: 105 mg

Thank you for following me on Pinterest, Facebook, and Instagram. Hashtag #bakinglikeachef so I can see your creations.

The nutritional information has been calculated using an online recipe nutrition calculator such as Verywellfit.com and is intended for informational purposes only. These figures should be used as a general guideline and not be construed as a guarantee.

The recipe was originally published on June 09, 2018. It has been updated and may differ from what was originally published. It was revised to include improved content and photos. 

For reference, if you have made this recipe previously and want to replicate it, please get in touch with hello@bakinglikeachef.com. I will be happy to send you the old version of the cake.

Apple Mousse Cake Pomme d'Eve

May 5, 2021 · 3 Comments

A single slice of apple mousse cake on a red dessert plate with a tea set.

Apple mousse cake - Eve's apple, or pomme d'Eve in French, is a sophisticated layered dessert with different textures and flavors. Sauteed caramelized apples are combined with green apple and caramel mousse and chocolate sponge. It is an amazing dessert for apple lovers!

A single slice of apple mousse cake on a red dessert plate with a tea set

I am an an-apple-a-day person and a new experiments lover. When I saw a picture of this apple mousse cake called Pomme d'Eve, meaning Eve's apple in English, I knew that I would have to make it!

It is a Japanese cake created by a famous Japanese chef Hidemi Sugino. I adapted his recipe to make the cake less complicated and affordable to bake at home.

This beautiful apple mousse cake tastes heavenly delicious. It is not over-sweetened.

It has a fresh note of green apples due to the apple mousse and a spicy cinnamon note of the caramel mousse.

The cut of the apple slices deeply sunk into the apple mousse, which is impressive. 

Two types of mousses are separated with a layer of chocolate biscuit. Well, this cake has its own anatomy.

BAKING ESSENTIALS CHECKLIST

Sign up and get a list of the necessary baking tools and ingredients

FREE DOWNLOAD

[feast_advanced_jump_to]
Sliced apple cake featuring caramelized apples on top of the mousse and a chocolate biscuit

Pomme d'Eve is a time-consuming dessert; however, the recipe's steps are not difficult.

If you like to caramelize, you will get another chance to master your technique. 

In the end, you will be rewarded with the gorgeous cut and wonderful taste after you dedicate your time and skills to the cake.

Why you should try this recipe

  1. It is a unique Japanese cake recipe to give a try.
  2. This apple mousse cake is a beautiful balance of textures and flavors.
  3. It is not oversweetened.
  4. Once served, wows, oohs, and ahhs of your guests are guaranteed!

Ingredients

For ingredients and detailed instructions, refer to the recipe card below.

Eggs: use an egg separator to separate chilled egg whites from the egg yolks. Then bring both egg whites and yolks to room temperature.

Sugar: the recipe calls for granulated white or caster sugar.

Flour: use all-purpose flour.

Cocoa powder: use unsweetened cocoa powder to make a chocolate sponge.

Grapeseed oil: it is a flavorless oil used in baking/cooking. Replace it with sunflower oil if desired.

Milk: use whole milk or low-fat milk to make the batter.

Apples: this cake is made with green apples like Granny Smith apples.

Butter: the recipe calls for unsalted butter.

Ground cinnamon: it brings a beautiful spicy note and makes a great pairing with apples.

Liquor Grand Marnier, rum: they both add a beautiful alcoholic flavor to the cake.

Gelatin: use gelatin powder such a Knox unflavored gelatin. No need to dissolve it in water before use. Add it as a powder as directed in the recipe.

Whipping cream: it has to be cold to whip it properly.

Lemon juice: use untreated lemon and a citrus juicer to make fresh lemon juice.

Two slices of apple mousse cake on a red dessert plate with teacups and saucers

How to make an apple mousse cake

To make the chocolate biscuit, preheat the oven to 355 F/180 C. Using an electric or a stand mixer, beat egg yolks with sugar for 10 minutes in a bowl. Add grapeseed oil and beat again (photo 1).

Once the mixture becomes homogeneous, delicately add the sifted flour and cocoa powder. Gradually add milk (photo 2).

Photo 1: Egg yolks/sugar mixture in a bowl Photo 2: Chocolate mixture in a bowl
PHOTO 1 PHOTO 2

In a separate bowl, beat the egg whites (photo 3) and add them to the main preparation with a rubber spatula (photo 4).

Photo 3: Beaten egg whites in a bowl Photo 4: Ready chocolate batter in a bowl
PHOTO 3 PHOTO 4

Spread the dough to the thickness of 1 cm on a silicone baking mat or a baking sheet lined with parchment. Bake for 10 minutes.

Take the biscuit out of the oven, let it cool. Cut two 7-inch/18-cm disks (photo 5).

To caramelize apples, cut unpeeled apples into slices up to about ½-inch/1 - 1.5 cm thick (photo 6).

Photo 5: Two biscuit disks on parchment paper Photo 6: Apple slices on a wooden board
PHOTO 5 PHOTO 6

Heat a non-stick frying pan with sugar over medium heat until making caramel. Do not use any utensils, just shake the pan over your stove.

Add butter and ground cinnamon, and mix. Add apple slices and cook, regularly turning them with a wooden spatula for 6 to 8 minutes until the apples become soft (photo 7).

Add Grand Marnier, mix and take from the heat. Drain apples through a colander and let them cool down (photo 8).

Photo 7: Caramelized apples in a pan Photo 8: Apple slices in a white colander
PHOTO 7 PHOTO 8

To make the green apple mousse, peel, core apples, and cut them into small cubes. Place them in the bowl of a food processor.

Add lemon juice, sugar, and rum and process to make apple puree (photo 9).

Transfer puree in a saucepan and heat it to 140 F/60 C (do not boil!). Add gelatin and mix until gelatin is dissolved (photo 10).

Photo 9: Apple puree in a bowl Photo 10: Apple puree in a saucepan
PHOTO 9 PHOTO 10

Place apple puree in a shallow dish and let it cool to room temperature.

In a separate clean bowl, whip the cold whipping cream until soft picks (photo 11) and add to the cooled apple puree. Mix well with the spatula (photo 12).

Photo 11: Whipped cream in a bowl Photo 12: Apple mousse in a metal bowl
PHOTO 11 PHOTO 12

To assemble the cake, cover the bottom of the mousse cake ring adjusted to 7 inches/18 cm in diameter with plastic film.

Line the sides of the ring with an acetate cake collar. Arrange caramelized apples in a circular pattern on the bottom, placing them directly on the plastic (photo 13).

Cover apples with the green apple mousse (photo 14).

Photo 13: Apples at the bottom of the ring Photo 14: Apple mousse in a ring
PHOTO 13 PHOTO 14

Place the first chocolate disk (photo 15) and refrigerate until the next step.

To make caramel, in a saucepan, mix sugar and water and heat over medium heat to get golden caramel. Take it off the heat and carefully add hot cream (photo 16).

Photo 15: Chocolate biscuit in a cake ring Photo 16: Golden colored caramel with added cream
PHOOT 15 PHOTO 16

Bring caramel over low heat and stir until homogeneous. Take it out of the heat, add ground cinnamon, and mix (photo 17).

To make the caramel mousse, in another saucepan, whisk eggs with sugar using a hand whisk.

Slowly pour the caramel into the eggs/sugar mixture, stirring constantly.

Bring the mixture over low to medium heat and cook until the cooking thermometer shows 181 F/83 C. Stir constantly while cooking (photo 18).

Photo 17: Caramel in a saucepan Photo 18: Caramel pastry cream in a saucepan
PHOTO 17 PHOTO 18

Transfer the preparation to a shallow plate, cover with plastic and let it cool to 140 F/60 C.

Once it reaches 140 F/60 C, add gelatin and mix. Let it cool down to 77 F/25 C and whisk with an electric mixer to aerate.

Take a clean bowl and whip whipping cream until the soft picks. Add whipped cream to the cooled caramel mixture and mix with the spatula (photo 19).

To finish assembling the cake, take it out of the refrigerator and pour the caramel mousse on top of the chocolate biscuit. Spread it with a small offset spatula (photo 20).

Photo 19: Caramel mousse in a bowl Photo 20: Caramel mousse in a cake ring
PHOTO 19 PHOTO 20

Place the second chocolate disk (photo 21), cover with plastic, and refrigerate the cake for 12 hours.

To make the neutral glaze, in a small saucepan, mix sugar, water and bring it over medium heat to cook for 2 to 3 minutes.

Take it off the heat, let it cool to 140 F/60 C. Add gelatin and mix until it is dissolved.

If there are lumps, pass them through a fine-mesh sieve. Add lemon juice, mix and let it cook to 77 F/25 C.

Take the cake out of the fridge, turn the cake. Carefully remove the ring and place the cake on a wire rack over a baking sheet.

Pour the glaze over the cake (photo 22). Using a cake lifter, transfer it to a cake board and refrigerate for at least one hour. 

Photo 21: Biscuit in a cake ring Photo 22: Cake over cake lifter and wire rack
PHOTO 21 PHOTO 22

Expert tips

  1. Use unpeeled apples to caramelize or peel apples with a vegetable peeler if preferred.
  2. Cut apple slices thicker (if desired) and arrange them at the bottom of the cake ring in a pattern you like.
  3. Use gelatin powder to make this mousse cake (no need to dissolve in water). You can also replace 10 g of powdered gelatin with 4 gelatin sheets soaked in cold water for 10 minutes and drained before use.
  4. Make sure to use a cooking thermometer to check the required temperature while making the cake.

Frequently asked questions

Can you make this apple mousse cake in advance?

Yes, you can assemble the cake and keep it in the refrigerator overnight. The next day, make a neutral glaze, pour it over the cake, and let it chill for at least one hour.

Can you freeze this mousse cake?

Yes, you can freeze this cake. Assemble the cake, cover it with plastic and freeze it (being in the ring) for up to one month. On the day of serving, remove the plastic, and turn the cake over. Warm up the cake ring with your hands or a blow torch and carefully lift the cake ring. Place the cake in the refrigerator for a few hours to thaw. One hour before serving, apply a neutral glaze and refrigerate for at least one hour.

Love apple desserts? Try these next!

  • Apple tart decorated with gold pearls and flours in a tart pan with a yellow cup on the background.
    Modern French Caramel Apple Tart
  • French crepe filled with caramelized apples and cinnamon, served on a dessert table.
    Apple Cinnamon Crepes Recipe (Beggar's Purses)
  • Tarte Tatin with caramelized apples packed on top of puff pastry.
    Tarte Tatin Pommes (Apple Tarte Tatin)
  • French apple fritters sprinkled with icing sugar on a blue dessert plate.
    Beignets aux Pommes (French Apple Fritters)

Want more delicious and beautiful recipes? Subscribe to my newsletter and follow me on Facebook, Pinterest, and Instagram for my latest updates. If you make this recipe, please leave a star rating on the recipe card and comment below!

Print

Recipe card

Apple Mousse Cake Pomme d'Eve

A single slice of apple mousse cake on a red dessert plate with a tea set.
Print Recipe
Save Recipe Recipe Saved

5 Stars 4 Stars 3 Stars 2 Stars 1 Star

5 from 2 reviews

Apple mousse cake - Eve's apple, or pomme d'Eve in French, is a sophisticated layered dessert with different textures and flavors. Sauteed caramelized apples are combined with the green apple and caramel mousse and chocolate sponge. It is an amazing dessert for apple lovers!

  • Author: Irina Totterman
  • Total Time: 3 hours (plus chilling time)
  • Yield: 8 1x
  • Category: Cakes
  • Method: Baking
  • Cuisine: Japanese

Ingredients

Scale

For the chocolate biscuit:

  • 4 large eggs (4 egg yolks + 4 egg whites)
  • ¼ cup + ½ tablespoon (65 g) granulated sugar
  • ⅓ cup + 1 tablespoon (50 g) all-purpose flour
  • 2 tablespoons (15 g) cocoa powder
  • 2 ⅓ tablespoons (30 g) grapeseed oil
  • 7 teaspoons (35 g) milk

For caramelized apples:

  • 2 green apples (medium size)
  • 3 ½ tablespoons (50 g) granulated sugar 
  • 1 oz. (30 g) unsalted butter
  • 1 teaspoon ground cinnamon
  • 1 tablespoon liquor Grand Marnier

For the green apple mousse:

  • 2 green apples (medium size)
  • 1 tablespoon rum
  • 1 ½ envelops (10 g) gelatin powder
  • ⅔ cup + 3 tablespoons (200 g) whipping cream
  • 1 teaspoon lemon juice
  • 2 tablespoons (28 g) granulated sugar 

For the caramel:

  • ⅓ cup + 1 ½ tablespoons (100 g) granulated sugar 
  • 7 teaspoons (35 ml) water
  • ⅓ cup + 1 ½ tablespoon (100 g) whipping cream 

For caramel mousse:

  • 3 large egg yolks
  • 2 teaspoon (10 g) granulated sugar 
  • 1 teaspoon ground cinnamon
  • 1 ½ envelops (10 g) gelatin powder
  • ⅓ cup + 1 ½ tablespoon (100 g) whipping cream 

For the neutral glaze:

  • ⅓ cup + 1 ½ tablespoon (100 g) granulated sugar
  • ⅔ cup + 5 tablespoons (230 ml) water
  • 1 tablespoon gelatin powder
  • 1 teaspoon lemon juice

*Don't you have the correct baking pan on hand right now? Try this simple Cake Pan Converter!

** If needed, please refer to Baking Conversion Charts.

Instructions

  1. To make the chocolate biscuit, preheat the oven to 355 F/180 C. Using an electric or a stand mixer, beat egg yolks with sugar for 10 minutes in a bowl. Add grapeseed oil and beat again. Once the mixture becomes homogeneous, delicately add the sifted flour and cocoa powder. Gradually add milk. In a separate bowl, beat the egg whites and add them to the main preparation with a rubber spatula.
  2. Spread the dough to the thickness of 1 cm on a silicone baking mat or a baking sheet lined with parchment. Bake for 10 minutes. Take the biscuit out of the oven, let it cool. Cut two 7-inch/18-cm disks.
  3. To caramelize apples, cut unpeeled apples into slices up to about ½-inch/1 - 1.5 cm thick. Heat a non-stick frying pan with sugar over medium heat until making caramel. Do not use any utensils, just shake the pan over your stove. Add butter and ground cinnamon, and mix. Add apple slices and cook, regularly turning them with a wooden spatula for 6 to 8 minutes until the apples become soft. Add Grand Marnier, mix and take from the heat. Drain apples through a colander and let them cool down.
  4. To make the green apple mousse, peel, core apples, and cut them into small cubes. Place them in the bowl of a food processor. Add lemon juice, sugar, and rum and process to make apple puree. Transfer puree in a saucepan and heat it to 140 F/60 C (do not boil!). Add gelatin and mix until gelatin is dissolved. Place apple puree in a shallow dish and let it cool to room temperature.
  5. In a separate clean bowl, whip the cold whipping cream until soft picks and add to the cooled apple puree. Mix well with the spatula.
  6. To assemble the cake, cover the bottom of the mousse cake ring adjusted to 7 inches/18 cm in diameter with plastic film. Line the sides of the ring with an acetate cake collar. Arrange caramelized apples in a circular pattern on the bottom, placing them directly on the plastic. Cover apples with the green apple mousse. Place the first chocolate disk and refrigerate until the next step.
  7. To make caramel, in a saucepan, mix sugar and water and heat over medium heat to get golden caramel. Take it off the heat and carefully add hot cream. Bring caramel over low heat and stir until homogeneous. Take it out of the heat, add ground cinnamon and mix.
  8. To make the caramel mousse, in another saucepan, whisk eggs with sugar using a hand whisk. Slowly pour the caramel into the eggs/sugar mixture, stirring constantly. Bring the mixture over low to medium heat and cook until the cooking thermometer shows 181 F/83 C. Stir constantly while cooking. Transfer the preparation to a shallow plate, cover with plastic and let it cool to 140 F/60 C. Once it reaches 140F/60 C, add gelatin and mix. Let it cool down to 77F/25 C and whisk with an electric mixer to aerate.
  9. Take a clean bowl and whip whipping cream until the soft picks. Add whipped cream to the cooled caramel mixture and mix with the spatula.
  10. To finish assembling the cake, take it out of the refrigerator and pour the caramel mousse on top of the chocolate biscuit. Spread it with a small offset spatula. Place the second chocolate disk, cover with plastic, and refrigerate the cake for 12 hours.
  11. To make the neutral glaze, in a small saucepan, mix sugar, water and bring it over medium heat to cook for 2 to 3 minutes. Take it off the heat, let it cool to 60 C. Add gelatin and mix until it is dissolved. If there are lumps, pass them through a fine-mesh sieve. Add lemon juice, mix and let it cook to 25 C.
  12. Take the cake out of the fridge, turn the cake. Carefully remove the ring and place the cake on a wire rack over a baking sheet. Pour the glaze over the cake. Using a cake lifter, transfer it to a cake board and refrigerate for at least one hour. 

Notes

  1. Use unpeeled apples to caramelize or peel apples with a vegetable peeler if preferred.
  2. Cut apple slices thicker (if desired) and arrange them at the bottom of the cake ring in a pattern you like.
  3. Use gelatin powder to make this mousse cake (no need to dissolve in water). You can also replace 10 g of powdered gelatin with 4 gelatin sheets soaked in cold water for 10 minutes and drained before use.
  4. Make sure to use a cooking thermometer to check the required temperature while making the cake.

Nutrition

  • Serving Size: 1 slice
  • Calories: 533
  • Sugar: 56.3 g
  • Sodium: 84 mg
  • Fat: 26.6 g
  • Saturated Fat: 13.3 g
  • Carbohydrates: 68 mg
  • Fiber: 3.8 g
  • Protein: 10 g
  • Cholesterol: 234 mg

Thank you for following me on Pinterest, Facebook, and Instagram. Hashtag #bakinglikeachef so I can see your creations.

The nutritional information has been calculated using an online recipe nutrition calculator such as Verywellfit.com and is intended for informational purposes only. These figures should be used as a general guideline and not be construed as a guarantee.

The recipe was adapted from https://katelig.livejournal.com/. It was originally published on September 16, 2018. The recipe has been revised to include improved content and photos. All posted pictures are mine. 

Paris-Brest (Best Recipe)

Mar 29, 2021 · 40 Comments

Paris-Brest dessert filled with praline mousseline cream and dusted with icing sugar.

Paris-Brest is an indulgent iconic French dessert made of choux pastry and hazelnut praline cream or creme praliné. Its round shape has its own history and is so gorgeous that it makes the dessert really unique. Take a bite of this signature French treat!

Assembled Paris-Brest dessert on a wooden and marble board

Yes, you are right about reading the name of the dessert Paris-Brest and not Paris-Breast. It has nothing to do with a woman's anatomy. The name of the Paris Brest pastry comes from a bicycle race.

[feast_advanced_jump_to]

The authentic Paris-Brest recipe (Paris Brest recette in French) is maintained by the family-operated pâtisserie Durand. The Durand family tried to file a patent in 1930, but the request was rejected due to the extensive distribution of the dessert.

BAKING ESSENTIALS CHECKLIST

Sign up and get a list of the necessary baking tools and ingredients

FREE DOWNLOAD

The secret recipe ingredient is Paris Brest praliné, making a difference from all the other dessert variations.

Most Paris-Brest recipes make one large ring of choux pastry, split in half and filled with cream. Some pastry chefs use individual-sized mini circles to make mini Paris Brest.

French chef Philippe Conticini put his twist on the classic dessert, creating a circle of cream puffs with a delicious craquelin topping. Paris-Brest by Philippe Conticini is well-recognized and loved around the world (the whole recipe is below).

What is Paris-Brest?

Paris-Brest is a signature French dessert made of choux pastry (pâte à choux in French), praline mousseline cream or (praline crème mousseline in French), and sprinkled with roasted almond slices and icing sugar.

If you wonder how to pronounce the dessert's name, it is simply "pah-ree-breast."

Paris-Brest history

Paris-Brest was created in 1910 by a French pastry chef Louis Durand to celebrate the famous bicycle race Paris-Brest-Paris.

The Petit Journal editor-in-chief, Pierre Giffard, actually asked Mr. Durand to create a dessert.

He wanted to promote a 745 miles/1,200 km race and develop sales in a Parisian newspaper.

As a result, the cake got a circular shape representing a bicycle wheel. The square, rectangular, or S-shape Paris-Brest also exists and has the authentic cake's taste and flavor, but not the shape.

Over the years, it has become a famous French dessert found in pastry shops all over France and is now made worldwide.

If you wonder where to taste the iconic French dessert and what is the best Paris Brest patisserie, here is a list of 11 top pâtisseries in the world - most of them are in the French capital.

Choux buns with piped praline mousseline cream on a marble board: Close up

Why you should try this recipe

  • Also called a Paris Brest cake, this classic French dessert makes a gorgeous table centerpiece.
  • Choux pastry isn't hard to make: it's easy and quick. You will need only 15 minutes to make pâte à choux (choux pastry in English) before bringing it to the oven.
  • Known as crème Paris Brest, praline mousseline cream - combination of hazelnut praline pastry cream (crème pâtissière in French) and butter - will please hazelnut lovers.

Paris-Brest ingredients

Paris-Brest ingredients in pictures

For ingredients and detailed instructions, refer to the recipe card below.

  • Butter: The recipe calls for unsalted butter, preferrable with 82% fat content. Use the butter straight from the fridge for the choux pastry and softened butter to make the craquelin and mousseline cream. So take the butter out of the refrigerator 1-2 hours before you start.
  • Sugar: You will need golden or dark brown sugar to make the craquelin and granulated white sugar for the rest of the dessert.
  • Flour: the recipe calls for wheat flour - all-purpose flour (plain flour in the UK).
  • Salt is a surprising ingredient in desserts. A pinch of salt enhances their flavor and improves texture.
  • Water: use cold water to make the choux pastry. You can experiment with a milk-water ratio of 50-50%, but using only water for choux pastry gives the best baking results.
  • Eggs: use chilled eggs to separate egg yolks from egg whites. Then bring egg yolks and whole eggs to room temperature.
  • Milk: use whole milk or low-fat milk if preferred.
  • Vanilla bean: the best to use is Madagascar vanilla beans.
  • Corn starch is used as a thickening agent while making pastry cream.
  • Praline: Nutty praline paste is essential to making the authentic Paris-Brest dessert. You can make French praline paste yourself or use store-bought hazelnut praline.
  • Whipping cream with 30% fat content is the best to make the recipe. You can use heavy whipping cream with 35% and higher fat content if desired.
  • Icing (powdered) sugar: make it at home with a coffee grinder or use store-bought powdered sugar.

Recipe variations

Over the years, chefs worldwide created their cake interpretations and modern takes on the classic recipe.

  • French chefs Pierre Hermé and Cyril Lignac and American chef Daniel Skurnick light up the cream, making crème légère.
  • Sébastien Bouillet adds hazelnut nougatine to the dessert, while Ludo Lefebvre sprinkles his Paris-Brest with chopped hazelnut nougatine.
  • Pastry chef Michelle Palazzo fills her dessert with pistachio buttercream, while another chef Julie Elkind uses caramel mousseline cream.
  • Gabriel Rucker, Le Pigeon's owner in the USA, created his unique strawberry-coconut version of the famous Paris-Brest. He adds coconut flavor to the cream and sprinkles the dessert with freeze-dried strawberries.
  • James Beard Award-winning chef Gabriel Rucker finally brought a roasted-peach version of Paris-Brest.

And it is not the end of Paris-Brest variations. It continues. So, what flavor is next?!

Crown of choux buns making Paris-Brest dessert on a marble board

How to make Paris-Brest

Make craquelin 

To make craquelin, mix the flour, brown sugar, and salt in a large mixing bowl. Add the softened butter and knead with your hands for a few minutes to obtain a smooth paste (photo 1).

Using a rolling pin, roll the dough about ⅙ inch (4 mm) thick between two parchment paper sheets.

Make sure it fits 8 disks ⅕ inches (5 cm) in diameter (photo 2). Freeze the dough.

hoto 1: Craquelin dough in a bowl Photo 2: Rolled dough with circle traces
PHOTO 1 PHOTO 2

Take the dough from the freezer and let it stand for a few minutes at room temperature.

Using a round cookie cutter, cut out 8 disks ⅕ inches (5 cm) in diameter (photo 3). Freeze again until ready to use.

Make choux pastry

To make a choux pastry, preheat the oven to 355 degrees F (180 degrees C). Take a parchment sheet and, using a pencil or a permanent marker, trace a pattern of a crown made of 8 circles of about ⅕ inches (4 to 5 cm) in diameter.

Turn the paper over and put it on a baking sheet. Place water, salt, sugar, and butter cut into pieces in a medium saucepan and bring to a boil.

Remove from the heat and add the sifted flour all at one time, and mix well with a wooden spoon.

Bring back the preparation to the heat for about 1 to 2 minutes to dry the dough: it will start sticking to the bottom of the pan (photo 4).

Photo 3: Dough disks on parchment paper Photo 4: "Dried" choux pastry dough in a saucepan
PHOTO 3 PHOTO 4

Take the pâte à choux (choux pastry in English) out of the heat and put it in the bowl of a stand mixer fitted with a paddle attachment. Let the dough cool for a few minutes.

Beat eggs for an omelet in a small bowl. Start adding the eggs gradually, slowly mixing. The dough must be neither too thick nor too liquid; it must form a ribbon (photo 5).

The test for the right choux dough: the furrow of a line drawn with the finger in the dough must close.

Place the choux pastry in a piping bag fitted with Ateco plain pastry tip 809.

Arrange 8 choux buns of about ⅕ inches (4 to 5 cm) in diameter on the baking sheet covered with the prepared parchment template (photo 6). 

Photo 5: Choux pastry in a bowl Photo 6: Choux buns as a crown on parchment
PHOTO 5 PHOTO 6

Take the craquelin disks from the freezer and place them on each choux mound (photo 7).

Bake the round pastry for 35 min to 40 min without opening the oven (photo 8). Remove from the oven and let cool on a wire rack.

Photo 7: Craquelin on top of each bun Photo 8: Baked choux crown on parchment paper
PHOTO 7 PHOTO 8

Make praline mousseline cream

To make praline mousseline cream, sift flour, and cornstarch. In a separate bowl, combine sugar, and egg yolks, add flour with cornstarch, and mix with a hand whisk (photo 9).

In a medium saucepan with a thick bottom, bring milk with the seeds of the vanilla bean to a boil. Pour hot milk into the yolk/flour mixture and continue mixing.

Pour this preparation back into the pot and bring over medium heat again. Whisk constantly until the cream thickens (photo 10).

Photo 9: Sugar/yolks/flour mixture in a bowl Photo 10: Pastry cream in a saucepan
PHOTO 9 PHOTO 10

Pour the ready pastry cream into a bowl and cover it with plastic film making contact with the cream. Let it cool at room temperature.

In the bowl of a stand mixer fitted with a whisk attachment, place softened butter and whip it. Add the praline and mix it (photo 11).

Gradually add the smoothed pastry cream and whisk until homogenous (photo 12).

Photo 11: Butter/praline mixture in a bowl Photo 12: Mousseline cream in a bowl
PHOTO 11 PHOTO 12

Make whipped cream

To make the praline insert, add cold whipping cream to the praline in three times and whisk with a hand or stand mixer (photo 13).

Place the praline whipped cream in a large pastry bag with any medium pastry tip and refrigerate.

Assemble Paris-Brest

The final step is to assemble the Paris-BrestFirst, cut the crown in half horizontally with a serrated knife (photo 14) and gently invert the top onto parchment paper.

Photo 13: Praline whipping cream cream 14: Choux ring cut into thickness on parchment paper
PHOTO 13 PHOTO 14

Transfer the praline mousseline cream to a pastry bag fitted with an open star pastry tip and push it onto each of the 8 cavities' bases.

Poach on the praline insert (photo 15), then finish with a layer of praline mousseline cream again. Cover with the cap of the crown and dust with icing (powdered) sugar (photo 16). Refrigerate for at least 1 hour.

Photo 15: Cream, praline insert over choux buns Photo 16: Assembled dessert on a marble board
PHOTO 15 PHOTO 16

Expert Tips

  • Add flour all at once to the water and butter mixture while making the choux pastry dough.
  • Add eggs gradually, beating the mixture with a hand whisk, a wooden spoon, or a stand mixer until the choux pastry is smooth.
  • Don't open the oven door while baking choux buns.
  • Cool the pastry cream at room temperature (please, don't refrigerate).
  • Take the dessert from the refrigerator 20-30 minutes before serving.
  • Make-ahead option: You can prepare praline paste a few days in advance, also craquelin, and keep it in the freezer. For mousseline cream, you make it the day before and refrigerate it. Take it from the fridge to room temperature about 1 hour before assembling the dessert. Whip it and pipe.

Storage

Store Paris-Brest pastry in an airtight container in the fridge for up to 48 hours.

Can you freeze it? While some may say 'yes' to the freezing of Paris-Brest, it is best to avoid it. However, you can freeze craquelin and choux pastry dough for up to 3 months. To thaw, bring the choux dough to the fridge overnight.

You can also freeze the unfilled baked choux ring or crown. Wrap it with plastic film and freeze it for up to 1 week. Thaw at room temperature and crisp in the oven at 350 degrees F (175 degrees C) for about 10 to 15 minutes. Let the pastry cool before assembling.

International inspirations for Paris-Brest

Paris-Brest became the first dessert as a gourmet symbol of the cycling race between the two French cities.

  • American chef Thomas Keller went ahead and created his Paris-New York dessert, where he flavored the cream with peanuts instead of hazelnuts.
  • Another Paris-New York pastry was created by Noémie Tessier, executive pastry chef of Angelina Paris, USA, who added pecan flavor to the classic mousseline cream.
  • Chef Eunji Lee, born in South Korea and trained in Paris, invented his New York-Seoul dessert while working in New York City, USA. He topped his dessert with brown rice craquelin and filled it with hazelnut-pecan praline and brown-rice cream.
  • The Michelin star pastry chef Guillaume Godin created the Paris-Londres cake, a dessert in the shape of a bridge "to represent unity and as a nod to famous bridges in London and Paris." But he went beyond the choux pastry in his creation and used pâte sucrée combined with mousse, apple tatin, and Chantilly cream.
  • French chef Eric Frechon, inspired by a bicycle ride Paris-Deauville, created his pudding cake - Paris-Deauville. He kept the round shape from Paris-Brest but ultimately changed the recipe.

Recipe FAQ

Why is it called a Paris-Brest?

Paris-Brest dessert was named after the cycling race Paris-Brest-Paris resembling a bicycle wheel with its crown shape.

What is another name for Paris-Brest?

Paris-Brest is also called pâte à choux with praline crème mousseline, Paris-Brest pastry, choux ring cake, and Paris-Brest cake.

Can you make Paris-Brest in advance?

For the best results, bake the choux crown 4 hours in advance and keep it unsliced at room temperature. Assemble Paris-Brest two hours before serving.

How to serve Paris-Brest

To let the mousseline cream soften, take the Paris-Brest dessert from the fridge 20 to 30 minutes before serving.

Love choux pastry? Try these next!

  • Chouquettes (French Sugar Puffs)
  • Cream Puffs Dessert
  • Gruyere Cheese Puffs (Gougères)
  • Browse all the Choux Pastry Recipes

Want more delicious and beautiful recipes? Subscribe to my newsletter and follow me on Facebook, Pinterest, and Instagram for my latest updates. If you make this recipe, please leave a star rating on the recipe card and comment below!

Print

Recipe card

Paris-Brest With Praline Mousseline Cream

Paris-Brest dessert filled with praline mousseline cream and dusted with icing sugar.
Print Recipe
Save Recipe Recipe Saved

5 Stars 4 Stars 3 Stars 2 Stars 1 Star

5 from 19 reviews

Paris-Brest is an indulgent French dessert made of choux pastry and traditional hazelnut filling - praline mouseling cream. Its round shape has its own history and is so gorgeous that makes the cake really unique. Take a bite of this signature French treat!

  • Author: Irina Totterman
  • Total Time: 3 hours
  • Yield: 8 1x
  • Category: Choux pastry
  • Method: Baking
  • Cuisine: French

Ingredients

Scale

For craquelin:

  • 1.4 oz. (40 g) unsalted butter, softened
  • 4 tablespoons (50 g) brown sugar
  • ⅓ cup + 1 tablespoon (50 g) all-purpose flour
  • 1 pinch of salt

For the choux pastry:

  • ½ cup + ½ tablespoon (125 g) water
  • 1 pinch of salt
  • 1 pinch of sugar
  • 2 oz. (60 g) unsalted butter
  • ⅔ cup (80 g) all-purpose flour
  • ½ cup (125 g) eggs (see note #1)

For praline mousseline cream:

  • 1 ½ cups + 5 ½ teaspoons (375 ml) whole milk
  • ½ vanilla bean
  • ⅓ cup (75 g) granulated sugar
  • 3 large egg yolks
  • 2 tablespoons (15 g) all-purpose flour
  • 1 ½ tablespoons (15 g) corn starch
  • 8 oz. (225 g) unsalted butter, softened
  • 4 oz. (115 g) hazelnut praline

For praline insert:

  • 3.5 oz. (100 g) hazelnut praline
  • 2 ½ tablespoons (35 g) whipping cream

For decoration:

  • 1 tablespoon icing (powdered) sugar

* If needed, please refer to Baking Conversion Charts.

Instructions

  1. To make craquelin, mix the flour, brown sugar, and salt in a bowl. Add the softened butter and knead with your hands for a few minutes to obtain a smooth paste. Using a rolling pin, roll the dough about ⅙ inch (4 mm) thick between two parchment paper sheets. Freeze the dough. Take the dough from the freezer and let it stand for a few minutes at room temperature. Using a round cookie cutter, cut out 8 disks ⅕ inches (5 cm) in diameter. Freeze again until ready to use.
  2. To make a choux pastry, preheat the oven to 355 degrees F/180 degrees C. Take a parchment sheet and, using a pencil, trace a pattern of a crown made of 8 circles of about ⅕ inches (4 to 5 cm) in diameter. Turn the paper over and put it on a baking sheet. Place water, salt, sugar, and butter cut into pieces in a medium saucepan and bring to a boil. Remove from the heat, add the sifted flour all at once, and mix well with a wooden spoon. Bring back the preparation to the heat for about 1 to 2 minutes to dry the dough (it will start sticking to the bottom of the pan). Put the choux pastry dough out of the heat in a bowl. Let it cool for a few minutes.
  3. Beat eggs for an omelet in a small bowl. Start adding the eggs gradually. The dough must be neither too thick nor too liquid, it must form a ribbon. The test for the right choux dough: the furrow of a line drawn with the finger in the dough must close.
  4. Place the choux pastry in a pastry bag fitted with Ateco plain pastry tip 809. Arrange 8 choux buns of about ⅕ inches (4 to 5 cm) in diameter on the baking sheet covered with the prepared parchment template. Take the craquelin disks from the freezer and place them on each choux mound.
  5. Bake the round pastry for 35 min to 40 min without opening the oven. Remove from the oven and let cool on a wire rack.
  6. To make praline mousseline cream, sift flour and corn starch. In a separate bowl, combine sugar, and egg yolks, add flour with cornstarch, and mix with a hand whisk. In a large saucepan, bring milk with seeds of the vanilla bean to a boil. Pour hot milk into the yolk/flour mixture and continue mixing. Pour this preparation back into the pot and bring over medium heat again. Whisk constantly until the cream thickens. Pour the ready pastry cream into a bowl and cover it with plastic film making contact with the cream. Let it cool at room temperature.
  7. In a bowl of the stand mixer, place butter and whip it. Add the praline and mix it. Gradually add the smoothed pastry cream and whisk until homogenous.
  8. To make the praline insert (whipped cream), add cold whipping cream to the praline in three times and whisk with a hand or stand mixer. Place the ready insert in a pastry bag fitted with any medium pastry tip and refrigerate.
  9. To assemble the Paris-Brest, cut the crown in half horizontally with a serrated knife and gently invert the top onto parchment paper. Transfer the praline mousseline cream to a pastry bag fitted with an open star pastry tip and push it onto each of the 8 cavities' bases. Poach on the praline insert, then finish with a layer of praline mousseline cream again. Cover with the cap of the crown and dust with icing (powdered) sugar. Refrigerate for at least 1 hour.

Notes

  1. 125 g whole eggs approximately equal to 2.50 whole large chicken eggs (eggshell removed).
  2. Add flour all at once to the water/butter mixture while making the choux pastry dough.
  3. Add eggs gradually, beating the mixture with a hand whisk, a wooden spoon, or a stand mixer until the choux pastry is smooth.
  4. Don't open the oven door while baking choux buns.
  5. Cool the pastry cream at room temperature (please, don't refrigerate).
  6. Make praline paste yourself or use store-bought hazelnut praline.
  7. Take the dessert from the refrigerator 30 minutes before serving.
  8. Make-ahead option: You can prepare praline paste a few days in advance, also craquelin, and keep it in the freezer. For mousseline cream, you make it the day before and refrigerate it. Take it from the fridge to room temperature about 1 hour before assembling the dessert. Whip it and pipe.

Nutrition

  • Serving Size: 1 choux bun
  • Calories: 664
  • Sugar: 29.1 g
  • Sodium: 282 mg
  • Fat: 51 g
  • Saturated Fat: 24.6 g
  • Carbohydrates: 46.4 g
  • Fiber: 2.3 g
  • Protein: 9.5 g
  • Cholesterol: 234 mg

Thank you for following me on Pinterest, Facebook, and Instagram. Hashtag #bakinglikeachef so I can see your creations.

The nutritional information has been calculated using an online recipe nutrition calculator such as Verywellfit.com and is intended for informational purposes only. These figures should be used as a general guideline and not be construed as a guarantee.

The recipe was adapted from cuisine.journaldesfemmes.fr. It was originally published on April 23, 2018. The recipe has been revised to include improved content and photos. All posted pictures are mine.

Nougatine Cake (6 Ingredients)

Mar 20, 2021 · 10 Comments

A slice of almond nougatine cake dusted with icing sugar on a red dessert plate.

This 6-ingredient French nougatine cake is elegant and crunchy. Simple almond dacquoise and vanilla buttercream sprinkled with almond nougatine make every bite amazing.   

A slice of almond nougatine cake dusted with icing sugar on a red dessert plate

This almond nougatine cake is truly delicious. Made with two dacquoise layers sandwiched with French buttercream filling and sprinkled with almond nougatine, the cake is a little slice of heaven.

Add here that this 6-ingredient cake is gluten-free and is made in a bit over an hour. Isn't your next baking project?

BAKING ESSENTIALS CHECKLIST

Sign up and get a list of the necessary baking tools and ingredients

FREE DOWNLOAD

[feast_advanced_jump_to]
Almond dacquoise cake decorated with buttercream, nougatine and dusted with icing sugar on a wooden board

Almond nougatine cake recipe

This cake recipe is a twist on French nougatine cake Saint-Louis (Le Saint-Louis in French).

Pastry chef Xavier Dalisson created it to celebrate the twentieth anniversary of the consecration of the Basilica Saint-Epvre in Nancy, France.

In 1907, the cake "Saint-Epvre®" became a registered trademark and was named after a pastry shop of the same name "Saint-Louis."

The cake recipe was kept secret for many generations of pastry chefs.

In the 1960s, French chef Gaston Lenôtre created his own version of the nougatine cake and called it "Succès," meaning "success" in English.

Why you should try this recipe

  1. This nougatine cake recipe is easy and quick.
  2. It is a 6-ingredient cake.
  3. This gluten-free nougatine dessert is perfect for serving those with gluten intolerance.
  4. Replacing almonds with hazelnuts transforms almond nougatine cake into hazelnut nougatine cake. Also, feel free to experiment with other kinds of nuts.

Ingredients

For ingredients and detailed instructions, refer to the recipe card below.

Eggs: use an egg separator to facilitate the separation of egg whites from the yolks while the eggs are still chilled. Then bring whole eggs and egg whites to room temperature.

Sugar: use caster sugar or superfine baker's sugar to make the dacquoise. To make superfine sugar out of granulate sugar, process it in a food processor for a few seconds.

Almond flour: the recipe calls for blanched finely ground almond flour and not a coarse almond meal. Spoon it from a container to measure almond flour. Please, do not pack/press it down into a measuring cup.

Butter: the recipe calls for unsalted, softened butter. Use top-quality butter if possible.

Slivered almonds: use store-bought toasted slivered almonds or toast nuts yourself by bringing almonds to the oven at 300 F/150 C for 15 minutes. You can replace slivered almonds with sliced almonds if desired.

Water: it is used to make sugar syrup while making buttercream.

Sliced nougatine cake featuring two dacquoise disks, buttercream, and almond nougatine on a golden cake base

How to make nougatine cake

Preheat the oven to 335 F/180 C. To make the dacquoise, place almond flour and half of the caster sugar in a food processor and process for a few minutes.

Place egg whites and the remaining half of the sugar in the bowl of a stand mixer and beat until the meringue becomes glossy (photo 1).

Add the almond flour/sugar mixture to the meringue in two to three times and gently mix with a rubber spatula (photo 2).

Photo 1: Meringue in a bowl Photo 2: Dacquoise mixture in a bowl
PHOTO 1 PHOTO 2

Prepare two baking sheets lined with parchment paper. Place two 8-inches/20 cm cake ring/s on parchment.

Transfer the meringue mixture in a pastry bag fitted with Ateco plain pastry tip 809 and pipe two spiral dacquoise disks within cake rings (photo 3).

Bake for 13 to 15 minutes until slightly golden. Remove dacquoise disks from the oven and let cool (photo 4).

Photo 3: Dacquoise spiral into a cake ring Photo 4: baked dacquoise disk in a ring
PHOTO 3 PHOTO 4

Gently run a knife around the cake ring's edges to help release dacquoise from the mold.

To make nougatine, place sugar in a saucepan and melt it on medium heat.

Rotate the saucepan over your stove to stir the sugar. When the caramel gets the amber color, remove it from heat and add lightly toasted slivered almonds.

Mix them quickly and pour the mixture on parchment paper (photo 5).

Cover with another parchment sheet and roll it out with a rolling pin (photo 6). Let it cool completely.

Photo 5: Almonds mixed with caramel on parchment paper Photo 6: Nougatine rolled between parchment sheets
PHOTO 5 PHOTO 6

Crush the nougatine between sheets of parchment paper with a rolling pin (photo 7).

To make the buttercream, in a saucepan, place sugar, water and heat the sugar syrup to 250 F/121 C.

In a separate bowl, using an electric mixer, beat eggs while pouring the syrup along the bowl's wall. Whisk until the mixture becomes whitish and cools down (photo 8).

Photo 7: Crushed nougatine on parchment Photo 8: Beaten eggs/sugar syrup mixture in a bowl
PHOTO 7 PHOTO 8

Gradually add the softened butter cut into cubes and mix until smooth and shiny (photo 9).

To assemble the cake, place the buttercream in a pastry bag fitted with a piping tip Wilton 6B and pipe rosettes on the first dacquoise disk (photo 10).

Photo 9: Buttercream in a bowl Photo 10: Cream rosettes piped over dacquoise disk
PHOTO 9 OHOTO 10

Distribute the pieces of crushed nougatine (photo 11). Cover with the second dacquoise disk.

Sprinkle the cake with icing (powdered) sugar. Decorate with a few rosettes of the cream and some pieces of nougatine (photo 12).

Photo 11: Crushed nougatine over cream rosettes Photo 12: Assembled and decorated nougatine cake
PHOTO 11 PHOTO 12

Expert tips

  1. If you do not have cake rings, draw two 8-inches/20 cm circles on parchment and flip the paper. Pipe dacquoise disks as a spiral within the circle's marks and bake.
  2. Refrigerate the nougatine cake for several hours before tasting. Serve the cake at room temperature, taking it out of the fridge 30 minutes before serving.

Frequently asked question

Can you make a nougatine cake in advance?

Yes, it is perfect for making this nougatine cake one day ahead. "It will be at the height of its delicacy if it is matured for several hours in the refrigerator before tasting," according to French chef Christophe Michalak.

Want more delicious and beautiful recipes? Subscribe to my newsletter and follow me on Facebook, Pinterest, and Instagram for my latest updates. If you make this recipe, please leave a star rating on the recipe card and comment below!

Print

Recipe card

Nougatine Cake (6 Ingredients)

A slice of almond nougatine cake dusted with icing sugar on a red dessert plate.
Print Recipe
Save Recipe Recipe Saved

5 Stars 4 Stars 3 Stars 2 Stars 1 Star

5 from 5 reviews

This 6-ingredient French nougatine cake is elegant and crunchy. Simple almond dacquoise and vanilla buttercream sprinkled with almond nougatine make every bite amazing.   

  • Author: Irina Totterman
  • Total Time: 1 hour, 25 minutes
  • Yield: 8 1x
  • Category: Cakes
  • Method: Baking
  • Cuisine: French
  • Diet: Gluten Free

Ingredients

Scale

For almond dacquoise:

  • ⅔ cup + 1 tablespoon (180 g) egg whites (see note #1)
  • 1 cup + 1 tablespoon (240 g) caster sugar
  • 2 cups + 3 tablespoons (210 g) almond flour

For buttercream:

  • 9 oz. (260 g) butter softened
  • ¼ cup (65 ml) water
  • ¼ cup (65 g) whole eggs (see note #2)
  • ⅔ cup + 2 teaspoons (160 g) granulated sugar

For nougatine:

  • 4 tablespoons (60 g) granulated sugar
  • 1 oz. (30 g) slivered almonds

For decoration:

  • 1 tablespoon icing (powdered) sugar

*Don't you have the correct baking pan on hand right now? Try this simple Cake Pan Converter!

** If needed, please refer to Baking Conversion Charts.

Instructions

  1. Preheat the oven to 335 F/180 C.  To make the dacquoise, place almond flour and half of the caster sugar in a food processor and process for a few minutes. Place egg whites and the remaining half of the sugar in the bowl of a stand mixer and beat until the meringue becomes glossy. Add the almond flour/sugar mixture to the meringue in two to three times and gently mix with a rubber spatula.
  2. Prepare two baking sheets lined with parchment paper. Place two 8-inches/20 cm cake rings on parchment. Transfer the meringue mixture in a pastry bag fitted with Ateco plain pastry tip 809 and pipe two spiral dacquoise disks within cake rings. Bake for 13 to 15 minutes, until slightly golden. Remove dacquoise disks from the oven and let cool. Gently run a knife around the cake ring's edges to help release dacquoise from the mold.
  3. To make nougatine, place sugar in a saucepan and melt it on medium heat. Rotate the saucepan over your stove to stir the sugar. When the caramel gets the amber color, add lightly toasted slivered almonds. Mix them and pour them on parchment paper. Cover with another parchment sheet and roll it out with a rolling pin. Let it cool completely. Crush the nougatine between sheets of parchment paper with a rolling pin.
  4. To make the buttercream, in a saucepan, place sugar, water and heat the sugar syrup to 250 F/121 C. In a separate bowl, using an electric mixer, beat eggs while pouring the syrup along the bowl's wall. Whisk until the mixture becomes whitish and cools down. Gradually add the softened butter cut into cubes and mix until smooth and shiny.
  5. To assemble the cake, place the buttercream in a pastry bag fitted with a piping tip Wilton 6B and pipe rosettes on the first dacquoise disk. Distribute the pieces of crushed nougatine. Cover with the second dacquoise disk. Sprinkle the cake with icing (powdered) sugar. Decorate with a few rosettes of the cream and some pieces of nougatine.

Notes

  1. 180 g egg whites approximately equal to 5 ½ raw fresh egg whites from large-sized chicken eggs.
  2. 65 g eggs approximately equal to 1 whole extra-large chicken egg (eggshell removed).
  3. If you do not have cake rings, draw two 8-inches/20 cm circles on parchment and flip the paper. Pipe dacquoise disks as a spiral within the circle's marks and bake.
  4. Refrigerate the nougatine cake for several hours before tasting. Serve the cake at room temperature, taking it out of the fridge 30 minutes before serving.

Nutrition

  • Serving Size: 1 slice
  • Calories: 634
  • Sugar: 57.5 g
  • Sodium: 38 mg
  • Fat: 41.8 g
  • Saturated Fat: 18 g
  • Carbohydrates: 62.7 g
  • Fiber: 3.2 g
  • Protein: 10 g
  • Cholesterol: 100 mg

Thank you for following me on Pinterest, Facebook, and Instagram. Hashtag #bakinglikeachef so I can see your creations.

The nutritional information has been calculated using an online recipe nutrition calculator such as Verywellfit.com and is intended for informational purposes only. These figures should be used as a general guideline and not be construed as a guarantee.

The recipe was adapted from https://www.femmeactuelle.fr. It was originally published on March 08, 2018. The recipe has been revised to include improved content and photos. All posted pictures are mine.

Best Italian Almond Cake Recipe (Gluten-Free)

Mar 2, 2021 · 18 Comments

Sliced almond cake covered with flaked almonds on a white platter.

This divine Italian almond cake - torta Elvezia - is made with almond-meringue layers (almond dacquoise) alternated with buttercream and toasted flaked almonds. Serving up to 12 people, the cake makes a perfect celebration. What's more? It is gluten-free!

Sliced almond cake covered with flaked almonds on a white platter

This almond dacquoise cake is the obvious appearance on the blog after cashew dacquoise cake Sans Rival, its pistachio version - Pistachio Sans Rival, gorgeous coconut dacquoise, and beautiful pistachio dacquoise.

[feast_advanced_jump_to]

Italian almond dacquoise cake Elvezia, or torta Elvezia, is a typical Mantuan dessert with a Swiss name. The correct spelling of the cake is "Helvetia," the Latin name of Switzerland.

BAKING ESSENTIALS CHECKLIST

Sign up and get a list of the necessary baking tools and ingredients

FREE DOWNLOAD

It was invented by Swiss confectioners - the Samson  Putscher family, when they moved to the Italian Province of Mantua from Switzerland in the late 1700s.

So, this Italian almond cake is a beautiful combination of Swiss pastry techniques with Italian ingredients. As per Giallo Zafferano, it is a cake "with a Swiss heart but born in Italy."

Almond dacquoise cake topped with sliced almonds with a cup in the background

Italian almond cake recipe

  • Italian almond layer cake is extraordinary in every bite. It consists of three almond dacquoise layers sandwiched with the buttercream and generously sprinkled with sliced almonds.
  • It is one of the best Italian almond cake recipes, along with almond ricotta cake.
  • The cake made with almond flour is gluten-free (no wheat flour is added). It serves a crowd of 12 with and without gluten intolerance.
  • The cake is perfect for a morning cup of coffee, an afternoon cup of tea, and anytime during the day.

Ingredients

For ingredients and detailed instructions, refer to the recipe card below.

  • Eggs: use an egg separator to separate the egg whites from the yolks while the eggs are chilled. Then make sure to bring them both to room temperature.
  • Sugar: use caster sugar or process granulated sugar in a food processor for a few seconds to make the sugar superfine.
  • Almond flour: the recipe calls for blanched, finely ground almond flour to make the cake. Try to avoid coarse almond meal made out of whole raw almonds.

You can replace almond flour with homemade ground almonds. For best results, use blanched almonds and blitz them in the food processor until they have the right "sandy" texture. But be careful not to turn them into almond butter!

While measuring almond flour or ground almonds, spoon it from a container gently into a measuring cup. Please, do not pack or press it down.

  • Rice flour: use white rice flour.
  • Acacia honey is the most neutral honey among others. Replace it with glucose if desired.
  • Butter: use unsalted softened butter. Take it out of the fridge 1 to 2 hours before you start.
  • Vanilla bean brings a beautiful flavor to the buttercream. Use Madagascar vanilla beans. You can replace it with vanilla or almond extract for a more prominent nutty almond flavor.
  • Sliced almonds: use store-bought toasted sliced almonds or toast nuts yourself in the oven at 300°F (150°C) for 10 to 15 minutes.
  • Icing sugar: make it yourself with a coffee grinder or use store-bought powdered sugar to dust the ready cake.

Recipe variations

Authentic Elvezia cake combines almond dacquoise, tasty zabaglione, and a delicious cocoa buttercream. 

The Italian almond layer cake recipe below is the adapted version of the Elvezia cake created by Italian pastry chef Luca Montersino.

Nowadays, different versions enriched with hazelnut flour, whipped cream, and chocolate chips also exist. So, you are free to experiment.

A slice of almond cake on a wooden dessert plate with flowers in the background

How to make Italian almond cake

Preheat the oven to 355°F (180°C). Prepare three parchment paper sheets and draw three 8.5 inches/22 cm diameter discs. Flip these paper sheets so that the drawn circles will be facing down.  

Make the almond dacquoise

Place egg whites and ¾ cup plus 1 tablespoon (185 g) caster sugar in a saucepan and beat with a hand whisk. Continue whisking and bring the mixture over low heat to warm up (photo 1).

Remove the egg whites/sugar mixture from the heat and beat slowly with an electric hand mixer or stand mixer.

Gradually increase to medium speed and whisk for about 5-7 minutes, then finish the meringue at high speed (photo 2).

Photo 1: Whisked egg whites in a bowl Photo 2: Meringue in a bowl
PHOTO 1 PHOTO 2

Place almond flour, ¾ cup +2 ½ tablespoons (205 g) caster sugar, and rice flour in a bowl of the food processor and crush the dry ingredients until homogeneous.

Add the flour mixture to the meringue in two-three times and gently mix with a rubber spatula (photo 3).

Transfer the preparation to a pastry bag fitted with Ateco plain pastry tip 809 and pipe three dacquoise disks in a spiral shape within the pencil marks (photo 4).

Alternatively, spread the meringue mixture with an offset spatula instead of making a spiral with a pastry bag and a tip.

Photo 3: Meringue preparation in a bowl Photo 4: Meringue-based spiral on parchment paper
PHOTO 3 PHOTO 4

Bake in the middle position of the oven for 12 to 15 minutes. Then, remove the dacquoise disks from the oven and let them cool on a wire rack (photo 5).

Expert tip: Do not try to peel off the biscuit when it is hot: it breaks easily.

Make buttercream

Place egg yolks with the scraped vanilla seeds in a stand mixer's bowl and whisk.

In a saucepan, place water, honey (warm it up in a microwave for a few seconds in advance), and granulated sugar and bring to a boil.

Once the syrup reaches 250°F (121°C) - use a candy thermometer - pour the sugar syrup into the egg yolks while whisking. Continue to whisk for the mixture to cool down and become whitish (photo 6).

Photo 5: Baked dacquoise disk on parchment Photo 6: Egg yolks/sugar mixture in a bowl
PHOTO 5 PHOTO 6

Add the softened butter cubes, one at a time, and continue whisking till the cream becomes smooth and homogeneous (photo 7). 

Assemble the cake

Cut the dacquoise disks' edges with a knife to get the right circles. Cover the first dacquoise disk with the buttercream, and sprinkle with toasted almonds. Place the second disk and repeat the operation (photo 8).

Photo 7: Buttercream in a bowl Photo 8: Cream topped with sliced almonds
PHOTO 7 PHOTO 8

Finally, put with the third disk and cover the cake's top and edges with buttercream.

Sprinkle the cake with the flaked almonds (photos 9 - 10). Dust the top of the cake with icing (powdered) sugar. Refrigerate for at least 2 hours.

Photo 9: Top of the cake covered with almonds Photo 10: Cakes' edges covered with almonds
PHOTO 9 PHOTO 10

Expert Tips

  1. Don't overmix the dacquoise mixture: it must remain airy before baking.
  2. Roast flaked almonds in the oven at 300°F (150°C) for 15 minutes.
  3. Serve the cake at room temperature: take it out of the fridge 30 minutes before serving.
  4. Make ahead option: Bake dacquoise disks in the evening and keep them in a cool place. Assemble the cake the next day.

Storing and freezing

Store the cake in an airtight container in the refrigerator for up to 2-3 days.

You can freeze the cake or individual slices covered with plastic wrap, then aluminum foil for up to 1 week. To thaw, bring the cake to the fridge overnight. To serve, let it stay at room temperature for 30 minutes.

Recipe FAQ

What is Italian cake made of?

Italian almond cake is made with almond dacquoise layers sandwiched with buttercream and generously sprinkled with toasted flaked almonds.

Love Italian desserts? Try these next!

If you like this delicious Italian almond cake, you may love other Italian desserts on the website.

  • Italian Carrot Cake
  • Italian Sponge Cake
  • Authentic Italian Tiramisu
  • Torta Paradiso
  • Browse all the cake recipes

Want more delicious and beautiful recipes? Subscribe to my newsletter and follow me on Facebook, Pinterest, and Instagram for my latest updates. If you make this recipe, please leave a star rating on the recipe card and comment below!

Print

Recipe card

Italian Almond Cake

Sliced almond cake covered with flaked almonds on a white platter.
Print Recipe
Save Recipe Recipe Saved

5 Stars 4 Stars 3 Stars 2 Stars 1 Star

5 from 5 reviews

This divine Italian almond cake - torta Elvezia - is made with almond-meringue layers (almond dacquoise) alternated with buttercream and sliced almonds. Serving up to 12 people, the cake makes a perfect celebration. What's more? It is gluten-free!

  • Author: Irina Totterman
  • Total Time: 2 hours
  • Yield: 12-13 1x
  • Category: Cakes
  • Method: Baking
  • Cuisine: Italian
  • Diet: Gluten Free

Ingredients

Scale
For the dacquoise:
  • 1 cup + 3 ½ tablespoons (300 g) egg whites (see note #1)
  • ⅔ cup + 2 ½ tablespoons (185 g) caster sugar
  • 2 ⅔ cups + 4 tablespoons (280 g) almond flour
  • ⅔ cup + 4 tablespoons (205 g) caster sugar
  • 7 ½ tablespoons (75 g) rice flour
For the buttercream:
  • ⅔ cup + 3 ½ tablespoons (200 g) granulated sugar
  • 6 ½ large (112 g) egg yolks (see note #2)
  • 4 tablespoons (60 g) water
  • ½ tablespoon (10 g) acacia honey
  • 14.1 oz. (400 g) butter, softened
  • ½ vanilla bean
For the decoration:
  • 7 oz. (200 g) toasted flaked almonds
  • 1 tablespoon icing sugar

*Don't you have the correct baking pan on hand right now? Try this simple Cake Pan Converter!

** If needed, please refer to Baking Conversion Charts.

Instructions

  1. Preheat the oven to 355°F (180°C). To make the almond dacquoise, place egg whites and ¾ cup plus 1 tablespoon (185 g) caster sugar in a saucepan and beat with a hand whisk. Continue whisking and bring the mixture over low heat to warm up.
  2. Remove the egg whites/sugar mixture from the heat and beat with an electric or stand mixer at a slow speed. Gradually increase to medium speed and whisk for about 5-7 minutes, then finish the meringue at high speed to get the glossy meringue.
  3. Place almond flour, ¾ cup +2 ½ tablespoons (205 g) caster sugar, and rice flour in a bowl of the food processor and crush the dry mixture until homogeneous. Add this mixture to the meringue to two-three times and mix with a rubber spatula.
  4. Prepare three parchment paper sheets and draw three discs with a diameter of 8.5 inches/22 cm. Flip these paper sheets so that the drawn circles will be facing down.
  5. Transfer the preparation to a pastry bag fitted with Ateco plain pastry tip 809 and pipe three dacquoise disks in a spiral shape within the pencil marks. Bake for 12 to 15 minutes. Remove the ready dacquoise disks from the oven and let them cool.
  6. To make the buttercream, place egg yolks with the scraped vanilla seeds in a stand mixer bowl and whisk. In a saucepan, place water, honey (warm it up in a microwave for a few seconds in advance), and granulated sugar and bring to a boil.
  7. Once the syrup reaches 250°F (121°C), pour the sugar syrup into the egg yolks while whisking. Once the mixture cools down and becomes whitish, add the softened butter cubes, one at a time, and continue whisking till the cream becomes smooth and homogeneous. 
  8. To assemble the cake, cut the dacquoise disks' edges with a knife to get the right circles. Cover the first dacquoise disk with the buttercream, and sprinkle with toasted almonds.
  9. Place the second disk and repeat the operation. Finally, put with the third disk and cover the cake's top and edges with buttercream. Sprinkle the cake all over with flaked almonds. Dust the top of the cake with icing (powdered) sugar. Refrigerate for at least 2 hours.

Notes

  1. 300 g egg whites approximately equal to 9 raw fresh egg whites from large-sized chicken eggs.
  2. 112 egg yolks approximately equal to 6.5 raw fresh egg yolks from large-sized chicken eggs.
  3. Don't overmix the dacquoise mixture: it must remain airy before baking.
  4. Spread the meringue mixture with an offset spatula instead of making a spiral with a pastry bag and a tip.
  5. Roast sliced almonds in the oven at 300°F/150°C for 15 minutes.
  6. Serve the cake at room temperature: take it out of the fridge 30 minutes before serving.
  7. Make ahead option: Bake dacquoise disks in the evening and keep them in a cool place. Assemble the cake the next day.

Nutrition

  • Serving Size: 1 slice
  • Calories: 664
  • Sugar: 47.6 g
  • Sodium: 205 mg
  • Fat: 45.7 g
  • Saturated Fat: 18 g
  • Carbohydrates: 59 g
  • Fiber: 4.3 g
  • Protein: 12.3 g
  • Cholesterol: 173 mg

Thank you for following me on Pinterest, Facebook, and Instagram. Hashtag #bakinglikeachef so I can see your creations.

The nutritional information has been calculated using an online recipe nutrition calculator such as Verywellfit.com and is intended for informational purposes only. These figures should be used as a general guideline and not be construed as a guarantee.

The recipe was originally published on November 8, 2018. It has been revised to include improved content and photos. All the posted pictures are mine.

Raspberry Oreo Cheesecake

Feb 8, 2021 · 36 Comments

A slice of raspberry cheesecake with Oreo cookie crust, a fork, raspberries on a white plate.

Enjoy this no-bake raspberry Oreo cheesecake recipe to make the perfect dessert for a special occasion. Pairing sweet Oreo cookie crust with tart raspberries, this easy cheesecake is made in an hour. A quick dessert is definitely one step easier!

A slice of raspberry cheesecake with Oreo cookie crust, a fork, raspberries on a white plate

I indeed love pink desserts. They look cozy and rosy, especially on Valentine's Day, Mother's Day, and at girls' parties.

Making a dessert with some contrast brings additional beauty and elegance to the treat.

Another aspect of the dessert is its easy making. What could be better than a dessert with no baking required?

Besides that, it saves time; it also is ideal for the hot summer months when the last thing we think of is turning on our oven.

Well, what could serve as the base of a dessert that requires zero baking? The short answer is cookies. The world's favorite Oreo cookies are perfect for this purpose.

And if you ever want to make a baked version of cheesecake, a crustless and easy-to-make Spanish cheesecake is the best in this category.

BAKING ESSENTIALS CHECKLIST

Sign up and get a list of the necessary baking tools and ingredients

FREE DOWNLOAD

A slice of no-bake raspberry Oreo cheesecake topped with meringues on a white dessert plate
[feast_advanced_jump_to]

Raspberry Oreo cheesecake recipe

So, a cookie-based, easy to make, good-looking dessert is summed up by the no-bake Oreo cheesecake recipe.

The rose color, tangy taste, and beautiful flavor are easily achieved by adding raspberries.

Contrast details such as Oreo cookies and meringue stripes on top make the cake look scrumptious.

This Raspberry cheesecake with Oreo crust is the first cheesecake on the blog.

Yes, there are many no-bake Oreo cheesecake recipes, all equally pleasing, tasty, and delicious.

However, adding raspberry is the key to a winning cheesecake, specially made for Valentine's Day.

A single slice of no-bake Oreo cheesecake, fork, and raspberries on a white plate

How to decorate a cheesecake

Sprinkle a cheesecake with raspberry powder and top with fresh berries and meringue.

Top a cheesecake with fresh berries like it is done on top of Lighter Raspberry Cheesecake by Tasty.

Pour the cake with Easy Raspberry Sauce like deliciously looking Orange Cheesecake with Raspberry Sauce from Betty Crocker. 

Use fruit jelly. and fresh berries like Ina Garten decorates her Raspberry Cheesecake.

Use fresh berries, whipped cream, and chocolate shavings like Lindsay does on White Chocolate Raspberry Cheesecake.

Top the cake with chocolate ganache and berries how Alice decorates her Raspberry Cheesecake with Oreo Crust.

Cheesecake topped with meringues, raspberries on a serving board with raspberries around: Overhead view

Why you should try this recipe

  1. This easy and quick no-bake Oreo dessert is made and polished off in an hour.
  2. Oreo raspberry cheesecake is perfect at any time of the year due to the use of fresh or frozen raspberries.
  3. The beautiful and tasteful contrast of sweet Oreo cookies with tangy raspberries make the cake especially stunning.
  4. Even a simple decoration of the cake is enough to wow your guests: these cake slices are beautiful!

Ingredients

For ingredients and detailed instructions, refer to the recipe card below.

Oreo cookies: these cookies are the star of this no-bake Oreo dessert.

Heavy cream: use your favorite brand of heavy cream, but make sure to use it with at least 36% fat content.

Raspberry puree: make this berry puree using fresh or frozen raspberries. Switch raspberries with other fruit to create your own cheesecake. 

Or replace raspberry puree with the same amount of heavy cream and make classic no-bake Oreo cheesecake.

Sugar: use caster sugar or granulated sugar making it superfine. Process granulated sugar in a food processor for a few seconds.

Gelatin: use gelatin sheets with a strength of 200 bloom.

Vanilla extract: use Madagascar Bourbon Pure Vanilla Extract or replace it with an alcohol-free vanilla flavor.

Whipping cream: it has be at least 30% fat content.

Cream cheese: use Philadelphia cream cheese or any other brand.

Red food color: it is optional, although it helps obtain the desired color of the cheesecake.

Egg whites: use large chilled eggs to separate egg whites from the yolks using an egg separator. Then bring egg whites to room temperature,

Icing sugar: make it with a coffee grinder out of granulated sugar or use store-bought powdered sugar.

Freeze-dried raspberries and fresh raspberries: these ingredients are optional and used to decorate this cheesecake.

How to make Oreo raspberry cheesecake

To make the Oreo crust, remove the cream from the Oreo cookies' center (photo 1).

Pulse cookie halves in a food processor to make fine crumbs (photo 2).

 Photo 1: Oreo haves and cream on a board Photo 2: Oreo crumbs in a bowl
PHOTO 1 PHOTO 2

Add heavy cream and combine it with hands (photo 3).

Place a 6-7 inch/16 cm adjustable cake ring on parchment paper, line with acetate cake collar, and press the mixture into the bottom with hands and/or a tablespoon (photo 4). Place in the freezer.

Photo 1: Crust dough into a cake ring Photo 4: Pressed crust in the cake ring
PHOTO 3 PHOTO 4

To make cheesecake, soak gelatin sheets in cold water for about 10 minutes.

Chop whole Oreo cookies into large pieces (photo 5), remove crumbs, and set them aside.

In a separate bowl, beat cold whipping cream and vanilla extract until soft peaks form (photo 6) and place in the fridge. 

Photo 5: Pieces of Oreo cookies on a board Photo 6: Whipped cream in a bowl
PHOTO 5 PHOTO 6

Place a fine-meshed strainer over a large bowl and press fresh raspberries with the back of a spoon to get the raspberry puree. Discard the seeds.

Bring a saucepan with raspberry puree and sugar over medium heat and cook till the sugar dissolves.

Remove the saucepan from heat, add drained gelatin, and mix. Set aside (photo 7).

In a large bowl, place cream cheese at room temperature. Add raspberry/sugar/gelatin mixture, 5 to 7 drops of red food color, and whisk with an electric mixer until smooth and creamy, but do not over mix (photo 8).

Photo 7: A raspberry mixture in a saucepan Photo 8: Pink cream mixture in a bowl
PHOTO 7 PHOTO 8

Using a rubber spatula, gently stir the chopped cookies into the filling (photo 9).

Fold in the whipped cream evenly with the use of the spatula (photo 10).

Photo 9: Pink mixture with cookies in a bowl Photo 10: Cheesecake filling in a bowl
PHOTO 9 PHOTO 10

Pour the cheesecake filling over the frozen cookie crust (photo 11). Refrigerate for 5 to 6 hours or overnight.

To make the meringue, whisk egg whites at room temperature with an electric mixer.

Gradually add granulated sugar and continue to whisk until firm peaks form. Add sifted powdered (icing) sugar and gently mix with the rubber spatula.

Pipe the meringue into strips, using Ateco plain pastry tip 806. Use a serrated knife to cut the baked meringue strips of 1 inch/2.5 cm length.  

To decorate cheesecake, remove it from the ring and acetate sheet, place it on a serving plate.

Crush freeze-dried raspberries with a food processor and make the powder using a mini strainer.

Place a circle of parchment in the center of the cake and sprinkle the rest of the surface with raspberry powder.

Arrange fresh raspberries with meringue strips on top of the cake and sprinkle with raspberry powder (photo 12).

Photo 11: Cheesecake filling over cookie crust Photo 12: A decorated cake with meringues and raspberries :
PHOTO 11 PHOTO 12

Expert tips

  1. Add red food color to the cheesecake filling to obtain the desired color. 
  2. Use frozen raspberries instead of fresh berries.
  3. Switch fresh raspberries with other fruit to create your own cheesecake. 
  4. Replace raspberry puree with the same amount of heavy cream and make classic no-bake Oreo cheesecake.
  5. To make the meringue, process granulated sugar in a food processor for 30 seconds to make superfine sugar. It dissolves quicker and easier while whisking.
  6. Decorate cheesecake in any way you desire: use halves of Oreo cookies cut with a serrated knife, mini marshmallows, chocolate chips, store-bought meringues or sprinkle the cake with Oreo crumbs.

Love cakes? Try these next!

  • Layer Cashew Cake Sans Rival
  • Apple And Olive Oil Cake
  • Maraschino Cherry Cake
  • Browse all the Cake Recipes

Want more delicious and beautiful recipes? Subscribe to my newsletter and follow me on Facebook, Pinterest, and Instagram for my latest updates. If you make this recipe, please leave a star rating on the recipe card and comment below!

Print

Recipe card

Raspberry Oreo Cheesecake

A slice of raspberry cheesecake with Oreo cookie crust, a fork, raspberries on a white plate.
Print Recipe
Save Recipe Recipe Saved

5 Stars 4 Stars 3 Stars 2 Stars 1 Star

5 from 16 reviews

Enjoy this no-bake raspberry Oreo cheesecake recipe to make the perfect dessert for a special occasion. Pairing sweet Oreo crust with tart raspberries, this easy cheesecake is made in an hour. A quick dessert is definitely one step easier!

  • Author: Irina Totterman
  • Total Time: 1 hour (plus chilling time)
  • Yield: 8 1x
  • Category: Cake
  • Method: No baking
  • Cuisine: American

Ingredients

Scale

For the Oreo crust:

  • 12 Oreo cookies
  • 2 tbsp (30 g) heavy cream

For the cheesecake filling:

  • 1.9 oz (55 g) raspberry puree 
  • ⅔ cup (150 g) granulated sugar
  • 4 gelatin sheets
  • 1 tsp vanilla extract
  • 1 cup (250 g) whipping cream
  • 15.5 oz (440 g) cream cheese
  • 14 Oreo cookies
  • 5-7 drops of red food color (optional)

For the meringue:

  • 2 large egg whites
  • 4 ½ tbsp (60 g) granulated sugar
  • 7 ½ tbsp (60 g) powdered (icing) sugar

For the decoration:

  • freeze-dried raspberries
  • fresh raspberries

*Don't you have the correct baking pan on hand right now? Try this simple Cake Pan Converter!

** If needed, please refer to Baking Conversion Charts.

Instructions

  1. To make the Oreo crust, remove the cream from the center of Oreo cookies. Pulse cookie halves in a food processor to make fine crumbs. Add heavy cream and combine it with hands. Place a 6-7 inch/16 cm adjustable cake ring on parchment paper, line with acetate cake collar, and press the mixture into the bottom with hands and/or a tablespoon. Place in the freezer.
  2. To make cheesecake, soak gelatin sheets in cold water for about 10 minutes. Chop whole Oreo cookies into large pieces, remove crumbs and set aside. In a separate bowl, beat cold whipping cream and vanilla extract until soft peaks form and place in the fridge. 
  3. Place a fine-meshed strainer over a large bowl and press fresh raspberries with the back of a spoon to get the raspberry puree. Discard the seeds. Bring a saucepan with raspberry puree and sugar over medium heat and cook till the sugar dissolves. Remove the saucepan from heat, add drained gelatin and mix. Set aside.
  4. In a large bowl, place cream cheese at room temperature. Add raspberry/sugar/gelatin mixture, 5 to 7 drops of red food color and whisk with an electric mixer until smooth and creamy. Using a rubber spatula, gently stir the chopped cookies into the filling. Fold in the whipped cream evenly with the use of the spatula. Pour the cheesecake filling over the frozen cookie crust. Refrigerate for 5 to 6 hours or overnight.
  5. To make the meringue, whisk egg whites at room temperature with an electric mixer. Gradually add granulated sugar and continue to whisk until firm peaks form. Add sifted powdered (icing) sugar and gently mix with the rubber spatula. Pipe the meringue into strips, using Ateco plain pastry tip 806. Use a serrated knife to cut the baked meringue strips of 1 inch/2.5 cm length.  
  6. To decorate cheesecake, remove it from the ring and acetate sheet, place it on a serving plate. Crush freeze-dried raspberries with a food processor and make the powder, using a mini strainer. Place a circle of parchment in the center of the cake and sprinkle the rest of the surface with raspberry powder. Arrange fresh raspberries with meringue strips on top of the cake and sprinkle with raspberry powder.

Notes

  1. Add red food color to the cheesecake filling to obtain the desired color. 
  2. Use frozen raspberries instead of fresh berries.
  3. Switch fresh raspberries with other fruit to create your own cheesecake. 
  4. Replace raspberry puree with the same amount of heavy cream and make classic no-bake Oreo cheesecake.
  5. To make the meringue, process granulated sugar in a food processor for 30 seconds to make superfine sugar. It dissolves quicker and easier while whisking.
  6. Decorate cheesecake in any way you desire: use haves of Oreo cookies cut with a serrated knife, mini marshmallows, chocolate chips, store-bought meringues or sprinkle the cake with Oreo crumbs.

Nutrition

  • Serving Size: 1 slice
  • Calories: 537
  • Sugar: 32.6 g
  • Sodium: 340 mg
  • Fat: 36.5 g
  • Saturated Fat: 20.2 g
  • Carbohydrates: 45.7 g
  • Fiber: 1.5 g
  • Protein: 10.1 g
  • Cholesterol: 100 mg

Thank you for following me on Pinterest, Facebook, and Instagram. Hashtag #bakinglikeachef so I can see your creations.

The nutritional information has been calculated using an online recipe nutrition calculator such as Verywellfit.com and is intended for informational purposes only. These figures should be used as a general guideline and not be construed as a guarantee.

The recipe was adapted from https://andychef.ru/. It was originally published on January 17, 2020. It has been revised to include improved content and photos. All posted pictures are mine.

French Souffle Recipe

Feb 7, 2021 · 36 Comments

French souffle with a teaspoon into the ramekin and pink praline in the background.

Learn how to make the perfect French souffle - an elegant, magical, and delicious dessert that delights kids and impresses adults. Made in 30 minutes and served right from the oven, it makes a fabulous dessert to finish a romantic dinner.

French souffle with a teaspoon into the ramekin and pink praline in the background

Today I am making a ramekin dessert - French souffle. It has been a long time since I wanted to make and post the souffle recipe.

Sweet soufflé is not food served for breakfast, lunch, or dinner. It usually is served as a dessert after the main course.

Moreover, it is best known to be served on special occasions such as birthdays or weddings.

It is one of the best impressive desserts for two made on Valentine's Day!

You might have heard that the French souffle recipe is one of the most stressful and difficult recipes to make.

The issue is that the souffle deflates quickly; it begins to flop when the souffle leaves the oven!

If you want to nail the souffle-making, I will guide you through making one of the perfect French desserts.

Some French chefs such as Gérard Idoux mastered his skills in making the perfect souffle for two decades.

Yes, he knows all the tricks of this fluffy treat: his restaurant serves over 300 soufflés daily!

However, you can easily make this French delight by following a few simple techniques.

BAKING ESSENTIALS CHECKLIST

Sign up and get a list of the necessary baking tools and ingredients

FREE DOWNLOAD

French souffle into a ramekin with candied almonds - pink praline: Oblique view
[feast_advanced_jump_to]

What is a soufflé?

Souffle (soufflé spelled in French) is a French baked dish made of egg yolks and mounted egg whites.

The word soufflé is derived from the French verb souffler which means
"to breathe" or "to blow".

Souffles can be classified into savory souffle made with herbs, cheese, or vegetables, and soufflé dessert made with bananas, chocolate, berries, etc.

Souffles are usually baked in individual baking vessels - ramekins that are buttered and sprinkled with sugar before adding preparations.

What is a ramekin?

Ramekin is a small glazed porcelain or glass bowl that is used to make individual dishes: souffles, French onion soup, crème brûlée, appetizers, custard, pudding, etc.

Ramekins are sold in different forms: classic round, geometric, square, oval, heart-shaped.

They are generally sold in sets of four or six. Some of them are accompanied with lids.

Soufflé history

The first appearance of a soufflé goes back to the 18th century and is attributed to French cook Vincent de la Chapelle.

The dessert was not popularized in France until the 19th century when the chef Marie-Antoine Carême included the souffle recipe in one of his cookbooks.

Later, in the 20th century, Julia Child introduced the souffle to the American continent.

Sweet soufflé with a teaspoon into the ramekin and almonds in the background

French soufflé recipe

To make the perfect souffle, you must understand what goes on behind the scenes.

Every souffle is made of an egg yolk base that gives the dessert flavor and helps build the souffle structure and beaten egg whites that provide the volume.

As per Harold McGee, the author of the book "On Food and Cooking. The Science and Lore of the Kitchen",

...if you manage to get any air into the mix, inexorable law of nature will raise it in the oven.

Simply saying, this is the air bubbles from egg whites that expand in a hot oven and give that famous rise to the souffle.

The water from the walls of the air bubbles evaporates and causes the bubbles to expand.

Perfect French souffle: tips and tricks

A souffle has an egg yolk base, which is pastry cream and beaten eggs.

What keeps a souffle risen is the air bubbles from the beaten egg whites that expand in the well-heated oven, giving that famous rise to the souffle.

So, preparing egg whites is the essential thing to succeed in making this dessert.

Tips for working with egg whites

Use fresh eggs at room temperature. Take them out of the fridge 1 to 2 hours before making a souffle. It helps egg whites expand quicker and easier.

Carefully separate egg whites from egg yolks: do not let any yolk into the egg whites; otherwise, it will prevent the egg whites from mounting correctly. Use an egg separator to facilitate this step.

Use a clean and grease-free metal bowl. According to Jeff Potter, the author of the book "Cooking for Geeks: Real Science, Great Cooks, and Good Food," the best bowl for whisking egg whites is a copper bowl since the copper interacts with the protein of egg whites and helps stabilize egg whites' foam.

Add ½ teaspoon white wine vinegar, or ½ teaspoon of cream of tartar, or ½ teaspoon of lemon juice to egg whites while beating them. This step is essential to help stabilize egg whites.

Beat egg whites with a hand whisk! According to Jeff Potter,

...electric beaters won't work in as much air before the foam is set.

If this step seems tiring, use an electric mixer on low-medium speed. If egg whites are mounted quickly, air bubbles will not be incorporated into the meringue.

Keep beating egg whites until a soft peak forms (it is called bec d'oiseau in French, which means "bird beak" in English).

Once you stop whisking, you must see a curve of beaten egg whites that resembling a bird beak, but do not over-beat egg whites to be too thick!

A single ramekin with pink souffle and crushed nuts in the background

Other tips for making the perfect French souffle

Prepare all the equipment and measure ingredients before you start making a souffle.

Butter ramekins with a silicone brush, making upward strokes, which helps the souffle surface detach from the dish easier.

Then coat the sides and the bottom of ramekins with a sugar layer, knocking out the excess, making a nice crust while baking. 

Refrigerate the prepared dishes while making the batter.

Make the egg yolk base first, then beat egg whites. First, it allows the base to cool down after cooking.

Second, the beaten egg whites, full of lots of air bubbles, have to be incorporated as soon as they are beaten.

Combine egg whites with the egg yolk base right away by folding egg whites in two stages.

Add a third of the egg whites and mix with a rubber or wooden spatula: slide the spatula under the preparation, along the bottom of the bowl, folding up and over.

Add this mixture to the rest of the egg whites and mix until egg whites are incorporated.

The mixture might look barely blended with streaks of whites, which is fine.

Once you spoon the mixture into ramekins, run your thumb around the inside rim of the dish to create a trench to help the souffle rise upwards. Tap the ramekins well before baking.

Preheat the oven well and bake the souffle in a very hot oven. Place ramekins on the lowest rack, where the heat expansion is at the highest level.

This arrangement will raise the souffle to the max. However, it also means that the souffle will deflate quicker once taken out of the oven. So, hurry up with serving!

Never open the oven while baking the souffle. Any sudden change in the oven temperature can cause the souffle to collapse.

How to serve a souffle

There is a saying that guests can wait for a souffle, but a souffle cannot wait for guests!

Mr. Idoux's daughter, who seems to have inherited the "perfect-souffle-making" gene, says,

you have two to three minutes max to get it to the table before it slumps.

As per another pastry chef Laurent Jeannin,

it has to be made to order and then consumed immediately. That's part of its legend.

To maintain the souffle's height for as long as possible, place ramekins on a plate heated in a microwave.

Sprinkle top of the souffle with powdered (icing) sugar. To appreciate the contrast of hot and cold, serve the souffle with ice cream on top or aside.

Why you should try this recipe

  1. This souffle dessert freshly made and served right from the oven steals the show.
  2. Pink-colored souffle is perfect for Valentine's Day, Mother's Day, a girl's birthday party, and a baby shower.
  3. French souffle recipe is straightforward and easy to make once you read through this post.

Ingredients

For ingredients and detailed instructions, refer to the recipe card below.

Pink Praline: it is the star of this pink-colored nutty souffle. Make it yourself at home or use store-bought crushed pink praline.

Heavy cream: use heavy cream with at least 36% fat content.

Eggs: make sure to separate egg whites from the yolks carefully. To facilitate this step, use an egg separator and chilled eggs.

Flour: use all-purpose flour.

Sugar: use white granulated or caster sugar. 

White wine vinegar: it helps stabilize egg whited while whisking.

How to make French souffle

Preheat the oven to 355 F/180 C. Butter ramekins with a silicone brush and sprinkle with sugar. Chill ramekins while making the batter.

Place pink praline in a food processor and crush until fine (photo 1).

Bring heavy cream and ¾ of crushed pink praline in a saucepan over low heat and stir (photo 2).

Photo 1: Crushed pink praline in a bowl Photo 2: Pink cream mixture in a saucepan
PHOTO 1 PHOTO 2

In a separate bowl, whisk egg yolks, flour, and half of the sugar (photo 3).

Pour the cream/praline mixture over the egg/sugar/flour mixture and mix (photo 4).

Photo 3: Yolks/flour/sugar mixture in a bowl Photo 4: Praline mixture in a bowl
PHOTO 3 PHOTO 4

Pour the mixture back into the saucepan, bring to a boil, and stir without stopping.

Once it thickens, pour into another bowl, add the remaining crushed pink praline (photo 5), mix and let cool.

In a clean and grease-free bowl, beat egg whites using a hand whisk.

Add vinegar and the remaining sugar, and continue to whisk until they are mounted (photo 6).

Photo 5: Praline mixture in a bowl Photo 6: Hand whisk with the beaten egg whites
PHOTO 5 PHOTO 6

Take a few tablespoons of egg whites, add to the pink praline preparation, and gently mix with a rubber spatula.

Then add the remaining egg whites to the main preparation and gently combine.

The preparation will be pink/white, not entirely homogeneous, which is fine (photo 7).

Pour the preparation into prepared ramekins (photo 8)...

Photo 7: Souffle preparation in a bowl Photo 8: Preparation into four ramekins
PHOTO 7 PHOTO 8

run thumb around the inside of the dishes and tap ramekins well (photo 9).

Bake on the lowest rack for 10 to 11 minutes. Do not open the oven door while baking!

Sprinkle the top of the souffle with powdered (icing) sugar and serve immediately (photo 10).

Photo 9: Souffle in a ramekin; ramekins on background Photo 10: Ready baked souffle with nuts
PHOTO 9 PHOTO 10

Expert tips

  1. Make pink praline yourself or use store-bought pink crushed pralines.
  2. Crush pink praline into medium-sized pieces to make crunchy souffle. However, it might limit the lift of the souffle. 

Love Valentine's Day desserts? Try these next!

  • French Chocolate Ganache Tart Recipe
  • Blackberry Friands
  • Raspberry Oreo Cheesecake Recipe
  • Browse all Valentine's Day Recipes

Want more delicious and beautiful recipes? Subscribe to my newsletter and follow me on Facebook, Pinterest, and Instagram for my latest updates. If you make this recipe, please leave a star rating on the recipe card and comment below!

Print

Recipe card

French Souffle Recipe

Pink-colored French souffle with pink praline in the background.
Print Recipe
Save Recipe Recipe Saved

5 Stars 4 Stars 3 Stars 2 Stars 1 Star

5 from 16 reviews

Learn how to make the perfect French souffle - an elegant, magical, and delicious dessert that delights kids and impresses adults. Made in 30 minutes and served right from the oven, it makes a fabulous dessert to finish a romantic dinner.

  • Author: Irina Totterman
  • Total Time: 30 minutes
  • Yield: 6 1x
  • Category: Cakes
  • Method: Baking
  • Cuisine: French

Ingredients

Scale
  • 3.5 oz (100 g) pink praline
  • ⅓ cup + 5 teaspoon (100 ml) heavy cream
  • 2 egg yolks
  • 3 ½ tsp (10 g) flour
  • 3 ½ tbsp (50 g) sugar 
  • ½ cup + 2 tablespoon (150 g) egg whites (see note #1)
  • ½ tsp white wine vinegar

* If needed, please refer to Baking Conversion Charts.

    Instructions

    1. Preheat the oven to 355 F/180 C. Butter ramekins  with a silicone brush and sprinkle with sugar. Chill ramekins while making the batter.

    2. Place pink praline in a food processor and crush until fine. Bring  heavy cream and ¾ of crushed pink praline in a saucepan over low heat and stir. In a separate bowl, whisk egg yolks, flour and, half of the sugar. Pour the cream/praline mixture over the egg/sugar/flour mixture and mix. Pour the mixture back into the saucepan, bring to a boil, and stir without stopping. Once it thickens, pour into another bowl, add the remaining crushed pink praline, mix and let cool.

    3. In a clean and grease-free bowl, beat egg whites using a hand whisk. Add vinegar and the remaining sugar, and continue to whisk until they are mounted. Take a few tablespoons of egg whites, add to the pink praline preparation and gently mix with a rubber spatula. Then add the remaining egg whites to the main preparation, and gently combine. The preparation will be pink/white, not entirely homogeneous, which is fine.

    4. Pour the preparation into prepared ramekins, run thumb around the inside of the dishes and tap ramekins well. Bake on the lowest rack for 10-11 minutes. Do not open the oven door while baking! Sprinkle top of the souffle with powdered (icing) sugar and serve immediately.

    Notes

    1. 150 g egg whites approximately equal to 4 raw fresh egg whites from extra large size chicken eggs.
    2. Make pink praline yourself or use store-bought pink crushed pralines. 
    3. Crush pink praline into medium-sized pieces to make crunchy souffle. However, it might limit the lift of the souffle. 

    Nutrition

    • Serving Size: 1 ramekin
    • Calories: 201
    • Sugar: 18.5 g
    • Sodium: 34 mg
    • Fat: 10.7 g
    • Saturated Fat: 4.6 g
    • Carbohydrates: 22.5 g
    • Fiber: 0.8 g
    • Protein: 5.4 g
    • Cholesterol: 93 mg

    Thank you for following me on Pinterest, Facebook, and Instagram. Hashtag #bakinglikeachef so I can see your creations.

    The nutritional information has been calculated using an online recipe nutrition calculator such as Verywellfit.com and is intended for informational purposes only. These figures should be used as a general guideline and not be construed as a guarantee.

    The recipe was adapted from https://www.750g.com/. It was originally published on April 10, 2019. The recipe has been revised to include improved content and photos. All posted pictures are mine.

    Mont Blanc Cake (Chestnut Cream Cake)

    Jan 13, 2021 · 12 Comments

    Mont Blanc cake covered with chestnut vermicelli with a cup, a candle, glasses on a table.

    Mont Blanc cake (chestnut cream cake) is a signature French dessert made with crunchy meringue, whipped cream, and chestnut vermicelli. "Curious" and elegant, this meringue cake makes every bite mouthwatering.

    Mont Blanc cake covered with chestnut vermicelli with a cup, a candle, glasses on a table

    Famous cake Mont Blanc... It is named after the highest mountain Le Mont Blanc in the Alps, meaning"white mountain" in French. Sprinkled with icing (powdered) sugar, it really resembles a snow-capped mountain.

    Mont Blank cake is a combination of the "riot" of chestnut vermicelli, slightly sweetened whipped cream, and the crunchy meringue.

    I have been thinking of making a Mont Blanc recipe since I accidentally watched a video on piping the chestnut vermicelli. 

    I need to admit that it is fun to make and, more pleasure, see how the cake is being swept out of the serving plate within minutes.

    The "chestnut mess" as an unusual appearance of the cake makes a deal for guests. Tasting the cake, one of my friends said, "I like new experiments!"

    Well, I love to experiment in baking too. That is why this chestnut cream cake is on the blog.

    [feast_advanced_jump_to]

    Mont Blanc origin

    The chestnut puree dessert made with whipped cream and meringue has an Italian origin, but in the 17th century, it became famous in France.

    Mont Blanc cake, or Mont-Blanc gateau in French, has been a signature dessert served at the Parisian tea shop Angelina since 1903. Later, in the 2010s, many French chefs created different variations of this dessert.

    It is the most popular French dessert in Japan, where pumpkin, squash, and other puree are used instead of chestnut.

    BAKING ESSENTIALS CHECKLIST

    Sign up and get a list of the necessary baking tools and ingredients

    FREE DOWNLOAD

    Cake topped with chestnut cream like vermicelli with glasses in the background

    What is chestnut cream?

    Chestnut cream or crème de marrons in French has been a specialty of the French Ardèche since 1885. It is made from broken candied chestnuts, sugar, and vanilla. 

    The French use it as a spread for the morning toast or add to yogurts and cottage cheese instead of white sugar.

    Chestnut cream is also used to make this famous French Mont Blanc dessert, French Saint-Honoré, or Italian tiramisu with chestnut cream. It is ideally paired with sweet red wine.

    According to Cuisine et Vins de France,

    The chestnut cream goes with everything and comes to enhance the simplest preparations. 

    Why you should try this recipe

    1. Mont Blanc recipe is gluten-free and is perfect for serving to everyone.
    2. This classic French pastry combines three textures: crunchy meringue, smooth and creamy whipped cream, and sweet, nutty chestnut vermicelli.
    3. It has the right balance of sweetness.
    4. The recipe is easy and fun to make, especially with kids. They like to help decorate the cake.
    5. The cake is so elegant that it is perfect for a birthday party and a bridal shower.

    Ingredients

    For ingredients and detailed instructions, refer to the recipe card below.

    Egg whites: using an egg separator, separate egg whites with the yolks while the eggs are chilled. Then let the whites get to room temperature before you start.

    Sugar: the recipe calls for caster sugar or superfine baker's sugar. To make superfine sugar out of granulated sugar, process it in a food processor for s few seconds.

    Icing sugar: make it at home using a coffee grinder or use powdered sugar.

    Chestnut puree: use unsweetened chestnut puree. It is one of the cake's stars, and it cannot be replaced with another puree.

    Chestnut cream: it is another French ingredient to make chestnut cream.

    Dark rum: replace it with cognac if desired.

    Whipping cream: use your favorite brand of whipping cream with at least 30% fat content.

    A single slice of the cake with the rest of Mont Blanc in the background

    How to make Mont Blanc cake

    Preheat the oven to 185 F/85 C. Use a pencil and draw five circles (6-inch/16 cm, 5-inch/13 cm, 4-inch/10 cm, 3-inch/7 cm, and 2-inch/5 cm in diameter) on two sheets of parchment paper. Turn them over and place them on two baking sheets.

    To make the meringue, whisk egg whites with an electric mixer or a stand mixer until stiff.

    Gradually add the caster sugar and beat to get glossy meringue (photo 1). Finally, add icing (powdered) sugar and gently mix with a rubber spatula (photo 2).

    Photo 1: Beaten egg whites with caster sugar Photo 2: Ready meringue in a bowl
    PHOTO 1 PHOTO 2

    Place the meringue in a pastry bag with Ateco plain pastry tip 806. Pipe 4 meringue dots in the corners of a baking sheet and place parchment to fix it.

    Pipe five meringue disks as spirals over the drawn circles on parchment paper (photos 3-4). Bake for 2 hours and then let cool.

    Photos 3-4: Meringue disks of different diameter piped on the parchment paper
    PHOTOS 3-4

    To make whipped cream, whisk whipping cream with icing (powdered) sugar until firm (photo 5). Place ⅔ of the cream in a pastry bag with Ateco plain pastry tip 806.

    To assemble the cake, place the largest cooled meringue disk on a cake board or a serving plate.

    Push whipped cream in a spiral using a pastry bag with Ateco plain pastry tip 806 (photo 6).

    Photo 5: Whipped cream in a bowl Photo 6: Piped cream on top of meringue disk
    PHOTO 5 PHOTO 6

    Place the second disk (5-inch/13 cm in diameter), garnish it with whipped cream. Continue the same way for the last three disks (photo 7).

    Use the rubber spatula and cover the cake with the remaining whipped cream. With a bent spatula, smooth the cream from bottom to top. 

    To make chestnut cream, using a mixer, mix chestnut puree, chestnut cream, and dark rum until homogenous (photo 8). Pass the cream through a fine-mesh sieve.

    Photo 7: Meringue disks alternated with whipped cream Photo 8: Chestnut cream in a bowl
    PHOTO 7 PHOTO 8

    Transfer the cream to a pastry bag fitted with a vermicelli tip or a bird nest pastry tip (photo 9). 

    Pipe the chestnut vermicelli in overlapping circles to cover the cake's entire surface (photo 10).

    Decorate with gold sugar pearls. Refrigerate for 2 hours. Right before serving, sprinkle the cake with icing (powdered) sugar.

    Expert tips

    1. 100 g egg whites approximately qual 3 raw fresh egg whites from large size chicken eggs.
    2. Replace caster sugar with superfine sugar. Process granulated sugar in a food processor for a few seconds to make it superfine.
    3. Pipe meringue kisses with the remaining meringue placing them around meringue disks.
    4. Use Wilton tip 3, Alteco tip 2, or even larger Alteco piping tips 4 to 8 instead of vermicelli tip if you cannot find that special tip. Ideally, use a 2- to 3-mm plain round tip.
    5. Do not over-pipe the cake with chestnut cream (you might not use all the cream) to prevent vermicelli from sliding down.
    6. Decorate the top of Mont Blanc cake with a candied chestnut if desired.
    7. Mont Blanc dessert is best served within a few hours since chestnut cream tends to dry out on top of the cake.
    8. Serve the cake with sweet wines, for example, French wines Rivesaltes or Banyuls.

    Frequently asked questions

    Can you make Mont Blanc cake in advance?

    You can make meringue disks one day in advance. But it is recommended to assemble the cake on the day of serving since chestnut cream piped as vermicelli tends to dry out.

    Can you freeze Mont Blanc cake?

    Yes, once you cover the cake with whipped cream, wrap the cake (with a cake board) in plastic film and freeze overnight. The next day, remove the plastic and let the cake sit for about 5 minutes. Garnish Mont Blanc with chestnut vermicelli and place in the fridge for the other 2 hours to thaw.

    Love meringue cakes? Try these next!

    • French Meringue Cake Merveilleux
    • Chocolate Concorde Cake
    • Rosewater Meringue Roulade
    • Browse all the Cake Recipes

    Want more delicious and beautiful recipes? Subscribe to my newsletter and follow me on Facebook, Pinterest, and Instagram for my latest updates. If you make this recipe, please leave a star rating on the recipe card and comment below!

    Print

    Recipe card

    Mont Blanc Cake - Chestnut Cream Cake

    Mont Blanc cake covered with chestnut vermicelli with a cup, a candle, glasses on a table.
    Print Recipe
    Save Recipe Recipe Saved

    5 Stars 4 Stars 3 Stars 2 Stars 1 Star

    5 from 6 reviews

    Mont Blanc cake (chestnut cream cake) is a signature French dessert made with crunchy meringue, whipped cream, and chestnut vermicelli. "Curious" and elegant, this meringue cake makes every bite mouthwatering.

    • Author: Irina Totterman
    • Total Time: 3 hours
    • Yield: 6 1x
    • Category: Cakes
    • Method: Baking
    • Cuisine: French
    • Diet: Gluten Free

    Ingredients

    Scale

    For French meringue:

    • 100 g egg whites (see note #1)
    • ⅓ cup + 2 tablespoons (100 g) caster sugar (see note #2)
    • ⅔ cup  + 2 tablespoons (100 g) icing (powdered) sugar

    For chestnut cream:

    • 7 oz. (200 g) unsweetened chestnut puree
    • 3.5 oz. (100 g) chestnut cream
    • ⅔ teaspoon dark rum

    For the whipped cream:

    • 2 cups (460 g) whipping cream
    • ⅓ cup (40) g icing sugar

    *Don't you have the correct baking pan on hand right now? Try this simple Cake Pan Converter!

    ** If needed, please refer to Baking Conversion Charts.

    Instructions

    1. Preheat the oven to 185 F/85 C. Use a pencil and draw five circles (6-inch/16 cm, 5-inch/13 cm, 4-inch/10 cm, 3-inch/7 cm, and 2-inch/5 cm in diameter) on two sheets of parchment paper. Turn them over and place them on two baking sheets.
    2. To make the meringue, whisk egg whites with an electric mixer or a stand mixer until stiff. Gradually add the caster sugar and beat to get glossy meringue. Finally, add icing (powdered) sugar and gently mix with a rubber spatula.
    3. Place the meringue in a pastry bag with Ateco plain pastry tip 806. Pipe 4 meringue dots in the corners of a baking sheet and place parchment to fix it. Pipe five disks as spirals over the drawn circles on parchment paper. Bake for 2 hours and then let cool.
    4. To make whipped cream, whisk whipping cream with icing (powdered) sugar until firm. Place ⅔ of the cream in a pastry bag with Ateco plain pastry tip 806.
    5. To assemble the cake, place the largest cooled meringue disk on a cake board or a serving plate. Push whipped cream in a spiral using a pastry bag with a tip of 10 mm. Place the second disk (5-inch/13 cm in diameter), garnish it with whipped cream. Continue the same way for the last three disks.
    6. Use the rubber spatula and cover the cake with the remaining whipped cream. With a bent spatula, smooth the cream from bottom to top.
    7. To make chestnut cream, using a mixer, mix chestnut puree, chestnut cream, and dark rum until homogenous. Pass the cream through a fine-mesh sieve. Transfer the cream to a pastry bag fitted with a vermicelli tip or bird nest pastry tip.  
    8. Pipe the chestnut vermicelli in overlapping circles to cover the cake's entire surface. Decorate with gold sugar pearls. Refrigerate for 2 hours. Right before serving, sprinkle the cake with icing (powdered) sugar.

    Notes

    1. 100 g egg whites approximately qual 3 raw fresh egg whites from large size chicken eggs.
    2. Replace caster sugar with superfine sugar. Process granulated sugar in a food processor for a few seconds to make it superfine.
    3. Pipe meringue kisses with the remaining meringue placing them around meringue disks.
    4. Use Wilton tip 3, Alteco tip 2, or larger Alteco piping tips as 4 to 8 instead of vermicelli tip if you cannot find that special tip. Ideally, use a 2- to 3-mm plain round tip.
    5. Do not over-pipe the cake with chestnut cream (you might not use all the cream) to prevent vermicelli from sliding down.
    6. Decorate the top of Mont Blanc cake with a candied chestnut if desired.
    7. Mont Blanc dessert is best served within a few hours since chestnut cream tends to dry out on top of the cake.
    8. Serve the cake with sweet wines, for example, French wines Rivesaltes or Banyuls.

    Nutrition

    • Serving Size: 1 slice
    • Calories: 469
    • Sugar: 49 g
    • Sodium: 43 mg
    • Fat: 23.8 g
    • Saturated Fat: 14.8 g
    • Carbohydrates: 59.9 g
    • Fiber: 1.7 g
    • Protein: 3.5 g
    • Cholesterol: 85 mg

    Thank you for following me on Pinterest, Facebook, and Instagram. Hashtag #bakinglikeachef so I can see your creations.

    The nutritional information has been calculated using an online recipe nutrition calculator such as Verywellfit.com and is intended for informational purposes only. These figures should be used as a general guideline and not be construed as a guarantee.

    The recipe was adapted from http://www.marieclaire.fr and https://www.cuisineactuelle.fr. It was originally published on March 03, 2018. The recipe has been revised to include improved content and photos. All posted pictures are mine.

    Caramel Buche de Noel (French Christmas Dessert)

    Dec 23, 2020 · 20 Comments

    A slice of caramel Buche de Noel on a black dessert plate.

    This amazing caramel Buche de Noel is a holiday Yule log cake made with chocolate sponge cake, salted caramel chocolate mousse, and covered with a glossy caramel glaze. It is the hottest Christmas dessert in Europe and French Canada!

    Glazed Buche de Noel with caramel decorations on top and black tableware in the background

    Do you like a challenge? I do. In December 2018, I decided to challenge myself by making a traditional French dessert Buche de Noel each week.

    That is why my blog is full of Christmas log cakes (aka Buche de Noel), rolled cakes, and roulades.

    And many of my readers joined me in that Buche de Noel challenge to bring a beautiful European tradition to their Christmas table.

    BAKING ESSENTIALS CHECKLIST

    Sign up and get a list of the necessary baking tools and ingredients

    FREE DOWNLOAD

    [feast_advanced_jump_to]

    Caramel Buche de Noel recipe

    The original recipe for Caramel Buche de Noel was created by French pastry chef Arnaud Larher.

    I adapted and simplified his recipe and made some changes to facilitate its preparation.

    It takes time, but you will be rewarded with an amazing French cake, a winner of the Christmas table.

    The most challenging part of making this holiday log is to succeed with dry caramel.

    I highly recommend reading about what dry caramel is, how to make it, and how to know when the caramel is ready.

    The chef decorated his Buche de Noel with spun sugar, but you can simplify this step. You can made caramel threads and arrange them on top of the dessert. Make sure the glaze is set.

    Caramel decorations are optional. Decorate your Buche de Noel as you desire.

    To be inspired, look at decorating a Yule log cake and decorating traditional Buche de Noel.

    Making meringue mushrooms might be the best decision. It is easy to fix them while the glaze is fresh.

    A single slice of caramel Buche de Noel on a black dessert plate: Close up

    Why you should try this recipe

    This salted caramel Yule log (aka Buche de Noel) is the perfect way to make your Christmas truly special. It becomes a centerpiece once served.

    The sweetness of chocolate and the saltiness of caramel are unbeatable, with more chocolate on top for good measure.

    Finally, this traditional French Christmas dessert brings an unforgettable experience that will warm your memories for a long time.

    Ingredients

    Caramel Buche de Noel ingredients

    For ingredients and detailed instructions, refer to the recipe card below.

    Eggs: the recipe calls for large eggs. Separate egg whites from the yolks while the eggs are chilled. Use an egg separator to facilitate this step.

    Sugar: use granulated or caster sugar to make the caramel. Use superfine baker's sugar to make the meringue.

    To make the superfine sugar at home, process granulated sugar for a few seconds in a food processor.

    Flour: use all-purpose flour to make the cake.

    Cocoa powder: use unsweetened cocoa powder.

    Whipping cream: use your favorite brand of whipping cream with at least 30% fat content.

    Heavy cream: it has higher fat content (at least 36%) compared with whipping cream. You can replace it with whipping cream if desired.

    Butter: use unsalted butter, better in the softened form.

    Dark chocolate: use top-quality dark chocolate such as Scharffen Berger dark chocolate, Valrhona dark chocolate, or Lindt Excellence dark chocolate.

    Salt: it enhances the flavor of the cake. Replace it with fleur de sel if you desire.

    Hazelnuts: use store-bought roasted hazelnuts or roast nuts in the oven at 355 F/180 C for 12 minutes. Replace hazelnuts with toasted almonds or a mix of hazelnuts and almonds.

    Glucose is a thick, colorless, and odorless syrup with a lower sweetening power than sugar.

    It prevents the crystallization of sugar while making caramel. Ensure glucose near the sides of a saucepan to help "melt" the glucose syrup. 

    Replace glucose with honey (2.5 oz./70 g honey for 4.6 oz./130 g glucose) or inverted sugar syrup (2.5 oz./70 g inverted sugar for 4.2 oz./120 g glucose). Be careful: honey can give a specific taste to the cake.

    White chocolate: use Lindt or Callebaut white chocolate.

    Gelatin: use gelatin sheets with a strength of 200 bloom.

    A sliced Christmas Yule log on a wooden tray with tableware in the background

    How to make Caramel Buche de Noel

    To make the chocolate biscuit, preheat the oven to 340 F/170 C. Sift all-purpose flour and cocoa powder three times using a flour sifter, and set aside. 

    Whisk egg whites with an electric mixer or a stand mixer until firm. Add a couple of tablespoons of sugar and continue beating.

    Gradually add the rest of the sugar one spoon at a time until the meringue becomes glossy (photo 1). Incorporate egg yolks with a rubber spatula.

    Then add the sifted dry ingredients, and using the spatula, mix, lifting the mass from the center outwards. You might find it easier to turn the bowl to facilitate this step (photo 2).

    Photo 1: Beaten egg whites in a bowl
Photo 2: Ready biscuit dough in a bowl
    PHOTO 1 PHOTO 2

    Spread the biscuit dough on a parchment paper sheet or a silicone non-spill baking sheet to the thickness of 25/64 inch/1 cm (photo 3). Bake for 12 minutes. Let cool before taking off the biscuit.

    To make the chocolate-caramel mousse, chop dark chocolate with a serrated knife. Place sugar in a saucepan and bring over medium heat.

    Once the sugar starts to caramelize, low the heat (photo 4). The caramel must get a gold color, but not burn!

    Photo 3: Biscuit dough on a baking sheet Photo 4: Caramel in a saucepan
    PHOTO 3 PHOTO 4

    Remove the saucepan from the heat and gradually pour 120 g of very hot heavy cream (photo 5). Be careful: it might splash! Add salt and then butter (photo 6).

    Photo 5: Boiling caramel in a saucepan Photo 6: Salted caramel in a pan
    PHOTO 5 PHOTO 6

    Mix caramel well and pour it over the chopped dark chocolate (use a metal bowl to keep the heat). Stir gently until the ganache becomes smooth and shiny (photo 7).

    In a separate bowl, whisk 300 g of whipping cream to get the whipped cream with soft peaks.

    Add ⅓ of the whipped cream to the chocolate-caramel ganache and mix well with a hand whisk.

    Then add the remaining whipped cream and incorporate it with the whisk, starting from the center, towards the edge (photo 8).

    Photo 7: Chocolate mixture in a metal bowl Photo 8: Chocolate caramel mousse in a bowl
    PHOTO 7 PHOTO 8

    To assemble the cake, peel the biscuit out of the parchment paper or baking mat and cut it into a rectangle of 11 x 11 inches/28 x 28 cm with sharp outlines.

    Cover the biscuit with the chocolate-caramel mousse and even with a bent spatula. Sprinkle with toasted chopped hazelnuts (photo 9).

    Roll the log tightly, starting from the top end, with the help of parchment. The end of the biscuit can break; it does not matter.

    Squeeze the rolled log (photo 10) covered by paper, pushing it with a grid or baking sheet. Refrigerate it wrapped in parchment for at least 2 hours.

    Photo 9: Biscuit with the mousse and hazelnuts on top Photo 10: Rolled log on parchment
    PHOTO 9 PHOTO 10

    To make the caramel glaze, soak gelatin sheets in cold water for 10 minutes. Chop dark and white chocolate and set aside.

    Place sugar and glucose in a saucepan and bring over medium heat until a nice color is obtained.

    Add hot whipping heavy cream (watch for splashing), and then pour over the mixture of chopped white and dark chocolate.

    Mix with the spatula to homogenize. Add the drained gelatin sheets and mix again (photo 11).

    This glaze is ready when the temperature reaches 82 to 86 F /28 to 30 C. If the glaze has bubbles, it can be homogenized using a hand immersion blender.

    To glaze the cake, place the rolled log on a wire rack and cover it with the caramel glaze (photo 12). It takes a few minutes for the glaze to settle.

    Photo 11: Caramel glaze in a bowl Photo 12: Glazed roll cake on a wire rack
    PHOTO 11 PHOTO 12

    To make caramel decorations, place sugar and glucose in a saucepan. Heat the mixture to 320 F/160 C (use a cooking thermometer), swirling the pan on top of the cooker.

    Once the temperature is reached, take two forks in one hand (close to each other), dip them in sugar, and shake them over the parchment.

    Collect the sugar with a small offset spatula and arrange it on top of the cake. The rolled log can be served immediately or refrigerated until serving.

    Expert tips

    1. Read more about dry caramel in the post for hazelnut praline paste.
    2. To roast hazelnuts, bring them in the oven at 355 F/180 C for 12 minutes.
    3. Read about how to master rolling a cake log and watch this short video about tightening a Christmas log.

    Frequently asked question

    What is the difference between caramel and dulce de leche?

    Caramel is made by cooking sugar, with or without water. Dulce de leche is made by slowly cooking cow milk and sugar altogether.

    Can you replace caramel with dulce de leche in this recipe?

    No, you cannot switch caramel for dulce de leche while making this caramel Buche de Noel due to the difference in their preparation technique.

    Can you use a store-bought caramel to make caramel Buche de Noel?

    No, this type of caramel is not a good substitute for the caramel made in the recipe. Caramel (better said, caramel sauce) has a thinner consistency than store-bought caramel.

    Love Christmas desserts? Try these next!

    • Christmas Banana Bread
    • Chocolate Raspberry Yule Log
    • Mini Gingerbread Men Cookies
    • French Gingerbread Cake

    Or browse all the Christmas recipes.

    Want more delicious and beautiful recipes? Subscribe to my newsletter and follow me on Facebook, Pinterest, and Instagram for my latest updates. If you make this recipe, please leave a star rating on the recipe card and comment below!

    Print

    Recipe card

    Caramel Bûche de noel (Christmas log)

    A slice of caramel Buche de Noel on a black dessert plate.
    Print Recipe
    Save Recipe Recipe Saved

    5 Stars 4 Stars 3 Stars 2 Stars 1 Star

    5 from 6 reviews

    This amazing caramel Buche de Noel is a holiday log cake made with chocolate sponge cake, salted caramel chocolate mousse, and covered with a glossy caramel glaze. It is the hottest Christmas dessert in Europe and French Canada!

    • Author: Irina Totterman
    • Total Time: 4 hours
    • Yield: 8 - 10 1x
    • Category: Cakes
    • Method: Baking
    • Cuisine: French

    Ingredients

    Scale

    For the chocolate biscuit:

    • 5 egg whites
    • ½ cup + 2 ½ teaspoons (125 g) granulated sugar
    • 4 egg yolks
    • ⅔ cup (85 g) all-purpose flour
    • 3 ½ tablespoons (25 g) cocoa powder

    For the chocolate-caramel mousse:

    • ¼ cup + 2 ½ tablespoons (90 g) granulated sugar 
    • 4 tablespoons (60 g) heavy cream
    • 1 oz. (30 g) butter
    • 2.7 oz. (75 g) dark chocolate
    • ⅔ cup (150 g) whipping cream
    • 1 pinch salt
    • 1.8 oz. (50 g) roasted hazelnuts

    For the caramel glaze:

    • ⅔ cup + 2 teaspoons (160g) granulated sugar
    • 0.7 oz. (20 g) glucose
    • ⅔ cup + 4 ½ tablespoons (220 g) heavy cream
    • 2.5 oz. (70 g) white chocolate
    • 2.5 oz. (70 g) dark chocolate
    • 3 gelatin sheets

    For caramel decorations:

    • ⅓ cup + 5 ⅓ teaspoons (100 g) granulated sugar 
    • 0.9 oz. (25 g) glucose

    *Don't you have the correct baking pan on hand right now? Try this simple Cake Pan Converter!

    ** If needed, please refer to Baking Conversion Charts.

    Instructions

    1. To make the chocolate biscuit, preheat the oven to 340 F/170 C. Sift all-purpose flour and cocoa powder three times using a flour sifter, and set aside. Whisk egg whites with an electric mixer or a stand mixer until firm. Add a couple of tablespoons of sugar and continue beating. Gradually add the rest of the sugar one spoon at a time until the meringue becomes glossy. Incorporate egg yolks with a rubber spatula.
    2. Then add the sifted dry ingredients, and using the spatula, mix, lifting the mass from the center outwards. You might find that it is easier to turn the bowl to facilitate this step. Spread the biscuit dough on a parchment paper sheet or a silicone non-spill baking sheet to the thickness of 25/64 inch/1 cm. Bake for 12 minutes. Let cool before taking off the biscuit.
    3. To make the chocolate-caramel mousse, chop dark chocolate with a serrated knife. Place sugar in a saucepan and bring over medium heat. Once the sugar starts to caramelize, low the heat. The caramel must get a gold color, but not burn! Remove the saucepan from the heat and gradually pour 120 g of very hot heavy cream. Be careful: it might splash!
    4. Add salt and then butter. Mix caramel well and pour it over the chopped dark chocolate (use a metal bowl to keep the heat). Stir gently until the ganache becomes smooth and shiny.
    5. In a separate bowl, whisk 300 g of whipping cream to get the whipped cream with soft peaks. Add ⅓ of the whipped cream to the chocolate-caramel ganache and mix well with a hand whisk. Then add the remaining whipped cream and incorporate it with the whisk, starting from the center, towards the edge.
    6. To assemble the cake, peel the biscuit out of the parchment paper or baking mat and cut it into a rectangle of 11 x 11 inches/28 x 28 cm with sharp outlines. Cover the biscuit with the chocolate-caramel mousse and even with a bent spatula. Sprinkle with toasted chopped hazelnuts. Roll the log tightly, starting from the top end, with the help of parchment (the end of the biscuit can break, it does not matter). Squeeze the rolled log covered by paper, pushing it with a grid or baking sheet. Refrigerate it wrapped in parchment for at least 2 hours.
    7. To make the caramel glaze, soak gelatin sheets in cold water for 10 minutes. Chop dark and white chocolate and set aside. Place sugar and glucose in a saucepan and bring over medium heat until a nice color is obtained. Add hot whipping heavy cream (watch for splashing), and then pour over the mixture of chopped white and dark chocolate. Mix with the spatula to homogenize. Add the drained gelatin sheets and mix again. This glaze is ready when the temperature reaches 82 to 86 F /28 to 30 C. If the glaze has bubbles, it can be homogenized using a hand immersion blender.
    8. To glaze the cake, place the rolled log on a wire rack and cover it with the caramel glaze. It takes a few minutes for the glaze to settle. 
    9. To make caramel decorations, place sugar and glucose in a saucepan. Heat the mixture to 320 F/160 C (use a cooking thermometer), swirling the pan on top of the cooker. Once the temperature is reached, take two forks in one hand (close to each other), dip them in sugar, and shake them over the parchment. Collect the sugar with a small offset spatula and arrange it on top of the cake. The rolled log can be served immediately or refrigerated until serving.

    Notes

    1. Read more about dry caramel in the post for hazelnut praline paste.
    2. To roast hazelnuts, bring them in the oven at 355 F/180 C for 12 minutes.
    3. Read about how to master rolling a cake log and watch this short video about tightening a Christmas log.

    Nutrition

    • Serving Size: 1 slice
    • Calories: 599
    • Sugar: 56.8 g
    • Sodium: 81 mg
    • Fat: 33.8 g
    • Saturated Fat: 18.7 g
    • Carbohydrates: 70.5 g
    • Fiber: 2.5 g
    • Protein: 9.2 g
    • Cholesterol: 186 mg

    Thank you for following me on Pinterest, Facebook, and Instagram. Hashtag #bakinglikeachef so I can see your creations.

    The nutritional information has been calculated using an online recipe nutrition calculator such as Verywellfit.com and is intended for informational purposes only. These figures should be used as a general guideline and not be construed as a guarantee.

    The recipe was adapted from https://cuisine.journaldesfemmes.fr/ and http://www.cookismo.fr/. It was originally published on November 12, 2018. The recipe has been revised to include improved content and photos. All posted pictures are mine.

    Ottolenghi's Apple and Olive Oil Cake

    Dec 13, 2020 · 13 Comments

    Sliced apple cake with olive oil on a serving plate.

    Ottolenghi apple and olive oil cake with maple icing is a fabulous fall dessert loaded with chunks of apple, flavored with cinnamon, and covered with a luscious maple frosting. If you are searching for the most delicious apple cake, your search ends here.

    Sliced apple cake with olive oil on a serving plate

    This cake recipe was created by the British-Israeli chef Yotam Ottolenghi and appeared in the famous "Ottolenghi: The Cookbook."

    [feast_advanced_jump_to]

    It is the ultimate apple olive oil cake made with fresh apples, extra-virgin olive oil, and a hint of cinnamon. Its maple frosting is simply irresistible.

    BAKING ESSENTIALS CHECKLIST

    Sign up and get a list of the necessary baking tools and ingredients

    FREE DOWNLOAD

    This cake is not just delicious; it is an absolute crowd-pleaser. Customers at the Ottolenghi shop rave about it, with many admitting to ordering the cake just for the maple icing.

    Apple and olive oil cake recipe

    • Ottolenghi's apple and olive oil cake recipe is easy and straightforward.
    • It is a must-make fall favorite dessert prepared with tart apples and sultana raisins to bring the texture, ground cinnamon and vanilla for beautiful flavors, and olive oil for the cake's moisture and depth of flavors.
    • Maple icing made with maple syrup and cream cheese is a perfect frosting for other layer cakes, cupcakes, etc.

    Ingredients

    Apple olive oil cake ingredients in pictures

    For ingredients and detailed instructions, refer to the recipe card below.

    • Sultana raisins are one of the stars of the cake. Replace them with regular raisins if you desire.
    • Flour: The recipe calls for all-purpose flour (the same as plain flour). But you can switch some parts of all-purpose flour for whole wheat flour or even buckwheat flour - the flavor of buckwheat beautifully pairs with apples.
    • Ground cinnamon: The original recipe requires ½ teaspoon, although you can increase it to 1 teaspoon of the spice.
    • Salt enhances the flavors of the cake.
    • Leavening agents: baking powder and baking soda help raise the cake.
    • Olive oil: Ottolenghi's recipe calls for a good extra virgin olive oil that brings moisture to the cake. Feel free to replace it with flavorless grapeseed or vegetable oil if preferred. Read more about how to make a cake moist.
    • Sugar: Use granulated white or caster sugar interchangeably.
    • Vanilla: Mr. Ottolenghi uses scraped seeds from ½ vanilla bean. Use ½ teaspoon of pure vanilla extract or alcohol-free vanilla flavor instead if desired.
    • Eggs: The recipe calls for whole large eggs and large egg whites. Use chilled eggs and an egg separator to separate egg whites from the yolks.
    • Lemon zest: Use one untreated lemon to get 1 teaspoon of lemon zest using a zester grater.
    • Apples: Ottolenghi's recipe calls for Bramley apples, but you can easily replace them with Granny Smith apples. Please, always use medium-sized apples: you will need about 1 lb 12 oz. (800 g). Indeed, you can experiment with Pink Lady apples, Honey Crisp, Gala apples, or other types of apples.
    • Butter: Use unsalted butter. Take it out of the fridge 2 hours before making the icing.
    • Brown sugar: Use golden or dark brown sugar. To increase the molasses component, use light brown muscovado sugar instead.
    • Maple syrup is the star of maple icing that is so delicious that you will never want to replace this ingredient.
    • Cream cheese is an essential ingredient. Make sure to bring it to room temperature before you start.

    Recipe variations

    The original Ottolenghi's apple cake is a layered cake sandwiched with delicious maple icing.

    • Feel free to make a single-layer cake and use half of the icing on top.
    • Add a fancy touch by decorating the top of the cake with caramelized apples and a couple of cinnamon sticks. Or simply dust the cake with icing sugar.
    A single slice of apple olive oil cake on a dessert plate

    How to make apple olive oil cake

    Step 1. Preheat oven to 375°F (190°C). Butter an 8-inch (20 cm) Le Creuset springform pan and line its bottom and sides with parchment paper.

    Step 2. Using a flour sifter, sift dry ingredients (flour, ground cinnamon, salt, baking powder, and baking soda) in a large bowl.

    Step 3. Place sultana raisins and water in a saucepan and simmer over low heat until the dry fruit completely absorbs the water. Set aside.

    Step 4. Peel fresh apples with a vegetable peeler, remove the heart and seeds, and cut them into ⅓ inch (1 cm) cubes.

    Pro tip: Use shredded apples instead of apple chunks for a tender cake texture.

    Step 5. To make the cake, place olive oil, sugar, and vanilla extract in the bowl of an electric mixer and beat.

    Pro tip: Alternatively, you can use a stand, hand mixer, or balloon whisk.

    Step 6. Gradually add lightly beaten whole eggs and continue to mix until the mixture becomes smooth (photo 1).

    Step 7. Then add apple cubes, sultana raisins, lemon zest grated with a zester grater, and combine with a large spatula (photo 2).

    Photo 1: Oil and egg mixture in a bowl Photo 2: Apple mixture in a bowl
    PHOTO 1 PHOTO 2

    Step 8. Add the sifted flour mixture and mix (photo 3). In a clean bowl, beat egg whites with a stand mixer or an electric mixer until soft peaks.

    Step 9. Add beaten egg whites into the main preparation in two additions and gently combine them with the spatula (photo 4).

    Photo 3: Half-way ready cake batter in a bowl Photo 4: Cake batter in a bowl
    PHOTO 3 PHOTO 4

    Step 10. Pour the batter into the prepared cake tin, even the surface using a rubber spatula or a spoon (photo 5), and bake for 90 minutes until golden brown.

    Pro tip: Check doneness with a skewer: if it comes out dry from the center of the cake, the bake is ready.

    Step 11. Remove it from the oven, place it on a wire rack, and let the cake cool in the pan (photo 6).

    Photo 5: Cake batter in a baking pan Photo 6: Baked cake in a mold
    PHOTO 5 PHOTO 6

    Step 12. To make the maple icing, place softened butter, brown sugar, and maple syrup in a bowl and beat until the mixture becomes creamy and smooth (photo 7).

    Step 13. Add cream cheese at room temperature and beat till the cream becomes thick and homogeneous.

    Step 14. To assemble the cake, remove the well-cooled cake from the pan and cut it horizontally using a serrated knife. Cut the top to even the surface if the cake is domed after baking.

    Step 15. Place the bottom of the cake on a serving platter and spread half of the maple icing (photo 8).

    Photo 7: Maple syrup buttered mixture in a bowl Photo 8: Cake covered with maple icing
    PHOTO 7 PHOTO 8

    Step 16. Place the top half of the cake on the cream layer and cover it with the remaining icing. Even the surface of the cake with a bent spatula or create waves.

    Assembled apple and olive oil cake on a serving plate

    Expert Tips

    1. Bring butter and cream cheese to room temperature about an hour before you start.
    2. Use an 8-inch (20 cm) round cake pan buttered and lined with parchment and precut circle cake pan liners. A springform form facilities the removal of the cake, but a regular cake pan works as well.
    3. Every oven is different: adjust your oven settings to 375°F, 190°C, 170°C fan, or gas mark 5.
    4. Use this simple cake pan converter to recalculate the amount of ingredients for different cake pan sizes. Modify the bake time accordingly: for a 7-inch (18 cm) cake, decrease the baking time by 10 minutes; to make a 6-inch (15 cm) cake, reduce the baking time by 15 to 20 minutes.
    5. Make-ahead option: Bake the cake in advance, wrap it with plastic wrap, and keep it in the fridge for up to one week. Slice and assemble the cake with maple icing the next day or on the day of serving.

    Storing

    Store this olive oil apple cake under a glass dome in the refrigerator for up to three days.

    Recipe FAQ

    What is special about olive oil cake?

    Olive oil brings moisture to the cake and adds a subtle fruity flavor, perfectly complementing the richness of other cake flavors. More, this versatile ingredient keeps the cake soft and tender, whether at room temperature or in the refrigerator.

    Can I make a cake with olive oil instead of butter?

    You can substitute olive oil for 80% of the butter amount. Keep in mind that olive oil has a strong taste and flavor, so if you want a neutral flavor, try grapeseed oil instead.

    Does oil make a cake more moist than butter?

    While both oil and butter add moisture to a cake, oil stays liquid at room temperature while butter solidifies. This means that oil-based cakes have a noticeably moist texture compared to butter cakes.

    Love apple recipes? Try these next!

    Try out some other apple desserts from the website if you liked this apple cake recipe.

    • Apple Crumble Bread
    • Apple Mousse Cake
    • Apple Tarte Tatin
    • French Apple Fritters
    • Apple And Blueberry Crumble

    Want more delicious and beautiful recipes? Subscribe to my newsletter and follow me on Facebook, Pinterest, and Instagram for my latest updates. If you make this recipe, please leave a star rating on the recipe card and comment below!

    Print

    Recipe card

    Apple Olive Oil Cake Recipe

    Sliced apple cake with olive oil on a serving plate.
    Print Recipe
    Save Recipe Recipe Saved

    5 Stars 4 Stars 3 Stars 2 Stars 1 Star

    5 from 6 reviews

    This Ottolenghi apple and olive oil cake is a fabulous fall dessert loaded with chunks of apples, flavored with cinnamon, and covered with maple icing. If you are looking for the most delicious apple cake, this is the one.

    • Author: Irina Totterman
    • Total Time: 1 hour, 30 minutes
    • Yield: 10 1x
    • Category: Cakes
    • Method: Baking
    • Cuisine: British

    Ingredients

    Scale

    For the cake:

    • 2.8 oz (80 g) sultana raisins
    • ¼ cup (60 ml) water
    • 2 ¼ cups (280 g) all-purpose flour
    • ½ teaspoon ground cinnamon
    • 1 pinch of salt
    • ½ teaspoon baking powder
    • ½ teaspoon baking soda
    • ½ cup (120 ml) olive oil
    • ½ cup + ½ tablespoon (160 g) granulated sugar
    • 1 teaspoon vanilla extract
    • 2 whole eggs, room temperature
    • 2 egg whites, room temperature
    • 1 teaspoon lemon zest
    • 3 medium-sized Granny Smith apples

    For the maple icing:

    • 3.5 oz (100 g) unsalted butter, softened
    • ½ cup (100 g) golden brown sugar 
    • ⅓ cup (85 ml) maple syrup
    • 7.7 oz (220 g) cream cheese, room temperature

    * If needed, please refer to Baking Conversion Charts.

    **Don't you have the correct baking pan on hand right now? Try this simple Cake Pan Converter!


    Instructions

    1. Preheat oven to 375°F (190°C). Butter an 8-inch (20 cm) springform pan and line its bottom and sides with parchment paper.
    2. Place sultana raisins and water in a saucepan and simmer over low heat until the water is completely absorbed by the dry fruit. Set aside. Peel apples with a vegetable peeler, remove the heart and seeds, and cut into about ⅓ inch (1 cm) cubes.
    3. To make the cake, place olive oil, sugar, and vanilla extract in the bowl of a stand mixer and beat. Gradually add lightly beaten whole eggs and continue to mix until the mixture becomes smooth. Then add apple cubes, sultana raisins, and lemon zest grated with a zester grater and combine with a rubber spatula. Finally, add the sifted dry ingredients (flour, ground cinnamon, salt, baking powder, and baking soda) and mix.
    4. In a clean bowl, beat egg whites with a stand mixer or an electric mixer until soft peaks. Add it into the main preparation in two additions and gently combine it with the spatula. Pour the batter into a cake pan, even the surface with a spoon, and bake for 90 minutes. Check the cake's readiness with a skewer: if it comes out dry, the cake is ready. Remove the cake from the oven and let it cool in the pan.
    5. To make the maple icing, place softened butter, brown sugar, and maple syrup in a bowl and beat until the mixture becomes creamy and smooth. Add cream cheese at room temperature and beat until the cream becomes homogeneous.
    6. To assemble the cake, remove the cold cake from the pan and cut it horizontally using a serrated knife. If the cake is domed after baking, cut the top to even the surface. Place the bottom of the cake on a serving platter and spread half of the maple icing. Place the top half of the cake on the cream layer and cover it with the remaining icing. Even the surface of the cake with a bent spatula or create waves.

    Notes

    1. Bring butter and cream cheese to room temperature about an hour before you start.
    2. Use an 8-inch (20 cm) round cake pan buttered and lined with parchment and precut circle cake pan liners. A springform form facilities the removal of the cake, but a regular cake pan works as well.
    3. Every oven is different: adjust your oven settings to 375°F, 190°C, 170°C fan, or gas mark 5.
    4. Use this simple cake pan converter to recalculate the amount of ingredients for different cake pan sizes. Modify the baking time accordingly: for a 7-inch (18 cm) cake, decrease the baking time by 10 minutes; to make a 6-inch (15 cm) cake, reduce the baking time by 15 to 20 minutes.
    5. Make-ahead option: Bake the cake in advance, wrap it with plastic film, and keep it in the fridge for up to one week. Slice and assemble the cake with maple icing on the day of serving.

    Nutrition

    • Serving Size: 1 slice
    • Calories: 491
    • Sugar: 49 g
    • Sodium: 211 mg
    • Fat: 20.3 g
    • Saturated Fat: 6.8 g
    • Carbohydrates: 74.5 g
    • Fiber: 2.5 g
    • Protein: 6.6 g
    • Cholesterol: 57 mg

    Thank you for following me on Pinterest, Facebook, and Instagram. Hashtag #bakinglikeachef so I can see your creations.

    The nutritional information has been calculated using an online recipe nutrition calculator such as Verywellfit.com and is intended for informational purposes only. These figures should be used as a general guideline and not be construed as a guarantee.

    The recipe was adapted from https://thehappyfoodie.co.uk/. It was originally published on November 21, 2018. The recipe has been revised to include improved content and photos.

    Coffee Swiss Roll (Coffee Roulade)

    Nov 23, 2020 · 16 Comments

    Coffee Swiss roll cake with a slice on a serving board.

    This coffee Swiss roll cake or coffee roulade is a simple dessert made with a biscuit Joconde and generously filled and covered with coffee mascarpone cream. Perfect for coffee lovers.

    Coffee Swiss roll cake with a slice on a serving board

    After making several rich chocolate cakes like Royal chocolate cake, French chocolate cake, and Fondant au chocolat, it is time to please a coffee lover like you and myself with a new coffee-flavored dessert.

    [feast_advanced_jump_to]

    Coffee Swiss roll recipe

    • It is the perfect coffee roll cake with an elegant taste of deliciousness.
    • The recipe is easy and quick to make.
    • It is best served for birthday parties or Christmas as a holiday Yule log.

    BAKING ESSENTIALS CHECKLIST

    Sign up and get a list of the necessary baking tools and ingredients

    FREE DOWNLOAD

    Ingredients

    For ingredients and detailed instructions, refer to the recipe card below.

    • Almonds: Use blanched almonds to grind with a food processor or use a store-bought almond meal.
    • Sugar: Use superfine caster sugar or process granulated sugar in a food processor to make it superfine. Make icing sugar yourself with a coffee grinder or use store-bought powdered sugar.
    • Flour: The recipe calls for all-purpose flour.
    • Butter: Use unsalted butter melted and cooled to room temperature.
    • Eggs: Use whole large eggs and large egg whites. To separate egg whites from egg yolks, use an egg separator.
    • Hazelnuts: Use store-bought roasted hazelnuts or learn how to roast hazelnuts at home.
    • Mascarpone is added to stabilize the whipped cream. Take mascarpone out of the fridge for 15 minutes (at maximum!) before you start making the cream.
    • Heavy cream: Use heavy or heavy whipping cream with at least 30% fat content.
    • Espresso coffee is the star of the coffee roll cake.
    • Instant coffee powder: Opt for your preferred brand of instant coffee. To make instant coffee granules powdered, use either a coffee grinder or mortar and pestle.

    Recipe variations

    • Add one tablespoon of white rum or Grand Marnier to the mascarpone cream if serving the cake to adults.
    • Replace roasted hazelnuts with candied nuts (walnuts, almonds, chestnuts, etc. ).
    • Decorate the cake with meringue mushrooms, nougatine pieces, or other Christmas decorations to serve it as a Yule Log.
    Sliced coffee cake roll on a serving board

    How to make coffee Swiss roll

    Step 1. Preheat the oven to 390°F (200°C) and prepare a non-spill baking sheet (no need to grease it).

    Pro tip: Alternatively, use a silicone baking mat or a 12 x 16 inches (30 x 40 cm) baking sheet lined with parchment paper. Grease the baking tray, then add the parchment paper and lightly grease it.

    Step 2. To make the cake batter, with a hand whisk, mix ground almonds, all-purpose flour, and icing sugar in a mixing bowl.

    Pro tip: Consult the biscuit Joconde recipe for step-by-step photographed explanations, helpful tips, and tricks.

    Step 3. Melt butter in the microwave at 20-second intervals and let it cool.

    Step 4. Place whole eggs in the bowl of a stand mixer with a whisk attachment and whip for a few seconds.

    Step 5. Add the dry ingredients to the egg mixture and mix at medium speed for 3 minutes until creamy and homogeneous. Pour the cooled melted butter and gently mix with a rubber spatula.

    Step 6. In a separate clean bowl, whip egg whites at high speed with an electric hand mixer. Once foamy, gradually add caster sugar and beat until stiff peaks.

    Step 7. Gently fold the beaten egg whites into the almond preparation in two or three batches and carefully mix with a spatula.

    Step 8. Pour batter onto the prepared cake pan, smooth the surface with a long offset spatula, and bake for 10-15 minutes. If baking a silicone mold, place it on the oven rack. The sponge should be slightly golden and spring back with touching.

    Step 9. Remove the cake from the oven. Turn it onto a kitchen or tea towel generously sprinkled with icing sugar. Gently peel the baking mat (photo 1) or the top layer of parchment paper (it was bottom during baking).

    Step 10. Sprinkle the sponge with icing sugar, roll the cake into the towel, and let it rest for 10 minutes (photo 2). Then, unroll it and let it cool to room temperature.

    Sponge cake on a towel with the peeled silicone baking sheet

    PHOTO 1

    Cake rolled in a kitchen towel

    PHOTO 2

    Step 11. To make the coffee mascarpone cream, place the prepared mascarpone (see the tips below) in the bowl of a stand mixer fitted with a whisk attachment. Whip the cheese for a few seconds.

    Step 12. Add cold heavy cream, icing sugar, espresso coffee, and instant coffee powder to the bowl. Mix with a hand whisk to homogenize everything. Then, whisk with the stand mixer until medium peaks.

    Step 13. To roll the cake, spread ⅔ of the cream filling in an even layer and smooth the surface with a bent spatula. Sprinkle with the chopped roasted hazelnuts (photo 3).

    Step 14. Roll the biscuit from the short end, using the kitchen towel to help. Make sure the end of the roll is facing down (photo 4). Tight roll as much as possible.

    Cake with coffee cream and toasted hazelnuts

    PHOTO 3

    Cake with cream wrapped in a kitchen towel

    PHOTO 4

    Step 15. Refrigerate it, still in the towel, for 4 hours. Wrap the bowl with the remaining cream with plastic film and refrigerate.

    Step 16. To decorate the cake, with a sharp knife, cut the ends of the cake for a neat appearance (photo 5). Spread coffee cream over the top of the cake (photo 6).

    Rolled cake with a sliced end on parchment paper

    PHOTO 5

    PHOTO 6

    Leave it plain or decorate it in the way you desire.

    Sliced coffee cake roll with a fork on a serving board

    Storing and freezing

    To ensure the freshness of the cake, apply the coffee mascarpone cream to the cake 1-2 hours before serving: the mascarpone-based cream dries out quickly. Keep the cake rolled in a towel in the refrigerator until you are ready to complete it.

    Store leftover cake in the fridge for up to 24 hours. It is not recommended to freeze it.

    Expert Tips

    • If using a smaller Swiss roll pan, read how to line a Swiss roll tin and recalculate ingredients with a cake pan converter.
    • For the best mascarpone cream, use chilled mascarpone that is slightly softened. Remove it from the fridge 15 minutes before making the cream.
    • If the cream starts curding, gently heat it in a water bath while whisking. Once the lumps disappear, stop heating. Allow the cream to cool to room temperature, then whip it briefly for a few seconds.
    • Keep the cake wrapped in a towel until you are ready to assemble it. Because the mascarpone cream can dry out rapidly, it is recommended to assemble the cake 1-2 hours before serving and keep it refrigerated until ready to serve.
    • Make ahead option: Bake the biscuit, roll it with ⅔ of the cream, and wrap it with a kitchen towel one day ahead. Store the rolled cake and cream covered with cling film in the fridge. Next day, one hour before serving, decorate the cake with cream, nuts, or chocolate crisps, and keep it in the refrigerator until serving.

    Recipe FAQ

    What is biscuit Joconde?

    Biscuit Joconde is a light sponge cake with ground almonds, eggs, all-purpose flour, sugar, and butter. It takes its name from the French La Joconde, meaning Mona Lisa.

    Want more delicious and beautiful recipes? Subscribe to my newsletter and follow me on Facebook, Pinterest, and Instagram for my latest updates. If you make this recipe, please leave a star rating on the recipe card and comment below!

    Print

    Recipe card

    Coffee Swiss Roll (Coffee Roulade)

    Coffee Swiss roll cake with a slice on a serving board.
    Print Recipe
    Save Recipe Recipe Saved

    5 Stars 4 Stars 3 Stars 2 Stars 1 Star

    5 from 6 reviews

    This coffee Swiss roll or coffee roulade is a simple dessert made with a biscuit Joconde and generously filled and covered with coffee mascarpone cream. Perfect for coffee lovers.

    • Author: Irina Totterman
    • Total Time: 1 hour, 15 minutes (plus chilling time)
    • Yield: 8 1x
    • Category: Cakes
    • Method: Baking
    • Cuisine: French

    Ingredients

    Scale

    For the biscuit Joconde:

    • ⅔ cup + 2 tablespoons (100 g) icing (powdered) sugar
    • 1 cup (100 g) ground almonds (almond meal)
    • 2 ½ large whole eggs (125 g), room temperature (note #1)
    • 1 ½ tablespoons (20 g) unsalted butter, melted
    • 3 tablespoons (25 g) all-purpose flour
    • 5 small egg whites (125 g), room temperature (note #2)
    • 3 tablespoons (40 g) caster sugar

    For the mascarpone cream:

    • ½ cup + 1 ½ tablespoons (140 g) mascarpone cheese, slightly softened (note #4)
    • 1 cup minus 2 tablespoons (300 g) cold heavy cream, 30% fat
    • ½ cup (65 g) icing (powdered) sugar
    • 1 ½ tablespoons of cold espresso coffee
    • ¾ tablespoon instant coffee powder

    For assembling:

    • 1.2 oz. (35 g) roasted hazelnuts

    *Don't you have the correct baking pan on hand right now? Try this simple Cake Pan Converter!

    ** If needed, please refer to Baking Conversion Charts.

    Instructions

    1. Preheat the oven to 390°F (200°C) and prepare a non-spill baking sheet (no need to grease it). Or use a silicone baking mat or a 12 x 16 inches (30 x 40 cm) baking sheet lined with parchment paper. Grease the baking tray, then add the parchment paper and lightly grease it.

    2. To make the cake batter, with a hand whisk, mix ground almonds, all-purpose flour, and icing sugar in a mixing bowl.

    3. Melt butter in the microwave at 20-second intervals and let it cool.

    4. Place whole eggs in the bowl of a stand mixer with a whisk attachment and whip for a few seconds.

    5. Add the dry ingredients to the egg mixture and mix at medium speed for 3 minutes until creamy and homogeneous. Pour the cooled melted butter and gently mix with a rubber spatula.

    6. In a separate clean bowl, whip egg whites at high speed with an electric hand mixer. Once foamy, gradually add caster sugar and beat until stiff peaks.

    7. Gently fold the beaten egg whites into the almond preparation in two or three batches and carefully mix with a spatula.

    8. Pour batter onto the prepared cake pan, smooth the surface with a long offset spatula, and bake for 10-15 minutes. If baking a silicone mold, place it on the oven rack. The sponge should be slightly golden and spring back with touching.

    9. Remove the cake from the oven. Turn it onto a kitchen or tea towel generously sprinkled with icing sugar. Gently peel the baking mat or top layer of parchment paper (it was bottom during baking).

    10. Sprinkle the sponge with icing sugar, roll the cake into the towel, and let it rest for 10 minutes. Then, unroll it and let it cool to room temperature.

    11. To make the coffee mascarpone cream, place the prepared mascarpone (see the notes) in the bowl of a stand mixer fitted with a whisk attachment. Whip the cheese for a few seconds.

    12. Add cold heavy cream, icing sugar, espresso coffee, and instant coffee powder to the bowl. Mix with a hand whisk to homogenize everything. Then, whisk with the stand mixer until medium peaks.  

    13. To roll the cake, spread ⅔ of the cream filling in an even layer and smooth the surface with a bent spatula. Sprinkle with the chopped roasted hazelnuts.

    14. Roll the biscuit from the short end, using the kitchen towel to help. Make sure the end of the roll is facing down. Tight roll as much as possible. Refrigerate it, still in the towel, for 4 hours. Wrap the bowl with the remaining cream with plastic film and refrigerate.

    15. To decorate the cake, with a sharp knife, cut the ends of the cake for a neat appearance. Spread the remaining coffee cream over the top of the cake. Decorate it in the way you desire.

    Notes

    1. 125 g whole eggs are approximately equal to ½ cup.
    2. 125 g egg whites are approximately equal to ½ cup.
    3. If using a smaller Swiss roll pan, read how to line a Swiss roll tin and recalculate ingredients with a cake pan converter.
    4. For the best mascarpone cream, use chilled mascarpone that is slightly softened. Remove it from the fridge 15 minutes before making the cream.
    5. If the cream starts curding, gently heat it in a water bath while whisking. Once the lumps disappear, stop heating. Allow the cream to cool to room temperature, then whip it briefly for a few seconds.
    6. Keep the cake wrapped in a towel until you're ready to assemble it. Because the mascarpone cream can dry out rapidly, it's recommended to assemble the cake 1-2 hours before serving and keep it refrigerated until ready to serve.
    7. Make ahead option: Bake the biscuit, roll it with ⅔ of the cream, and wrap it with a kitchen towel one day ahead. Store the rolled cake and cream covered with cling film in the fridge. Next day, one hour before serving, decorate the cake with cream, nuts, or chocolate crisps, and keep it in the refrigerator until serving. 

    Nutrition

    • Serving Size: 1 slice
    • Calories: 478
    • Sugar: 26.3 g
    • Sodium: 63 mg
    • Fat: 34.5 g
    • Saturated Fat: 16.7 g
    • Carbohydrates: 33.5 g
    • Fiber: 1.7 g
    • Protein: 8.9 g
    • Cholesterol: 137 mg

    Thank you for following me on Pinterest, Facebook, and Instagram. Hashtag #bakinglikeachef so I can see your creations.

    The nutritional information has been calculated using an online recipe nutrition calculator such as Verywellfit.com and is intended for informational purposes only. These figures should be used as a general guideline and not be construed as a guarantee.

    The recipe was adapted from Femme Actuelle. It was originally published on December 17, 2018. It has been revised to include the improved recipe and photos. 

    Mandarin and Gingerbread Pavlova

    Nov 19, 2020 · 50 Comments

    Mandarin Gingerbread pavlova on a serving plate.

    This easy mandarin and Gingerbread Pavlova is a delicious twist on traditional Christmas desserts during the holiday season. Give a try to the perfect combination of spiced meringue, fluffy mascarpone whipped cream, and tangy citrus.

    Mandarin Gingerbread pavlova on a serving plate.

    Mandarin and Gingerbread Pavlova recipe

    As a traditional Australian Christmas dessert, Pavlova is made all year round. Interestingly, winter Pavlova is a great alternative to holiday gingerbread desserts worldwide: Pain d'epices, Gingerbread madeleines, or mini Gingerbread men cookies.

    [feast_advanced_jump_to]

    Scents of Gingerbread and a Christmas tree are the best indications of the festive season each year. Warm spices bring an unbeatable flavor and holiday spirit.

    BAKING ESSENTIALS CHECKLIST

    Sign up and get a list of the necessary baking tools and ingredients

    FREE DOWNLOAD

    What about mandarins? Mandarins are treated with special care in Chinese culture. The Chinese word for "mandarin"-Kam-sounds similar to the word for "gold." Having mandarins in your home at New Year is considered to bring riches into your life.

    So why not team up gingerbread and mandarins to create a Christmas Pavlova to celebrate the New Year holiday? It's also a bonus that it makes your house smell amazing! 

    A single slice of Gingerbread Pavlova on a dessert plate.

    Ingredients

    Mandarin and Gingerbread Pavlova ingredients.

    For ingredients and detailed instructions, refer to the recipe card below.

    • Egg whites: Use large egg whites at room temperature, helping them reach their maximum volume. To facilitate separating egg whites from the yolks, use chilled eggs and an egg separator.
    • Granulated sugar: I usually process granulated sugar in a food processor for a few seconds to obtain superfine sugar or use caster sugar. It dissolves easier while making the meringue. 
    • White wine vinegar stabilizes the whisked egg whites while making the meringue. Replace it with the same amount of lemon juice or cream of tartar.
    • Corn starch is an essential ingredient to create a soft marshmallow center of the Pavlova. Replace it with potato starch if preferred.
    • Spices: Use ground spices such as cinnamon, clove, nutmeg, and ginger.
    • Heavy cream: Choose heavy or heavy whipping cream with at least 30% fat content.
    • Mascarpone is added to stabilize the whipped cream.
    • Mandarins: Use organic, untreated mandarins.
    • Citrus juice: Use a citrus squeezer to make lemon and orange juice.
    • Maple syrup: Replace it with golden syrup or light corn syrup if desired.
    Gingerbread Pavlova with mandarin on a serving platter.

    How to make mandarin and gingerbread Pavlova

    Step 1. Preheat the oven to 230°F (110°C). Line a baking sheet with parchment paper and draw a circle 8-inch (20 cm) in diameter with a pencil. Turn the parchment over so that the pencil line is facing down.

    Step 2. To make the meringue, with an electric mixer or a stand mixer, whisk egg whites and salt together until soft peaks form.

    Whisked egg whites in a bowl.

    Step 3. Whisk in the sugar (one spoonful at a time) until the meringue is stiff and glossy. Add white wine vinegar and cornstarch and beat for a few more seconds.

    Meringue on parchment paper.

    Step 4. Use a large metal spoon to mound the meringue on a baking sheet.

    Unbaked meringue shell on parchment paper.

    Step 5. With a flour sifter, sprinkle spices over the meringue and create a meringue dome using a rubber or bent spatula.

    Baked meringue shell on parchment paper.

    Step 6. Bake at 230°F (110°C) for 20 minutes, then reduce heat to 210°F (100°C), and bake for an additional 1 hour 15 minutes.

    Step 7. Turn off the oven and leave the meringue in the oven, with the door closed, for 3 to 4 hours (better overnight) until cooled completely.

    Step 8. To make the mascarpone whipped cream, beat cold heavy cream cream with an electric mixer. While whisking, add mascarpone and sugar and whisk until medium peaks.

    Pro tip: Consult the mascarpone frosting recipe for step-by-step photographed explanations, helpful tips, and tricks.

    Step 9. To prepare mandarins, peel mandarins, divide them into segments, cut each segment in half (if desired), and discard pips.

    Step 10. To make the sticky sauce, peel 3 strips of zest from a mandarin.

    Sticky sauce in a saucepan.

    Step 11. In a saucepan, combine zest strips, cinnamon sticks, juices, and syrup and bring it to a boil for about 6 minutes or until the syrup is reduced to ⅓ cup (about 80 ml). Remove and discard zest strips and cinnamon. Set aside to cool.

    A mandarin wedge in hand above the assembled meringue.

    Step 12. To assemble the Pavlova, place the meringue on a serving platter or a cake stand. Generously garnish it with mascarpone frosting and top it with mandarins.

    Step 13. Pour the sticky source all over.

    Assembled Gingerbread Pavlova on a serving plate.

    Expert Tips

    Check out a few quick tips to ensure your Pavlova is perfect. 

    1. Top the meringue with mascarpone frosting and mandarin slices shortly before serving; otherwise, the meringue will soften and break down due to the mascarpone whipped cream and syrupy fruit's moisture.
    2. Make-ahead option: Bake the meringue dome a day in advance, leave it in the closed oven, and decorate it the next day.

    Recipe variations

    • Flavorings: Experiment with spices in the meringue recipe, increasing each of them up to one teaspoon.
    • Toppings: Replace mandarin wedges with other citrus fruits (oranges or grapefruit). Learn here how to supreme oranges.
    • Decoration: Make gingerbread snowflake cookies by following a recipe for Gingerbread cookie ornaments and caramel tree decorations. Or decorate your Pavlova with store-bought gingerbread cookies, crumbling cookies if desired.

    Storing and freezing

    Gingerbread Pavlova is best enjoyed right after it is assembled. Store leftovers in the refrigerator and eat within 24 hours.

    Can you freeze Pavlova? Unfortunately, you can not freeze the assembled Pavlova, but you can freeze the meringue dome.

    Place the cooled meringue on a baking sheet lined with parchment and freeze for at least 3 hours or longer. Place it in a freezer-friendly bag, press out as much air as possible, seal and label the bag, and freeze for up to three months.

    To thaw, bring the Pavlova meringue to the kitchen counter 2 to 3 hours before serving. Cover the meringue shell with a paper towel while defrosting. Then decorate it with cream and fruit.

    Love holiday desserts? Try these next!

    • French Gingerbread Loaf
    • Oatmeal Craisin Cookies
    • Christmas meringue spheres
    • Bredele (Alsatian Christmas Cookies)
    • Or browse all the Christmas recipes

    Want more delicious and beautiful recipes? Subscribe to my newsletter and follow me on Facebook, Pinterest, and Instagram for my latest updates. If you make this recipe, please leave a star rating on the recipe card and comment below!

    Print

    Recipe card

    Mandarin and Gingerbread Pavlova

    Mandarin Gingerbread pavlova on a serving plate.
    Print Recipe
    Save Recipe Recipe Saved

    5 Stars 4 Stars 3 Stars 2 Stars 1 Star

    5 from 23 reviews

    Mandarin and Gingerbread Pavlova is a delightful twist on traditional Christmas desserts during the holiday season. It is made with spiced meringue, fluffy mascarpone whipped cream, and tangy citrus.

    • Author: Irina Totterman
    • Total Time: 3 hours, 30 minutes (plus resting time)
    • Yield: 8 1x
    • Category: Cakes
    • Method: Baking
    • Cuisine: Australian

    Ingredients

    Scale

    For the meringue:

    • 6 egg whites, room temperature
    • 1 ½ cups (330 g) granulated sugar 
    • 1 tablespoon white wine vinegar
    • 2 teaspoons corn starch
    • 1 pinch of salt
    • ½ teaspoon ground cinnamon
    • ¼ teaspoon ground clove
    • ½ teaspoon ground nutmeg
    • ½ teaspoon ground ginger

    For the mascarpone whipped cream:

    • 1 cup + 4 tablespoons (300 g) cold heavy cream, 30% fat
    • 3 ½ tablespoons (50 g) cold mascarpone cheese
    • 2 tablespoons (15 g) icing sugar

    For the topping:

    • 6 mandarins

    For the sticky sauce:

    • 3 mandarin zest strips
    • 1 cinnamon stick
    • ½ cup (125 ml) orange juice
    • 1 tablespoon lemon juice
    • 2 tablespoons maple syrup

    *Don't you have the correct baking pan on hand right now? Try this simple Cake Pan Converter!

    ** If needed, please refer to Baking Conversion Charts.

    Instructions

    1. Preheat oven to 230°F (110°C). Line a baking sheet with the parchment paper and draw a circle 8-inch (20 cm) in diameter with a pencil. Turn the parchment over so that the pencil line is facing down.
    2. To make the meringue, with an electric or a stand mixer, whisk egg whites and salt together until soft peaks form. Whisk in the sugar a spoonful at a time until the meringue is stiff and glossy. Add white wine vinegar and corn starch, and beat a few more seconds. 
    3. Use a large metal spoon to mound the meringue on a baking sheet. With a flour sifter, sprinkle spices over the meringue and create a meringue dome, using a bent or rubber spatula.
    4. Bake the meringue shell at 230°F (110°C) for 20 minutes, then reduce heat to 210°F (100°C). Bake for an additional 1 hour 15 minutes.
    5. Turn off the oven and leave the meringue in the oven, with the door closed, for 3 to 4 hours (better overnight) until cooled completely.
    6. To prepare mandarins, peel mandarins, divide into segments, cut each segment in half (if desired), and discard pips.
    7. To make the sticky sauce, peel 3 strips of zest from a mandarin. In a saucepan, combine zest strips, cinnamon stick, juices and syrup and bring to a boil for a bout 6 minutes or until the syrup reduced to ⅓ cup. Remove and discard zest strips and cinnamon. Set aside to cool.
    8. To make the mascarpone whipped cream, beat cold heavy cream with an electric mixer. While whisking, add mascarpone and sugar, and whisk until medium peaks. 
    9. To assemble the cake, place the meringue on a serving platter or a cake stand. Generously garnish it with mascarpone frosting, top with mandarins, and pour with the sticky sauce.

    Notes

    1. Process granulated sugar in a food processor for a few seconds to obtain superfine sugar or use caster sugar. It helps dissolve easier while making the meringue.  
    2. Top the meringue with the mascarpone frosting  and mandarin slices shortly before serving; otherwise, the meringue will soften and break down due to the moisture of the whipped cream and syrupy fruit.
    3. Make-ahead option: Bake the meringue dome a day in advance, leave it in the closed oven, and decorate it the next day.

    Nutrition

    • Serving Size: 1 slice
    • Calories: 385
    • Sugar: 54.2 g
    • Sodium: 63 mg
    • Fat: 16.8 g
    • Saturated Fat: 10.5 g
    • Carbohydrates: 58 g
    • Fiber: 1 g
    • Protein: 4.5 g
    • Cholesterol: 58 mg

    Thank you for following me on Pinterest, Facebook, and Instagram. Hashtag #bakinglikeachef so I can see your creations.

    The nutritional information has been calculated using an online recipe nutrition calculator such as Verywellfit.com and is intended for informational purposes only. These figures should be used as a general guideline and not be construed as a guarantee.

    The recipe was originally published on January 01, 2020. It has been updated and may differ from what was originally published.

    For reference, if you have made this recipe previously and want to replicate it, the original recipe called for caramel tree decorations made with ⅓ cup (75 g) granulated sugar and 2 tablespoons (30 ml) water.

    To make caramel tree decorations, prepare parchment paper. Bring sugar and water in a saucepan over low to medium heat and cook, without stirring, for 12 to 13 minutes or until golden color.

    Set aside for 2 minutes or until the caramel begins to thicken slightly. Use a spoon to carefully drizzle the caramel to form tree shapes on the parchment. Set aside to cool and set.

    Christmas Pavlova Wreath

    Nov 12, 2020 · Leave a Comment

    Christmas Pavlova wreath on a serving plate.

    This Christmas Pavlova wreath is a festive meringue with a marshmallow-like center and crispy exterior, perfect for the festive time of the year. Topped with fresh fruit and sweetened whipped cream, it is the most delicious way to celebrate Christmas. 

    Christmas Pavlova wreath on a serving plate.

    Love for Pavlova doesn't depend upon a day or a holiday. If you have a sweet tooth for Pavlova dessert, you could probably eat this Australian (or New Zealand) invention every day.

    In the summertime, make the most delicious Cinnamon Pavlova and benefit from fresh figs.

    [feast_advanced_jump_to]

    Closer to the fall, take turns with Plum Pavlova. Also, try experimenting with making cherry boozy Pavlova by replacing plums with cherries.

    BAKING ESSENTIALS CHECKLIST

    Sign up and get a list of the necessary baking tools and ingredients

    FREE DOWNLOAD

    Finally, once the most festive season arrives, enjoy gingerbread in all its kinds: Gingerbread Pavlova, Gingerbread cookie ornaments, and the tastiest French Gingerbread Loaf.

    A single slice of Pavlova wreath on a dessert plate.

    Pavlova wreath recipe

    • Christmas Pavlova wreath represents a decorative sign of Christmas. It is a perfect fit for those who have snow in winter.
    • With effortless making, it is a last-minute holiday dessert.
    • It is a festive twist on classic Pavlova.
    • This elegant dessert is great for those with dietary restrictions since it is gluten-free.
    • You can create your own Pavlova using fruit preserves and fresh fruits of your choice.

    Ingredients

    For ingredients and detailed instructions, refer to the recipe card below.

    • Egg whites: Use large egg whites at room temperature. Use an egg separator to separate egg whites from the yolks while the eggs are chilled. Then let egg whites reach room temperature: it helps them reach their volume when beaten.
    • Sugar: The recipe calls for superfine white sugar - caster sugar. To facilitate whisking the meringue, process granulated sugar in a food processor for a few seconds to make it superfine.
    • White vinegar helps stabilize the whisked egg whites while making the meringue. Replace it with the same amount of lemon juice or cream of tartar.
    • Corn starch is essential to creating a soft marshmallow center, a Pavlova dessert's signature. You can replace it with potato starch.
    • Heavy cream: Opt for cold heavy or heavy whipping cream with at least 30% fat content.
    • Icing sugar: Make it yourself with a coffee grinder or use store-bought powdered sugar.
    • Vanilla extract: Use Madagascar Bourbon pure vanilla extract or replace it with an alcohol-free vanilla flavor if preferred.
    • Fresh fruits: Use a combination of fresh red berries (fresh strawberries, raspberries, etc.) or fruits of your choice.
    Meringue wreath with red fruit on top on a serving plate.

    How to make Christmas Pavlova wreath

    Step 1. Preheat the oven to 230°F (110°C). Prepare a baking sheet covered with parchment paper.

    Step 2. Mark an 8-inch (20 cm) circle on the baking parchment and flip the paper ink-side down to ensure no marks transfer to the meringue. 

    Step 3. To make the meringue, place egg whites in a large mixing bowl and beat with an electric whisk at high speed.

    Step 4. Gradually add sugar, one spoon at a time, beating until sugar dissolves and the meringue forms stiff peaks (photo 1).

    Step 5. Add cornflour and white wine vinegar, and whisk until just combined, about 20 to 30 seconds (photo 2).

    Meringue with a stiff peak on a mixer beater over the bowl.

    PHOTO 1

    Meringue in a metal bowl.

    PHOTO 2

    Step 6. Using a large metal spoon, spoon 8 to 10 large dollops of meringue close together to form a wreath shape (photo 3).

    Step 7. Bake in the preheated oven at 230°F (110°C) for 20 minutes, then reduce heat to 210°F (100°C). Bake for a further 1 hour 15 minutes. 

    Step 8. Turn off the oven and allow Pavlova to cool, with the oven door closed, for about 3 to 4 hours (photo 4).

    Meringue mounds on parchment paper.

    PHOTO 3

    Baked meringue wreath on parchment paper.

    PHOTO 4

    Step 9. To make sweetened whipped cream, beat heavy cream, powdered (icing) sugar, and vanilla until soft peaks form.

    Pro tip: Consult the Chantilly cream recipe for step-by-step photographed explanations, helpful tips, and tricks.

    Step 10. To assemble Pavlova, place the meringue wreath on a serving platter and top with the sweetened whipped cream (photo 5).

    Step 11. Decorate Pavlova with fresh strawberries, raspberries, pomegranate seeds, and chopped pistachios (photo 6).

    Meringue wreath topped with whipped cream.

    PHOTO 5

    Decorated Pavlova wreath on a serving platter.

    PHOTO 6

    To serve, sprinkle pavlova with powdered (icing) sugar if desired.

    Christmas Pavlova wreath on a serving platter.

    Expert Tips

    1. Ensure you use a clean bowl and avoid even a tiny drop of egg yolk while separating the eggs.
    2. If fresh fruits are out of season, sprinkle the top of Pavlova with fruit preserves, freeze-dried berries, and chopped nuts.
    3. Assemble Pavlova at the last minute, right before serving.
    4. Make ahead option: Prepare the meringue base a day ahead and keep it in the oven. Alternatively, bake the Pavlova shell two days in advance and store it in a sealed container in a cool, dry area. Chill the bowl and whip the cream, then cover it with plastic film and refrigerate for up to one day. Finally, assemble the dessert before serving.

    Recipe variations

    Christmas Pavlova is a classic for those who live in Australia and New Zealand.

    Shaped traditionally as a dome or wreath or making mini Pavlovas topped with whipped cream and seasonal fruits is what this holiday offers best.

    • Experiment with the number of meringue rounds to shape the wreath. Typically, it ranges from 8 to 12.
    • Play with fruit jams, preserves, and your favorite fruits to bring new tastes and flavors. You will want to bring the holiday colors like red, white, and green with fresh raspberries, pomegranate seeds, and mint leaves.
    • Use other Pavlova toppings such as oranges, chocolate sauce, red and green sprinkles, you name it.

    Storing and freezing

    Pavlova is best assembled at the moment of serving. Store leftover Pavlova in the fridge and consume it within 24 hours.

    If making the Pavlova base in advance, store it in an airtight container in a dry, cool place. Don't refrigerate it; otherwise, it will absorb moisture and lose its crispness.

    Can you freeze the Pavlova dessert? It is not recommended to freeze the assembled Pavlova, but you can freeze the meringue shell.

    Bring the baking tray with the meringue to the freezer for a few hours. Once it is solid, double cover the meringue shell with plastic wrap, then aluminum foil, and freeze for up to one month.

    To thaw, unwrap it, place it on a serving platter, and let it thaw for about 3 hours at room temperature.

    Recipe FAQ

    Why does Pavlova go brown after baking?

    If Pavlova turns brown after baking, it was baked in the hot oven. You might need to check the oven temperature with an instant-read oven thermometer and experiment. Next time, try to bake Pavlova at a slightly lower temperature but a bit longer.

    What causes Pavlova to collapse?

    Pavlova usually cracks and collapses due to rapid temperature changes. To prevent it, the Pavlova base has to be cooled down slowly: leave your Pavlova in the oven overnight. If you are in a hurry, leave it in the oven for at least 3 to 4 hours.

    How to store a Pavlova

    Store the assembled Pavlova in the refrigerator and consume it within the next 24 hours.

    Love meringue desserts? Try these next!

    • Meringue Cake Merveilleux
    • Meringue Roulade
    • Giant Meringue
    • Plum Pavlova
    • Or browse all the cake recipes

    Want more delicious and beautiful recipes? Subscribe to my newsletter and follow me on Facebook, Pinterest, and Instagram for my latest updates. If you make this recipe, please leave a star rating on the recipe card and comment below!

    Print

    Recipe card

    Christmas Pavlova Wreath

    Christmas Pavlova wreath on a serving plate.
    Print Recipe
    Save Recipe Recipe Saved

    5 Stars 4 Stars 3 Stars 2 Stars 1 Star

    No reviews

    Christmas Pavlova wreath is a festive meringue with a marshmallow-like center and crispy exterior, perfect for the festive time of the year. Topped with fresh red fruit and sweetened whipped cream, it is the most delicious way to celebrate Christmas. 

    • Author: Irina Totterman
    • Total Time: 1 hour, 30 minutes (plus resting time)
    • Yield: 8 1x
    • Category: Cakes
    • Method: Baking
    • Cuisine: Australian
    • Diet: Gluten Free

    Ingredients

    Scale

    For the meringue:

    • 4 egg whites, room temperature
    • ¾ cup + 2 tablespoons (200 g) caster sugar 
    • 1 teaspoon white vinegar
    • 1 tablespoon cornstarch

    For the sweetened whipped cream:

    • 1 ¼ cups + 1 tablespoon (300 ml) cold heavy cream, 30% fat
    • 1 tablespoon powdered (icing) sugar
    • ½ teaspoon vanilla extract

    For decoration:

    • (200 g) fresh strawberries
    • 200 g fresh raspberries
    • ¼ pomegranate
    • few raw pistachios
    • 1 tablespoon powdered (icing) sugar

    *Don't you have the correct baking pan on hand right now? Try this simple Cake Pan Converter!

    ** If needed, please refer to Baking Conversion Charts.

    Instructions

    1. Preheat the oven to 230°F (110°C). Prepare a baking sheet covered with parchment paper. Mark an 8-inch (20 cm) circle on parchment paper and flip the parchment to ensure no marks transfer to the meringue. 

    2. To make the meringue, place egg whites in a large bowl and beat with an electric mixer at high speed.

    3. Gradually add caster sugar, one spoon at a time, beating until the sugar dissolves and the meringue is stiff, thick, and glossy.

    4. Add cornflour and white wine vinegar, and whisk for 20 to 30 seconds until just combined.

    5. Using a large metal spoon, spoon 8 to 10 dollops of meringue close together to form a wreath shape. 

    6. Bake at 230°F (110°C) for 20 minutes, then reduce heat to 210°F (100°C). Bake for a further 1 hour 15 minutes. Turn off the oven and allow Pavlova to cool, with the door closed, for about 3 to 4 hours.

    7. To make sweetened whipped cream, beat heavy cream, powdered sugar, and vanilla until soft peaks form.

    8. To assemble Pavlova, place the meringue wreath on a serving platter and top with the whipped cream. Decorate Pavlova with fresh fruit, pomegranate seeds, chopped pistachios, and sprinkle with powdered sugar.

    Notes

    1. Ensure you use a clean bowl and avoid even a tiny drop of egg yolk while separating the eggs. 
    2. If fresh fruits are out of season, sprinkle the top of Pavlova with fruit preserves, freeze-dried berries, and chopped nuts. 
    3. Assemble Pavlova at the last minute, right before serving. 
    4. Make ahead option: Prepare the meringue base a day ahead and keep it in the oven. Alternatively, bake the Pavlova shell two days in advance and store it in a sealed container in a cool, dry area. Chill the bowl and whip the cream, then cover it with plastic film and refrigerate for up to one day. Finally, assemble the dessert before serving.

    Nutrition

    • Serving Size: 1 slice
    • Calories: 269
    • Sugar: 30.1 g
    • Sodium: 32 mg
    • Fat: 14.3 g
    • Saturated Fat: 8.8 g
    • Carbohydrates: 37.9 g
    • Fiber: 2.2 g
    • Protein: 3.1 g
    • Cholesterol: 52 mg

    Thank you for following me on Pinterest, Facebook, and Instagram. Hashtag #bakinglikeachef so I can see your creations.

    The nutritional information has been calculated using an online recipe nutrition calculator such as Verywellfit.com and is intended for informational purposes only. These figures should be used as a general guideline and not be construed as a guarantee.

    The recipe was originally published on December 24, 2018. It has been updated and may differ from what was originally published.

    Concorde Cake (Gateau Concorde)

    Oct 28, 2020 · 26 Comments

    Concord cake (gâteau Concorde) on a marble board with dessert plates in the background.

    If you look for a chocolate meringue cake, this Concorde cake (gâteau Concorde in French) will surely please your guests. It is a chocoholic's dream made with crisp meringue layers sandwiched with luscious chocolate mousse and topped with chocolate shavings.

    Sliced chocolate meringue cake Concorde on a cake board

    Cake Concorde has an interesting history. It was created in honor of the mythical French aircraft Concorde in the early 1970s, while Gaston Lenôtre was a chef of the catering on the lines Air France.

    According to Madam Mercotte, the French Chef Mr. Lenôtre

    "[has] raised the pastry to the rank of art and paved the way for many world-famous pastry chefs known today."

    Concorde cake also has different spelling as Concord cake. It is translated as gâteau Concorde in French.

    BAKING ESSENTIALS CHECKLIST

    Sign up and get a list of the necessary baking tools and ingredients

    FREE DOWNLOAD

    Decorated Concorde cake with plates and a wine bottle in the background
    [feast_advanced_jump_to]

    Concorde cake

    Gaston Lenôtre was a French chef who invented the Concorde cake. Later, it was recreated by many chefs around the world.

    Israeli Chef Gadi Peleg, an owner of Breads Bakery in Manhattan, was inspired by his favorite cake sold in now-closed Soutine Bakery and created his own Concord cake version.

    He simplified the decoration of the cake, covering it entirely with meringue sticks. 

    So, if you feel uncomfortable with tempering chocolate, this type of Concord cake assembling is for you.

    Madam Mercotte slightly modified the Concorde cake recipe and offered it as a technical test for five amateur pastry chefs during Le Meilleur Pâtissier Saison 6 émission 7, Douce France.

    I adapted her recipe and left the cake's decoration with chocolate shavings/chips on top.

    It is probably the most challenging part of making the cake.

    Chocolate meringue cake on a marble board: Overhead view

    How to decorate Concorde cake

    French gâteau Concorde, meaning Concord(e) cake in English, is decorated with the tempered chocolate shavings on top of the cake, arranged in a swirl's shape.

    If you have a cooking thermometer, trust me that you can master this technique, even at the first attempt.

    Follow the water bath method to temper chocolate, and you will succeed!

    In the worst scenario, make chocolate shavings out of a chocolate bar, using a knife or a vegetable peeler, and decorate the top of the cake.

    It is the same technique used to make Meringue Cake Merveilleux.

    Another way to decorate Concorde cake is to make meringue sticks using Ateco plain pastry tip 806 instead of Ateco plain pastry tip 809 used in the recipe below.

    You will end up with smaller and neat meringue sticks to cover the cake entirely. Arrange them so that they are poking up in different directions.

    Why you should try this recipe

    1. This deliciously decadent cake is perfect for any special event: serve it for Christmas, birthday party, Easter, or a family barbeque party.
    2. It is a chocolate meringue cake to satisfy your sweet tooth.
    3. Concord cake recipe has a make-ahead option: make meringue disks and sticks and prepare chocolate shavings in advance and save time on the day of assembling the dessert.
    4. The cake is gluten-free; so, no worries about serving the cake for a crowd.
    5. Decorating the cake is very forgiving: cover the cake with meringue sticks completely instead of using tempered chocolate shaving.
    A slice of Concord cake (Gâteau Concorde) with the rest of the cake

    Ingredients

    For ingredients and detailed instructions, refer to the recipe card below.

    Egg whites: the recipe calls for large egg whites. Separate egg whites from the yolks while eggs are chilled. Use an egg separator to facilitate this step.

    Sugar: for the best results, use caster sugar or superfine baker's sugar. You can make superfine sugar yourself by processing granulated sugar in a food processor bowl for a few seconds.

    Icing sugar: make it yourself by using a coffee grinder or use a store-bought powdered sugar.

    Cocoa powder: use unsweetened cocoa powder to make the cake.

    Whipping cream: use whipping cream with at least 35% or more milk fat.

    Dark chocolate: to make this chocolate cake, use high-quality dark chocolate such as Scharffen Berger dark chocolate or Valrhona dark chocolate.

    The authentic recipe for Concorde cake calls for Valrhona dark chocolate Caraibe.

    How to make Concorde cake

    To make the chocolate meringue, preheat the oven to 240 F/115 C.

    Using a flour sifter, sift icing (powdered) sugar and cocoa powder, and set aside.

    Place egg whites in a stand mixer recipient and beat until stiff. Gradually add granulated (caster) sugar and whisk until glossy (photo 1).

    Add the dry mixture of icing sugar with cocoa powder and gently mix with a rubber spatula (photo 2).

    Photo 1: Beaten egg whites in a bowl Photo 2: Chocolate meringue in a bowl
    PHOTO 1 PHOTO 2

    Prepare two parchment paper sheets and draw three discs with a diameter of 6 ½-inch/17 cm. Flip paper sheets so that the drawn circles will be facing down.

    Transfer the chocolate meringue to a pastry bag with Ateco plain pastry tip 809 and pipe three meringue disks in a spiral within the pencil marks (photo 3).

    Also, push a few rows of long meringue sticks around disks, using the same pastry tip.

    Dip a knife in melted butter and cut meringue "sausages" into segments of 25/32-inch (almost 1 inch)/2 cm (photo 4).

    Photo 3: Two meringue disks on parchment Photo 4: Meringue disk and  meringue sticks on parchment
    PHOTO 3 PHOTO 4

    Bake for 1 hour. Remove from the oven and let the meringue cool down. Break the meringue sticks (photo 5).

    To make the chocolate mousse, melt dark chocolate using a bain-marie/water bath or a microwave (mix chocolate every 30 seconds).

    Bring ⅔ cup + 1 tablespoons (170 g) whipping cream to a boil and pour cream in 3 times over chocolate, mixing well with the spatula (photo 6). Keep the mixture at 113 F/45 C (maximum).

    Photo 5: Baked meringue on the parchment
Photo 6: A chocolate mixture in a metal bowl
    PHOTO 5 PHOTO 6

    In a separate bowl, whisk 1 ½ cups (340 g) whipping cream to get a softly whipped cream.

    Add whipped cream to the chocolate preparation (photo 7), mix, and use immediately. Do not refrigerate!

    To make dark chocolate shavings, temper chocolate. Pour the tempered chocolate on a worktop surface (better marble or granite) and spread it up to 1/10-inch/2 mm thick.

    When the chocolate is just starting to crystallize, push it quickly with a triangle, a chocolate spatula, or a large knife.

    Repeat the operation several times to obtain chocolate shavings, ideally with a length of about 1 ½-inch/4 cm. Let completely crystallize before you use it (photo 8).

    Photo 7: Chocolate mousse in a metal bowl Photo 8: Chocolate shavings on parchment
    PHOTO 7 PHOTO 8

    To assemble the Concorde cake, place the first meringue disk on a serving plate or a cake board, with the flat surface facing down.

    Cover it regularly with 6.4 oz. (180 g) chocolate mousse (photo 9). Place the second meringue disc smooth side up this time.

    Spread 6.4 oz. (180 g) mousse again. Cover with the last disc with the flat side on the top (photo 10).

    Photo 9: Meringue topped with mousse on parchment Photo 10: Meringue on top of the mousse
    PHOTO 9 PHOTO 10

    Cover the top and sides with the remaining chocolate mousse and smooth them with a spatula.

    Decorate the cake's sides horizontally, placing the meringue sticks on two levels (photo 11).

    Decorate the top of the cake with chocolate shavings (photo 12). Sprinkle with the icing (powdered) sugar. Refrigerate the cake for at least 6 hours, better overnight.

    Photo 11: Cake decorated with meringue sticks Photo 12: Cake topped with chocolate shavings
    PHOTO 11 PHOTO 12

    Expert tips

    1. Read on the main tips for the perfect meringue.
    2. Read on how to temper dark chocolate.
    3. Make-ahead tip: make meringue disks in advance and store them for up to 15 days in a dry place, being well packed. You can also make chocolate shavings ahead of time and keep them in a cold, dry place.
    4. Keep the finished Concorde cake for up to 48 hours in the fridge.

    Frequently asked questions

    Can you make this cake ahead of time?

    Yes, you can make meringue and chocolate shavings up to 15 days in advance. Keep them in a dry place.

    How to store Concorde cake

    Store the assembled cake Concorde for up to 2 days.

    Can you freeze this chocolate meringue cake

    For the best cake taste and meringue texture, I do not recommend freezing this cake.

    Print

    Recipe card

    Chocolate Concorde (Gateau Concorde)

    Concord cake (gâteau Concorde) on a marble board with dessert plates in the background.
    Print Recipe
    Save Recipe Recipe Saved

    5 Stars 4 Stars 3 Stars 2 Stars 1 Star

    5 from 11 reviews

    If you look for a chocolate meringue cake, this Concorde cake (gâteau Concorde in French) will surely please your guests. It is a chocoholic's dream made with crisp meringue layers sandwiched with luscious chocolate mousse and topped with chocolate shavings. 

    • Author: Irina Totterman
    • Total Time: 2 hours, 15 minutes
    • Yield: 10 1x
    • Category: Cakes
    • Method: Baking
    • Cuisine: French
    • Diet: Gluten Free

    Ingredients

    Scale

    For the chocolate meringue:

    • ⅔ cup + 1 ½ tablespoons (190 g) egg whites (see note #1)
    • ⅔ cup + 8 ½ teaspoons (190 g) granulated sugar 
    • 1 ½ cups + 1 teaspoon (190 g icing) (powdered) sugar
    • ⅓ cup (40 g) cocoa powder

    For the chocolate mousse:

    • ⅔ cup + 1 tablespoons (170 g) whipping cream
    • 1 ½ cups (345 g) whipping cream
    • 9.9 oz. (280 g) dark chocolate 

    For dark chocolate shavings:

    • 7 oz. (200 g) dark chocolate

    *Don't you have the correct baking pan on hand right now? Try this simple Cake Pan Converter!

    ** If needed, please refer to Baking Conversion Charts.

    Instructions

    1. To make the chocolate meringue, preheat the oven to 240 F/115 C.
    2. Using a flour sifter, sift icing (powdered) sugar and cocoa powder, and set aside. Place egg whites in a stand mixer recipient and beat until stiff. Gradually add granulated (caster) sugar and whisk until glossy. Add the dry mixture of icing sugar with cocoa powder and gently mix with a rubber spatula.
    3. Prepare two parchment paper sheets and draw three discs with a diameter of 6 ½-inch/17 cm. Flip paper sheets so that the drawn circles will be facing down. Transfer the chocolate meringue in a pastry bag with Ateco plain pastry tip 809 and pipe three meringue disks in a spiral within the pencil marks.
    4. Also, push a few rows of long meringue sticks around disks, using the same pastry tip. Dip a knife in melted butter and cut meringue "sausages" into segments of  25/32-inch (almost 1 inch)/2 cm. Bake for 1 hour. Remove from the oven and let the meringue cool down. Break the meringue sticks.
    5. To make the chocolate mousse, melt dark chocolate using a bain-marie/water bath or a microwave (mix chocolate every 30 seconds). Bring ⅔ cup + 1 tablespoons (170 g) whipping cream to a boil and pour cream in 3 times over chocolate, mixing well with the spatula. Keep the mixture at 113 F/45 C (maximum).
    6. In a separate bowl, whisk 1 ½ cups (340 g) whipping cream to get a softly whipped cream. Add whipped cream to the chocolate preparation, mix and use immediately. Do not refrigerate!
    7. To make dark chocolate shavings, temper chocolate. Pour the tempered chocolate on a worktop surface (better marble or granite) and spread it up to 1/10-inch/2 mm thick. When the chocolate is just starting to crystallize, push it quickly with a triangle, a chocolate spatula, or a large knife. Repeat the operation several times to obtain chocolate shavings, ideally with a length of about 1 ½-inch/4 cm. Let it completely crystallize before you use it.
    8. To assemble the Concorde cake, place the first meringue disk on a serving plate or a cake board, with the flat surface facing down. Cover it regularly with 6.4 oz. (180 g) chocolate mousse. Place the second meringue disc smooth side up this time. Spread 6.4 oz. (180 g) mousse again. Cover with the last disc with the flat side on the top. Cover the top and sides with the remaining chocolate mousse and smooth them with a spatula.
    9. Decorate the sides of the cake horizontally, placing the meringue sticks on two levels. Decorate the top of the cake with chocolate shavings. Sprinkle with the icing (powdered) sugar. Refrigerate the cake for at least 6 hours, better overnight.

    Notes

    1. 190 g egg whites approximately equal to 5 raw fresh egg whites from extra large size chicken eggs.
    2. Read on the main tips for the perfect meringue.
    3. Read on how to temper dark chocolate.
    4. Make-ahead tip: make meringue disks in advance and store them for 15 days in a dry place, being well packed. You can also make chocolate shavings ahead of time and keep them in a cold, dry place.
    5. Keep the finished Concorde cake for up to 48 hours in the fridge.

    Nutrition

    • Serving Size: 1 slice
    • Calories: 570
    • Sugar: 62.6 mg
    • Sodium: 75 mg
    • Fat: 30.6 mg
    • Saturated Fat: 20.1 mg
    • Carbohydrates: 70.3 mg
    • Fiber: 2.8 mg
    • Protein: 7.6 mg
    • Cholesterol: 68 mg

    Thank you for following me on Pinterest, Facebook, and Instagram. Hashtag #bakinglikeachef so I can see your creations.

    The nutritional information has been calculated using an online recipe nutrition calculator such as Verywellfit.com and is intended for informational purposes only. These figures should be used as a general guideline and not be construed as a guarantee.

    The recipe was adapted from https://www.mercotte.fr/. It was originally published on October 08, 2018. The recipe has been revised to include improved content and photos.All posted pictures are mine.

    Chocolate Raspberry Yule Log

    Oct 27, 2020 · 8 Comments

    Chocolate roll cake garnished with chocolate and raspberries on a black slate board.

    Delight your family and friends with this stunning chocolate raspberry Yule log. Fluffy chocolate sponge cake, luscious chocolate ganache, and dark chocolate tears on top make this chocolate raspberry dessert an impressive Christmas Swiss roll during the holiday season.

    Swiss roll decorated with chocolate and raspberries and a cup and a towel in the background

    What if I tell you that this gorgeous chocolate raspberry roll cake tastes dreamy?

    Would you resist a light chocolate sponge combined with rich chocolate ganache?

    And what about the most beautiful chocolate and fruit combinations, such as dark chocolate and raspberry?

    And yes, this beautiful cake roll topped with dark chocolate tears looks sophisticated. It is speechless.

    So, if you are looking for the perfect dessert to finish your dinner party or sweet date night, do not look any further. This is the only dessert you need.

    If you prefer a Christmas Yule log to a traditional cake, this rolled cake is the perfect choice to serve on your holiday table.

    Do you agree that Christmas dinner deserves the best dessert of the year? And this chocolate raspberry Yule log perfectly fits it!

    Change your habits and make this Swiss chocolate cake as a birthday cake. Just be creative!

    I anticipate the only question you might have is if this raspberry Yule log is difficult to make. No, it is not, and I will prove it.

    Still scared looking at this fancy chocolate decoration? Then, stay with me, and I will show you how to decorate the cake easily!

    BAKING ESSENTIALS CHECKLIST

    Sign up and get a list of the necessary baking tools and ingredients

    FREE DOWNLOAD

    Chocolate raspberry roll cake on a slate board; a cup and berries in the background
    [feast_advanced_jump_to]

    What is a Yule log cake?

    The Yule log cake, the English name of Buche de Noel, is a classic Christmas rolled cake shaped and decorated like a log.

    It resembles a Swiss roll cake with a thin layer of vanilla sponge cake filled with strawberry or raspberry jam. 

    When sliced , the rolled cake reveals a neat swirl. The Swiss roll is also known as the jelly roll in the United States.

    Why you should try this recipe

    This chocolate raspberry cake roll is a stunning dessert that becomes a winner of the table from the first minute it is served.

    It is an all-year-round sweet favorite: make it for Christmas as Buche de Noel (or Christmas Yule log) or serve it for Valentine's Day or as a birthday cake. Omit fresh raspberries on the cake if berries are out of season.

    Replacing raspberry preserves with your favorite jam allows you to create a new chocolate and fruit combination.

    Finally, this Christmas Swiss roll with chocolate filling topped with chocolate tears is just for chocolate lovers.

    Ingredients

    Raspberry chocolate Yule Log ingredients

    For ingredients and detailed instructions, refer to the recipe card below.

    Eggs: the recipe calls for large eggs. Separate chilled egg whites from the yolks using an egg separator.

    Flour: use all-purpose flour to make this cake roll recipe.

    Cocoa powder: use unsweetened cocoa powder to dust chocolate tears and the top of the dessert.

    Potato starch is added to all-purpose flour as a lower-protein ingredient to make a soft biscuit.

    Butter: use unsalted butter, melted and cooled. It creams the biscuit ingredients together, giving such elasticity to the baked biscuit that it allows you to roll up easily.

    Sugar: use granulated sugar or caster sugar. To make the meringue, it is recommended to process granulated sugar in a food processor for a few seconds or use superfine baker's sugar.

    Raspberry preserves: use seedless raspberry preserves to make the yule log with raspberry filling.

    You can also use regular raspberry preserves (with seeds) or replace them with raspberry jam or preserves of your choice.

    Fruit preserves or jams have to be the "right" consistency. If it is too runny, the fruit filling will soak into the cake. If it is too thick or in pieces, it will not spread evenly. 

    Whipping cream: use your favorite brand of whipping cream with at least 35% or more milk fat. Make sure the whipping cream is well-chilled to make the whipped cream.

    Dark chocolate: use top-quality dark chocolate such as Scharffen Berger dark chocolate or Valrhona dark chocolate. Please, avoid using chocolate chips.

    Gelatin: use gelatin sheets with a strength of 200 bloom.

    Heavy cream: it is also known as heavy whipping cream with 36-40% fat.

    Milk: the recipe calls for whole milk.

    Icing sugar: make it yourself with a coffee grinder or use store-bought powdered sugar.

    Fresh raspberries: use fresh juice raspberries or omit fresh berries if they are out of season.

    How to make chocolate raspberry Yule log

    Heat oven to 375°F / 190°C. To make the biscuit, combine flour, cocoa powder, and potato starch. Sift the flour mixture using a flour sifter and set it aside.

    In a large mixing bowl, beat egg whites with an electric hand mixer at medium speed until soft peaks.

    Increase speed, gradually add granulated sugar, and whisk at high speed until stiff peaks form (photo 1).

    Add egg yolks and gently mix with a rubber spatula, working in the same direction from the bottom of the bowl.

    Then add the dry ingredients to the egg mixture and gently combine with the spatula. Finally, add melted butter (cool it to 122°F / 50°C) and mix again (photo 2).

    Photo 1: Meringue in a metal bowl Photo 2: Ready biscuit dough in a metal bowl
    PHOTO 1 PHOTO 2

    Pour the cake batter on a baking sheet covered with a piece of parchment paper or a non-spill baking sheet and even the surface with a bent spatula (photo 3).

    Make sure to form a rectangle of 12 x 11 inches / 30 x 27 cm. Bake cake for 10 minutes. Take it from the oven and let it cool.  

    To make chocolate mousse, whisk ⅔ cup (150 g) whipping cream to get the whipped cream and refrigerate (photo 4).

    Photo 3: Biscuit dough on a baking sheet Photo 4: Whipped cream in a metal bowl
    PHOTO 3 PHOTO 4

    Melt dark chocolate in a bain-marie/water bath or microwave until the chocolate reaches 122°F / 50°C. In a separate bowl, soak gelatin in cold water.

    Place three tablespoons (45 g) of heavy cream and milk in a small saucepan and bring to a boil. In another mixing bowl, mix egg yolks and sugar with a hand whisk.

    Pour hot milk mixture into the egg yolk mixture, constantly whisking.

    Bring the mixture back to the saucepan and cook over low heat, whisking.

    Once the preparation thickens, remove the saucepan from heat and cool it down, placing it over a large bowl with the iced cold water.

    Add the drained gelatin immediately and mix until melted (photo 5).

    Pour the warm preparation over the melted chocolate and gently mix with the spatula (photo 6).

    Photo 5: Pastry cream in a saucepan Photo 6: Chocolate preparation in a metal bowl
    PHOTO 5 PHOTO 6

    Add the cold whipped cream and mix with the spatula once the chocolate ganache reaches 113°F / 45°C (photo 7). Keep the ready chocolate mousse at room temperature.

    To make chocolate tears, temper dark chocolate (the step-by-step instruction is in the post).

    Cut the guitar sheets or simply plastic sheets into square or rectangular pieces and place them on the work surface.

    Drop small amounts of tempered chocolate on guitar sheets with an offset spatula and gently spread with a single movement, forming tears. (photo 8).

    Photo 7: Chocolate ganache in a metal bowl Photo 8: Chocolate "tears" on plastic sheets
    PHOTO 7 PHOTO 8

    Sprinkle chocolate with a little bit of cocoa powder. To give the tears a slight curvature, place pieces of guitar sheets in a baguette pan.

    Instead, use small narrow glasses to insert sheets with chocolate (photo 9).

    Let the chocolate set for about 15 minutes in the fridge, and gently peel the decorations. 

    To assemble the cake, flip the biscuit over parchment or a clean tea towel and remove the baking paper or baking sheet.

    Cut the rectangle of the cake layer 11 x 10 inches / 28 x 25 cm. Spread a thin, even layer of the raspberry preserves on the bottom of the sponge using a bent spatula or a large metal spoon (photo 10).

    Photo 9: Glasses with inserted chocolate tears Photo 10: Raspberry preserves spread on the biscuit
    PHOTO 9 PHOTO 10

    Spread another chocolate mousse layer on top of the raspberry preserves (photo 11).

    Roll the biscuit, starting from the long side, top to bottom, and tighten it (photo 12).

    Wrap the biscuit roll in parchment paper and refrigerate for at least 1 hour. 

    Photo 11: Chocolate mousse on top of the biscuit Photo 12: Rolled cake on parchment
    PHOTO 11 PHOTO 12

    Take the roll cake out of the fridge and place it on a serving plate. Cover the roll with the chocolate mousse and spoon it out with the back of a tablespoon (photo 13).

    Decorate the cake with chocolate tears. Sprinkle with cocoa powder and icing (powdered) sugar and arrange fresh raspberries (photo 14). Refrigerate for at least 2 hours.

    Photo 13: Mousse on top of the rolled cake Photo 14: Roll decorated with chocolate, raspberries
    PHOTO 13 PHOTO 14

    Recipe variations

    The chocolate and raspberry combination is classic, but you can experiment with other chocolate and fruit variations.

    If you have never tempered chocolate and feel uncomfortable trying it, there are easy ways to decorate this chocolate raspberry Swiss roll.

    Cover the cake roll with chocolate ganache and spoon it with the back of a tablespoon. Or use a bent spatula and create a faux wood effect.

    Then arrange fresh raspberries on top of the cake and sprinkle with chopped pistachios. To get inspired, look at Rosewater Meringue Roulade or Raspberry Pistachio Roulade.

    If fresh berries are out of season, decorate the top of the cake with a gold curling ribbon. It is the same decoration I used to make Nutella Swiss Roll.

    The simplest way to decorate this chocolate roll cake is to cover it with chocolate shavings and sprinkle it with confectioners' sugar, like Meringue Cake Merveilleux.

    Another way to decorate the roll cake is to cover it with chocolate glaze and arrange Meringue Mushrooms or freeze-dried raspberries on top of the cake.

    If you plan to serve this cake as a Christmas Yule log, use Christmas cake toppers, gingerbread man cookies, whole star anise, or cinnamon sticks to decorate this chocolate raspberry dessert.

    Decorated raspberry Swiss roll with raspberries in the blackboard: Overhead view

    Storage instructions

    How to store this rolled cake? This cake can be stored, covered tightly, in the refrigerator for 1 to 2 days.

    I don't recommend freezing this cake to keep the beautiful texture and the best taste.

    Expert tips

    1. Make chocolate tears in advance: it will save time while making the roll cake.
    2. Unlike other cake roll recipes, this cake recipe is very forgiving: you do not need to roll up the hot sponge in a kitchen towel. Wait until the cake cools on parchment paper, and then roll.
    3. Decorate the top of the cake with edible gold leaf if you desire.
    4. Take a Swiss chocolate roll from the fridge 30 minutes before serving.

    Frequently asked questions

    What is Swiss roll filling made of?

    The most common filling for a Swiss roll is whipped cream filling, jam, or a combination of both. Other variations are cream cheese frosting and fillings made with crème fraîche, vanilla or chocolate buttercream, mascarpone, chocolate ganache, fudge, or marshmallow.

    What's the difference between a Swiss roll and a roulade?

    A Swiss roll is always made with a sponge cake and filling rolled inside. A roulade is a French word meaning rolled up. It can be sweet and savory, including Swiss roll, meringue, and choux pastry rolls. Interestingly, rolled cakes are roulades in France and French-speaking countries like Switzerland.

    Love cake rolls? Try these next!

    • Meringue roulade topped with raspberries and pistachios on a black serving board.
      Pavlova Roll (Meringue Roulade)
    • Sliced pistachio Swiss roll on a white cake board.
      Raspberry Pistachio Roulade (Pistachio Swiss Roll)
    • Slices of Nutella Swiss roll on a wooden board lined with parchment.
      Nutella Swiss Roll Cake (Nutella Roulade)
    • Coffee Swiss roll cake with a slice on a serving board.
      Coffee Swiss Roll (Coffee Roulade)

    Browse all the Cake Recipes

    Want more delicious and beautiful recipes? Subscribe to my newsletter and follow me on Facebook, Pinterest, and Instagram for my latest updates. If you make this recipe, please leave a star rating on the recipe card and comment below!

    Print

    Recipe card

    Chocolate Raspberry Yule Log

    Chocolate roll cake garnished with chocolate and raspberries on a black slate board.
    Print Recipe
    Save Recipe Recipe Saved

    5 Stars 4 Stars 3 Stars 2 Stars 1 Star

    5 from 4 reviews

    This stunning chocolate raspberry Yule log or Christmas Swiss roll is made with a chocolate sponge, luscious chocolate ganache, and dark chocolate tears with fresh raspberries on top. 

    • Author: Irina Totterman
    • Total Time: 1 hour, 30 minutes (plus chilling time)
    • Yield: 8 1x
    • Category: Cakes
    • Method: Baking
    • Cuisine: French

    Ingredients

    Scale

    For biscuit:

    • 4 large eggs
    • 2 ⅓ tablespoons (18 g) all-purpose flour
    • 2 ⅔ tablespoons (20 g) cocoa powder
    • 2 tablespoons (20 g) potato starch
    • 1.3 oz (37 g) unslated butter, melted
    • ⅓ cup + 2 teaspoons (85 g) granulated sugar

    For the chocolate mousse:

    • ⅔ cup (150 g) whipping cream
    • 4 oz (112 g) dark chocolate
    • 1 ½ gelatin sheets
    • 3 tablespoons (45 g) heavy cream
    • 2 tablespoons (30 g) milk
    • 1 ½ large egg yolks
    • 2 ½ teaspoons (12 g) granulated sugar

    For assembling:

    • 3.5 oz (100 g) seedless raspberry preserves
    • 5.3 oz (150 g) dark chocolate
    • 3 tablespoons (22 g) cocoa powder
    • 1 ½ tablespoons (12 g) icing (powdered) sugar
    • 5 fresh raspberries
    • edible gold leaf (optional)

    *Don't you have the correct baking pan on hand right now? Try this simple Cake Pan Converter!

    ** If needed, please refer to Baking Conversion Charts.

    Instructions

    1. Preheat the oven to 375 degrees F/190 degrees C. To make the biscuit, sift flour, cocoa powder, and potato starch using a flour sifter and set aside. In a bowl, beat egg whites with an electric mixer until they are mounted.

    2. Gradually add granulated sugar and continue to whisk until stiff and glossy. Add egg yolks and gently mix with a rubber spatula, working in the same direction. Then add the dry mixture of flour, cocoa, and starch and gently combine with the spatula. Finally, add melted butter and mix again.

    3. Pour the biscuit dough on a baking sheet covered with parchment paper or a non-spill baking sheet and even the surface with a bent spatula. Make sure to form a rectangle of 12 x 11 inches/30 x 27 cm. Bake biscuit for 10 minutes. Take it from the oven and let cool.  

    4. To make chocolate mousse, whisk ⅔ cup (150 g) whipping cream to get the whipped cream and refrigerate. Melt chocolate in a bain-marie/water bath or microwave until the chocolate reaches 122 degrees F/50 degrees C. In a separate bowl, soak gelatin in cold water.

    5. Place 3 tablespoons (45 g) of heavy cream and milk in a small saucepan and bring to a boil. In another bowl, mix egg yolks and sugar with a hand whisk. Pour hot milk mixture into the egg yolks/sugar preparation, constantly whisking. Bring the mixture back to the saucepan and cook over low heat, whisking.

    6. Once the preparation thickens, remove the saucepan from heat and cool it down, placing it over a large bowl with the iced cold water. Add the drained gelatin immediately and mix until melted. Pour the warm preparation over the melted dark chocolate and gently mix with the spatula. Once the chocolate ganache reaches 113 F/45 C, add the cold whipped cream and mix with the spatula. Keep the ready chocolate mousse at room temperature.

    7. To make chocolate decorations, temper dark chocolate. Cut the guitar sheets or simply plastic sheets into small pieces and arrange them on a table. Using the bent spatula, spread the small amount of chocolate on those sheets and form thin tears. Sprinkle chocolate with cocoa powder and place the sheets with chocolate in a baguette pan to give them a slight curvature. Instead, use small narrow glasses to insert sheets with chocolate.

    8. To assemble the cake, flip the biscuit over parchment or a kitchen towel and remove the parchment paper or baking sheet. Cut the rectangle of 11 x 10 inch/28 x 25 cm. Spread a thin layer of the raspberry preserves and another chocolate mousse layer using the bent spatula. Roll the biscuit, starting from the top to the bottom, and tighten it. Wrap the biscuit roll in parchment paper and refrigerate for at least 1 hour. 

    9. Take the roll cake out of the fridge and place it on a serving platter. Cover the roll with the chocolate mousse and spoon it with the back of a tablespoon. Decorate the cake with chocolate tears. Sprinkle with cocoa powder and icing (powdered) sugar. Arrange fresh raspberries. Refrigerate for at least 2 hours.

    Notes

    1. Make chocolate tears in advance: it will save time while making the roll cake.
    2. Unlike other roll cakes, this cake roll is very forgiving: you do not need to roll up the hot sponge in a kitchen towel. Let it cool on parchment and then roll.
    3. Decorate the top of the cake with edible gold leaf if you desire.
    4. Take a Swiss chocolate roll from the fridge 30 minutes before serving.

    Nutrition

    • Serving Size: 1 slice
    • Calories: 440
    • Sugar: 38 g
    • Sodium: 85 mg
    • Fat: 26.1 mg
    • Saturated Fat: 15.8 mg
    • Carbohydrates: 50.5 mg
    • Fiber: 4.4 mg
    • Protein: 8.8 mg
    • Cholesterol: 163 mg

    Thank you for following me on Pinterest, Facebook, and Instagram. Hashtag #bakinglikeachef so I can see your creations.

    The nutritional information has been calculated using an online recipe nutrition calculator such as Verywellfit.com and is intended for informational purposes only. These figures should be used as a general guideline and not be construed as a guarantee.

    The recipe was adapted from https://www.academiedugout.fr/. It was originally published on December 09, 2018. The recipe has been revised to include improved content and photos. All posted pictures are mine.

    Mango Crepe Cake Recipe

    Oct 12, 2020 · 9 Comments

    Cake decorated with mango curls on a marble board with white dishes in the background.

    This mango layer crepe cake (aka Mille crepe cake) is a deliciously upgraded version of simple French crepes. Layered and decorated with honey mango, the cake is full of memories and emotions. It is like sunshine on the table.

    Sliced Mille crepe cake on a white marble board: Close up

    If you are a crepe lover, you have probably tried crepes in different ways: folded into halves, triangles, or rolled into a log with the hidden creamy center. But have you ever tried a crepe layer cake?

    If you are a party planner or a food enthusiast who plans a crepe party, one day, you will want to amaze your guests with a deliciously sophisticated crepe dessert, which is a crepe cake.

    [feast_advanced_jump_to]

    Crepe cake recipe

    I have been in love with the idea of making a crepe cake since I perfected French crepes making.

    Over time, I tested different cream and fruit variations, different approaches to stack crepes (with and without mold). I even tried to layer crepes as they are and those cut perfectly, with the neat edges.

    I suggest cutting crepes to the desired size, using a plate or a cake ring. And I also recommend using a mousse cake mold/ring to stack crepes. You will end up with a beautiful cake where each crepe is neat and perfectly layered.

    However, if you are in a hurry, you can stack crepes keeping their natural lacy-looking edges. If you do not have a mold, you will still succeed with this crepe cake.

    Finally, I created the best mango crepe cake recipe as an inspiration from a Mille crepe dessert served in T Xuan in Paris.

    It is a unique Chinese tea room in the center of Paris, founded by Yuelin Cui and Pierre-Henri Boissavy that offers a wide variety of Chinese desserts.

    Decorated mango layer cake on a marble board with dishes in the background

    What is a crepe layer cake?

    Crepe cake, or crepe layer cake, or also known as Mille crepe cake, is a French dessert made with crepes, whipped cream, and sometimes fruits.

    BAKING ESSENTIALS CHECKLIST

    Sign up and get a list of the necessary baking tools and ingredients

    FREE DOWNLOAD

    The best cream for a crepe cake

    The universal cream to make a Mille crepe cake is whipped cream. You can make it at home or use a store-bought one, but the homemade version tastes so much better!

    Make sure to whip the cream until stiff peaks to prevent crepes from slipping and sliding while stacking them.

    It is also a good idea to add a whipped cream stabilizer while making homemade whipped cream. Use one package (0.35 oz/10 g) to whip one cup of cold whipping cream.

    Use it plain or flavor it with 1 /2 to 1 teaspoon vanilla extract and make vanilla whipped cream.

    Add 1 teaspoon orange flower water and enjoy the orange-flavored whipped cream. It is the same cream I used to make Banoffee Pie Cups.

    To bring a romantic touch, make rose water scented whipped cream by adding 1 teaspoon rose water.

    If you serve the cake to adults, experiment with adding 1 teaspoon dark rum or fruit brandy to the cream.

    Want to replace granulated white sugar with golden brown sugar? Please, go for it!

    You can also try to make a crepe cake with white chocolate or milk chocolate whipped cream. They both beautifully work for this dessert.

    Sliced mango cake served on a marble board: Close up

    Why you should try this recipe

    1. This crepe cake recipe is easy and straightforward: make French crepes in advance and assemble the cake within one hour (chilling time is not included).
    2. If you have never made a crepe birthday cake, it is your chance: this best crepe cake makes a great alternative to a birthday cake.
    3. Crepe cake is another option to serve at a crepe party.
    4. This crepe dessert is a delicious creation for crepe lovers when simple crepes are upgraded into a stunning dessert.

    Ingredients

    For ingredients and detailed instructions, refer to the recipe card below.

    Crepes: make thin crepes by following the recipe for French crepes. The thinner crepes, the more beautiful cake it is. If you get/have "thick" crepes, you will want to use fewer crepes than recommended in the recipe below.

    Whipping cream: use whipping cream with at least 35% fat. To stabilize it, use a whipped cream stabilizer; although, it is optional.

    Sugar: use granulated white sugar or replace it with golden brown sugar.

    Mango: honey mangoes are the best to make this mango crepe cake since they have a very small seed. It means that this type of mango has a high flesh to seed ratio. Also, use other seasonal mango varieties available in your area.

    Flaked almonds: use store-bought toasted flaked almonds or toast nuts yourself at 300 F/150 C for 10 to 15 minutes.

    Lime: use organic untreated lime and make fresh zest using a zester grater.

    Cake decorated with mango curls, lemon zest and sprinkled with toasted flaked almonds

    How to make crepe cake

    Follow the recipe for French crepes and make thin crepes. Let them cool. Then use a plate and cut crepes to the size of 7-inch/18 cm (photo 1).

    To make the whipped cream, beat 1 ⅔ cups + 1 tablespoon (400 g) cold whipping cream with 2 ⅔ tablespoons (40 g) granulated sugar using an electric mixer until stiff peaks (photo 2).

    Photo 1: Cut crepes on a cutting board Photo 12: Whipped cream in a metal bowl
    PHOTO 1 PHOTO 2

    Slice up mangoes into thin slices.

    To assemble the cake, adjust a mousse cake mold to the same diameter as crepes, place it on a serving platter, and line the mold with acetate cake collar.

    Place the first crepe in the mold, spread a thin layer of the whipped cream, and place another crepe. Spread another layer of the cream, place another crepe, and cover with the cream again.

    Arrange mango slices over the entire surface of the crepe (photo 3). Repeat these steps with all 12 crepes to mount the cake, adding mango slices for every three crepes.

    Finish with the last crepe, cover the mold with plastic film, and refrigerate for 1 to 2 hours.

    To decorate the cake, whip ⅓ cup + 1 ½ tablespoons (100 g) whipping cream and ⅔ tablespoon (10 g) sugar until soft peaks. Take the cake out of the fridge, remove the mold and acetate film. Garnish top of the cake with the whipped cream, making waves with a rubber spatula.

    Sprinkle sides of the cake with toasted flaked almonds.

    Slice up the remaining mangoes into very thin slices using a mandoline slicer (the thinner slice, the easier to curl). Use a sharp knife to cut each oval slice into two long slices.

    Twist mango slices into spirals and arrange them over the top of the cake. Using a zester grater, make fresh lime zest and sprinkle it over mango curls (photo 4). 

    Photo 3: Cream topped with fruit slices in a mold  Photo 4: Cake on a board
    PHOTO 3 PHOTO 4

    Expert tips

    1. Be sure to make firm whipped cream to spread it between crepes: it secures crepes from slipping and sliding when you unmold the cake.
    2. To decorate the cake, whip the cream until firm and pipe it over the top of the cake in the way you desire.
    3. If you do not have a mandoline slicer, carve off the mango's cheek, place it with the flat side on a flat surface, and peel off the skin with a vegetable peeler. Use a sharp knife to cut very thin slices, then cut each slice into two. To decorate the top of the cake, twist each slice into a spiral.
    4. Make a mango pure using a food processor and then a fine-mesh sieve and pour it over each slice while serving (it is optional).

    Frequently asked questions

    Can you make a crepe cake in advance?

    You can make crepes in advance, even freeze them, but I recommend to assemble the cake on the day of serving. Both whipped cream made without stabilizer and chocolate whipped cream are not stable enough to hold stacked crepes in place for an extended period.

    What crepes can you use to make this cake?

    Use homemade or store-bought thin crepes (not pancakes) to make the cake. The thinner crepes, the more impressive crepe cake: its beauty is in those paper-thin crepes! You can also use gluten-free crepes or chocolate crepes.

    How to cut Mille crepe cake?

    To make perfect slices of the cake, warm a long chef's knife in hot water and dry it with a paper towel. Cut the cake, washing and wiping the blade between each cut.

    Love crepes? Try these next!

    • French Chocolate Crepes
    • Vanilla Baby Dutch Pancake
    • Beggar's Purses With Caramelized Apples
    • Browse all the Crepe and Pancake Recipes

    Want more delicious and beautiful recipes? Subscribe to my newsletter and follow me on Facebook, Pinterest, and Instagram for my latest updates. If you make this recipe, please leave a star rating on the recipe card and comment below!

    Print

    Recipe card

    Mango Crepe Cake Recipe

    Cake decorated with mango curls on a marble board with white dishes in the background.
    Print Recipe
    Save Recipe Recipe Saved

    5 Stars 4 Stars 3 Stars 2 Stars 1 Star

    5 from 5 reviews

    This mango layer crepe cake (aka Mille crepe cake) is a deliciously upgraded version of simple French crepes. Layered and decorated with honey mango, the cake is full of memories and emotions. It is like sunshine on the table.

    • Author: Irina Totterman
    • Total Time: 1 hours (plus chilling time)
    • Yield: 10 1x
    • Category: crepes
    • Method: No-Bake
    • Cuisine: French

    Ingredients

    Scale
    • 12 thin crepes

    For the whipped cream:

    • 2 cups + 3 tablespoons (500 g) whipping cream
    • 3 ½ tablespoons (50 g) granulated sugar

    For assembling:

    • 7 honey mangoes
    • 2 oz (60 g) toasted flaked almonds
    • ½ lime, zest

    *Don't you have the correct baking pan on hand right now? Try this simple Cake Pan Converter!

    ** If needed, please refer to Baking Conversion Charts.

    Instructions

    1. Follow the recipe for French crepes and make thin crepes. Let them cool. Then use a plate and cut crepes to the size of 7-inch/18 cm.
    2. To make the whipped cream, beat 1 ⅔ cups + 1 tablespoon (400 g) cold whipping cream with 2 ⅔ tablespoons (40 g) granulated sugar using an electric mixer until stiff peaks.
    3. Slice up mangoes into thin slices.
    4. To assemble the cake, adjust a mousse cake mold to the same diameter as crepes, place it on a serving platter, and line the mold with acetate cake collar. Place the first crepe in the mold, spread a thin layer of the whipped cream, and place another crepe. Spread another layer of the cream, place another crepe, and cover with the cream again. Arrange mango slices over the entire surface of the crepe. Repeat these steps with all 12 crepes to mount the cake, adding mango slices for every three crepes. Finish with the last crepe, cover the mold with plastic film, and refrigerate for 1 to 2 hours.
    5. To decorate the cake, whip ⅓ cup + 1 ½ tablespoons (100 g) whipping cream and ⅔ tablespoon (10 g) sugar until soft peaks. Take the cake out of the fridge, remove the mold and acetate film. Garnish top of the cake with the whipped cream, making waves with a rubber spatula.
    6. Sprinkle sides of the cake with toasted flaked almonds.
    7. Slice up the remaining mangoes into very thin slices using a mandoline slicer (the thinner slice, the easier to curl). Use a sharp knife to cut each oval slice into two long slices. Twist mango slices into spirals and arrange them over the top of the cake. Using a zester grater, make fresh lime zest and sprinkle it over mango curls. 

    Notes

    1. Be sure to make firm whipped cream to spread it between crepes: it secures crepes from slipping and sliding when you unmold the cake.
    2. To decorate the cake, whip the cream until firm, and pipe it over the top of the cake in the way you desire. 
    3. If you do not have a mandoline slicer, carve off the mango's cheek, place it with the flat side on a flat surface, and peel off the skin with a vegetable peeler. Use a sharp knife to cut very thin slices, then cut each slice into two. To decorate the top of the cake, twist each slice into a spiral.
    4. Make a mango pure using a food processor and then a fine-mesh sieve and pour it over each slice while serving (it is optional). 

    Nutrition

    • Serving Size: 1 slice
    • Calories: 406
    • Sugar: 29.8 g
    • Sodium: 83.8 g
    • Fat: 23.7 g
    • Saturated Fat: 12.5 g
    • Carbohydrates: 43.3 g
    • Fiber: 3.6 g
    • Protein: 7.6 g
    • Cholesterol: 113.6 g

    Thank you for following me on Pinterest, Facebook, and Instagram. Hashtag #bakinglikeachef so I can see your creations.

    The nutritional information has been calculated using an online recipe nutrition calculator such as Verywellfit.com and is intended for informational purposes only. These figures should be used as a general guideline and not be construed as a guarantee.

    Canned Pear Pound Cake Recipe

    Oct 2, 2020 · 8 Comments

    Sliced canned pear cake on a cutting board: Close up.

    Welcome this easy canned pear pound cake recipe to your life and enjoy each moment of its baking. The cake is packed full of fruit flavors that go perfectly with your morning or afternoon tea.

    Sliced canned pear cake on a cutting board: Close up

    I like pound loaf cakes! First, I like their strong and organized shape that resembles a brick. Second, there are plenty of loaf cake recipes, and I have an endless list of recipes I want to try. And finally, they are so E A S Y to make!

    There is the only challenge in making the cake. Canned pears, even cut into small pieces, tend to sink to the bottom of the cake.

    How to stop fruit from sinking in the cake? The best advice is to toss the fruit pieces with one or two tablespoons of all-purpose flour before adding them to the cake batter.

    Still, if the fruit pieces are heavier than the batter, as in this pear cake, they slightly sink. It is normal and expected.

    [feast_advanced_jump_to]

    What is a pound cake?

    Pound cake is a type of cake made of equal parts of four ingredients: flour, sugar, butter, and eggs.

    In the 18th century, it was made with a pound of each ingredient: here is the name "pound." The modern pound cake is a makeover to the classic one, but I would say it is even tastier and more flavored.

    And this canned pear pound cake is not an exception. Made with sweet pears and flavored with lovely cherry brandy, it makes a modern take on a classic pound cake.

    BAKING ESSENTIALS CHECKLIST

    Sign up and get a list of the necessary baking tools and ingredients

    FREE DOWNLOAD

    Pound cake pan

    Pound cake is mostly baked in a loaf or bundt pan. You can also bake it in an angel food cake pan, but you will need to adjust the baking time.

    Butter and flour your pan to facilitate the removal of the cake after baking. Fill the pan to about 75% with the cake batter and bake.

    And do not forget to let the cake cool down for 10 to 15 minutes before taking it out of the pan.

    Two slices of pear cake on a plate with the rest of the cake in background

    How to glaze pound cake

    The traditional pound cake is a plain one; however, glaze brings additional sweetness and flavor to the cake.

    The main tip is to glaze the cake while it is warm. If you want the cake to be more flavored and moist, poke holes with a toothpick or a bamboo skewer and pour the glaze all over the cake.

    But first, pour one-fourth of the glaze and wait for a little bit. Then add more in small portions till the glaze is done.

    Best glaze for pound cake

    To make a basic sugar glaze, mix 1 cup + 3 ½ tablespoons (150 g) icing (powdered) sugar and 1 to 3 tablespoons of milk.

    You can easily customize the glaze by adding two teaspoons of vanilla extract or ¼ teaspoon of coconut or almond extract.

    If pound cake is served for grown-ups, add a few drops of Amaretto, Grand Marnier, or brandy.

    To make the lemon glaze, replace the milk with 2 to 3 tablespoons of lemon juice. The same is about another fruity glaze - the orange glaze - when milk is replaced with 2 to 3 tablespoons of orange juice.

    You can also add a little cinnamon, nutmeg, or allspice while making your glaze. Just experiment!

    How to store pound cake

    Wrap pound cake with plastic film or cover with a foil and keep it up to 1 or 2 days at room temperature. The cake will keep its freshness in the fridge for up to a week. You can freeze pound cake for about 4 to 6 months.

    Sliced pear cake on a brown board with pear haves in the background

    Why you should try this cake

    1. This easy pear cake recipe is perfect for a beginner baker and the experienced one.
    2. A one-bowl recipe is always a huge plus.
    3. This cake is an all-year-round favorite due to the use of canned pear.
    4. Flavored with alcohol, it is loved by adults. To make it kids-friendly, just omit alcohol.

    Ingredients

    For ingredients and detailed instructions, refer to the recipe card below.

    Flour: regular all-purpose flour is used for the recipe.

    Corn flour: it is used to make this cake in the equal amount as all-purpose flour.

    Sugar: use regular granulated sugar or caster sugar.

    Eggs: use large whole eggs at room temperature.

    Baking powder: fresh aluminum-free baking powder is the best to make this cake.

    Heavy cream: use your favorite brand of heavy cream.

    Butter: the recipe calls for unsalted softened butter. Take it out of the fridge one to two hours before you start.

    Cherry brandy essence: it brings additional fruity flavor. You can easily omit this ingredient.

    Pears in syrup: the recipe calls for canned pear halves (you will need five for this recipe or just one tin).

    Pear syrup: you will need 1.6 fl oz (50 ml) of canned pear syrup remained after draining pear halves. You can replace it with Kirsch or any fruit-based brandy if you serve the cake for adults (omit cherry brandy essence in this case).

    How to make canned pear pound cake

    Preheat oven to 395 degrees F/200 C.

    Drain pear halves on a paper towel to absorb the syrup. Cut them into small slices or cubes. Flour pear pieces and put aside (photo 1).

    To make the cake batter, place softened butter and sugar in a large bowl and mix with a hand whisk. Add eggs, one at a time, incorporating them into the mixture (photo 2).

    Photo 1: Fruit pieces with flour on a board Photo 2: Egg mixture in a bowl
    PHOTO 1 PHOTO 2

    Add heavy cream, canned pear syrup, cherry brandy essence, and flour mixed with baking powder and cornflour. Combine everything with the whisk (photo 3).

    Add ⅓ of pear pieces to the batter and gently mix with a rubber spatula (photo 4).

    Photo 3: Cake batter in a bowl Photo 4: Batter with pear pieces in a bowl
    PHOTO 3 PHOTO 4

    Butter and flour a silicone loaf pan (make sure to read about how to bake with silicone molds) and pour the cake batter into the mold. Place the remaining pear pieces on top of the preparation (photo 5).

    Bake the cake for about 35 to 40 minutes or until a toothpick inserted into the center of the cake comes out clean (photo 6).

    Photo 5: Batter with pear on top in a pan Photo 6: Baked cake in the mold
    PHOTO 5 PHOTO 6

    Let the cake cool slightly in the pan before turning it onto a wire rack to cool completely.

    Expert tips

    1. Cut the canned pear into small pieces and make sure to flour them well. Pear pieces are heavy enough, and this step helps prevent them from sinking to the bottom of the cake.
    2. Omit alcohol to make the cake kid-friendly.
    3. Replace canned pear syrup with Kirsch or any fruit-based brandy, and omit cherry brandy essence if you serve the cake for adults.

    Recipe FAQ

    What is Kirsch?

    Kirsch, or "kirschwasser" in German, is a colorless brandy from the Black Forest region of Southern Germany. It is made from the double distillation of sweet or sour cherries. Kirsch is one of the essential ingredients to make the famous Black Forest Cake.

    How to make Kirsch at home

    If you have a hard time purchasing Kirsch, you can make it yourself. Pour the bottle of cherry brandy essence (20 ml) and 1 ¼ cups (280 g) of granulated sugar into an empty one-liter bottle. Add 26 fl oz (770 ml) of neutral vodka. Shake very well until the sugar has completely dissolved. It is ready.

    Love cakes? Try these next!

    • Banana Bread With Streusel Topping
    • Raspberry Almond Cake Ispahan
    • Hazelnut Cake With Hazelnut Ganache
    • Browse all the Cake Recipes

    Want more delicious and beautiful recipes? Subscribe to my newsletter and follow me on Facebook, Pinterest, and Instagram for my latest updates. If you make this recipe, please leave a star rating on the recipe card and comment below!

    Print

    Recipe card

    Canned Pear Pound Cake Recipe

    Sliced canned pear cake on a cutting board: Close up.
    Print Recipe
    Save Recipe Recipe Saved

    5 Stars 4 Stars 3 Stars 2 Stars 1 Star

    5 from 2 reviews

    Welcome this easy canned pear pound cake recipe to your life and enjoy each moment of its baking. The cake is packed full of fruit flavors that go perfectly with your morning or afternoon tea. 

    • Author: Irina Totterman
    • Total Time: 1 hour, 15 minutes
    • Yield: 12 1x
    • Category: Cakes
    • Method: Baking
    • Cuisine: French

    Ingredients

    Scale
    • ⅓ cup + 2 tablespoons (100 g) all-purpose flour
    • ⅔ cup (100 g) cornflour
    • ⅔ cup (150 g) granulated sugar
    • 3 large eggs
    • 1 ⅓ teaspoons (6 g) baking powder
    • ⅔ cup (150 g) heavy cream
    • 2.7 oz (75 g) butter, softened
    • ⅓ teaspoon cherry brandy essence
    • 1.6 fl oz (50 ml) canned pear syrup
    • 5 canned pear halves 

    *Don't you have the correct baking pan on hand right now? Try this simple Cake Pan Converter!

    ** If needed, please refer to Baking Conversion Charts.

    Instructions

    1. Preheat oven to 395 degrees F/200 C.
    2. Drain pear halves on a paper towel to absorb the syrup. Cut them into small slices or cubes. Flour pear pieces and put aside.
    3. To make the cake batter, place softened butter and sugar in a large bowl and mix with a hand whisk. Add eggs, one at a time, incorporating them into the mixture. Add heavy cream, canned pear syrup, cherry brandy essence, and flour mixed with baking powder and cornflour. Combine everything with the whisk. Add ⅓ of pear pieces to the batter and gently mix with a rubber spatula.
    4. Butter and flour a silicone loaf pan and pour the cake batter into the mold. Place the remaining pear pieces on top of the preparation.
    5. Bake the cake for 35 to 40 minutes or until a toothpick inserted into the center of the cake comes out clean. Let the cake cool slightly in the pan before turning onto a wire rack to cool completely.

    Notes

    1. Cut the canned pear into small pieces and make sure to flour them well. Pear pieces are heavy enough, and this step helps prevent them from sinking to the bottom of the cake.
    2. Omit alcohol to make the cake kid-friendly.
    3. Replace canned pear syrup with Kirsch or any fruit-based brandy and omit cherry brandy essence if you serve the cake for adults.

    Nutrition

    • Calories: 220
    • Sugar: 13.8 g
    • Sodium: 57 mg
    • Fat: 10.5 g
    • Saturated Fat: 6 g
    • Carbohydrates: 29.7 g
    • Fiber: 1.2 g
    • Protein: 3.2 g
    • Cholesterol: 68 mg

    Thank you for following me on Pinterest, Facebook, and Instagram. Hashtag #bakinglikeachef so I can see your creations.

    The nutritional information has been calculated using an online recipe nutrition calculator such as Verywellfit.com and is intended for informational purposes only. These figures should be used as a general guideline and not be construed as a guarantee.

    The recipe was adapted from  https://www.meilleurduchef.com. It was originally published on February 08, 2018. The recipe has been revised to include improved content and photos. All posted pictures are mine.

    Hazelnut Flour Cake Recipe

    Aug 14, 2020 · 1 Comment

    A slice and the rest of the hazelnut cake on a wooden board with a colorful cup and nuts on background.

    This impressive-looking hazelnut flour cake topped with chocolate hazelnut ganache is a hazelnut lover's dream. Topped with caramelized nuts, this cake is the indulgence at its finest. And this recipe is just so easy to make!

    Sliced hazelnut loaf cake on a wooden board: Close up

    Today is the turn of my favorite hazelnut flour cake. It combines the nutty taste of the cake biscuit with the chocolate hazelnut ganache.

    Add caramelized hazelnuts to the bite, and you will get the most harmonized taste in the mouth.

    This brick-looking cake has such an organized shape and beautiful texture that delights the eyes.

    Chocolate hazelnut ganache piped into parallel laces upgrades a simple loaf cake into the celebration one.

    If you follow the blog, you have probably noticed that I do not like to leave loaf cakes plain. Once I baked a Banana Bread, I made a streusel on top.

    When I made a Raspberry Almond Cake, I covered it with the white chocolate dried raspberry glaze.

    And when I made Gingerbread Loaf Cake, I sprinkled it with crumbled speculoos cookies and topped with dried fruit.

    BAKING ESSENTIALS CHECKLIST

    Sign up and get a list of the necessary baking tools and ingredients

    FREE DOWNLOAD

    [feast_advanced_jump_to]
    A slice and the rest of the cake on a board, a cup on the background

    Why you should try this recipe

    1. This hazelnut ganache cake recipe is simple and easy to make.
    2. A beautiful and tasteful hazelnut and chocolate combo is for Nutella lovers: if you love Nutella, this cake is just for you!
    3. The recipe guides to how to make hazelnut ganache, one of the most delicious ones.
    4. This simple hazelnut ganache cake makes a perfect dessert for a special event, such as a birthday.

    Ingredients:

    For ingredients and detailed instructions, refer to the recipe card below.

    Hazelnut flour/meal: use a store-bought hazelnut flour/meal or make ground hazelnuts yourself using a food processor.

    Use roasted nuts with their skins on for better color and flavor. Be careful not to over-grind hazelnuts; otherwise, you will get nut butter.

    Brown sugar: use golden brown sugar to make the cake.

    Eggs: the recipe calls for large eggs. Separate egg whites from egg yolks while the eggs are chilled. You will probably love this beneficial tool - an egg separator.

    Icing sugar: make it yourself using a coffee grinder or use store-bought powdered sugar.

    Flour: all-purpose flour is also used for this recipe.

    Baking powder: be sure to use fresh aluminum-free baking powder.

    Butter: the recipe calls for unsalted butter. No need to take it out of the fridge in advance: you will melt it.

    Salt: just a pinch of salt is what you need here.

    Sugar: use either granulated white sugar or caster sugar.

    Whipping cream: use whipping cream with 35% fat content.

    Nutella hazelnut spread: nothing is special here. Yes, the well-known Nutella hazelnut spread is used to make the most delicious ganache to decorate the cake.

    Hazelnut praline paste: please, either make it yourself or use a store-bought hazelnut praline.

    Hazelnuts: these nuts are the stars of the cake. Either use store-bought roasted hazelnuts or roast nuts yourself.

    A few slices of hazelnut cake on a cutting board and a cup in the background

    How to make hazelnut flour cake

    To make the ganache, place Nutella and hazelnut praline paste in a bowl and mix with a hand whisk (photo 1).

    Bring whipping cream to a boil and pour it into the chocolate/hazelnut mixture and mix with the hand whisk until homogeneous (photo 2).

    Cover the bowl with plastic film in contact and refrigerate overnight.

    Photo 1: Nutella and hazelnut mixture in a bowl Photo 2: Hazelnut ganache in a bowl
    PHOTO 1 PHOTO 2

    Preheat oven to 300 F/150 C. To make the cake batter, place hazelnut flour, brown sugar, and icing sugar in a bowl of the stand mixer and mix dry ingredients.

    Gradually add egg white, then egg yolks, and continue to beat (photo 3).

    Add salt, sifted all-purpose flour, baking powder, and mix (photo 4).

    Photo 3: Hazelnut flour mixture in a bowl Photo 4: Cake mixture in a bowl
    PHOTO 3 PHOTO 4

    Melt butter and slowly add to the preparation. Mix until the batter is smooth and homogeneous (photo 5). Transfer it to a regular bowl.

    In a separate bowl, place ⅓ cup + 2 tablespoons/110 g egg whites and whisk them until soft peaks.

    Gradually add 1 tablespoon/15 g granulated sugar and whisk with an electric mixer to get the meringue. (photo 6).

    Photo 5: Batter mixture in a bowl Photo 6: Meringue in a metal bowl
    PHOTO 5 PHOTO 6

    Gradually add the meringue to the principal preparation mixing with a rubber spatula (photo 7).

    Butter a silicone loaf pan, and pour the batter into the mold (photo 8).

    Photo 7: Cake batter in a metal bowl Photo 8: Batter in a silicone loaf pan
    PHOTO 7 PHOTO 8

    Bake for 45 minutes (photo 9). Remove the cake from the mold while it is warm. Let it cool on a wire rack.

    To make caramelized hazelnuts, place the nuts in a non-stick frying pan and sprinkle them with icing sugar.

    Heat over medium and mix until hazelnuts are coated with caramel. When the sugar is completely melted and incorporated, transfer the nuts to parchment paper (photo 10).

    Separate caramelized hazelnuts while they are hot. Let cool down.

    Photo 9: Baked hazelnut cake in a loaf pan Photo 10: Caramelized nuts on parchment
    PHOTO 9 PHOTO 10

    To decorate the cake, whip the cold ganache (photo 11) and place it in a pastry bag fitted with Ateco plain pastry tip 806.

    Pipe the ganache into parallel laces on top of the cake. Arrange whole and halved caramelized hazelnuts over the ganache (photo 12). Refrigerate until serving. 

    Photo 11: Chocolate ganache in a bowl Photo 12: Ganache pipped over the cake with nuts
    PHOTO 11 PHOTO 12

    Expert tips

    1. Follow this recipe to make Hazelnut Praline Paste yourself, or use a store-bought hazelnut paste.
    2. To pipe the ganache easier, refrigerate it for a few minutes after whipping the ganache.
    3. Decorate caramelized hazelnuts with edible gold leaf on top of the cake if you desire. 
    4. Serve the cake right from the fridge. It is not supposed for the cake to stay on the table long: the ganache will lose its shape on top of the dessert.

    Frequently asked questions

    Can you make hazelnut flour cake in advance?

    Yes, you have to make hazelnut ganache one day ahead due to the necessarily chilling time overnight. You can also bake the loaf in advance and decorate it the next day.

    How to store hazelnut ganache cake

    Store this decorated hazelnut ganache cake in the fridge for up to two to three days.

    Love chocolate cakes? Try these next!

    • French Meringue Cake Merveilleux
    • Royal Chocolate Cake - Trianon
    • Nutella Cake Roll
    • Browse all the Cake Recipes

    Want more delicious and beautiful recipes? Subscribe to my newsletter and follow me on Facebook, Pinterest, and Instagram for my latest updates. If you make this recipe, please leave a star rating on the recipe card and comment below!

    Print

    Recipe card

    Hazelnut Flour Cake

    A slice and the rest of the hazelnut cake on a wooden board with a colorful cup and nuts on background.
    Print Recipe
    Save Recipe Recipe Saved

    5 Stars 4 Stars 3 Stars 2 Stars 1 Star

    5 from 1 review

    This impressive-looking hazelnut flour cake topped with chocolate hazelnut ganache is a hazelnut lover's dream. Topped with caramelized nuts, this cake is indulgence at its finest. And this recipe is just so easy to make!

    • Author: Irina Totterman
    • Total Time: 1 hour (plus chilling time overnight)
    • Yield: 8 1x
    • Category: Cakes
    • Method: Baking
    • Cuisine: French

    Ingredients

    Scale

    For hazelnut ganache:

    • ⅔ cup (150 g) whipping cream 
    • 4.2 oz (120 g) Nutella hazelnut spread  
    • 3.2 oz (90 g) hazelnut praline paste

    For batter:

    • ⅔ cup + 3 tablespoons (100 g) hazelnut flour/meal
    • ⅓ cup + 2 teaspoons (75 g) brown sugar
    • 1 large egg white (30 g) 
    • 2 large egg yolks (35 g) 
    • 4 ½ tablespoons (35 g) icing sugar
    • ⅓ cup + 1 tablespoon (50 g) all-purpose flour
    • 1 teaspoon baking powder
    • 3.5 oz (100 g) butter, unsalted
    • 1 pinch of salt
    • ⅓ cup + 2 tablespoons (110 g) egg whites (see note #1)
    • 1 tablespoon (15 g) sugar

    For caramelized hazelnuts:

    • 2.5 oz (70 g) hazelnuts
    • 3 ½ tablespoons (25 g) icing sugar

    *Don't you have the correct baking pan on hand right now? Try this simple Cake Pan Converter!

    ** If needed, please refer to Baking Conversion Charts.

    Instructions

    1. To make the ganache, place Nutella and hazelnut praline paste in a bowl and mix with a hand whisk. Bring whipping cream to a boil and pour it into the chocolate/hazelnut mixture and mix with the hand whisk until homogeneous. Cover the bowl with plastic film in contact and refrigerate overnight.
    2. Preheat oven to 300 F/150 C. To make the cake batter, place hazelnut flour, brown sugar, and icing sugar in a bowl of the stand mixer and mix dry ingredients. Gradually add egg white, then egg yolks, and continue to beat. Add salt, sifted all-purpose flour, baking powder, and mix. Melt butter and slowly add to the preparation. Mix until the batter is smooth and homogeneous. Transfer it to a regular bowl.
    3. In a separate bowl, place ⅓ cup + 2 tablespoons/110 g eggs whites and whisk them until soft peaks. Gradually add 1 tablespoon/15 g granulated sugar and whisk with an electric mixer to get the meringue. Gradually add the meringue to the principal preparation mixing with a rubber spatula.
    4. Butter a silicone loaf pan, pour the batter into the mold, and bake for 45 minutes. Remove the cake from the mold while it is warm. Let it cool on a wire rack.
    5. To make caramelized hazelnuts, place the nuts in a non-stick frying pan and sprinkle them with icing sugar. Heat over medium and mix until hazelnuts are coated with caramel. When the sugar is completely melted and incorporated, transfers the nuts on parchment paper. Separate caramelized hazelnuts while they are hot. Let cool down.
    6. To decorate the cake, whip the cold ganache and place it in a pastry bag fitted with Ateco plain pastry tip 806. Pipe the ganache into parallel laces on top of the cake. Arrange whole and halved caramelized hazelnuts over the ganache. Refrigerate until serving. 

    Notes

    1. 110 g egg whites approximately equal to 2 whole extra-large chicken eggs (eggshell removed).
    2. Follow the recipe to make Hazelnut Praline Paste yourself or use a store-bought hazelnut praline.
    3. To pipe the ganache easier, refrigerate it for a few minutes after whipping the ganache.
    4. Decorate caramelized hazelnuts with edible gold leaf on top of the cake if you desire. 
    5. Serve the cake right from the fridge. It is not supposed for the cake to stay on the table long: the ganache will lose its shape on top of the dessert.

    Nutrition

    • Serving Size: 1 slice
    • Calories: 574
    • Sugar: 36.5 g
    • Sodium: 129 mg
    • Fat: 40.8 g
    • Saturated Fat: 11.2 g
    • Carbohydrates: 46.9 g
    • Fiber: 4.3 g
    • Protein: 9.8 g
    • Cholesterol: 88 mg

    Thank you for following me on Pinterest, Facebook, and Instagram. Hashtag #bakinglikeachef so I can see your creations.

    The nutritional information has been calculated using an online recipe nutrition calculator such as Verywellfit.com and is intended for informational purposes only. These figures should be used as a general guideline and not be construed as a guarantee.

    The recipe was adapted from https://www.meilleurduchef.com. It was originally published on June 17, 2018. The recipe has been revised to include improved content and photos. All posted pictures are mine.

    Charlotte Royale Cake

    Aug 5, 2020 · 22 Comments

    Sliced Charlotte Royale on a dessert plate.

    Raspberry Charlotte Royale cake is a stunning summer cake lined with a rolled biscuit and filled with silky Bavarian cream and fresh raspberries. Rich, sweet, and delicious, you will surely get back for more.

    Sliced Carlotte Royale on a dessert plate

    What is Charlotte Royale?

    Charlotte Royale is a half-sphere-shaped dessert made from slices of raspberry Swiss roll cake, filled with classic Bavarian cream and fresh raspberries.

    [feast_advanced_jump_to]

    Over the years, Charlotte cakes have gained immense popularity since their invention by the French chef Marie-Antoine Carême.

    BAKING ESSENTIALS CHECKLIST

    Sign up and get a list of the necessary baking tools and ingredients

    FREE DOWNLOAD

    As per Joe Pastry, "Charlotte Royale is ... a dressed up version of Charlotte russe." Charlotte Royale and Charlotte Russe have the same mousse filling, but the Royal version replaces Charlotte Russe's ladyfinger lining with Swiss roll slices.

    While strawberry Charlotte may be a simple dessert, its sophisticated counterpart, Charlotte Royale, poses a more technical challenge. However, this guided recipe and accompanying step-by-step photographs will quickly guide you through the process.

    A single slice of Charlotte Royale cake on a plate

    Ingredients

    For ingredients and detailed instructions, refer to the recipe card below.

    • Large eggs at room temperature.
    • Granulated sugar
    • All-purpose flour: To make a gluten-free biscuit, replace all-purpose flour with cornstarch or rice flour.
    • Potato starch: You can switch it to corn starch.
    • Raspberry jam: Use a homemade or store-bought raspberry jam. If you do not like seeds, please use a seedless raspberry jam. You can also replace it with another fruit jam.
    • Whole milk: You can replace it with low-fat milk.
    • Gelatin sheets with a strength of 200 bloom. To substitute leaves of gelatine in the recipe, use 8 g of powdered gelatin and ¼ cup (60 ml) of cold water.
    • Vanilla bean: You can replace it with 1 teaspoon of vanilla bean paste.
    • Heavy cream or heavy whipping cream with at least 30% fat content.
    • Fresh raspberries: You can replace them with other fresh seasonal fruits such as strawberries.
    • Cake glaze or neutral topping is optional, but if you make the cake in advance, you will need to brush the dessert with a clear glaze to prevent it from drying out.

    How to make Charlotte Royale

    Step 1. Preheat the oven to 390°F (200°C). Sift the flour and potato starch into a large bowl and set aside.

    Step 2. To make the rolled cake, separate the egg whites from the egg yolks with an egg separator. Beat the whites at medium speed, gradually adding sugar. Once the meringue is glossy, decrease the mixer speed and add egg yolks whisked as an omelet.

    Step 3. Beat the mixture for the other 15 seconds till all the ingredients are well incorporated. Add the sifted dry ingredients and gently mix with a spatula (photo 1).

    Step 4. Divide the batter into two parts. Spread the first part of the batter on a 12 x 16 inches (30 x 40 cm) baking sheet covered with parchment paper to the thickness of ⅕ inches (5 mm) and smooth with a bent spatula (photo 2).

    Pro tip: Alternatively, use a non-spill baking sheet (no need to grease it).

    Photo 1: Cake batter in a bowl Photo 2: Cake batter spread on parchment paper
    PHOTO 1 PHOTO 2

    Step 5. Bake for 10 minutes (photo 3). Once the biscuit is ready, remove it from the oven and cover it with a clean tea towel.

    Step 6. Flip it on top of the cloth and carefully remove the parchment or silicone sheet: gently lift the corners and then the mat or paper's whole surface. Cover the biscuit with another parchment layer and roll it from the long side to let it cool and retain moisture (photo 4). Repeat with the second part of the cake batter.

    Photo 3: Baked biscuit on parchment Photo 4: Sponge roll into parchment and tea towel
    PHOTO 3 PHOTO 4

    Step 7. Unwrap the cooled cake (photo 5). Spread a thin layer of the raspberry jam and roll it into a tight spiral with parchment (photo 6).

    Pro tip: Read on how to make a cake roll.

    Photo 5: Sponge rolled into parchment and towel Photo 6: Tight cake roll with raspberry filling
    PHOTO 5 PHOTO 6

    Step 8. Wrap the rolled biscuit in a plastic film and refrigerate for about three to four hours to facilitate cutting.

    Step 9. To make the Bavarian cream, first, make cream Anglaise or vanilla custard. Place gelatin sheets in a bowl of cold water and let it soak for 10 minutes. Bring whole milk with the scraped vanilla seeds to a boil.

    Pro tip: Consult the Bavarian cream recipe for step-by-step photographed explanations, helpful tips, and tricks.

    Step 10. Whisk egg yolks with sugar in a separate bowl, then slowly pour in the hot milk while continually stirring. Return the yolk mixture to a saucepan, cook over low heat, and continue whisking.

    Step 11. Once the custard coats the back of the spoon and reaches 179°F (82°C) - use a sugar thermometer - and take the pot from the heat. Add the drained gelatin. Transfer the custard to another bowl, cover it with plastic wrap in contact, and let it cool to room temperature.

    Pro tip: Consult the recipe for creme Anglaise for step-by-step photographed explanations, helpful tips, and tricks.

    Step 12. Pour heavy cream into the bowl of a stand mixer with a whip attachment (you can use an electric mixer) and whisk cream until soft peaks (photo 7).

    Pro tip: Read about the peak stages of whipped cream.

    Step 13. Add the whipped cream to the cooled custard, gently mixing with a wooden spoon or spatula (photo 8). Let it rest to thicken slightly, occasionally stirring.

    Photo 7: Soft cream peaks on beaters and cream Photo 8: Bavarian cream in a bowl
    PHOTO 7 PHOTO 8

    Step 14. To assemble Charlotte cake, line the bottom and sides of a bowl 8 inches (20 cm) in diameter with a plastic film.

    Step 15. Cut the edges of the sponges with a sharp knife, then cut rolled biscuits into thin slices - 5 mm or ⅕ inch thick (photo 9).

    Step 16. Arrange them at the bottom and sides of the lined bowl, pressing them against each other and the dish (photo 10).

    Photo 9: Cake slices on a cutting board Photo 10: A bowl lined with rolled slices
    PHOTO 9 PHOTO 10

    Step 17. Pour a third of the Bavarian cream in the center and distribute half of the fresh raspberries (photo 11). Pour another third of the cream again and repeat the layer of raspberries (photo 12).

    Photos 11-12: Charlotte base filled with cream and raspberries
    PHOTO 11 PHOTO 12

    Step 18. Finish with the cream. Cover the bottom of the bowl with the remaining rolled biscuit slices (photo 13), and place a plastic film on top of the biscuits.

    Step 19. Cover the top of the bowl with a cardboard base to pack everything. Finally, refrigerate the Charlotte cake for at least 6 hours and up to 24 hours.

    To serve, remove the cardboard and plastic, flip the cake on a serving plate, lift off the bowl, and serve immediately (photo 14).

    Photo 13: Bowl assembled with roll cake slices Photo 14: Charlotte cake on a serving platter
    PHOTO 13 PHOTO 14

    Optionally, brush the surface of the cake with a thin layer of a clear glaze and refrigerate until serving. 

    If you feel about decorating your Charlotte, you can arrange red fruits and mint sprigs on top of the cake.

    You can also whip Chantilly cream, place it in a pastry bag fitted with an open star pastry tip, and pipe a continuous design of scallops around the base of the Charlotte.

    Raspberry Charlotte Royale on a serving platter

    Expert Tips

    1. To get enough slices, make two sponge rolls out of the biscuit ingredients provided in the recipe. You will use one and a half rolls to choose the beautifully looking cake slices.
    2. Spread a THIN layer of the raspberry jam over the biscuit to get neat slices with cutting.
    3. Roll the biscuit from either end: if you roll from the short end, the slices will be larger.
    4. Press the cake slices against the bowl to prevent Bavarian cream from overflowing afterward.
    5. Start making Bavarian cream once you are ready to assemble the cake; otherwise, it will thicken before you slice up the cake roll.
    6. Wait for the Bavarian cream to thicken slightly; otherwise, it will leak between the cake slices and the bowl. In this case, the cake will be covered by Bavarian cream on top of the slices.
    7. Make-ahead option: Prepare the Swiss roll cakes on the first day, assemble the cake on the following day, and keep it wrapped in the refrigerator for 1-2 days.

    Recipe variations

    Everyone loves classic Charlotte Royale, but if you are ready to add a modern twist on tradition, try experimenting with new additions to the classic recipe.

    • Rolled biscuit: Try to make a chocolate version of Charlotte Royale by swapping the classic Swiss roll for its chocolate variation.
    • Filling: While Bavarian vanilla or raspberry cream is classic for making the Charlotte Royale, strawberry or chocolate cream is something for you to give a try.
    • Fruits: Use strawberries to make strawberry Charlotte Royale and even blueberries or cherries as other fruit variations. Swap raspberry jam for another fruit jam accordingly.

    If fresh fruits are out of the season, you can use the remaining rolled biscuit slices to fill the Charlotte. Just use them instead of berries: arrange slices in layers or insert them into the cream randomly.

    Another way to make a plain (without fresh fruits) Charlotte is to double the Bavarian cream recipe and add more vanilla to accentuate the taste.

    • Shape: Make your Charlotte Royale in a classic cake mold instead of using a glass bowl that shapes it into a half-sphere.

    Storing and freezing

    Store Charlotte Royale under a glass dome in the refrigerator for up to 24-48 hours.

    Can you freeze Charlotte Royale? It is not recommended to freeze the Charlotte cake since it is prepared with gelatin, which does withstand freezing temperatures.

    Recipe FAQ

    Why is it called Charlotte Royale cake?

    Charlotte Royale took its name from Queen Charlotte, the wife of King George III. 

    What is Charlotte Royale made of?

    Charlotte Royale is made with sliced Swiss roll cake and filled with Bavarian cream and fresh raspberries.

    What are Charlotte molds lined with?

    Traditionally, Charlotte molds are lined with spoon biscuits (biscuits à la cuillère) or boudoir (aka champagne biscuits or ladyfingers) and filled with Bavarian cream.

    What is the difference between Charlotte Russe and Charlotte Royale?

    The Charlotte Royale and Charlotte Russe share a common mousse filling. However, the Charlotte Royale uses Swiss roll slices in lieu of the classic ladyfinger lining featured in the Charlotte Russe.

    Want more delicious and beautiful recipes? Subscribe to my newsletter and follow me on Facebook, Pinterest, and Instagram for my latest updates. If you make this recipe, please leave a star rating on the recipe card and comment below!

    Print

    Recipe card

    Charlotte Royale Cake

    Sliced Charlotte Royale on a dessert plate.
    Print Recipe
    Save Recipe Recipe Saved

    5 Stars 4 Stars 3 Stars 2 Stars 1 Star

    5 from 11 reviews

    Raspberry Charlotte Royale is a gorgeous French dessert lined with a rolled biscuit and filled with silky Bavarian cream and fresh raspberries. Rich, sweet, and delicious, it is perfect for any special occasion.

    • Author: Irina Totterman
    • Total Time: 2 hours, 30 minutes (plus resting time)
    • Yield: 8 1x
    • Category: Cakes
    • Method: Baking
    • Cuisine: French

    Ingredients

    Scale

    For rolled biscuit:

    • 6 large eggs, room temperature
    • ½ cup + ½ tablespoon (120 g) granulated sugar
    • ⅓ cup + 7 teaspoons (60 g) all-purpose flour
    • 6 tablespoons (60 g) potato starch
    • 13 oz (370 g) raspberry jam

    For Bavarian cream:

    • 1 ¼ cup + 2 teaspoons (300 ml) whole milk
    • 3 gelatine sheets 
    • 3 egg yolks
    • ⅓ cup + 5 ½ teaspoons (100 g) granulated sugar 
    • 1 vanilla bean
    • ⅔ cup (150 g) whipping cream
    • 14 oz (400 g) fresh raspberries

    For finishing (optional):

    • clear glaze or neutral topping

    *Don't you have the correct baking pan on hand right now? Try this simple Cake Pan Converter!

    ** If needed, please refer to Baking Conversion Charts.

    Instructions

    1. Preheat the oven to 390°F (200°C). Sift flour and potato starch in a large bowl and set aside.

    2. Rolled biscuit batter: Separate the egg whites from the egg yolks with an egg separator. Beat the whites at medium speed, gradually adding sugar. Once the meringue is glossy, decrease the mixer speed and add egg yolks whisked as an omelet. Beat the mixture for the other 15 seconds till all the ingredients are well incorporated. Add the sifted dry ingredients and gently mix with a spatula.

    3. Divide the batter into two parts. Spread the first part of the batter on a 12 x 16 inches (30 x 40 cm) baking sheet covered with parchment paper to the thickness of ⅕ inches (5 mm) and smooth with a bent spatula. Alternatively, use a non-spill baking sheet (no need to grease it). 

    4. Bake for 10 minutes. Once the biscuit is ready, remove it from the oven and cover it with a clean tea towel. Flip it on top of the cloth and carefully remove the parchment or silicone sheet: gently lift the corners and then the mat or paper's whole surface. Cover the biscuit with another parchment layer and roll it from the long side to let it cool and keep the moisture. Repeat the same with the second part of the cake batter.

    5. Unwrap the cooled cake. Spread a thin layer of the raspberry jam and roll it into a tight spiral with parchment paper. Wrap the rolled biscuit in plastic film and refrigerate for about three to four hours to facilitate cutting.

    6. Cream Anglaise: Place gelatin sheets in a bowl of cold water and let it soak for 10 minutes. Bring whole milk with the scraped vanilla seeds to a boil. In a separate bowl, whisk egg yolks with sugar, then pour in the hot milk slowly while continually stirring. Bring the yolk mixture back to a saucepan, cook over low heat, and continue whisking. Once the custard coats the back of the spoon and reaches 179°F (82°C) - use a sugar thermometer - and take the pot from the heat. Add the drained gelatin. Transfer the custard to another bowl, cover it with plastic wrap in contact, and let it cool to room temperature.

    7. Bavarian cream: Pour heavy cream into the bowl of a stand mixer with a whip attachment (you can use an electric mixer) and whisk cream until soft peaks. Add the whipped cream to the cooled custard, gently mixing with a wooden spoon or spatula. Let it rest to thicken slightly, occasionally stirring.

    8. Assemble Charlotte: Line the bottom and sides of a bowl 8 inches (20 cm) in diameter with a plastic film. Cut the edges of the sponges with a sharp knife, then cut rolled biscuit into thin slices - 5 mm or ⅕ inch thick. Arrange them at the bottom and sides of the lined bowl, pressing them against each other and the dish. 

    9. Fill with Bavarian cream: Pour a third of the Bavarian cream in the center and distribute half of the fresh raspberries. Pour another third of the cream again and repeat the layer of raspberries. Finish with the cream. Cover the bottom of the bowl with the remaining rolled biscuit slices, and place a plastic film on top of the biscuits.

    10. Finish cake assembling: Place a cardboard base over the top of the bowl to pack everything. Refrigerate the Charlotte cake for at least 6 hours and up to 24 hours. When ready to serve, remove the cardboard and plastic, flip the cake on a serving plate, lift off the bowl, and serve immediately. 

    11. Brush the surface of the cake with a thin layer of a clear glaze and refrigerate until serving (optional). 

    Notes

    1. Make two sponge rolls out of the biscuit ingredients provided in the recipe to get enough slices. You will use one and a half rolls to choose the beautifully looking cake slices.
    2. Spread a THIN layer of the raspberry jam over the biscuit to get neat slices with cutting.
    3. Roll the biscuit from either end: if you roll from the short end, the slices will be larger.
    4. Press the cake slices against the bowl to prevent Bavarian cream from overflowing afterward.
    5. Start making Bavarian cream once you are ready to assemble the cake; otherwise, it will thicken before you slice up the cake roll.
    6. Wait for the Bavarian cream to thicken slightly; otherwise, it will leak between the cake slices and the bowl. In this case, you will end up with the cake covered by Bavarian cream on top of slices.

    Nutrition

    • Serving Size: 1 slice
    • Calories: 497
    • Sugar: 59.8 g
    • Sodium: 79 mg
    • Fat: 12.9 g
    • Saturated Fat: 6.1 g
    • Carbohydrates: 88.9 g
    • Fiber: 3.5 g
    • Protein: 10.8 g
    • Cholesterol: 243 mg

    Thank you for following me on Pinterest, Facebook, and Instagram. Hashtag #bakinglikeachef so I can see your creations.

    The nutritional information has been calculated using an online recipe nutrition calculator such as Verywellfit.com and is intended for informational purposes only. These figures should be used as a general guideline and not be construed as a guarantee.

    The recipe was adapted from https://www.mercotte.fr/. It was originally published on June 04, 2018. The recipe has been revised to include improved content and photos.

    Pavlova Roll (Meringue Roulade)

    Jul 22, 2020 · 23 Comments

    Meringue roulade topped with raspberries and pistachios on a black serving board.

    Here is the ultimate Pavlova roll recipe for all occasions. This easy meringue roulade is a delightful twist on the traditional Pavlova, featuring a mouthwatering combination of sweet meringue, tangy raspberries, luscious whipped cream, and crunchy toasted pistachios. Light, impressive, and full of flavors.

    Meringue roulade topped with raspberries and pistachios on a black serving board

    Whether it is a beautiful summer day or a birthday party, a Christmas holiday, or Valentine's Day, this gorgeous dessert will be a winner of the table.

    [feast_advanced_jump_to]

    This meringue roulade recipe offers the delightful taste of Pavlova but requires a much shorter cooking time. While classic Pavlova typically takes about 2 hours to bake, this meringue only needs 30 minutes in the oven.

    BAKING ESSENTIALS CHECKLIST

    Sign up and get a list of the necessary baking tools and ingredients

    FREE DOWNLOAD

    If you love light and airy meringue, enjoy other meringue-based desserts on the website, such as easy and quick Large Meringue, crowd-pleasing French Meringue Cake Merveilleux, summertime Plum Pavlova, or no-bake Eton Mess.

    What is a Pavlova roll?

    Pavlova roll, or Pavlova roulade, is a rolled meringue with a crispy top and soft, marshmallow-like interior. It is filled and decorated with whipped cream and seasonal fruits.

    As a variation of the famous Australian or NZ Pavlova, this stunning and yummy meringue dessert has many names, such as meringue roulade, meringue roll, Swiss meringue roll, Pavlova roll, Pavlova cake roll, Pavlova log, and rolled Pavlova.

    Not all the names correctly describe the roulade, but one thing they all have in common: delicious.

    Pavlova roll decorated with fresh raspberries and pistachios on a serving board

    Pavlova roll recipe

    • This quick and easy rolled Pavlova recipe results in a very impressive-looking dessert.
    • Ideal for any party, this naturally gluten-free dessert serves 8-10 people.
    • This meringue roulade is fully customizable: replace fresh raspberries with cherries or other fruits of your choice.
    • It is perfect for a birthday, anniversary, Christmas, Easter, and Australia Day.

    Ingredients

    For ingredients and detailed instructions, refer to the recipe card below.

    • Egg whites: Use large egg whites from fresh eggs. Easily separate the whites from the yolks while they are cold. Use an egg separator or the old-school eggshell method when you break the egg and pour the egg yolk from half of the shell to another half, allowing the white to drip into a bowl. Let the egg whites get to room temperature before you start.

    Use leftover egg yolks to make Italian pastry cream, Bavarian cream, crème Anglaise, or savory hollandaise sauce.

    • Sugar: Use superfine caster sugar, also known as baker's sugar or castor sugar. To make granulated sugar superfine, process it in a food processor for a few seconds.
    • Vanilla extract: Madagascar Bourbon pure vanilla extract is the most full-flavored among other vanilla extracts. Use alcohol-free vanilla flavor if you desire. 
    • White wine vinegar helps stabilize the beaten egg whites so that the meringue retains its volume and keeps the air whisked into it. To replace it, use the same amount of lemon juice or cream of tartar.
    • Corn starch is an essential ingredient to make a meringue roulade. With its long molecules, cornstarch prevents egg white proteins from clotting too much while the meringue is baking. It facilities the meringue rolling while assembling the dessert.
    • Heavy cream: Use your favorite heavy or heavy whipping cream brand with at least 30% fat content.
    • Sour cream helps stabilize whipped cream. Replace it with mascarpone, but do not over-mix the cream.
    • Icing sugar: Make it yourself with a coffee grinder or use store-bought powdered sugar.
    • Rosewater (optional) brings floral flavor to the dessert. Combined with vanilla, rosewater makes an enticing match in this Pavlova roulade.
    • Raspberries: The recipe calls for fresh seasonal raspberries. Frozen raspberries will not work in this recipe, but you can use fresh or frozen cherries. In this case, use drained, pitted, and wiped dry cherries.
    • Pistachios: Choose toasted or raw pistachios to decorate the dessert.
    Decorated rolled Pavlova on a black serving board with plates in the background

    Recipe variations

    • Flavoring: Flavor the meringue roll and the filling cream with vanilla, coconut, almond extract, orange blossom water, or rose water.
    • Filling: Swap raspberries for fresh peaches, nectarines, cherries, kiwis, or a mix of red fruit (fresh strawberries, blueberries, blackberries, and raspberries). Replace pistachios with toasted almonds.
    • Decoration: Decorate the meringue roulade with fresh rose petals or chocolate shavings instead of fresh berries.

    How to make meringue roulade

    Step 1. To make the Pavlova meringue, preheat the oven to 320°F (160°C).

    Step 2. Place egg whites in a clean bowl of an electric mixer or the bowl of a stand mixer fitted with the whisk attachment and whisk until soft peaks.

    Step 3. Gradually add sugar in a few additions and continue to whisk egg whites on medium-high speed until the meringue becomes glossy and stiff peaks form.

    Step 4. Add vanilla extract, white wine vinegar, and cornstarch and gently mix with a large metal spoon or a large rubber spatula (photo 1).

    Step 5. Line a 13 x 9.5 inches rimmed baking sheet (33 x 24 cm) with non-stick baking paper extending 1 inch (2.5 cm) over each side of the pan. Secure parchment paper to the pan with meringue drops at the corners (photo 2).

    Photo 1: Meringue in a bowl Photo 2: Parchment fixed with the meringue into a pan
    PHOTO 1 PHOTO 2

    Step 6. Spread the meringue mixture into the prepared pan and level it with an offset spatula or a dough scraper (photo 3).

    Step 7. Bake in the preheated oven for 30 minutes. The meringue is ready when it forms a crust on top. Remove the pan from the oven, slide the meringue on a work surface, and let it cool (photo 4). 

    Step 8. Flip the meringue onto a clean sheet of parchment larger than the longest side of the pan and gently peel off the lining paper from the base.

    Photo 3: Meringue into a baking pan Photo 4: Baked meringue in a pan
    PHOTO 3 PHOTO 4

    Step 9. To make the stabilized whipped cream, place cold heavy cream, cold sour cream, icing (powdered) sugar, rose water, and vanilla extract in a clean oil-free bowl.

    Step 10. Whisk with a hand whisk for about 5-6 minutes until soft peaks: the cream will start holding its shape (photo 5). 

    Step 11. To assemble the meringue roll, spread the cream in an even layer over the top of the meringue, and set aside a few spoons of cream for decoration.

    Step 12. Arrange raspberries (reserve a few for the decor) on top of the cream, and sprinkle with chopped pistachios (photo 6).

    Photo 5: Whipped cream in a bowl Photo 6: Meringue covered with cream, raspberries, and pistachios
    PHOTO 5 PHOTO 6

    Step 13. Roll the meringue into a log, starting from the long end. Use parchment paper as a guide to help you roll it (photo 7).

    Step 14. Transfer the roulade onto a serving plate with the seam side down. Decorate the top of the cake with the cream, making waves with a spatula. Refrigerate for at least 30 minutes.

    Step 15. Once ready to serve, decorate the roulade with the remaining cream, fresh raspberries, and chopped toasted pistachios (photo 8). Sprinkle with icing (powdered) sugar.

    Photo 7: Meringue roll on parchment Photo 8: Assembled Pavlova roulade
    PHOTO 7 PHOTO 8

    Expert Tips

    1. Ensure to use a clean and dry bowl. Any remaining moisture or grease will interfere with whisking.
    2. Add sugar in a slow stream or one spoonful at a time. Whisk for 10 seconds before adding the next spoonful.
    3. Check the meringue's texture by rubbing it between your fingers to confirm sugar is incorporated and dissolved.
    4. Avoid opening the oven door while baking.
    5. Don't trim the edge of the meringue roulade: it isn't a sponge cake roll.
    6. Use an electric mixer to whip the cream, but keep your eye on it, don't over-whisk. 
    7. Make sure to spread the cream filling onto the cooled meringue.
    8. To recalculate the amount of ingredients for a classic Swiss roll tin, use this simple cake pan calculator.

    Storing and freezing

    Pavlova roll is best eaten on the day of making, but you can store any leftovers in the refrigerator for up to two days.

    Can you freeze a meringue roulade? It is not recommended to freeze it due to the cream filling: it doesn't stand freezing.

    Recipe FAQ

    What's the difference between a Pavlova and a roulade?

    Classic Pavlova is a shaped meringue dessert topped with whipped cream and fresh fruit. On the other hand, Pavlova roulade is made by spreading meringue on a baking tray, baking, filling it with cream and berries, and rolling it into a log.

    Why is my meringue roulade sticky?

    The meringue roulade becomes sticky with the extra moisture from the air. To prevent it, store it in a dry place.

    Can you make meringue roulade ahead of time?

    The answer is yes and no. You can make this roulade one day beforehand, but it might lose some crispiness due to the cream's use. With that said, it is better to make the dessert on the day of serving to keep the meringue crispiness on the outside and marshmallowy on the inside.

    Love cake rolls? Try these next!

    After discovering the best Pavlova roll recipe, explore the perfection of other rolled cakes on the website:

    • Vanilla Swiss roll
    • Nutella Swiss roll
    • Coffee Swiss roll
    • Pavlova roll cake
    • Pistachio roulade
    • Or browse all the cake recipes

    Want more delicious and beautiful recipes? Subscribe to my newsletter and follow me on Facebook, Pinterest, and Instagram for my latest updates. If you make this recipe, please leave a star rating on the recipe card and comment below!

    Print

    Recipe card

    Pavlova Roll (Meringue Roulade)

    Meringue roulade topped with raspberries and pistachios on a black serving board.
    Print Recipe
    Save Recipe Recipe Saved

    5 Stars 4 Stars 3 Stars 2 Stars 1 Star

    5 from 10 reviews

    Pavlova roll, or meringue roulade, is an interesting and pretty take on the traditional Pavlova with sweet meringue, tart raspberries, luscious whipped cream, and toasted pistachios. Light, impressive, and full of flavors.

    • Author: Irina
    • Total Time: 1 hour, 20 minutes (plus resting time)
    • Yield: 8 1x
    • Category: Cakes
    • Method: Baking
    • Cuisine: Australian, NZ
    • Diet: Gluten Free

    Ingredients

    Scale

    For the Pavlova meringue:

    • 4 large egg whites, room temperature
    • 1 cup + 5 ½ teaspoons (250 g) caster sugar
    • 1 teaspoon vanilla extract
    • 1 teaspoon white wine vinegar
    • 1 teaspoon cornstarch

    For the cream filling:

    • 1 ⅔ cups + 4 teaspoons (400 ml) cold heavy cream. 30 % fat
    • ⅓ cup + 1 tablespoon (100 g) cold sour cream
    • 1 tablespoon icing (powdered) sugar
    • 1 tablespoon rosewater (optional)
    • 1 teaspoon vanilla extract

    For assembling:

    • 7 oz (200 g) fresh raspberries
    • 0.7 oz (20 g) toasted pistachios
    • 1 tablespoon icing (powdered) sugar

    *Don't you have the correct baking pan on hand right now? Try this simple Cake Pan Converter!

    ** If needed, please refer to Baking Conversion Charts.

    Instructions

    1. To make the Pavlova meringue, preheat the oven to 320°F (160°C). Place egg whites in a clean bowl of an electric mixer or the bowl of a stand mixer fitted with the whisk attachment and whisk until soft peaks.

    2. Gradually add sugar in a few additions and continue to whisk egg whites on medium-high speed until the meringue becomes glossy and stiff peaks form. Add vanilla extract, white wine vinegar, and cornstarch and gently mix with a large metal spoon or a large rubber spatula.

    3. Line a 13 x 9.5 inches (33 x 24 cm) rimmed baking sheet with non-stick baking paper extending 1 inch (2.5 cm) over each side of the pan. Secure parchment paper to the pan with meringue drops at the corners. 

    4. Spread the meringue mixture into the prepared pan and level it with an offset spatula or a dough scraper. Bake in the preheated oven for 30 minutes. The meringue is ready when it forms a crust on top.

    5. Remove the pan from the oven, slide the meringue on a work surface, and let it cool. Flip the meringue onto a clean sheet of parchment larger than the longest side of the pan and gently peel off the lining paper from the base. 

    6. To make the stabilized whipped cream, place cold heavy cream, cold sour cream, icing (powdered) sugar, rose water, and vanilla extract in a clean oil-free bowl. Whisk with a hand whisk for about 5-6 minutes until soft peaks: the cream will start holding its shape.

    7. To assemble the meringue roll, spread the cream in an even layer over the top of the meringue, and set aside a few spoons of cream for decoration. Arrange raspberries (reserve a few for the decor) on top of the cream, and sprinkle with chopped pistachios.

    8. Roll the meringue into a log, starting from the long end. Use parchment paper as a guide to help you roll it. Transfer the roulade onto a serving plate with the seam side down. Decorate the top of the cake with the cream, making waves with a spatula. Refrigerate for at least 30 minutes.

    9. Once ready to serve, decorate the roulade with the remaining cream, fresh raspberries, and chopped toasted pistachios. Sprinkle with icing (powdered) sugar.

    Notes

    1. Ensure to use a clean and dry bowl. Any remaining moisture or grease will interfere with whisking.
    2. Add sugar in a slow stream or one spoonful at a time. Whisk for 10 seconds before adding the next spoonful.
    3. Check the meringue's texture by rubbing it between your fingers to confirm sugar is incorporated and dissolved.
    4. Avoid opening the oven door while baking.
    5. Don't trim the edge of the meringue roulade: it isn't a sponge cake roll.
    6. Use an electric mixer to whip the cream, but keep your eye on it, don't over-whisk. 
    7. Make sure to spread the cream filling onto the cooled meringue.
    8. To recalculate the amount of ingredients for a classic Swiss roll tin, use this simple cake pan calculator.

    Nutrition

    • Serving Size: 1 slice
    • Calories: 339
    • Sugar: 34.8 g
    • Sodium: 54 mg
    • Fat: 19.7 g
    • Saturated Fat: 11.6 g
    • Carbohydrates: 39.4 g
    • Fiber: 1.9 g
    • Protein: 4.1 g
    • Cholesterol: 62 mg

    Thank you for following me on Pinterest, Facebook, and Instagram. Hashtag #bakinglikeachef so I can see your creations.

    The recipe was adapted from Ottolenghi Raspberry Meringue Roulade at https://thehappyfoodie.co.uk/. It was originally published on November 04, 2018. The recipe has been revised to include improved content and photos.

    The nutritional information has been calculated using an online recipe nutrition calculator such as Verywellfit.com and is intended for informational purposes only. These figures should be used as a general guideline and not be construed as a guarantee.

    Fraisier Cake (French Strawberry cake)

    Jul 21, 2020 · 24 Comments

    Sliced Fraisier cake on a serving plate.

    Fraisier cake or gateau Fraisier is a traditional French strawberry cake made with two layers of Genoise biscuit and generously garnished with fresh strawberries and luscious Diplomat cream. It's a visually stunning masterpiece perfect for birthdays and other special celebrations.

    Sliced Fraisier cake on a serving plate.

    Fraisier cake, or gateau Fraisier

    This French strawberry cake is one of the most gorgeous cakes I have ever made. And I made a lot of cakes as a cake lover.

    [feast_advanced_jump_to]

    I started experimenting with the Fraisier cake recipe a long time ago by making Fraisier by Yann Couvreur first. His modern presentation, studded with a generous amount of fresh strawberries cut into rings, is stunning.

    BAKING ESSENTIALS CHECKLIST

    Sign up and get a list of the necessary baking tools and ingredients

    FREE DOWNLOAD

    But later, I went to a classic Frasier cake with diplomat cream (crème diplomate) made of pastry cream and whipped cream with added gelatin, which is much lighter.

    What's next, asking you? Maybe individually served mini Fraiser cakes, perfect for St. Valentine's Day. Let's see.

    What is Fraisier cake

    Fraisier cake, or simply Fraisier, is a classic French strawberry cake made with fresh strawberries, a vanilla mousseline cream or crème mousseline, and a very lightly soaked Genoise sponge. The cake's name, gateau Fraisier, is derived from the French word for strawberry, "fraise," and "gateau," meaning cake.

    The raspberry version of a similar French cake made with raspberries is called Framboisier cake (from the French word "framboise," meaning raspberry). A matching blackberry cake is called Mûrier (from the French word "la mûre," meaning blackberry).

    Each of these summer strawberry cakes is visually impressive, incredibly tasty, and delicious. As per Chefsimon.com, it is "a pastry of incomparable freshness and delicacy."

    Ingredients

    For ingredients and detailed instructions, refer to the recipe card below.

    • Strawberries - choose good quality fresh strawberries of the same diameter to get a beautiful finish to the cake. The larger the berry, the juicier it is; the smaller the strawberry, the more flavorful it is. Read this guide on types of strawberries and choose those available in your area.
    • Large eggs at room temperature.
    • Sugar - regular granulated sugar or caster sugar.
    • All-purpose flour
    • Unsalted butter - high-quality European-style butter with 82% fat content. I always get it on the counter 1 hour before I start.
    • Kirsch brings a beautiful flavor. Use dark rum or cognac instead.
    • Gelatin sheets with a strength of 200 bloom. To substitute sheet gelatin in the recipe, use 8 g of powdered gelatin and ¼ cup (60 ml) of cold water.
    • Cornstarch works as a thickening agent.
    • Vanilla pod - the best quality wholesale Madagascar vanilla bean. You can use 1 teaspoon of vanilla bean paste instead.
    • Whole milk 3.2 %
    • Heavy cream with at least 30% fat content. It must be cold, right from the fridge.
    • Freeze-dried strawberries or powdered sugar for decor.
    A slice of French strawberry cake on a dessert plate.

    How to make Fraisier cake step-by-step

    Step 1: To make a Genoise sponge, preheat the oven to 355°F (180°C). Grease an 8-inch (20 cm) round cake pan with softened butter, sprinkle with all-purpose flour, and remove excess.

    Pro tip: Consult the Genoise cake recipe for step-by-step photographed explanations, helpful tips, and tricks

    Step 2: Melt the butter in the microwave oven at 30-second intervals and set aside. Check its temperature: it should be 122-140°F (50-60°C).

    Step 3: In the heatproof bowl of a stand mixer, place the room-temperature eggs and sugar. Beat with a hand whisk several times.

    Step 4: Place the bowl in a water bath and whisk constantly with a hand whisk until the egg mixture reaches 104°F (40°C). 

    Step 5: Remove it from the water bath and bring it to a stand mixer fitted with a whisk attachment. Whisk at medium-high speed for 10 minutes until the volume has tripled and the mixture reaches the ribbon stage.

    Step 6: Sift the flour over the bowl and gently stir with a rubber spatula until smooth. Add two tablespoons of the cake batter to the melted butter and mix with a spatula. Add the butter mixture back, and mix.

    Step 7: Pour the batter into your prepared baking pan and bake for 25 minutes, until golden brown. Check for doneness with a toothpick.

    Step 8: Remove the cake from the oven and let it cool in the pan for 5-10 minutes. Flip it over on a wire rack and let it cool for 10 minutes, then flip it back and let it cool completely. 

    Step 9: Cut the cake into two layers (a bit over ½ inches or 1.5 cm thick) with the help of a cake leveler or a long serrated knife.

    Pro Tip: Remove the crust from the top of the cake to make it a white sponge cake while keeping the bottom intact. The bottom will become the top of your cake. 

    Step 10: To make simple syrup with Kirsch, bring the water and sugar to a boil. Remove from the heat, add Kirsch, and let it cool down.

    Step 11: To make Diplomat cream, soak gelatin sheets in a bowl of cold water for 10 minutes.

    Step 12: For the pastry cream, mix the egg yolks with sugar and cornstarch with a hand whisk until smooth.

    Pto tip: Consult the pastry cream recipe for step-by-step photographed explanations, helpful tips, and tricks.

    Step 13: Pour the milk with the scraped vanilla seeds into a medium saucepan and bring it to a boil. Remove the pan from the heat. Pour the hot milk over the egg yolk mixture, whisking constantly.

    Step 14: Transfer the mixture back into the pot and cook over low heat, whisking constantly until the cream thickens. Check the temperature of the cream: it mustn't exceed 179°F (82C)!

    Pro tip: If lumps appear, pass the cream through a fine sieve.

    Step 15: Add the gelatin sheets and mix with a hand whisk while the cream is hot. Immediately transfer the pastry cream to a clean, shallow dish. Cover it with plastic film in contact and allow it to cool on the kitchen counter - no need to refrigerate.

    Step 16: For the whipped cream, whip the cold heavy cream with a stand or electric mixer until soft peaks. Cover the bowl with cling film and refrigerate.

    Step 17: To finish the Diplomat cream, place the pastry cream in a large bowl and whisk it several times with a hand whisk to loosen it. Add ⅓ of the whipped cream to the pastry cream and mix with a rubber spatula or hand whisk. Add the rest of the whipped cream and stir to combine to make a smooth Diplomat cream: don't whip it up.

    Pro tip: Mix whipped cream with pastry cream at the last moment, just before assembling the cake.

    Step 18: To assemble the cake, place a mousse cake ring on the cake board or serving plate, adjust it to 8 inches (20 cm), and line it with an acetate strip.

    Step 19: Wash and pat dry strawberries, peel them, and cut about 10-12 berries in half. Reserve a few whole strawberries for garnish, and cut the remaining ones into 1-inch or 2 cm-sized pieces (photo 1).

    Step 20: Place the first cake disc (leave the bottom of the cake; this will be the top of the cake). Generously soak it with Kirsch syrup using a pastry or silicone brush. 

    Step 21: Arrange the strawberry halves around the edges of the cake, cut sides out, and place them together, leaving no space (photo 2).

    Strawberry halves and smaller slices on a cutting board.

    PHOTO 1

    Strawberry halves around the cake edge in a cake mold.

    PHOTO 2

    Step 22: Transfer some Diplomat cream to a piping bag with a tip for simple assembling. Fill the gaps between the strawberries with cream, leaving the center hollow (photo 3). Use a small offset spatula or the back of a spoon to smooth out the cream if needed.

    Step 23: Add the sliced strawberries to the remaining Diplomat cream and stir gently with a spatula without crushing the fresh fruit. Fill the inside of the cake with the cream and slices of freshly cut strawberries.

    Step 24: Spread the plain Diplomat cream from the center on top of the cake with an offset spatula. Be sure to cover the surface of the cake without displacing the halved strawberries (photo 4).

    Diplomat cream filled between strawberry halves in a mold.

    PHOTO 3

    Cake mold filled with Diplomat cream.

    PHOTO 4

    Step 25: Place the bottom layer of sponge cake upside down (don't soak it). Cover the cake with plastic wrap and refrigerate for 2 hours or overnight.

    To serve, unmold the cake and sprinkle the top of the cake with freeze-dried strawberry powder (use a food processor) or powdered sugar. Decorate with fresh strawberries.

    Genoise sponge cake layer on top of the mold.

    PHOTO 5

    Decorated gateau Fraisier on a dessert plate.

    PHOTO 6

    Expert tips to make French strawberry cake

    1. Be organized by preparing and measuring all the ingredients for making and assembling the cake.
    2. Mix whipped cream with pastry cream at the last moment, just before assembling the cake.
    3. Respect the cooling and resting time while making Diplomat cream.
    4. Be sure to choose strawberries of the same height (2.5 inches or 3-3.5 cm) for a beautiful presentation.
    5. Use a springform cake tin instead of a mousse cake ring.
    6. Neatly pipe the Diplomat cream between edged strawberries.
    7. Keep the cake in the mold (pastry ring) until serving. Decorate the top of the cake at the last minute.

    Storage

    Store Fraisier cake in a mold covered with plastic wrap in the refrigerator until the moment of serving.

    The dessert is best eaten on the day of serving, but you can keep leftovers in an airtight container for up to 2 days.

    Can you freeze Fraisier cake? It is not advisable to freeze Fraisier since strawberries with cream do not stand freezing well.

    Recipe FAQ

    Can you make Fraisier cake in advance?

    Yes, you can make this strawberry cake one day in advance. Store it in a mold covered with plastic film until serving.

    Love French desserts? Try these next!

    • Classic French madeleines
    • French chocolate crepes
    • French financiers
    • French chocolate cake

    Want more delicious and beautiful recipes? Subscribe to my newsletter and follow me on Facebook, Pinterest, and Instagram for my latest updates. If you make this recipe, please leave a star rating on the recipe card and comment below!

    Print

    Recipe card

    Fraisier Cake (Fench Strawberry cake)

    Sliced Fraisier cake on a serving plate.
    Print Recipe
    Save Recipe Recipe Saved

    5 Stars 4 Stars 3 Stars 2 Stars 1 Star

    5 from 10 reviews

    Fraisier cake or gateau Fraisier is a traditional French strawberry cake made with a Genoise biscuit and generously garnished with fresh strawberries and luscious Diplomat cream. It's a visually stunning masterpiece perfect for birthdays and other special celebrations. 

    • Author: Irina Totterman
    • Total Time: 2 hours, 30 minutes
    • Yield: 10 1x
    • Category: Cakes
    • Method: Baking
    • Cuisine: French

    Ingredients

    Scale

    For Genoise sponge cake:

    • 2 large eggs, room temperature
    • ⅓ cup + 2 tablespoons (90 g) granulated sugar
    • ⅔ cup + 2 ½ teaspoons (90 g) all-purpose flour
    • 1 ½ tablespoons (20 g) unsalted butter

    For the sugar syrup:

    • 3 tablespoons (45 ml) of water
    • 2 tablespoons (25 g) granulated sugar
    • ½ tablespoon kirsch (dark rum or cognac)

    For the pastry cream:

    • 2 ½ gelatin sheets, 200 bloom
    • 2 ½ extra large egg yolks (47 g), room temperature
    • ⅓ cup + 2 tablespoons (90 g) granulated sugar
    • 3 tablespoons (30 g) cornstarch
    • 1 vanilla bean (or 1 teaspoon vanilla paste)
    • 1 ¼ cups (295 ml) whole milk

    For the Diplomat cream:

    • pastry cream (whole quantity)
    • 1 cup (235 g) cold heavy cream, 30% fat

    For assembly:

    • 1 ½ lb (600 g) fresh strawberries
    • 2 tablespoons freeze-dried strawberries (or powdered sugar)

    *Don't you have the correct baking pan on hand right now? Try this simple Cake Pan Converter! 

    Instructions

    1. To make a Genoise sponge, preheat the oven to 355°F (180°C). Grease an 8-inch (20 cm) round cake pan with softened butter, sprinkle with all-purpose flour, and remove excess.
    2. Melt the butter in the microwave oven at 30-second intervals and set aside. Check its temperature: it should be 122-140°F (50-60°C).
    3. In the heatproof bowl of a stand mixer, place the room-temperature eggs and sugar. Beat with a hand whisk several times.
    4. Place the bowl in a water bath and whisk constantly with a hand whisk until the egg mixture reaches 104°F (40°C).
    5. Remove it from the water bath and bring it to a stand mixer fitted with a whisk attachment. Whisk at medium-high speed for 10 minutes until the volume has tripled and the mixture reaches the ribbon stage.
    6. Sift the flour over the bowl and gently stir with a rubber spatula until smooth. Add two tablespoons of the cake batter to the melted butter and mix with a spatula. Add the butter mixture back, and mix.
    7. Pour the batter into your prepared baking pan and bake for 25 minutes, until golden brown. Check for doneness with a toothpick.
    8. Remove the cake from the oven and allow it to cool in the pan for 5-10 minutes. Flip it over on a wire rack and let it cool for 10 minutes, then flip it back and let it cool completely.
    9. Cut the cake into two layers (a bit over ½ inches, or 1.5 cm thick) with the help of a cake leveler or a long serrated knife. Remove the crust from the top of the cake to make it a white sponge cake while keeping the bottom intact. The bottom will become the top of your cake.
    10. To make simple syrup with Kirsch, bring the water and sugar to a boil. Remove from the heat, add Kirsch, and let it cool down.
    11. To make Diplomat cream, soak gelatin sheets in a bowl of cold water for 10 minutes.
    12. For the pastry cream, mix the egg yolks with sugar and cornstarch with a hand whisk until smooth. Pour the milk with the scraped vanilla seeds into a medium saucepan and bring it to a boil. Remove the pan from the heat. Pour the hot milk over the egg yolk mixture, whisking constantly.
    13. Transfer the mixture back into the pot and bring to cook over low heat, whisking constantly, until the cream thickens. Check the temperature of the cream: it mustn't exceed 179°F (82C)! If lumps appear, pass the cream through a fine sieve.
    14. While the cream is hot, add the gelatin sheets and mix with a hand whisk. Immediately transfer the pastry cream to a clean, shallow dish. Cover it with plastic film in contact and allow it to cool on the kitchen counter - no need to refrigerate.
    15. For the whipped cream, whip the cold heavy cream with a stand or electric mixer until soft peaks. Cover the bowl with cling film and refrigerate.
    16. To finish the Diplomat cream, place the pastry cream in a large bowl and whisk it several times with a hand whisk to loosen it. Add ⅓ of the whipped cream to the pastry cream and mix with a rubber spatula or hand whisk.
    17. Add the rest of the whipped cream and stir to combine to make a smooth Diplomat cream: don't whip it up.
    18. To assemble the cake, place a mousse cake ring on the cake board or serving plate, adjust it to 8 inches (20 cm), and line it with an acetate strip.
    19. Wash and pat dry strawberries, peel them, and cut about 10-12 berries in half. Reserve a few whole strawberries for garnish, and cut the remaining ones into 1-inch or 2 cm-sized pieces.
    20. Place the first cake disc (leave the bottom of the cake: this will be the top of the cake). Generously soak it with Kirsch syrup using a pastry or silicone brush.
    21. Arrange the strawberry halves around the edges of the cake, cut side out, well placing them together, leaving no space.
    22. Transfer some of the Diplomat cream to a piping bag with a tip for simple assembling. Fill the gaps between the strawberries with cream, leaving the center hollow. Use a small offset spatula or the back of a spoon to smooth out the cream if needed.
    23. Add the diced strawberries to the remaining Diplomat cream and stir gently with a spatula without crushing the fresh fruit. Fill the inside of the cake with the cream and slices of freshly cut strawberries.
    24. Spread the plain Diplomat cream from the center on top of the cake with an offset spatula. Be sure to cover the surface of the cake without displacing the halved strawberries.
    25. Place the bottom layer of sponge cake upside down (don't soak it). Cover the cake with plastic wrap and refrigerate for 2 hours or overnight.
    26. To serve, unmold the cake and sprinkle the top of the cake with freeze-dried strawberry powder (use a food processor) or powdered sugar. Decorate with fresh strawberries.

    Notes

    1. Respect the cooling and resting time while making Diplomat cream.
    2. Mix whipped cream with pastry cream at the last moment, just before assembling the cake.
    3. Be sure to choose strawberries of the same height (2.5 inches or 3-3.5 cm) for a beautiful presentation.
    4. Use a springform cake tin instead of a mousse cake ring.
    5. Neatly pipe the Diplomat cream between edged strawberries.
    6. Keep the cake in the mold (pastry ring) until the moment of serving. Decorate the top of the cake at the last minute.

    Nutrition

    • Serving Size: 1 slice
    • Calories: 198
    • Sugar: 26 g
    • Sodium: 23 mg
    • Fat: 3.87 g
    • Saturated Fat: 1.7 g
    • Carbohydrates: 37.74 g
    • Fiber: 1.5 g
    • Protein: 3.46 g
    • Cholesterol: 83 mg

    Thank you for following me on Pinterest, Facebook, and Instagram. Hashtag #bakinglikeachef so I can see your creations.

    The nutritional information has been calculated using an online recipe nutrition calculator such as Verywellfit.com and is intended for informational purposes only. These figures should be used as a general guideline and not be construed as a guarantee.

    The recipe was originally published on September 18, 2018. It has been updated and may differ from what was initially published.

    For reference, if you have made this recipe previously and want to replicate it, please get in touch with hello@bakinglikeachef.com. I will be happy to send you the old version of the cake.

    Royal Chocolate Cake / Trianon

    Jul 10, 2020 · 50 Comments

    Sliced Royal chocolate cake on a golden cake board with crepes Gravottes on background.

    Here is a recipe for Royal cake - French dark chocolate mousse cake, also called Trianon - that consists of nut dacquoise, a crispy layer of crepes Gavottes, and chocolate mousse. Just make it and enjoy the best chocolate goodness ever.

     A single slice of Royal cake with a fork on a white plate and the rest of the cake with a cup on background

    If you are a lover of decadent mousse chocolate cakes, this Royal cake (aka French cake Trianon) is for you.

    In French, the Royal cake is gâteau Royal, where gâteau means cake, and Royal means Royal.

    Another name for Royal cake is Royal au Chocolat, which means chocolate Royal.

    The dessert is also called Versaillais or Trianon gateau. According to one of the versions, the cake was named after the village Trianon near Versailles.

    The cake itself is a three-layer dark chocolate mousse cake.

    The bottom layer is dacquoise - a meringue with added almond and hazelnut flour. It tastes like French macarons, but its texture is softer and moist.

    The middle layer is crunchy praline feuillantine made with crispy French crepes Gavottes, milk chocolate, chocolate paste, and hazelnut praline. This layer is the most delicious one and a signature of Royal chocolate cake.

    The cake is topped with a creamy dark chocolate mousse based on whipping cream.

    Three simple ingredients (chocolate, whipping cream, and milk) result in a dangerously addictive and delicious chocolate mousse.

    Finally, the cake is covered with a cocoa mirror glaze.

    BAKING ESSENTIALS CHECKLIST

    Sign up and get a list of the necessary baking tools and ingredients

    FREE DOWNLOAD

    [feast_advanced_jump_to]
    Glazed Royal chocolate cake with a kitchen towel, a knife and a white cup: Overhead view

    Why you should try this recipe

    This recipe for the Royal chocolate cake is easy enough to make, but it does call on some patience and special skills.

    The chocolate taste and flavor of the cake are the best in this dessert: it is worth devoting your time to the pleasure of the mouth.

    The freezing option is one of the best features for anyone who is looking to start their own home-based business.

    The delicious taste will be preserved even after being prepared in advance, so you can enjoy it at any time.

    The top of this cake is perfect for whatever you would like to do. It is really up to your creativity.

    Sliced cake Trianon on a cake board with crepes Gravottes, a cup and a towel on background

    Ingredients

    For ingredients and detailed instructions, refer to the recipe card below.

    Crepes Gravottes (crêpe dentelle in French): these crispy and buttery cookies are a specialty of France. They are the star of the Royal cake.

    You can purchase crepes Gravottes (you will need half of the box) or feuilletine flakes (crepes Dentelles crumbs) on Amazon. 

    You can try to replace this ingredient with cornflakes; they are not the same, but they will work in the absence of authentic crepes-cookies.

    Milk chocolate: use any brand of milk chocolate, for example, Lindt.

    Chocolate paste: use Nutella hazelnut spread. 

    Hazelnut praline paste: make it yourself or use a store-bought hazelnut praline.

    Egg whites: separate egg whites from egg yolks using an egg separator. Then bring the whites to room temperature.

    Sugar: the recipe calls for granulated sugar.

    Icing sugar: make it yourself with a coffee grinder or store-bought powdered sugar.

    Whipping cream: use a chilled bowl to whisk cold whipping cream.

    Milk: the recipe calls for whole milk.

    Dark chocolate: use high-quality dark chocolate such as Valrhona dark chocolate *.

    Cocoa powder: the most flavorful cocoa powder is produced by the European brand Valrhona, although you can use any other brand.

    Gelatin: use gelatin sheets with a strength of 200 bloom. To substitute sheet gelatin in the recipe, use 8 g of powdered gelatin and ¼ cup or 60 ml of cold water.

    Almond flour, hazelnut flour/meal.

    How to make Royal cake

    To make the dacquoise, preheat the oven to 335 degrees F/170 degrees C. Using a flour sifter, sift powdered (icing) sugar, almond, and hazelnut flour.

    In a separate bowl, whisk egg whites and gradually add granulated sugar until slightly firm (photo 1).

    Once the meringue is ready, add the icing sugar/flour mixture and gently mix with a spatula (photo 2).

    Photo 1: Beaten egg whites in a metal bowl Photo 2: Egg whites/sugar/nut flour mixture in a bowl
    PHOTO 1 PHOTO 2

    Transfer the preparation to a pastry bag with Ateco plain pastry tip 809. Adjust a mousse cake mold to 7 inches/18 cm in diameter.

    Pipe a spiral inside the mold placed on a baking sheet lined with parchment paper (photo 3), or simply use a spoon.

    Bake for 20 to 25 minutes. Let it cool in a frame (photo 4). 

    Photo 3: Dacquoise preparation piped as a spiral inside a cake mold Photo 4: Dacquoise baked according to the recipe in the mold
    PHOTO 3 PHOTO 4

    To make the crunchy praline feuillantine,  crush crepes Gravottes roughly with your hands or a rolling pin.

    Melt milk chocolate in a bain-marie/water bath. In a bowl, place hazelnut praline, Nutella, and crepes chips and mix (photo 5). Add melted chocolate and mix again (photo 6).

    Photo 5: Crunchy mixture in a metal bowl Photo 6: Ready crispy mixture in a bowl
    PHOTO 5 PHOTO 6

    Use a knife to loosen the dacquoise from the mold, but keep it inside. 

    Pour the crunchy mixture over the dacquoise, and spread it on a thin layer with the back of a spoon (photo 7).

    Then remove the mold and freeze the dacquoise for about 10 to 15 minutes (photo 8). 

    Photo 7: Crunch mixture over the dacquoise in a mold Photo: Frozen dacquoise on the parchment paper
    PHOTO 7 PHOTO 8

    To make the chocolate mousse, whip the cold whipping cream in a bowl to get the whipped cream and refrigerate (photo 9). 

    Melt dark chocolate broken into small pieces in a bain-marie/water bath.

    Bring milk to a boil, pour it over the melted chocolate, and mix with a rubber spatula until smooth.

    When the chocolate mixture is lukewarm, add it to the whipped cream and mix with a spatula as fast as possible (photo 10). Next, transfer the mousse to a pastry bag with a plain tip.

    Photo 9: Whipped cream in a metal bowl Photo 10: Ready chocolate mousse in a metal bowl
    PHOTO 9 PHOTO 10

    To assemble the cake, seal one side of the 8 inches/20 cm cake ring with a plastic film and place it on a wooden board or a baking sheet.

    Insert an acetate collar inside the ring. Poach the chocolate mousse in the mold, trying to raise it on the sides of the ring using a rubber spatula (photo 11).

    Take the dacquoise disk from the freezer, turn it over, and place it over the mousse (dacquoise side up).

    Slightly press the disk and remove the excess mousse with a bent spatula (photo 12). Cover with a plastic film and freeze for at least 5 hours; better overnight.

    Photo 11: Chocolate mousse inside the mold Photo 12: Dacquoise pressed into the mousse in the cake mold
    PHOTO 11 PHOTO 12

    To make the cocoa mirror glaze, soak gelatin sheets in cold water for 10 minutes.

    Heat whipping cream over low heat and set aside. Pour water and sugar into a saucepan and bring to a boil.

    Once the sugar syrup starts boing actively, pour it over the sifted cocoa powder and gently mix, trying not to incorporate air.

    Add the drained gelatin and mix it with an immersion hand blender. Then pour hot whipping cream and mix again.

    Pass the mixture through a fine-mesh sieve and mix with a hand blender (photo 13). Let the glaze cool down to 86 degrees F/30 degrees C.

    To glaze the cake, take the dessert out of the freezer. Place the cake on a wire rack or a plate, which is itself placed on a baking sheet, to collect the excess glaze.

    Remove the plastic film, mold (heat the sides of the ring with a blow torch), and acetate collar.

    Pour the glaze over the cake and remove the excess glaze with a bent spatula, passing it over the top once (photo 14).

    Transfer the dessert to a cake board using two metal spatulas. Place the cake in the fridge to thaw for 3 to 4 hours.

    Photo 13: Cocoa mirror glaze in a glass bowl Photo 14: Glazed Royal cake on a bowl with the excess glaze on the parchment paper
    PHOTO 13 PHOTO 14

    Recipe variations

    The layers remain constant in the traditional French Royal chocolate cake, while the cake's decoration varies.

    The most popular way to decorate the cake is with a chocolate glaze, but you can also coat it in cocoa nibs at the bottom.

    One decoration that you can do for your special day if desired, would be to cover the edges of the dessert with a chocolate band and sprinkle the top of the cake with cocoa powder.

    To make the band, cut a strip of the acetate collar equal to the diameter and height of the edge of the cake.

    Cover it with melted chocolate on one side, using a bent spatula, and let set at room temperature for 1 minute.

    Place the chocolate film all around the cake, with chocolate inside. Refrigerate for 10 minutes and gently remove the film.

    Then dust the top of the cake with cocoa powder and prearrange the cake pieces with the back of the knife's blade.

    But the easiest way to make the Royal cake special is by covering the sides of the cake with chocolate shavings and dusting cocoa powder on top.

    Storing and freezing

    Store the assembled cake in the refrigerator for 2 to 3 days.

    If you want to freeze the cake for longer, wrap it unglazed with plastic film to prevent the absorption of freezer odors.

    Keep the cake frozen for up to two to three weeks. Then, glaze the cake on the day of serving and let it thaw for 3 to 4 hours in the refrigerator.

    Expert Tips

    1. Do not over-whisk egg whites while making the dacquoise. They have to be slightly firm to incorporate the nut flour.
    2. Spread the chocolate mousse well inside the mold, using a rubber spatula to avoid trapping air in the cake.
    3. Once the cocoa mirror glaze is applied, use a bent metal spatula to remove the excess with a single pass over the top of the cake to avoid making marks.
    4. Take the dessert out of the fridge for about 20 minutes before tasting it (the cold temperature alters the taste of the chocolate).

    Recipe FAQ

    Can you make the Royal cake in advance?

    Yes, you can make this dark chocolate mousse cake one or more days in advance and keep it frozen. Then, glaze the cake on the day of serving.

    Love cakes? Try these next!

    • Sliced Sans Rival cake on a cake board.
      Sans Rival Cake (Filipino Cashew Meringue Cake)
    • Coconut dacquoise on a cake board.
      Coconut Dacquoise Cake Recipe
    • French Meringue Cake Merveilleux on a cake round with chocolate shavings and a cup on background.
      French Meringue Cake Merveilleux
    • Sliced German fruit flan topped with strawberries and peaches on a serving plate.
      Fruit Flan (Obsttorte)

    Browse all the Cake Recipes

    Want more delicious and beautiful recipes? Subscribe to my newsletter and follow me on Facebook, Pinterest, and Instagram for my latest updates. If you make this recipe, please leave a star rating on the recipe card and comment below!

    Print

    Recipe card

    Royal Chocolate Cake - Trianon

    Sliced Royal chocolate cake on a golden cake board with crepes Gravottes on background.
    Print Recipe
    Save Recipe Recipe Saved

    5 Stars 4 Stars 3 Stars 2 Stars 1 Star

    4.9 from 18 reviews

    Here is a recipe for Royal cake - French dark chocolate mousse cake, also called Trianon - that consists of nut dacquoise, a crispy layer of crepes Gavottes, and chocolate mousse. Just make it and enjoy the best chocolate goodness ever.

    • Author: Irina Totterman
    • Total Time: 2 hours (plus chilling time)
    • Yield: 8 1x
    • Category: Cakes
    • Method: Baking
    • Cuisine: French

    Ingredients

    Scale

    For the dacquoise:

    • 3 ½ tablespoons (55 g) egg whites (see note #1)
    • 2 ½ tablespoons (35 g) granulated sugar
    • ½ cup + 1 teaspoon (65 g) icing sugar
    • ⅓ cup (30 g) almond flour
    • 2 tablespoons (15 g) hazelnut flour/meal

    For the crunchy praline feuillantine:

    • 1.7 oz (50 g) crepes Gravottes
    • 1.7 oz (50 g) milk chocolate
    • 1.7 oz (50 g) hazelnut spread Nutella
    • 1.7 oz (50 g) Hazelnut Praline Paste

    For the chocolate mousse:

    • 2 cups + 3 tablespoons (500 ml) whipping cream
    • 5 tablespoons (75 g) whole milk
    • 7 oz (200 g) dark chocolate 

    For the cocoa mirror glaze:

    • ⅔ cup + 4 ½ tablespoons (210 g) granulated sugar
    • 5 tablespoons (75 g) water
    • 9 ½ tablespoons (70 g) cocoa powder, unsweetened
    • ½ cup + 2 tablespoons (145 ml) whipping cream
    • 3 ⅓ gelatin sheets (8 g powdered gelatin - see note #2)

    *Don't you have the correct baking pan on hand right now? Try this simple Cake Pan Converter!

    ** If needed, please refer to Baking Conversion Charts.

    Instructions

    1. To make the dacquoise, preheat the oven to 335 degrees F/170 degrees C. Using a flour sifter, sift powdered (icing) sugar, almond, and hazelnut flour. In a separate bowl, whisk egg whites and gradually add granulated sugar until slightly firm. Once the meringue is ready, add the icing sugar/flour mixture and gently mix with a spatula.
    2. Transfer the preparation to a pastry bag with Ateco plain pastry tip 809. Adjust a mousse cake mold to 7 inches/18 cm in diameter. Pipe a spiral inside the mold placed on a baking sheet with parchment paper, or simply use a spoon. Bake for 20 to 25 minutes. Let it cool in a frame. 
    3. To make the crunchy praline feuillantine, crush crepes Gravottes roughly with your hands or a rolling pin. Melt milk chocolate in a bain-marie/water bath. Place hazelnut praline, Nutella, and crepes chips in a bowl and mix. Add melted chocolate and mix again.
    4. Use a knife to loosen the dacquoise from the mold, but keep it inside. Pour the crunchy mixture over the dacquoise, and spread it on a thin layer. Then remove the mold and freeze the dacquoise for about 10 to 15 minutes. 
    5. To make the chocolate mousse, whip the cold whipping cream in a bowl to get the whipped cream and refrigerate.  Melt dark chocolate broken into small pieces in a bain-marie/water bath. Bring milk to a boil, pour it over the melted chocolate, and mix with a rubber spatula until smooth. When the chocolate mixture is lukewarm, add it to the whipped cream and mix with a spatula as fast as possible. Transfer the mousse to a pastry bag with a plain tip.
    6. To assemble the cake, seal one side of the 8 inches/20 cm cake ring with a plastic film and place it on a wooden board or a baking sheet. Insert an acetate collar inside the ring. Poach the chocolate mousse in the mold, trying to raise it on the sides of the ring using a rubber spatula. Take the dacquoise disk from the freezer, turn it over, and place it over the mousse (dacquoise side up). Slightly press the disk and remove the excess mousse with a bent spatula. Cover with a plastic film and freeze for at least 5 hours.
    7. To make the cocoa mirror glaze, soak gelatin sheets in cold water for 10 minutes. Heat whipping cream over low heat and set aside. Pour water and sugar into a saucepan and bring to a boil. Once the sugar syrup starts boing actively, pour it over the sifted cocoa powder and gently mix, trying not to incorporate air. Add the drained gelatin and mix it with a hand blender. Then pout hot whipping cream and mix again. Pass the mixture through a fine-mesh sieve and mix with a hand blender. Let the glaze cool down to 86 degrees F/30 degrees C.
    8. To glaze the cake, take the dessert out of the freezer. Place the cake on a wire rack or a plate, which is itself placed on a baking sheet to collect the excess glaze. Remove the plastic film, mold (heat the sides of the ring with a blow torch), and acetate collar. Pour the glaze over the cake and remove the excess glaze with a bent spatula, passing it over the top once. Transfer the dessert to a cake board using two metal spatulas. Place the cake in the fridge to thaw for 3 to 4 hours.

    Notes

    1. 55 g egg whites approximately equal 1 ½ raw egg whites from extra large-sized chicken eggs.
    2. To substitute sheet gelatin, use 8 g of powdered gelatin and ¼ cup (60ml) of cold water.
    3. Do not over whisk egg whites while making the dacquoise. They have to be slightly firm to incorporate the nut flour.
    4. Spread the chocolate mousse well inside the mold, using a rubber spatula to avoid trapping air in the cake.
    5. Once the cocoa mirror glaze is applied, use a bent metal spatula to remove the excess with a single pass over the top of the cake to avoid making marks.
    6. Store the decorated cake for 2 to 3 days in the fridge.
    7. Take the dessert out of the fridge for about 20 minutes before tasting it (the cold temperature alters the taste of the chocolate).

    Nutrition

    • Serving Size: 1 slice
    • Calories: 635
    • Sugar: 58.8 g
    • Sodium: 60 mg
    • Fat: 41.1 g
    • Saturated Fat: 23.6 g
    • Carbohydrates: 70.2 g
    • Fiber: 5 g
    • Protein: 8.7 g
    • Cholesterol: 97 mg

    Thank you for following me on Pinterest, Facebook, and Instagram. Hashtag #bakinglikeachef so I can see your creations.

    The nutritional information has been calculated using an online recipe nutrition calculator such as Verywellfit.com and is intended for informational purposes only. These figures should be used as a general guideline and not be construed as a guarantee.

    The recipe was adapted from http://www.elle.fr. It was originally published on May 11, 2018. The recipe has been revised to include improved content and photos. All posted pictures are mine.

    Pretty Fresh Fruit Charlotte

    Jul 4, 2020 · 28 Comments

    A slice of the charlotte with the remaining cake on a white platter.

    This red fruit Charlotte is one of the prettiest cakes that combines a classic sponge cake, creamy Bavarian cheese mousse filling, and fresh red fruits. It is a fancy-ish dessert for any celebration.

    Sliced fruit charlotte cake on a white platter with fresh berries; a cup in the background

    Over time, Charlotte cakes have gained widespread popularity. This is attributed to the culmination of its visually appealing presentation and its irresistible taste.

    [feast_advanced_jump_to]

    While most fruit Charlottes are made with lady fingers, this red fruit charlotte or charlotte aux fruits rouges is prepared with soft and fluffy sponge cake.

    BAKING ESSENTIALS CHECKLIST

    Sign up and get a list of the necessary baking tools and ingredients

    FREE DOWNLOAD

    What is a Charlotte cake?

    Charlotte cake is a classic molded French dessert lined with ladyfingers or sponge cake and filled with fruit puree, custard, mousse, or Bavarian cream.

    To make hot Charlotte, the mold is lined with stale bread slices dipped in butter and filled with, for example, sautéed apples and then baked.

    A slice of the charlotte cake on a white serving platter

    Fresh fruit Charlotte recipe

    • This fresh fruit Charlotte cake is an elegant choice for a dessert that would fit any celebration table. Serve it as a birthday fruit cake, celebrate Independence Day or the Fourth of July, or enjoy a slice with your afternoon tea or coffee.
    • The Charlotte recipe is straightforward: make the cake within a day or split the preparation into two days. It is not as complicated as it seems.

    Ingredients

    For ingredients and detailed instructions, refer to the recipe card below.

    • Flour: Use all-purpose flour.
    • Sugar: The recipe calls for granulated or caster sugar.
    • Potato starch: It is recommended to utilize potato starch over cornstarch in this particular recipe. Although both options may be substituted in most recipes, this recipe calls for a clear and vivid fruit layer, making it an exception. Opting for corn starch instead may result in an imperfectly translucent fruit layer.
    • Eggs: Use large whole eggs at room temperature.
    • Red food color: Use as much as you want to get the red color of the sponge (this recipe uses 100 drops of the red food color by McCormick).
    • Gelatin: Use gelatin sheets (gold) with a strength of 200 bloom. To substitute sheet gelatin with powdered gelatin, consider that 3 ½ gelatin sheets equal one powdered gelatin envelope. Use ¼ cup (60ml) of cold water per envelope.
    • Fresh fruits: Use any three kinds of seasonal fresh fruit, such as raspberries, cherries, blackcurrant, blueberries, and blackberries.
    • Cream: Opt for cold heavy or heavy whipping cream with at least 30% fat content to whisk it properly.
    • Fresh farmer cottage cheese: Opr for farmer's cheese, preferably dry curd cottage cheese (not the regular curd cottage cheese that is salty).

    How to make fruit Charlotte cake

    Making fruit Charlotte cake involves a few steps: preparing red fruit confit, making a sponge cake and cheese mousse, and assembling the cake.

    Step 1. To make fruit confit, cover a 6 inches (15 cm) round stainless steel cutter with doubled plastic film, make a plastic bottom, and put it aside. Soak gelatin in cold water for 10 minutes.

    Step 2. In a saucepan, place the whole berries and half of the sugar. Heat the mixture over low heat for about 5 to 10 minutes, stirring occasionally.

    Step 3. Add the rest of the sugar mixed with potato starch, stirring constantly, and let boil for 1 minute.

    Step 4. Remove the saucepan from heat and stir in the drained gelatin (photo 1). Pour the confit into the ring and freeze for 3 hours (photo 2).

    Photo 1: Red fruit confit in a saucepan Photo 2: Confit poured into a steel ring
    PHOTO 1 PHOTO 2

    Step 5. To make sponge cake, preheat the oven to 340°F (170°C). Using a flour sifter, sift all-purpose flour and potato starch.

    Step 6. Separate egg whites from egg yolks with an egg separator and reserve the whites.

    Step 7. Using an electric mixer in a bowl, beat egg whites and gradually add the remaining sugar until you obtain a glossy meringue (photo 3).

    Step 8. In a separate bowl, whisk yolks with half of the sugar until whitish (photo 4).

    Photo 3: Beaten egg whites in a bowl Photo 4: Whisked egg yolks in a bowl
    PHOTO 3 PHOTO 4

    Step 9. Add the beaten egg whites to the egg yolks and sugar mixture (photo 5).

    Step 10. Add the dry sifted mixture (flour and starch) in several times and gently mix it with a rubber spatula (photo 6). Tyr not to deflate the batter and keep as much air as possible.

    Photo 5: Egg whites/yolks mixture in a bowl  Photo 6: Cake batter in a bowl
    PHOTO 5 PHOTO 6

    Step 11. Add red food color as much as you wish and gently mix (photo 7).

    Step 12. Line a baking sheet with parchment paper and spread the batter to the thickness of about ⅕ inches (5 mm) with a long bent spatula (photo 8). Bake for about 10 minutes and let it cool.

    Photo 7: Red-colored batter in a metal bowl Photo 8: Batter spread onto parchment paper
    PHOTO 7 PHOTO 8

    Step 13. Invert the baked sponge on a clean sheet of parchment paper and remove the parchment paper from its bottom. Let the sponge cool down.

    Step 14. Cut a sponge disk of 6.7 inches (17 cm) in diameter (use a cake ring or a plate) and strips of 2 inches (5 cm) wide.

    Step 15. Line a mousse cake mold adjusted to 7 ½ inches (19 cm) in diameter with an acetate cake collar and place it on parchment.

    Step 16. Cover the inside edges of the mold with sponge strips and place the sponge disk at the bottom of the cake mold: it has to fit inside the lined mold perfectly (photo 9). 

    Step 17. To make cheese mousse, soak gelatin sheets in cold water for 10 minutes. Whisk heavy cream to get the whipped cream (at soft peaks), cover the bowl with plastic wrap, and refrigerate (photo 10).

    Pro tip: Consult sugar-free whipped cream recipe for step-by-step photographed explanations, helpful tips, and tricks.

    Photo 9: Mold lined with sponge strips  Photo 10: Whipped cream in a bowl
    PHOTO 9 PHOTO 10

    Step 18. In a saucepan, bring sugar and water to a boil. In a separate bowl, beat egg yolks with an electric hand whisk. Add the hot sugar syrup to the yolks, whisking constantly. 

    Step 19. Add the drained gelatin while the mixture is hot and continue to beat until the preparation completely cools down (photo 11). Add farm cottage cheese and mix with a rubber spatula (photo 12).

    Photo 11: Egg yolks mixture in a bowl Photo 12: Half-way ready mousse in a bowl
    PHOTO 11 PHOTO 12

    Step 20. Finish by adding the whipped cream and gently whisk with a hand whisk (photo 13). Transfer the mouse to a piping bag fitted with Ateco plain pastry tip 806.

    Step 21. To assemble fruit Charlotte, spread a single spiral (a bit less than ½ inch or 1 cm thick) of the cottage cheese mousse.

    Step 22. Place a frozen red fruit confit disk in the center and fill the remaining space to the edges with the mousse (photo 14).

    Photo 13: Cheese mousse in a bowl Photo 14: Fruit disk over mousse in a mold
    PHOTO 13 PHOTO 14

    Step 23. Add another layer of cheese mousse (a bit less than one inch (2 cm) thick) - it equals two spirals pushed from the pastry bag.

    Step 24. Finish the Charlotte by making waves in a circular pattern on top using a short offset spatula or the back of a spoon (photo 15). Refrigerate for at least 3-4 hours; better overnight.

    To serve, remove the mousse cake mold by lifting it. Peel the acetate cake film and discard it.

    Decorate the top of the cake with whole red berries and fresh mint leaves (photo 16) and sprinkle with powdered (icing) sugar or cover with a clear glaze.

    Photo 15: Cake with cheese mousse in a mold Photo 16: Decorated fruit cake on parchment
    PHOTO 15 PHOTO 16

    Wrap the Charlotte cake with a pretty ribbon for a final touch if desired.

    Pro tip: Alternatively, mix fresh red fruit with raspberry jam or preserves and arrange the fruit mixture on top of the Charlotte.

    A fresh fruit dessert topped with red fruit and icing sugar

    Expert Tips

    1. To make the fruit confit, replace fresh red fruits with frozen ones. As for the decoration, they have excess moisture: choose another way to decorate the cake.
    2. To freeze the confit, adjust a mousse cake mold to the required diameter if you do not have the correct size of a round stainless steel cutter. 
    3. If you do not have time to freeze the fruit confit disk, let it cool down. While pushing the mousse spiral, lift the mouse around, and set it aside (better in the fridge) for 10 minutes. Then place the cooled confit in the center of the cheese mousse. Refrigerate for 10 minutes again. Finish with the thick layer of the mousse as directed in the recipe. 
    4. Pass the farm cottage cheese through a fine sieve for a more homogeneous mousse.
    5. Once the mousse is ready, assemble the charlotte relatively quickly since the mousse will begin to set up with time due to included gelatin.
    6. Do not worry about the top of the cake: as long as it is even, it is enough to decorate with fresh fruits later.
    7. Make-ahead option: make the red fruit confit and freeze it one day in advance. Make and assemble the cake the next day.

    Storing and freezing

    Store fruit Charlotte cake under a cake dome in the refrigerator for up to 2 days. Keep leftover cake in an airtight container refrigerated.

    Can you freeze fruit Charlotte? It is not recommended to freeze this cake.

    Recipe FAQ

    Can you make fruit Charlotte in advance?

    You can prepare the red fruit confit and freeze it in a ring or cutter for up to one week. Then, bake the sponge cake one day in advance and keep it well-wrapped with cling film at room temperature. The next day, make the cheese mousse and assemble the cake. Refrigerate your Charlotte for 3-4 hours as a minimum, better overnight.

    Love Charlotte cakes? Try these next!

    • Pear Charlotte Cake
    • Charlotte aus Fraises (Strawberry Charlotte Cake)
    • Chocolate Charlotte
    • Browse all the Cake Recipes

    Want more delicious and beautiful recipes? Subscribe to my newsletter and follow me on Facebook, Pinterest, and Instagram for my latest updates. If you make this recipe, please leave a star rating on the recipe card and comment below!

    Print

    Recipe card

    Fresh Fruit Charlotte Cake

    A slice of the charlotte with the remaining cake on a white platter.
    Print Recipe
    Save Recipe Recipe Saved

    5 Stars 4 Stars 3 Stars 2 Stars 1 Star

    5 from 12 reviews

    This fresh fruit Charlotte is one of the prettiest cakes that combines a sponge cake, Bavarian cheese mousse, and fresh red fruits. It is a fancy-ish cake for any celebration.

    • Author: Irina Totterman
    • Total Time: 2 hours, 30 minutes (plus chilling time)
    • Yield: 8 1x
    • Category: Cakes
    • Method: Baking
    • Cuisine: French

    Ingredients

    Scale

    For the sponge cake:

    • ⅓ cup + 7 teaspoons (60 g) all-purpose flour
    • ⅓ cup (60 g) potato starch
    • 5 eggs
    • ½ cup + 2 ½ teaspoons (125 g) granulated sugar
    • red food color (as needed)

    For the red fruit confit:

    • 2 gelatin sheets 200 bloom
    • 7.2 oz. (205 g) mixed berries (raspberries, blackberries, blueberries)
    • ⅓ cup + 1 teaspoon (80 g) granulated sugar
    • ½ tablespoon (5 g) potato starch

    For the farmer's cheese mousse:

    • 3 gelatin sheets 200 bloom
    • 1 ¼ cups + 2 ½ teaspoons (300 g) heavy cream
    • 2 egg yolks
    • ⅓ cup + 1 teaspoon (80 g) granulated sugar
    • 2 tablespoons (30 g) water
    • 8.8 oz. (250 g) farmer's cheese

    For the decoration:

    • 7 oz. (200 g) fresh red fruits
    • 1 teaspoon powdered (icing) sugar

    *Don't you have the correct baking pan on hand right now? Try this simple Cake Pan Converter!

    ** If needed, please refer to Baking Conversion Charts.

    Instructions

    1. To make the red fruit confit, cover a 6 inches/15 cm round stainless steel cutter with doubled plastic film, making a plastic bottom, and put it aside. Soak gelatin in cold water for 10 minutes. In a saucepan, place the whole berries and half of the sugar. Heat the mixture over low heat for about 5 to 10 minutes, stirring from time to time. Add the rest of the sugar mixed with potato starch, stirring constantly, and let boil for 1 minute. Remove the saucepan from the heat and stir in the drained gelatin. Pour the confit into the ring and freeze for 3 hours.
    2. To make the sponge cake, preheat the oven to 340 degrees F/170 C. Using a flour sifter, sift flour and potato starch. Separate egg whites from egg yolks with an egg separator and reserve the whites. Using an electric mixer in a bowl, beat egg whites and gradually add the rest of the sugar until glossy. In a separate bowl, whisk yolks with half of the sugar until whitish. Then add the beaten egg whites to the egg yolks/sugar mixture. Add the dry sifted mixture (flour and starch) in several times and mix it with a rubber spatula. Add red food color as much as you wish and gently mix. Line a baking sheet with parchment paper and spread the batter to the thickness of about ⅕ inches/5 mm with a bent spatula. Bake for about 10 minutes and let it cool.
    3. Invert the baked sponge on a sheet of parchment paper and remove the parchment paper from its bottom. Cut a biscuit disk of 6.7 inches/17 cm in diameter (use a cake ring or a plate) and strips of 2 inches/5 cm wide. Line a mousse cake mold adjusted to 7 ½ inches/19 cm in diameter with an acetate cake collar and place it on parchment. Cover the inside edges of the mold with strips and place the sponge disk at the bottom of the cake mold (it has to fit inside the lined mold perfectly). 
    4. To make the cheese mousse, soak gelatin in cold water for 10 minutes. Whisk whipping cream until soft peaks and refrigerate. In a saucepan, bring sugar and water to a boil. In a separate bowl, beat egg yolks with an electric mixer. Add the hot sugar syrup to the yolks, whisking constantly. Then add the drained gelatin while the mixture is hot and continue to beat until the preparation completely cools down. Add farm cottage cheese and mix with a rubber spatula. Finish by adding the whipped cream and whisk with a hand whisk. Transfer the mouse to a pastry bag fitted with Ateco plain pastry tip 806.
    5. To assemble Charlotte, spread a single spiral (a bit less than ½ inches/1 cm thick) of the cottage cheese mousse. Place a frozen red fruit confit disk in the center and fill the remaining space to the edges with the mousse. Add another layer of cheese mousse (a bit less than one inch/2 cm thick) - it equals two spirals pushed from the pastry bag. Finish the Charlotte by making waves or a spiral on top with the use of the bent spatula. Refrigerate for at least 3-4 hours; better overnight.
    6. To serve, remove the mousse cake mold by lifting it up. Peel the acetate cake film and discard it. Decorate the top of the cake with whole red berries and fresh mint leaves (photo 16) and sprinkle with powdered (icing) sugar or cover with a clear glaze. Wrap the Charlotte cake with a pretty ribbon for a final touch if desired.

    Notes

    1. To make the fruit confit, replace fresh red fruits with frozen ones. As for the decoration, they are too watery: choose another way to decorate the cake.
    2. To freeze the confit, adjust a mousse cake mold to the required diameter if you do not have the correct size of a round stainless steel cutter. 
    3. If you do not have time to freeze the fruit confit disk, let it cool down. While pushing the mousse spiral, lift the mouse around, and set it aside (better in the fridge) for 10 minutes. Then place the cooled confit in the center of the cheese mousse. Refrigerate for 10 minutes again. Finish with the thick layer of the mousse as directed in the recipe. 
    4. Pass the farm cottage cheese through a fine-mesh sieve if you prefer to obtain a more homogeneous mousse.
    5. Once the mousse is ready, assemble the charlotte relatively quickly since the mousse will begin to set up with time due to included gelatin.
    6. Do not worry about the top of the cake: as long as it is even, it is enough to decorate it with fresh fruits later.
    7. Make-ahead option: make the red fruit confit and freeze it one day in advance. Make and assembled the cake the next day.

    Nutrition

    • Serving Size: 1 slice
    • Calories: 446
    • Sugar: 40.3 g
    • Sodium: 168 mg
    • Fat: 17.1 g
    • Saturated Fat: 9.3 g
    • Carbohydrates: 63.5 g
    • Fiber: 2.8 g
    • Protein: 13.2 g
    • Cholesterol: 206 mg

    Thank you for following me on Pinterest, Facebook, and Instagram. Hashtag #bakinglikeachef so I can see your creations.

    The nutritional information has been calculated using an online recipe nutrition calculator such as Verywellfit.com and is intended for informational purposes only. These figures should be used as a general guideline and not be construed as a guarantee.

    The recipe was adapted from C'est pa de la tarte. It was originally published on October 24, 2018. The recipe has been revised to include improved content and photos. All the posted pictures are mine.

    Pistachio Dacquoise With Strawberries

    Jun 27, 2020 · 20 Comments

    Pistachio dacquoise decorated with fresh strawberries on a white serving platter with berries and flatware on background.

    This pistachio dacquoise recipe is a keeper! The cake is a feast for the eyes and the mouth.

    It is all about contrasting textures and flavors where the biscuit dacquoise marries with pistachio mousseline cream and fresh strawberries. Unveil this lovely cake for an extra special dessert!

    A slice of pistachio dacquoise topped strawberry halves and the rest of the cake on background

    What a beautiful color combination where the green color of the pistachio cream fits the red color of strawberries! It is an unusual combination in fashion, but what a beauty in a cake.

    What a beautiful combo where the sweet bitterness of the pistachio emphasizes the fruity flavor of red berries! It brings additional pleasure to the taste.

    Pistachio dacquoise belongs to a category of cakes called dacquoise. And if you follow my blog, you may be familiar with other dacquoise recipes such as Coconut Dacquoise Cake and Layer Cashew Cake Sans Rival.

    BAKING ESSENTIALS CHECKLIST

    Sign up and get a list of the necessary baking tools and ingredients

    FREE DOWNLOAD

    [feast_advanced_jump_to]

    Definition of dacquoise

    According to Merriam-Webster, dacquoise is

    a dessert made of layers of baked nut meringue with a filling usually of buttercream.

    Dacquoise varies to the type of chopped nuts folded into the meringue before baking. You can use pistachios and make pistachio dacquoise (see the recipe below), hazelnuts, almonds, or any type of nuts you desire.

    For those with nut allergies, replace nuts with coconut flour and make coconut dacquoise.

    Recipe: Pistachio dacquoise cake topped with cream and strawberries on a white plate

    History of dacquoise

    The origin of dacquoise is French. The cake takes its name from the French feminine dacquois, which means from Dax, where Dax is a town located in southern France.

    The word itself is known from 1954. As a cake, the dacquoise originated in the 17th century when it was created as a luxurious dessert for the people of the French court.

    Later on, the dacquoise recipe became popular in England when lots of French chefs moved there to cook for the top class.

    Why pistachio dacquoise recipe works

    • This pistachio dacquoise recipe (aka pistachio meringue recipe) is classic to welcome it into your life, learn, and make it a go-to cake recipe.
    • Bright colors of the cake and its exquisite look make the dessert a winner of the table from the first minute it is served.
    • The cake serves up to 10 people or maybe 5 with doubled servings. Yes, your guests will be begging for an additional slice!
    • Making the dacquoise one day in advance saves time for the day of serving.
    • The taste of the cake is beautiful: yes, it is a delicious French cake!
    • What's more? The cake is gluten-free!
    Pistachio dacquoise cake decorated with fresh strawberries: Overhead view

    Ingredients

    For ingredients and detailed instructions, refer to the recipe card below.

    Pistachios: process raw or toasted unsalted pistachios in a food processor to make ground pistachios.

    Icing sugar: make it yourself with a coffee grinder or use a store-bought powdered sugar.

    Almond flour: it is a usual ingredient to make the dacquoise.

    Eggs: the recipe calls for egg whites and yolks from large eggs at room temperature.

    Sugar: use regular granulated white sugar.

    Milk: whole milk is perfect to use in the recipe.

    Corn starch: a small amount of corn starch is added to the pastry cream.

    Butter: use a top-quality unsalted butter.

    Pistachio paste: use a store-bought pistachio paste or make it yourself.

    Strawberries: fresh strawberries (not the frozen ones) are the key to decorate the cake. Replace them with fresh raspberries if you prefer.

    How to make pistachio dacquoise step by step

    Preheat oven to 335 F/170 C.

    To make pistachio dacquoise, chop pistachios into small pieces or process nuts in a food processor to get the ground pistachios. Mix powdered (icing) sugar, almond flour, and chopped (ground) pistachios.

    Beat egg whites with an electric mixer and gradually add granulated sugar. The meringue has to be flexible: just reach medium-firm picks (photo 1).

    Pour the dry ingredients into the whites and gently mix with a rubber spatula going in a circular motion from outside to inside. Stop mixing as soon as the mixture is homogeneous (photo 2).

    Photo 1: Meringue in a metal bowl Photo 2: Ready dacquoise mixture in a metal bowl
    PHOTO 1 PHOTO 2

    Butter a tart ring or another cake ring of 9 inches/23-24 cm in diameter (the height does not matter) and place it on a baking sheet covered with the parchment paper.

    Place the dacquoise preparation in a pastry bag with Ateco plain pastry tip 806. Make a spiral into the tart/cake ring, starting from the center and going to the edge of the ring.

    Then make small balls in the direction towards the center, side by side along the edge of the ring (see note #1). Sprinkle small balls with powdered (icing) sugar (photo 3). Bake for 30 minutes (photo 4).

    Photo 3: Piped dacquoise preparation into a cake ring Photo 4: Baked dacquoise in a cake ring
    PHOTO 3 PHOTO 4

    To make the pastry cream, bring milk in a saucepan to boil. In a separate small bowl, whip egg yolk, sugar, and corn starch together. Pour the hot milk into the yolk/sugar/starch mixture, stirring constantly.

    Pour the mixture back in the saucepan and bring it over low heat. Continue whisking until the mixture starts thickening (photo 5). Pour the pastry cream on a shallow plate, cover with a plastic film in contact and let it cool at room temperature.

    To make the Italian meringue, bring water and sugar to a boil. Meanwhile, whip egg white with an electric mixer. Once the sugar syrup reaches 250 F/121 C  (use a cooking thermometer), pour it over the beaten egg white while keeping whisking. Beat until the meringue becomes firm (photo 6). 

    Photo 5: Pastry cream of yellow color in a saucepan Photo 6: Italian meringue in a metal bowl
    PHOTO 5 PHOTO 6

    To make creme Anglaise, bring milk to a boil. In a separate bowl, mix sugar and egg yolks. Pour the hot milk into the yolk/sugar mixture, stirring constantly.

    Bring the preparation back in the saucepan, heat over low to reach 181 F/83 C, continually whisking with a hand whisk (photo 7). Pour the thick cream on a small plate, cover with a plastic film in contact and let it cool at room temperature.

    Mix the pastry cream with the pistachio paste and set aside (photo 8).

    Photo 7: Crème anglaise in a saucepan Photo 8: Greenish pastry cream/pistachio paste mixture in a glass bowl
    PHOTO 7 PHOTO 8

    Whisk the softened butter with a stand or electric mixer. Add the cooled creme Anglaise and whisk. Then add the Italian meringue, whip again: the buttercream is ready (photo 9).

    Add the pastry cream/pistachio paste mixture to the buttercream and whip again. The pistachio mousseline cream is ready (photo 10).

    Photo 9: Buttercream in a metal bowl
Photo 10: Pistachio mousseline cream in a metal bowl
    PHOTO 9 PHOTO 10

    To assemble the cake, place the dacquoise on a serving plate. Transfer the pistachio mousseline cream in a pastry bag with a plain tip and spread the cream over the dacquoise biscuit, leaving the edges of dacquoise not covered (photo 11). 

    Cut strawberries into halves and place them over the mousseline cream. Sprinkle chopped pistachios over berries and dust the edges of dacquoise with powdered (icing) sugar (photo 12).  

    Photo 11: Cake piped with mousseline cream Photo 12: Strawberry halves on top of the cream; fully decorated cake
    PHOTO 11 PHOTO 12

    Expert tips

    1. While making the dacquoise, pipe small round balls around the edges of the ring instead of making balls in the direction towards the center: this method makes sure that you will have enough of the dacquoise preparation to finish piping.
    2. If you make dacquoise in advance, assemble the cake four hours as a maximum before serving, or it will become soggy.
    3. Replace fresh strawberries with fresh raspberries if you desire.
    4. Take the cake out of the fridge 30 minutes before serving so that the mousseline cream will have time to soften.

    Frequently Asked Question

    Can you make a dacquoise in advance?

    Yes, you can make a dacquoise up to one week in advance. Wrap it tightly in plastic film and store in an airtight container.

    What is mousseline cream?

    Mousseline cream (pronounced "moos-eh-leen") is a pastry cream combined with softened butter. The typical ratio of the pastry cream and butter is 2:1. 

    What is the difference between pastry cream and creme Anglaise?

    Both, pastry cream and creme Anglaise are made with milk, egg yolks, and sugar. The main difference between pastry cream and creme Anglaise is that the pastry cream is corn starch added.

    More delicious cake recipes you will love

    • French Meringue Cake Merveilleux
    • Caramel Carrot Cake With Pecans
    • No-Bake Raspberry Oreo Cheesecake
    • Browse all the Cake Recipes

    Want more delicious and beautiful recipes? Subscribe to my newsletter and follow me on Facebook, Pinterest, and Instagram for my latest updates. If you make this recipe, please leave a star rating on the recipe card and comment below!

    Print

    Recipe card

    Pistachio Dacquoise With Strawberries

    Pistachio dacquoise decorated with fresh strawberries on a white serving platter with berries and flatware on background.
    Print Recipe
    Save Recipe Recipe Saved

    5 Stars 4 Stars 3 Stars 2 Stars 1 Star

    5 from 9 reviews

    This pistachio dacquoise recipe is a keeper! The cake is a feast for the eyes and the mouth: it is all about contrasting textures and flavors where the biscuit dacquoise marries with pistachio mousseline cream and fresh strawberries. Unveil this lovely cake for an extra special dessert!

    • Author: Irina Totterman
    • Total Time: 2 hours, 30 minutes
    • Yield: 9-10 1x
    • Category: Cakes
    • Method: Baking
    • Cuisine: French
    • Diet: Gluten Free

    Ingredients

    Scale

    For pistachio dacquoise:

    • 1.4 oz (40 g) unsalted pistachios
    • 1 cup + 4 teaspoons (135 g) icing sugar
    • 1 cup + 3 tablespoons (115 g) almond flour
    • ½ cup + 5 ½ teaspoons (150 g) egg whites (see note #1)
    • 3 ½ tablespoons (50 g) granulated sugar

    For pistachio mousseline cream:

    For the pastry cream:

    • ¼ cup (60 g) milk
    • 1 egg yolk
    • ½ tablespoon (5 g) corn starch
    • 1 tablespoon (15 g) granulated sugar

    For the Italian meringue:

    • 2 tablespoons (30 g) egg whites (see note #2)
    • ¼ cup + 1 teaspoon (60 g) granulated sugar
    • 1 tablespoon (15 g) water

    For creme Anglaise:

    • 7 teaspoons (35 g) milk
    • 2 tablespoons (30 g) egg yolks (see note #3)
    • 1 tablespoon (15 g) granulated sugar

    Plus:

    • 5.3 oz (150 g) butter, softened
    • 1.4 oz (40 g) pistachio paste

    For decoration:

    • 17.6 oz (500 g) fresh strawberries
    • ½ oz (15 g) pistachios
    • 1 teaspoon powdered (icing) sugar

    *Don't you have the correct baking pan on hand right now? Try this simple Cake Pan Converter!

    ** If needed, please refer to Baking Conversion Charts.

    Instructions

    1. Preheat oven to 335 F/170 C.
    2. To make pistachio dacquoise, chop pistachios into small pieces or process nuts in a food processor to get the ground pistachios. Mix powdered (icing) sugar, almond flour, and chopped (ground) pistachios. Beat egg whites with an electric mixer and gradually add granulated sugar. The meringue has to be flexible: reach medium-firm picks. Pour the dry ingredients into the whites and gently mix with a rubber spatula going in a circular motion from outside to inside. Stop mixing as soon as the mixture is homogeneous.
    3. Butter a tart ring or another cake ring of 9 inches/23-24 cm in diameter (the height does not matter) and place it on a baking sheet covered with the parchment paper. Place the dacquoise preparation in a pastry bag with Ateco plain pastry tip 806. Make a spiral into the tart/cake ring, starting from the center and going to the edge of the ring. Then make small balls in the direction towards the center, side by side along the edge of the ring (see note #4). Sprinkle small balls with powdered (icing) sugar. Bake for 30 minutes.
    4. To make the pastry cream, bring milk in a saucepan to boil. In a separate small bowl, whip egg yolk, sugar, and corn starch together. Pour the hot milk into the yolk/sugar/starch mixture, stirring constantly. Pour the mixture back in the saucepan and bring it over low heat. Continue whisking until the mixture starts thickening. Pour the pastry cream on a shallow plate, cover with a plastic film in contact and let it cool at room temperature.
    5. To make the Italian meringue, bring water and sugar to a boil. Meanwhile, whip egg white with an electric mixer. Once the sugar syrup reaches 250 F/121 C  (use a cooking thermometer), pour it over the beaten egg white while keeping whisking. Beat until the meringue becomes firm. 
    6. To make creme Anglaise, bring milk to a boil. In a separate bowl, mix sugar and egg yolks. Pour the hot milk into the yolk/sugar mixture, stirring constantly. Bring the preparation back in the saucepan, heat over low to reach 181 F/83 C, continually whisking with a hand whisk. Pour the cream on a small plate, cover with a plastic film in contact and let it cool at room temperature.
    7. Whisk the softened butter with a stand or electric mixer. Add the cooled creme Anglaise and whisk. Then add the Italian meringue, whip again: the buttercream is ready.
    8. Mix the pastry cream with the pistachio paste and add it to the buttercream. Whip again. The pistachio mousseline cream is ready!
    9. To assemble the cake, place the dacquoise on a serving plate. Transfer the pistachio mousseline cream in a pastry bag with a plain tip and spread the cream over the dacquoise biscuit, leaving the edges of dacquoise not covered. 
    10. Cut strawberries into halves and place them over the mousseline cream. Sprinkle chopped pistachios over berries and sprinkle the edges of dacquoise with powdered (icing) sugar.  

    Notes

    1. 150 g egg whites approximately equal 4 ½ raw fresh egg whites from large size chicken eggs.
    2. 30 g egg whites approximately equal 1 raw fresh egg white from medium size chicken egg.
    3. 30 g egg yolks approximately equal 1 ½ raw fresh egg yolks from extra large size chicken eggs.
    4. While making the dacquoise, pipe small round balls around the edges of the ring instead of making balls in the direction towards the center: this method makes sure that you will have enough of the dacquoise preparation to finish piping. 
    5. If you make dacquoise in advance, assemble the cake four hours as a maximum before serving, or it will become soggy.
    6. Replace fresh strawberries with fresh raspberries if you desire.
    7. Take the cake out of the fridge 30 minutes before serving so that the mousseline cream will have time to soften.

    Nutrition

    • Serving Size: 1 slice
    • Calories: 362
    • Sugar: 30.8 g
    • Sodium: 123 mg
    • Fat: 22.7 g
    • Saturated Fat: 9.1 g
    • Carbohydrates: 36.6 g
    • Fiber: 2.9 g
    • Protein: 7 g
    • Cholesterol: 96 mg

    Thank you for following me on Pinterest, Facebook, and Instagram. Hashtag #bakinglikeachef so I can see your creations.

    The nutritional information has been calculated using an online recipe nutrition calculator such as Verywellfit.com and is intended for informational purposes only. These figures should be used as a general guideline and not be construed as a guarantee.

    The recipe was adapted from http://empreintesucree.fr. It was originally published on May 09, 2018. The recipe has been revised to include improved content and photos. All posted pictures are mine.

    Large Meringue (Giant Meringue)

    Jun 10, 2020 · 10 Comments

    Giant meringue with redcurrant on top.

    Enjoy this easy meringue recipe for the mouthwatering dessert - large meringue (aka giant meringue) - decorated with mascarpone whipped cream and fresh berries. With its active, hands-on time of 20 minutes and up to ten servings, the recipe is a keeper.

    Giant meringue topped with cream and redcurrant on a white plate

    Are you looking for a simple, amazingly yummy, and delicious dessert? Add this egg white dessert recipe to your collection now.

    [feast_advanced_jump_to]

    The giant meringue (meringue géante in French) is made with a classic French meringue (meringue française) placed on a baking sheet without special shaping.

    BAKING ESSENTIALS CHECKLIST

    Sign up and get a list of the necessary baking tools and ingredients

    FREE DOWNLOAD

    It is fun to make and eat: slice it or dig into the dessert.

    A single slice of large meringue on a white dessert plate

    Why you should try this recipe

    • The giant meringue recipe is so simple that even a beginner baker will succeed.
    • It is an easy meringue recipe that takes 20 minutes of hands-on time.
    • This egg white dessert resembles a giant Pavlova but does not require shaping.
    • Naturally, the meringue dessert is gluten-free.
    • It is the perfect dessert for an entertaining party serving up to ten people.

    Ingredients

    For ingredients and detailed instructions, refer to the recipe card below.

    • Egg whites: Take chilled eggs out of the fridge and separate egg yolks from egg whites. Make sure egg whites are free of any traces of egg yolk. Let egg whites come up to room temperature. If you are short on time, place chilled eggs in a bowl of warm tap water for a few minutes to warm them up.

    Use old eggs that produce fluffier and higher meringues. Read about how to decode an egg carton.

    • Sugar: Use caster or baker's sugar or process granulated sugar in a food processor for a few seconds to get superfine. It will help to whisk the meringue.
    • Flaked almonds: Use store-bought toasted flaked nuts or toast almonds in the oven at 300°F (150°C) for 10 minutes.
    • Heavy cream: Whisk cold heavy or heavy whipping cream with at least 30% fat content in a chilled metal bowl.
    • Mascarpone cheese - no need to bring it to room temperature; use it from the fridge.
    Sliced giant meringue with a single slice on a plate

    Recipe variations

    Experiment with the meringue dessert recipe and bring your creativity up to decorate the meringue.

    • Make sugar-free whipped cream or Chantilly cream. Keep the cream plain, or flavor it with a few drops of rose water, orange flower water, or almond extract. Instead, add 1 /2 teaspoon of vanilla extract.
    • Use one type of fruit or a combination. The big meringue cracks during baking; it is typical for such a size meringue dessert. Arrange fresh fruit along cracks and around the dessert. Download this complimentary fruit flavor pairing chart to assist you with creating delicious fruit combinations.
    • Finally, make giant meringue cookies instead of making a single dessert.

    How to make a giant meringue

    Preheat oven to 245°F (120°C). To make the meringue, beat egg whites with an electric or stand mixer on medium speed until soft peaks form. Gradually add sugar and whisk until glossy peaks (photo 1).

    Add powdered (icing) sugar and gently mix with a rubber spatula. Add half of the flaked almonds and combine (photo 2). 

    Photo 1: Whisked meringue in a bowl Photo 2: Meringue with almonds in a bowl
    PHOTO 1 PHOTO 2

    Place the meringue on a baking sheet covered with parchment paper. Form a large meringue, sprinkle it with the rest of the flaked almonds (photo 3), and bake for 2 hours. Let it cool (photo 4).

    Photo 3: Large meringue topped with almonds on parchment Photo 4: Baked meringue on parchment paper
    PHOTO 3 PHOTO 4

    To make the cream, place cold heavy cream and mascarpone into a chilled bowl and whisk until medium-stiff peaks.

    Pro tip: Consult the mascarpone frosting recipe for step-by-step photographed explanations, helpful tips, and tricks.

    To decorate the large meringue, place the meringue on a serving plate. Pipe the cream with your favorite tip or spoon it into the dessert. Decorate with the fresh fruit of your choice.

    Decorated giant meringue on a cake stand with red currant on a plate

    Expert Tips

    1. To get the highest volume of the meringue, use clean equipment: a metal or glass bowl and beaters.
    2. Make the meringue on a dry day. Avoid humid or rainy days since the meringue tends to absorb moisture.
    3. If you have time before serving, leave the meringue in the closed oven for 1 to 2 hours to let it cool, even overnight, if you desire.
    4. The meringue will be cracked after baking, which is normal. Arrange fresh berries along the cracks.
    5. Add one tablespoon of powdered (icing) sugar to the cream if desired.
    6. Serve it with berry coulis aside.

    Storing and freezing

    Store giant meringue under a cake dome in the refrigerator and consume it within 24 hours.

    Can you freeze the meringue dessert? While it is possible to freeze the meringue, it is not what I would recommend. It is quite fragile and can attract moisture in the freezer. I highly recommend baking the meringue one day ahead instead of freezing.

    Recipe FAQ

    How long to cook a meringue

    The cooking time for meringue is approximately 1 ½-2 hours at a low temperature.

    Can you make a giant meringue in advance?

    You can bake the meringue one day in advance and leave it in the closed oven overnight. Decorate the dessert before serving.

    Can you decorate a large meringue with frozen berries?

    Frozen and fresh red fruits are mostly interchangeable in baking, but decorating the meringue dessert with frozen berries is not recommended. They tend to get a bit squished and juice running while thawing. In this case, frozen fruits are not an aesthetically pleasing option for this type of cake decoration.

    Love meringue desserts? Try these next!

    • Vanilla Meringue Cake
    • Meringue Cake Merveilleux
    • Meringue Spheres
    • Meringue Mushrooms

    Want more delicious and beautiful recipes? Subscribe to my newsletter and follow me on Facebook, Pinterest, and Instagram for my latest updates. If you make this recipe, please leave a star rating on the recipe card and comment below!

    Print

    Recipe card

    Large Meringue (Giant Meringue)

    Giant meringue with redcurrant on top.
    Print Recipe
    Save Recipe Recipe Saved

    5 Stars 4 Stars 3 Stars 2 Stars 1 Star

    5 from 5 reviews

    This large meringue (aka giant meringue) is the easiest mouthwatering egg white dessert (à la unshaped Pavlova) decorated with mascarpone whipped cream and fresh berries. With its active, hands-on time of 20 minutes and up to ten servings, the recipe is a keeper. 

    • Author: Irina Totterman
    • Total Time: 2 hours, 20 minutes
    • Yield: 8-10 1x
    • Category: Cakes
    • Method: Baking
    • Cuisine: French

    Ingredients

    Scale

    For the meringue:

    • 7 ½ large egg whites (250 g) egg whites, room temperature
    • 1 cup + 2 tablespoons (250 g) granulated sugar
    • 2 cups (250 g) powdered (icing) sugar
    • 1.8 oz (50 g) toasted flaked almonds

    For the decoration:

    • ⅓ cup + 1 ½ tablespoons (100 g) heavy cream, 30% fat
    • 3.5 oz (100 g) mascarpone cheese
    • 7 oz (200 g) fresh berries

    * If needed, please refer to Baking Conversion Charts.

    Instructions

    1. Preheat oven to 245°F (120°C). To make the meringue, beat egg whites with an electric or stand mixer on medium speed until soft peaks form. Gradually add sugar and whisk until glossy peaks. Add powdered (icing) sugar and gently mix with a rubber spatula. Add half of the flaked almonds and combine.

    2. Place the meringue on a baking sheet covered with parchment paper. Form a large meringue, sprinkle it with the rest of the flaked almonds, and bake for 2 hours. Let it cool.

    3. To make the cream, place cold heavy cream and mascarpone into a chilled bowl and whisk until medium-stiff peaks. 

    4. To decorate the large meringue, place the meringue on a serving plate. Pipe the cream with your favorite tip or spoon it into the dessert. Decorate with the fresh fruit of your choice.

    Notes

    1. 250 g egg whites approximately equal to 7 ½ raw fresh egg whites from large size chicken eggs (or 1 cup egg whites)
    2. To get the highest volume of the meringue, use clean equipment: a metal or glass bowl and beaters.
    3. Make the meringue on a dry day. Avoid humid or rainy days since the meringue tends to absorb moisture.
    4. If you have time before serving, leave the meringue in the closed oven for 1 to 2 hours to let it cool, even overnight, if you desire.
    5. The meringue will be cracked after baking, which is normal. Arrange fresh berries along the cracks.
    6. Add one tablespoon of powdered (icing) sugar to the cream if desired.
    7. Serve it with berry coulis aside. 

    Nutrition

    • Serving Size: 1 slice
    • Calories: 341
    • Sugar: 57.5 g
    • Sodium: 54 mg
    • Fat: 8.8. g
    • Saturated Fat: 3.2 g
    • Carbohydrates: 62.4 g
    • Fiber: 3.5 g
    • Protein: 6.3 g
    • Cholesterol: 17 mg

    Thank you for following me on Pinterest, Facebook, and Instagram. Hashtag #bakinglikeachef so I can see your creations.

    The nutritional information has been calculated using an online recipe nutrition calculator such as Verywellfit.com and is intended for informational purposes only. These figures should be used as a general guideline and not be construed as a guarantee.

    The recipe was adapted from http://madame.lefigaro.fr. It was originally published on July 29, 2018. The recipe has been revised to include improved content and photos.

    • « Go to Previous Page
    • Page 1
    • Page 2
    • Page 3
    • Go to Next Page »

    Primary Sidebar

    Personal photo of the website's author

    Hi, I am Irina!

    A home baker with over 30 years of experience, sharing baking recipes with step-by-step instructions, helpful tips, and tricks. Get baking, and let the fun begin!

    About • Start Here • Contact

    Summer Desserts

    • Fig tiramisu cups in a serving board.
      Easy Fig Tiramisu (15-Minute Recipe)
    • Louise cake on a cake stand.
      Ottolenghi's Louise Cake With Plum And Coconut
    • Apple and blueberry crumble in a white ceramic dish with ice cream and two spoons.
      Apple And Blueberry Crumble (Super Easy)
    • Sliced Jordgubbstårta on a cake board.
      Jordgubbstårta (Swedish Strawberry Cake)

    More Summer Desserts →

    Readers’ Favorites

    • Sliced Sans Rival cake on a cake board.
      Sans Rival Cake (Filipino Cashew Meringue Cake)
    • A batch of baked madeleines in a baking mold.
      Classic French Madeleines (Madeleine Cookies)
    • Italian sponge cake on a marble board.
      Italian Sponge Cake (Pan di Spagna)
    • Halved muffin loaded with blueberries with the rest of the cakes in the background.
      To Die For Blueberry Muffins Recipe
    • French financiers with almonds on a wooden board lined with parchment.
      Classic French Financiers (Authentic Recipe)
    • Stack of banana bread slices on a serving board.
      Easy Banana Bread Without Baking Soda

    More Cake Recipes →

    Footer

    Featured in banner with logos.

    BAKING LIKE A CHEF

    • Home
    • About
    • Recipe Index
    • Baking 101
    • Cake Pan Converter
    • Contact
    • Log In

    SOCIAL

    • Facebook
    • Pinterest
    • Instagram
    • Twitter

    LEGAL

    • Privacy Policy
    • Disclaimer
    • Terms & Conditions
    • Accessibility Statement

    Copyright © 2025 Baking Like a Chef • Baking Like a Chef is a participant in the Amazon Services LLC Associates Program, an affiliate advertising program designed to provide a means for sites to earn advertising fees by advertising and linking to Amazon.com. As an Amazon Associate, I earn a commission – at no cost to you –  from qualifying purchases.